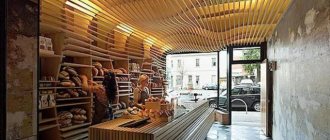
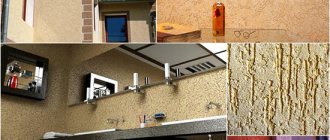
Here's another cool idea for renovation: leather finishing. A very fashionable solution now and at the same time an “eternal classic”. This, of course, is not just about furniture - you can come up with a lot of interesting things in the interior! Look at the photos and read the tips, a lot will become clearer!
Interior fashion is now focusing on luxury and ecology. And while designer catalogs are full of “jungle”, “monstera” and “crocodile” prints, we will tell you about the most universal texture - “leather”. Universal because, despite all the trends and trends, leather surfaces in the house will always be relevant and respectable.
And yes, leather in the interior is always a hint of modest luxury, the sophistication and originality of the design of a seemingly ordinary city apartment.
Of course, no one will cover all the walls with the skins of unfortunate animals - an environmentally friendly approach has forced manufacturers to create modern and comfortable materials that only imitate natural leather.
How to create an interesting surface?
A variety of finishing and paint materials allows you to imitate any texture. The wide scope for design is limited only by imagination. Principles for creating an interesting surface:
- Heterogeneity of texture . Genuine leather is famous for its unique pattern, so use special tools designed for imitation. Select several nozzles with different cells to create a non-uniform relief.
- Natural look, restraint . Give preference to natural colors that convey the real colors of the animals. A modest but high-quality imitation looks expensive.
- Glazing . No matter how deep the relief is, it will not stand out without a shadow accent. Master dry brush technology, use metallic enamels, gradient design techniques.
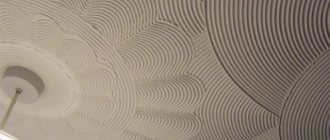
Decorative plaster Plasma 3D is designed for modeling natural patterns:
- wood;
- skin;
- marble;
- granite
Attention
The mobility of the material even creates a massive texture with emphasized cracks and seams. The plaster is so resistant to physical stress and moisture that it is cost-effective for finishing any indoor surfaces.
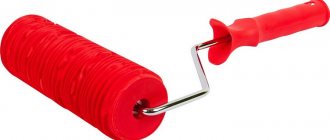
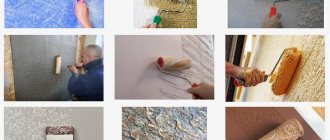
Crocodile leather cover
In this case you will need:
- rubber roller (you can take a tool of any length and width);
- glue gun;
- ordinary marker.
First you need to remove the rubber roller from the metal rod to make it easier to work with it. Elongated and transverse lines are alternately drawn on the surface. It is not necessary that they be even: the smoother the lines are, the more natural the segments on the surface will look. This way the analogy with crocodile skin will be brighter and more expressive.
Thin lines of glue must be applied to the applied markings. You should work carefully so as not to smear the resulting edges. If necessary, delimit the surface of the roller and work in several approaches, waiting until the previous section has completely dried.
The decorative roller is ready! Prime the surface and you can proceed to subsequent work.
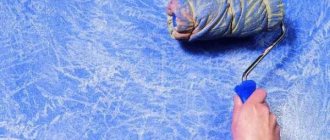
Knead the construction putty until it becomes a thick paste, then apply the mixture with a spatula to the wall (layer thickness - 2-3 mm). Next, after wetting the roller in clean cold water, you need to pass it over the surface of the putty. One pass is enough, after which you need to dip the roller in water, shake off the drops and proceed to the next section.
When the putty has dried, you must:
- Carefully remove small protruding errors with a metal spatula;
- dilute white acrylic paint, adding color to your liking;
- apply paint with a brush to the treated surface and wait for it to dry;
- Apply additional color with light strokes, making the surface more textured and expressive;
- Using fine sandpaper, clean the surface, and then apply acrylic varnish.
After complete drying, you will get a surface that exactly replicates crocodile skin. The effect is very beautiful.
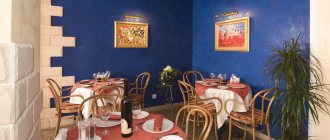
Where is imitation appropriate?
“Leather” surfaces look most advantageous in classic interiors, art deco, loft, modern, hi-tech, minimalist styles with their simplicity and restraint. Thanks to the variety of colors, including soft pastel palettes, “skin” is suitable for:
- vintage interiors;
- shabby chic;
- Provence;
- country.
There is no need to cover the entire room with “leather” trim—it’s enough to focus on some areas. This type of finishing is relevant when decorating studios and small apartments that require visual or thematic zoning of the area. The skin allocates spaces:
- Above the fireplace;
- headboard;
- ceiling;
- floor.
The most non-standard solutions involve the design of furniture, tabletops, and the creation of decorative panels.
Important
Imitation will be appropriate in any style if you choose the shade and gloss. Such inserts act as an independent and eye-catching element of the interior. It is important to apply finishing in moderation.
Available materials
Genuine leather is a rather expensive, fancy material, so it is being replaced with more affordable ecodermantine. To simplify the upholstery of the room, install one-piece:
- “leather” panels;
- slabs;
- panels.
In the “price – quality – aesthetics” ratio, decorative plasters come first. There are many reasons for this.
Surfaces decorated with decorative plaster are easy to clean, repair, and are resistant to mechanical and thermal stress. This finish allows you to decorate large areas without seams, is easy to apply, and is not limited by dimensional grids. Colors are practically unlimited, the widest range of design solutions and textures is available.
The work uses polymer, Venetian, structural, textured compositions, lime travertine . For painting - gypsum and acrylic mixtures. Plasters with the addition of fractional fillers, including marble chips or sand, are widely used. Among the manufacturers it is worth highlighting:
- Asti;
- DERUFA;
- Oikos;
- Ceresit;
- Knauf;
- Eco-decor.
Question No. 4. So what to choose in the interior: leather or its imitation?
That is why we recommend using materials that imitate it in the interior rather than genuine leather:
- more environmentally friendly: artificial leather is simply humane;
- more logical: let’s be honest, artificial material looks more adequate in a modest small apartment;
- more practical to use: for example, decorative plaster can be wiped and washed, it does not tear like leather, you can always repair a chipped piece (but a tear of a couple of centimeters in a piece of natural leather cannot be repaired; the entire piece will have to be replaced);
- it’s easy to choose a color: when the time comes for repairs, you won’t be able to buy an additional piece of leather of exactly the same color - each skin reacts to the dye individually, but with plaster you just need to remember the color number, it can be repeated in 10 years;
- any area: genuine leather is limited by the area of the skin, but with the same decorative plaster you can get huge surfaces without seams.
Technique for crocodile and snake scales
The composition is applied to the prepared leveled surface:
- Old paint, wallpaper, plaster are wetted and removed with a spatula.
- The leveling layer is applied with cement or putty using cross-shaped movements, leveled using the rule from the edge of the wall.
To work you will need:
- sponge;
- trowel;
- sandpaper No. 320 and 600;
- structural cushion under the “skin”.
Stages of work:
- Primer. A primer with quartz filler or a universal deep penetration primer is used. Concrete, plasterboard and chipboard are treated with an adhesive primer with sand. Apply with a fleecy roller in 1–2 layers. Dries for 2-3 hours until completely transparent.
- Base layer. The plaster is transferred to the surface with a trowel and smoothed in a circular motion. If the mixture is dense enough, it is applied immediately under the relief, the layer thickness is at least 5 mm. Otherwise or when applying Venetian - at least 1.5 mm. Thickness for medium relief - 3 mm.
- Second layer. Necessary if the mixture is painted in mass, in order to avoid glimpses of the rough finish, with a low density of plaster. Apply as a base until uniform. After 2-3 minutes you can start working on the simulation.
- Relief creation. The plaster mark and the structural roller are moistened with water from a sprayer. The roller is applied vertically at the upper edge of the wall, rolled over the surface in wave-like movements with medium pressure. Before each use, the instrument is wetted. The texture is created by overlapping rolls with interrupted seams. The textured layer dries in 6–12 hours.
- Sanding. It is necessary to eliminate roughness and create a uniform texture. Use sandpaper or a sander with 320 grit sandpaper. When the material begins to polish, replace it with #600 sandpaper. The relief is sanded approximately 50%. After sanding, wipe the surface with a dry cloth.
- Coloring and tinting. If the plaster is not painted in bulk, apply 2 layers of water-based paint with a foam roller or brush. Dries in 1–2 hours. To highlight the relief, the surface is tinted with paint of a contrasting color using a porous sponge, then rubbed with a damp cloth.
- Protective covering. At the final stage of finishing, pearlescent varnish is applied with a roller. As an alternative, colorless protective wax is used, which is rubbed in with a trowel. You can add silver or gold pearlescent pigment to the wax.
To create a heterogeneous or fine texture, reminiscent of the skin of reptiles - crocodiles or snakes, the roller is passed twice, illusorily alternating fragments of large and small relief. If you can’t find a tool, you can make a roller yourself from hot glue. The markings are transferred to the foam rubber, then the pattern is modeled linearly with a gun.
Advice
If the rough finish is dark in color, apply white primer. It will create a basic, uniform base that is easier to work with.
Types depending on the base
In the past, when plastering work was required, there was no need to think about the choice of mortar, since cement-sand or cement-lime combinations were the only available options.
Now, a homeowner who has started a renovation is faced with an abundance of materials that differ from each other in their characteristics.
Cement
This type is a cement-sand or cement-lime mixture, made according to certain proportions with the addition of water.
The cement-lime composition is well suited for finishing walls in rooms with high humidity, which allows it to be used for plastering kitchens and bathrooms.
Cement-sand plaster serves as a composition for leveling walls and bringing surfaces to zero.
Advantages:
- Strength. In this indicator, cement compositions are significantly superior to other materials, forming a reliable coating on the surface of the walls.
- High adhesion. The features of the components included in the cement mortar ensure high-quality adhesion of the plaster to the surface, which makes the use of a primer for pre-treatment unnecessary.
- Price. The materials used to make the solution are affordable and accessible.
Flaws:
- The use of mortar requires accurate calculation of the load on the wall and the thickness of the coating, since cement plaster has a significant mass.
- Plastering is a labor-intensive process that includes several mandatory steps.
- The composition hardens for a long time - about 3-4 weeks.
Plaster
From the name it is clear that the main component of the composition is gypsum, to which light fillers are added to reduce material consumption.
As well as high-quality modifying additives designed to increase the adhesion of the solution.
Used for application under subsequent decorative finishing using paint or wallpaper.
Advantages:
- No shrinkage. This property allows you to obtain a perfectly flat surface, without the formation of cracks on it during the solidification of the solution.
- Elastic. Due to the good viscosity of gypsum mixtures, thicker layers can be applied to the surface if necessary. In this case, the solution will not deform or drain.
- Vapor permeability. When the composition applied to the surface hardens, it forms a porous structure that allows the walls to “breathe”, which protects them from the formation of mold even with increasing humidity.
- Environmentally friendly. In this regard, gypsum plaster is superior to cement mortars.
Flaws:
- The material is not suitable for finishing rooms with constantly high humidity.
- Lower strength in contrast to cement composition.
- Gypsum coating negatively affects metal objects - nails, screws and other metal fasteners located in the thickness of the plaster quickly rust and become unusable.
Polymer
This material is not intended for rough leveling of surfaces, but is used exclusively as a decorative coating.
It is made on the basis of polymer resins and other synthetic substances. Ready-made plaster can be colored (contains colored granules) or plain (mostly white).
Advantages:
- Dries quickly and evenly, resulting in a flat and smooth surface.
- Does not require additional finishing.
- Resistant to moisture.
- Has many options for relief finishing.
- Frost-resistant.
The disadvantages include the high cost of the material.
Silicone
The main component of the material is silicone resin, which is mixed with various fillers (fabric fibers, minerals).
Components are also added to the composition to improve the strength of the coating and make it resistant to ultraviolet radiation and temperature changes.
Used for decorative purposes to treat almost any surface, including wood.
Advantages:
- High elasticity.
- Absolute water resistance.
- Durability of the coating (more than 25 years).
- High-quality adhesion.
- Good vapor permeability.
Flaws:
- High price.
- The surface needs to be treated with silicone primers before plastering.
Crumpled wall effect
The effect of a compressed wall is created by construction polyethylene. The surface is cleaned, leveled, and primed in 1–2 layers with a deep penetration primer. Turkish leather is modeled with a white plaster composition for surface painting. The tools you will need are a sponge, a trowel, and a brush with hard bristles. Stages:
- make a plaster mark 5–6 mm thick, smooth it slightly, but do not level it thoroughly;
- attach 5 sq. to the plaster. m of construction film, lightly press into the composition;
- manually model the folds, do not leave large areas smooth;
- smooth the texture with a trowel and randomly walk over the construction film;
- leave to dry for 2-3 hours;
- carefully remove the film, starting from the top edge;
- leave until completely dry for 10–15 hours;
- sand the surface with sandpaper No. 180;
- prime the wall with 1 layer;
- apply a layer of wax with added pigment;
- wet the sponge and lightly blur the pigment in a circular motion;
- After sanding the wall with sandpaper, apply pearlescent or metallic varnish.
Embossing can be done with decorative paper. Tracing paper is embedded in the plaster, but is not removed by analogy with film, but acts as an independent decorative element
Tools for applying texture
The appearance of the coating depends on the device used to apply the design to it. For such work, choose one of the tools below.
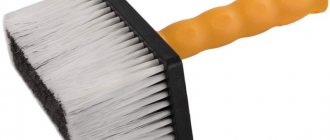
Rollers and stencils
The easiest way to work is with a roller. It is rolled over the base, leaving a mark in the form of a pattern or small pattern, which form the texture of the coating. The tool is installed at the top of the wall and smoothly lowers down. The pressure should be minimal, otherwise the quality of the print will suffer. It also depends on the material from which the device is made:
- Rubber. A relatively soft base that gives a clear indented or raised impression. The downside is that the mixture sticks to the instrument.
- Tree. Similar to rubber, with the difference that the solution does not stick to the work surface. But it dries quickly on it, so regular cleaning is required.
- Leather. Used to imitate the texture of natural stone when working with Venetian.
- Plastic. Experts do not recommend using it, since the plastic cracks and leaves flaws on the plaster.
- Pile fabric. The size of the pile determines the resulting relief. Before purchasing, it is recommended to test how firmly the fibers are held in the base. If they fall out easily, you should look for another device.
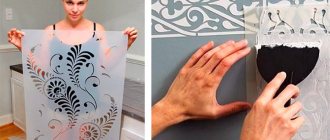
A stencil is a sheet of dense material on which a design is cut out. It is fixed to the wall, after which a solution is applied to the holes. This results in a convex additional layer.
Instagram @astroy912
Using a stencil, you can not only imitate brickwork, for example, but also create three-dimensional panels with your own hands. Geometric patterns and floral patterns look especially good in this design.
Homemade devices
To apply a design to the coating, a variety of available materials are used.
- Foam sponge. They blot the wet solution with it, obtaining an interesting texture.
- Comb. Using wavy or straight movements, an original effect is achieved.
- Plastic film. The damp wall is completely covered with film, specially crumpling it to create folds and irregularities. After drying, the panel is removed and the base is sanded. This is how you get decor that imitates silk.
Ready-made tools will also be improved. For example, a smooth roller is wrapped with a medical tourniquet, a rope with knots, or sheathed with fabric.
Instagram alexandro_guro
This way you can get an unusual texture of the decorated surface. For the same purposes, brushes with different bristles lengths, brushes of different widths, crumpled newspaper or fabric, plastic film and much more are used.
Painting features
Leather-like plaster is rarely painted en masse. It is decorated mainly after complete drying:
- Fine-textured compositions or water-based emulsions in pastel or dark colors are suitable for coloring.
- For the base, choose pigments that are close to natural (brown, brick, beige).
- For grouting, basic colors are suitable - white and black.
- For tinting - silver or gold enamel, pearlescent varnish or wax.
Coloring methods:
- Monochromatic coloring. If the plaster is painted in mass, 2 layers of identical colors are applied, followed by rolling with a structural roller. In another case, the wall is painted after the plaster has dried. No tinting or grouting is used, the relief is not highlighted.
- With tinting . The most popular and aesthetic option. The surface is painted in the main color, then rubbed over with a contrasting pigment. At the final stage it is tinted with mother-of-pearl, silver or gold enamel.
- Tinting . The method is relevant if overlapping the base layer is not required. The paint is applied to the surface using the dry brush and roller method. 2-3 contrasting pigments are used with intermediate grouting and sanding.
Attention
The work uses a foam roller and a brush with hard bristles. The paint is rubbed off with a porous sponge. Fine-textured compositions are smoothed with a trowel. Do not use a lint roller when painting - it will leave rough edges.
Decorative plaster from ordinary putty: proven recipes
Selecting a composition for subsequent application of relief on it is quite simple. Let's look at how to make a mixture “for a roller”, a stencil and any other device.
- We take gypsum or chalk powder (aka calcium carbonate) as a base. It will take 6500 g.
- PVA glue as a binder. You will need 800 g of it.
- CMC glue solution 5% It is diluted in water strictly according to the manufacturer's instructions. Need 2000
- A bar of 72% laundry soap as a plasticizer. Grind it on a grater and dilute it in a small amount of water to a gel-like state.
The kneading process is very simple. First we prepare the liquid. Add the powder into it in small portions and mix well. It is optimal to use a construction mixer. Let the finished paste sit for a while and stir vigorously again. The peculiarity of this variety is its long drying time. We invite you to watch a video that shows the process of texturing a homemade material.
There is an even simpler recipe, which requires any gypsum putty with additives. To increase its strength you will need PVA glue. It is added to the mixing water, after which the mixture is introduced into the liquid in parts. Proportions are observed in accordance with the manufacturer's recommendations. The finished solution can be applied in any way you like to obtain a relief surface.
To obtain bark beetle type plaster, we can recommend the following mixture option:
- coarse sand, sifted and washed - 3 parts;
- finely dispersed gypsum composition with mineral additives such as “Satengips” - 3 parts;
- a mixture of gypsum with polymer additives such as “Fugenfüller” - 1 part.
All components are mixed dry to a homogeneous mass, which is mixed with water and kneaded well.
Instagram @alexandro_guro
A properly prepared and applied homemade decorative mixture of putty material is not much inferior to its industrial counterpart.
It is important to select its components taking into account the purpose
Expert advice
To simplify the work and achieve a natural effect, experts advise:
- consider the type of plaster when choosing a primer - for acrylic and silicate compositions only the appropriate water-based or silicate-based primer is suitable;
- instead of decorative paper under Turkish leather, buy regular tracing paper, as it is cheaper and does the job just as well;
- to create a non-uniform relief, alternate nozzles of large and small fractions;
- lubricate the roller with Ceresit separator - water blurs the relief;
- do not neglect to wet the roller before rolling, otherwise there will be streaks and jerks;
- try to avoid bright pigments - they look pretentious and unnatural;
- imitation “leather” is an independent colorful element of the interior, so do not cover it with wall decorations;
- to artificially age and add small cracks, dry the plaster with a hairdryer at a distance of 5–6 cm for 10–15 minutes.
Creating a decorative leather surface is simple: just apply a layer of plaster, go over it with a structural roller, and tint the relief. The most spectacular solutions involve imitation of the skin pattern of a snake, crocodile or reptile. Even construction polyethylene can give a unique surface texture, achieving the effect of a crushed wall.
How to apply decorative plaster with your own hands master class
Professional craftsmen have their secrets. Let us look at the most effective methods of applying plaster.
How to apply decorative plaster on walls video
The simplest option that even a beginner can use is the spray method. With it you can achieve surface relief. This can be done this way: after the first layer has dried, a second one is applied to it, and with the help of available tools we create a texture.
Even an ordinary broom is suitable for this purpose. It needs to be dipped into the mixture and hit against a stick so that the splashes fly onto the wall. The surface can be painted in any color and then splashes of plaster will create the effect of falling snow.
The Italian method of finishing walls with plaster is in many ways similar in technology to the first. After painting the first layer, without allowing it to dry, a second layer is immediately applied, but of a different color. The second layer should overlap the first layer by more than half. While the material remains soft, it needs to be leveled.
The desired texture can be set using one or two tools. After applying the covering layer, you need to take a trowel with a small amount of plaster mortar. Next, using gentle pressure along the entire wall, we create patterns.
How to apply and make decorative plaster with your own hands in the “wet silk” style. Video lessons master class.
Hatching method. Here we set the relief on fresh, still soft plaster. The surface is treated with a metal brush, then left to dry for exactly one day. After which the remaining mixture is removed with a spatula.
Let's learn to plaster ourselves. Master Class
Textured plaster
In another way, this type of wall decoration can be called relief. There is not much difference between structural and textured plaster; both are designed to create unique textures.
The complexity of the ornament depends on the composition used and the tools for its application. Among textured plaster, imitation wood, compressed paper, and ashlar are popular. This finish does not lose its relevance, it looks unusual and expensive.
The main component of the textured mixture is limestone flour. Marble or granite chips and fibers can also be added to the mixture. Its properties depend on the composition of the plaster. Manufacturers often add polymer substances to the plaster, which make the relief coating more dense and prevent it from cracking.
The more complex and intricate you want to create the texture, the more layers there should be. Moreover, these layers should be thin. The terrain will also depend on the tools used.
Structural plaster
The main characteristic of such decorative plaster is its heterogeneity. Taking into account the size of the added granules, it can be coarse-grained or fine-grained. The latter does not have a pronounced texture and can be used if you want to make the surface smooth. The first, on the contrary, gives the surface peculiar reliefs.
The tool you use (roller, spatula or sprayer) also matters. The elasticity of this plaster allows it to be applied to any surface, from wood to metal.
It is recommended to be used for finishing bathrooms, walls in the living room, and ceilings. Water-based plaster is best suited for indoor use.
The color of the mixture is initially white, but by adding pigment to your taste, you can make decorative plaster of any shade yourself. The main thing is not to overdo it with the coloring ingredient.
Venetian plaster
This type of coating is a transparent mixture based on marble dust, slaked lime and water emulsion. It is sold in liquid form in containers weighing from 7 to 25 kilos. It looks like a viscous composition. It is recommended to apply it to perfectly smooth walls.
The composition of Venetian plaster allows you to add any color to it. With its help you will get a surface with the effect of noble marble. It is completely fire safe, waterproof and resistant to mechanical stress. “Venetian” is a quick-drying mixture, so repairs with it will not be lengthy.