|
|
|
|
There are a wide variety of tools for applying decorative plaster.
Some of them, such as the roller, trowel and spatula, are used regularly and are difficult to do without. But there are other devices for creating a decorative effect that are used in certain cases. Even with a minimum of experience, but with the right tools, you can achieve good results when decorating rooms. A tool for decorative plaster is always needed, because otherwise we will not be able to work. Therefore, it is important to know the capabilities of each of these tools in order to achieve the best decorative effect. However, it is worth noting that in some cases you need to have additional skills in order to work correctly with the selected tool.
Gentleman's set.
It’s better to stock up on everything you need in advance so that you don’t get distracted during the work process and waste time searching for the right tool. It’s convenient to have everything at hand: it not only speeds up the process, but also makes it more enjoyable.
What tools are needed to plaster a wall? The basic set of devices for preparing the surface for plastering and directly for plastering includes several items:
- It’s worth getting a special hammer;
- a ladle, with the help of which the plastering process is accelerated;
- construction plumb line;
- construction level;
- a rule designed to level the mortar on the wall;
- spatulas of different sizes and types;
- trowel;
- rollers;
- grater or several graters.
How to create complex patterns on a surface?
Drawing on wet plaster is not a difficult process, but it requires a responsible attitude and time. When applying, take into account the consistency of the solution, the tool with which they are working, and the strength and direction of pressure. But there are ways of decorating that only real masters can do:
- Stencil application.
- Modeling using plastic gypsum mortar.
- Varnishes that peel or tear as they dry. In this way, a multi-colored painted surface is obtained.
- Acid etching.
Plastering is not as boring as it might seem to an ignorant person. Solutions applied using different methods and tools create designs that are different from each other and allow you to create an original design not only for the interior of the house, but also for the façade.
Useful all-rounders.
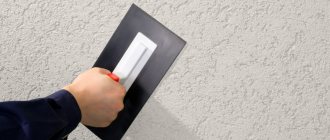
It is convenient when one tool for decorative plaster can be used to perform different types of work. One such universal tool is a stainless steel trowel. It is colloquially called a plaster spatula. This is perhaps the most popular tool among professionals. It will be useful in the process of applying the mixture to the surface. And it will become a good helper when you need to level the dried solution.
Since a trowel is simply an irreplaceable tool when plastering walls and one of the most intensively used, it is worth choosing the most convenient option. The most expensive one you can afford. This is very important, because a lot depends on the quality of this device: how well the work will be done, and how quickly it can be done.
The design of the trowel is quite simple. It consists of a canvas, a handle and a handle with a knee. A spatula with a blade fifteen centimeters wide and twenty centimeters long is considered convenient. The preferred knee size is within five centimeters. A higher knee will create inconvenience in work, a lower one can cause an arm injury.
There are miniature trowels. They are used to cut off small bumps on the surface of the coating and cover up cracks in the wall. Such small blades are also called segments.
The material from which the trowel is made is important - it must be strong and durable so that the working plate of the trowel does not deform even after many hundreds of “squares” of plastered walls.
Important! The handle of the trowel should be comfortable, because you will have to hold it in your hand for many hours in a row. So you should be very careful when choosing this tool.
The most popular representatives of this type of tools are trowels for applying the mixture and Venetian trowels, which are also called trowels. The latter allow you to form a surface with a marble effect using stroking movements.
Trowel selection criteria
To ensure ease and comfort for the builder during cladding, you need to choose this tool correctly . In this case, the determining criteria for work will be:
- The trowel should fit the hand as closely as possible, that is, be comfortable. It is imperative to select a tool, paying special attention to its weight, shape and size. It must be remembered that using a trowel not only applies Venetian plaster, but also gives the desired appearance to the cladding. This means that working with it should be as comfortable as possible.
- If you have never had to deal with Venetian plaster before, then you need to buy several trowels of different sizes at once. In this case, it will be possible to select the optimal type of trowel during the finishing process itself.
- With all this, the trowel must have high quality workmanship. Of course, for a beginner in this business it will be quite difficult, and sometimes even impossible, to determine such an indicator, so the solution to such issues must be entrusted to a specialist.
Determining product quality:
- The working surface of the tool must be smooth and highly polished. This parameter will eliminate or slightly reduce the likelihood of the plaster sticking to the trowel.
- The handle in the tool must be made so that it can be held freely during the entire work.
- The trowel should be rectangular in shape, since these are the parameters that can provide optimal functionality to the device.
- It is also very important that the edges of the product are rounded to avoid deformation of the soil layer.
The falcon that doesn't fly.
A very simple, but very useful tool for decorative plaster in the process of plastering ceilings and walls is the construction falcon. It is a shield with a handle in the center. Usually a falcon is made of light metal. Its size is 35 by 35 or 40 by 40 centimeters.
The purpose of such a device is to maintain the solution during application. The falcon is also used to apply plaster and level it over the surface. Technologically, the process looks like this: the mixture is placed on the shield, which is then applied to the surface to be finished using a plaster spatula.
The falcon can be replaced with a simple piece of plywood, making a tool for plastering walls with your own hands.
Operating rules
To significantly increase the period of active use of a plastering tool, you should perform several simple steps:
- Products should be stored in a dry place without access to moisture;
- use the tool for its intended purpose and select the correct size and material of the equipment;
- After finishing use, you should immediately wash and dry all tools.
A huge selection of construction plastering elements and devices allows you to perform assigned tasks quickly, efficiently, accurately and simply. The practicality of the materials used greatly facilitates work in any conditions and with any volume of working surface, making it easy and quick.
Mr. Spatula.
When applying decorative plaster, different spatulas are needed and all are important. Their most popular “profession” is smoothing the plaster layer. They are also used for applying mixtures - putty or plaster. Not a single professional can do without a spatula.
For plastering, the most suitable tool is a spatula, the blade of which has the shape of a trapezoid or rectangle. It would be good if it was made of stainless steel. Then the spatula will work properly for a long time and will not wear off or become deformed.
It is worth paying attention to the handle. Different materials are used for its manufacture. The handle can be wooden, plastic, rubber, or a combination.
You can make sure that a particular spatula model is right for you by holding it in your hands and imagining that you are plastering with it. There is no need to rush, because you will have to spend more than one hour working with this device.
Important! The spatula blade must be perfectly straight. And after pressing the surface, it should instantly return to its original position.
Venetian plaster requires a special spatula. Its blade is made of polished metal.
Rubber
Another interesting variety. In its most primitive form, it is a piece of rubber with a cut edge. Flexible synthetic material does not scratch the surface, it is also quite wear-resistant and durable.
Set of three sizes.
Use a rubber spatula to rub the seams of ceramic tiles, as well as the places where silicone sealant is applied.
The tool is well suited for working with convex and concave shapes: rounded corners, columns, arches.
Professional finishers often have a whole set of small rubber spatulas in their toolbox for this purpose.
Necessary "Rule".
The rule is what is used to correct the already unlaid layer of plaster, in other words, to tighten it. There is no way to do without the rule if the goal is to make high-quality coverage. Rules come in different widths, lengths and shapes. The most commonly used models are two to three thousand millimeters long. Blade configuration can be
- h-shaped: used to distribute the solution applied to the wall over the surface;
- in the form of a trapezoid: it is used to trim a layer of plaster;
- rectangular: universal option; The presence of a bubble level in its composition increases the functionality of this type of tool.
Preparing the walls
Decorative plaster can be applied to any prepared surface:
- finishing putty or leveling plaster (cement, gypsum, etc.);
- brick and concrete;
- aerated concrete;
- GKL or chipboard;
- wood (using mesh or shingle reinforcement).
When starting the work process, you need to carefully prepare the walls. The surface must be clean, dry, dust-free. All traces of the previous finishing are removed, cracks and irregularities must be puttied.
If the finishing is planned on brickwork, wooden walls or other uneven bases, then such surfaces must first be leveled - plastered or covered with sheets of gypsum plasterboard or chipboard. Large defects are hidden with plaster, small ones are covered with putty.
Before plastering, the walls are primed . The primer will ensure good adhesion of the decorative material to the walls. It is worth choosing alkyd or acrylic compositions of deep penetration. For wet rooms, an antiseptic primer is selected to protect the walls from the formation of fungi and mold.
To prepare walls made of smooth materials such as chipboard and plasterboard, adhesive compounds with quartz sand are needed . Sand will add roughness and improve the adhesion of the coating and the base. Adhesive quartz primer can be selected from the following brands: Bayramix Astar, DALI-Decor Quartz Primer, Alpina Expert, Betonokontakt.
If decorative plaster has already been applied to the walls , you can apply a new layer of material to it to update the interior. To do this, it is not necessary to get rid of the previous finish. It is enough to treat the surface with an adhesive primer, which ensures reliable and strong adhesion of the materials.
Reinforcement with fiberglass mesh . Some bases require reinforcement before decorative work. For example, when creating a wet facade, mineral wool or expanded polystyrene is covered with a layer of plaster with a fiberglass mesh. This is the base leveling layer. When finishing plastering, the mixture is applied in a thin layer of 2-5 mm; at this stage, fiberglass is not needed.
Three hard.
Different types of plaster coating require the use of specific plastering tools. Thus, bark beetle plaster cannot be made without a special grater. It is this very device with the help of which a special pattern characteristic of this type of coating is created on the surface of the solution.
The grater prepares the plastered surface for the final finishing – painting or wallpapering. With its help, you can eliminate defects and make the wall or ceiling as smooth as possible. To achieve the best effect, the top layer of plaster is slightly moistened with water. It is possible to lubricate it a little with a liquid plaster solution. The working part of the grater can be made of different types of materials. Polyurethane graters are especially common. There are plastic, metal and rubber options.
A type of grater - a trowel tool used for grinding plaster has a handle and a wooden blade. The most comfortable graters are made from coniferous wood. They are used for preliminary leveling of the plaster layer.
How to make a Venetian?
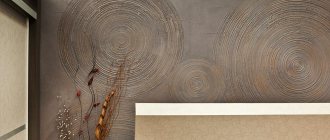
This decorative finish looks rich and attractive. With the help of the Venetian, they create the effect of marble or aged stone. You can apply this plaster to the base using the following tools:
- Containers for mixing solutions.
- Construction mixer.
- Compositions for tinting.
- Thin spatula for mixing and collecting mortar.
- Wide spatula for applying the solution.
- Skins for sanding.
- Rags.
To create Venetian plaster, several shades are used. To begin with, decide on color schemes. Then a base solution is prepared. This layer is applied continuously to the base.
After it dries, the second and third solution are lighter shades, which form the desired pattern. When everything is ready, you need to remove excessively protruding areas, sand them and, if necessary, open them with wax.
Roller for its intended purpose.
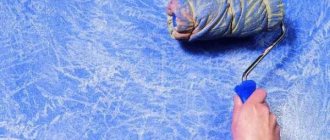
Plastering work cannot be done without a roller. It is useful when preparing the surface when you need to prime the walls or ceiling. And then it can be used to apply the mixture. Rollers are made of rubber, film, fabric, polyurethane. Perhaps the most practical is a rubber roller. It is easy to clean and very durable.
There are special rollers - they are able to “draw” patterns on the plaster. Such rollers are called embossed: a certain pattern is carved on their surface. By pressing the roller onto the dried mortar, we get beautiful patterns on the wall.
You can make such a creative roller yourself. For example, wrap a rope or fabric around a regular smooth tool. This will give an original drawing.
If you use old rope, you will get a “grass” design. An ordinary plastic bag produces an intricate pattern. Taking a thick fabric, preferably waterproof, making a sleeve out of it and putting it on a roller, we get “crumpled paper”. You can cut out figures from a used car tire, stick them on a roller - you will have an absolutely exclusive pattern.
Features of carrying out work independently
Plastering walls is a complex process that is performed in several stages:
- Surface preparation. The old coating and significant defects are removed. Large potholes are filled with mortar, and bumps are removed.
- Primer. The surface is cleaned of dirt and carefully treated with a primer solution, which increases the adhesion of the wall.
- Marking and installation of beacons. Places for installing beacons are indicated on the wall. The first one is mounted at a distance of 30-50 cm from the corner. The next ones are installed after 100-150 cm. A level is used when working.
- Plastering. After mixing, the solution is applied between the beacons, after which it is tightened using a rule. When the plaster has set, the surface is treated with a trowel.
Having certain knowledge and skills, you can do the plastering of walls yourself. The main thing to remember is the rules for preparing the surface and applying the solution. The choice of working tool is also important.
Sources
- https://GidPoKraske.ru/oborudovanie/instrumenty/instrumenty-dlya-shtukaturnyh-rabot.html
- https://kraski-net.ru/oborudovanie/instrument/prisposobleniya-dlya-shtukaturnyh-rabot
- https://DekorShtukaturka.ru/instrumenty/instrumenty-dlya-shtukaturnyh-rabot
- https://gipsohouse.ru/decoration/plaster/6638-instrumenty-dlya-shpaklevki-sten.html
- https://stroykasm.ru/category/instrument-stroitelnyj/shtukaturnyj-instrument/
- https://otdelkasten.com/shtukaturka-sten/instrumenty-dlja-oshtukaturivanija-sten
Helpful points.
You can draw on plaster using a stencil. You can find many such templates with slots through which paint penetrates in stores. They are usually cut from plastic or film.
The stencil is attached to the layer of plaster using masking tape. And then they begin to apply the mixture with a roller from the edges to the center. This makes for an unusual decoration.
You can take or order stencils made from self-adhesive film. They are convenient to attach to the wall, but they are disposable. Of course, you can make stencils yourself.
Video description
The video shows ideas that can be adopted by those who are trying to create texture using decorative plaster:
Final finishing
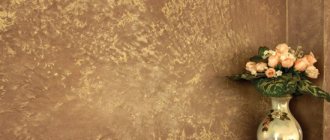
The putty itself is white. If you are not satisfied with it, the finished finish can be additionally painted with water-based paint. But to create an even shade, experts prefer to add colored pigments to the finished solution. When diluted, it will be a little darker; when it lies on the walls and dries, the color will become two shades lighter. This must be taken into account when choosing this coloring technology.
Its difficulty lies in the fact that you cannot immediately prepare the solution for decorating the walls: it sets quickly. And it is extremely difficult to create two identical shades when mixing again. Each time the color of the mixture will be new. Therefore, it is worth adding pigments to the putty only when surfaces of a small area are being treated. In other cases, it is easier to paint already finished surfaces, then the decorative putty walls will look the same color.
Painting is done with a brush or roller. Usually two layers of paint are applied: one base coat fills all the recesses, then, when it dries, a layer of contrasting composition or water-soluble paint two shades darker is applied. First, a small area is painted, then the applied layer is wiped off with a wet cloth without pressure. This technique helps to emphasize the relief and highlight its convex parts.
Decorative putty painted in two colors Source avatars.mds.yandex.net
Choose a pistol.
A special gun is a great help when you need to plaster large areas. It is especially often used when finishing facades. The gun directs a strong stream of mixture onto the wall. This method of applying the solution is called spraying.
One of the fairly economical options is a cartouche pistol. This tool for applying decorative plaster significantly reduces the time of plastering work. If you calculate the time that will have to be spent per square meter of finishing with plaster, it turns out that purchasing a gun will be much more profitable.
Structurally, this is a semi-automatic device. It is attached to the container in which the plaster solution is located.
The mixture is then supplied to the sprayer using a compressor. You can choose the amount of pressure - more or less. The operating mode of the pistol varies in this way. The container has to be periodically filled with the solution again - this takes time. You can optimize the process if you use a plastering station. It provides separate functions for mixing the solution and supplying it to the sprayer.
A fairly large container is used for the mixture, which allows you to work longer without being distracted by preparing the solution.
The solution supply pressure is selected individually in each specific case. Do not make it too low: the mixture will fly to the sides and leak. Too high pressure is also unfavorable: the hose can be torn out of the device. Experts recommend choosing the distance at which it is better to position the gun in relation to the surface being treated, about forty centimeters.
Important! Experts advise keeping the gun constantly at the same distance from the wall while applying the mixture to the selected area. This will ensure an even layer. Finding the optimal distance is not difficult: you need to see at what pressure and at what distance the mixture lies smoothly and does not leak.
For guns, gypsum-based plaster mixtures are usually used. They dry quickly. Special solutions designed for such devices are commercially available, although they are more expensive.
Types of trowels
Depending on the type of work, trowels are divided into the following types
| Photo | Name | Description |
| Mason's trowel | The shape is triangular or trapezoidal. Used for preparing mortar and laying brick and stone. | |
| Finisher's trowel | For preparing and working with plaster and gypsum solutions. The shape is predominantly rectangular - this is convenient for measuring the amount of dry mixture. | |
| Concrete and stove trowel | Classic trowel for mixing concrete and cement mortars, incl. bark beetle Reinforced handle, steel plate 2 mm thick. | |
| Tiler's trowel | Triangular shape with beveled edges. Also used for mixing and laying tiles. The tip is reinforced for tapping. | |
| Plastering trowel | One of the most convenient for throwing mortar onto vertical surfaces. It is best to choose a size of 16x19 cm. | |
| Trowel | Used for uniform distribution and polishing of the mixture on the surface. The plate is absolutely smooth. Recommended sizes are 20x8, 24x10 and 28x14 cm. | |
| Toothed trowel | For applying adhesive mortar when laying tiles. It is also convenient for creating textured shading on the wall. The height of the teeth is from 4 to 10 mm. | |
| Trowel for jointing | The main tool for tilers and masons, allowing for even seams. The shape of the handle may be different, but the plate is always narrow. | |
| Trowel for filling seams | You need to buy it complete with a jointer. It is convenient to keep some supply of solution. Due to the sides, it is convenient to work with laying on a horizontal surface, and forming a seam through the window. | |
| Corner trowel | Required for forming corner sections of walls and forming even corners | |
| Trowel for foam and aerated concrete blocks | A very convenient tool when working with such building materials. The quantity is enough for exactly one block, lays down in an even layer, and due to the jagged surface adhesion increases |
So, we’ve sorted out the varieties, now we can begin to review individual models chosen by builders and home craftsmen as the most convenient, simple and inexpensive to work with different materials. The 2022 rating is based on the experience of builders.
Price of quality.
Tools for finishing plaster of different brands, sizes and qualities vary in price.
For example, the cost of a spatula varies from fifty to five hundred rubles. The price of a trowel is from one hundred thirty to one thousand rubles. The rule will cost from four hundred to two thousand rubles. A grater costs from one hundred to four hundred rubles. You can buy a tool for applying plaster at a finishing materials store or order it online. The costs for it are included in the costs that will have to be incurred for performing plastering work per square meter. However, according to professionals, it’s worth the investment. A good and correctly selected tool will allow you to do the job at the highest level. data-matched-content-ui-type=”image_stacked” data-matched-content-rows-num=”2″ data-matched-content-columns-num=”3″ data-ad-format=”autorelaxed”>
Tool manufacturers and pricing policy
There are many similar devices on the market, but there are top sellers that are of high quality. There are several brands: Oikos, CO.ME, PQtools, Pavan, Senideco, Storch.
As for the pricing policy, you need to understand that the high-quality materials used increase the cost of the instrument. The most expensive types can cost about 3,000, the average price is more than 1,000 rubles.
There are many similar devices on the market, but there is a leader in sales.
A trowel for plastering work allows you to perform finishing more comfortably and get the desired beautiful result. When choosing, it is important to know the purpose of the trowel and evaluate the comfort of its use for the master himself.