Photo: kraski-net.ru Decorative plaster is very beautiful, much more convenient than wallpaper, and also hides the imperfections of the walls. It is easy to work with even complete beginners in the construction business. You can also cook it yourself! We learned the 8 best ways to make decorative plaster with your own hands!
Decorative plaster with PVA glue
By the way, PVA glue can be replaced with grout mixture in the same quantity - the recipe will not change.
You will need:
6 kg of putty, 2 liters of water, 200 ml of PVA.
Preparation and application:
Pour dry putty into a large container, dilute with water and knead the mixture. Add PVA and mix again until smooth. To apply, use a textured roller with a suitable pattern.
Conclusion
Friends, now you know how you can replace decorative plaster to get a durable and inexpensive wall covering. If you like this option for wall decoration, but for some reason you are looking for a replacement for decorative plaster, take my experience into account: replace it with acrylic putty.
That's how my playful cats inspired me to renovate my apartment. And, I must say, I like plaster much more than wallpaper, although in our small town this type of finishing is unpopular.
You may ask: how do cats have fun now? After all, you can’t climb on plastered walls and you can’t sharpen your claws, and you won’t be able to tear anything off of them. But cats don’t get bored and find new and exciting things to do. Nowadays, their trend is to steal spools from a sewing machine and unwind the threads. But more on that another time! And that’s all I have for today. Natalya was with you.
PS Do you have cats? How do you combat their sabotage? I will be glad to see your comments.
Decorative plaster with primer
Thanks to the primer, the adhesion of the plaster increases and it acquires antiseptic and fungicidal properties.
You will need:
6 kg of putty, primer, 200 g of grout.
Preparation and application:
Mix a homogeneous mass of dry putty with a primer until it acquires the consistency of thick sour cream. Use only white primer and add a little grout at the end. Apply with brushes, roller or embossed spatula.
How to decorate the walls if there is a cat in the house
I thought for a long time, mentally going through different options for wall decoration. The first thing that came to my mind was to paint the walls. I saw textured paint on the Internet and liked it. But in our town there are no beautiful textured paints for sale, so this method did not suit me.
I was not attracted to walls painted with ordinary paint, because such decor is used in public spaces such as hospitals or kindergartens and, in my opinion, does not look very presentable.
Besides, the walls in my apartment are crooked, and I would have to straighten them before painting, but I didn’t want to do that.
In one magazine I saw walls decorated with decorative plaster. It looked very beautiful and unusual, but there were also disadvantages to this method of wall decoration:
- high price of decorative plaster;
- if you want to make a new renovation, you will need a special attachment for a sander, because it is difficult to remove decorative plaster from the walls;
- There is simply no decorative plaster in our stores, and I didn’t want to go somewhere looking for it.
But still, the idea of this method of finishing walls firmly settled in my head, and I was seriously puzzled: what can replace decorative plaster so that it is both beautiful and cheap? Moreover, the cat sabotage had reached its climax, and the corridor in the apartment already looked deplorable. But the hallway is the face of our home!
Meanwhile, the unsuspecting cats continued to do their dirty work: they rushed around the apartment, jumped on the walls in the heat of play and continued to peel off the wallpaper. They did not yet know that an insidious plan was brewing in the head of their mistress, and soon they would lose their favorite entertainment.
Decorative gypsum plaster
A very simple and common option with good adhesion and high covering ability.
You will need:
6 kg of gypsum mixture, 2 liters of water, 200 ml of PVA, color.
Preparation and application:
Mix gypsum with water at room temperature and add PVA. In this case, the glue provides a convenient consistency and acts as an additional binder. At the end you can tint the decorative plaster with color.
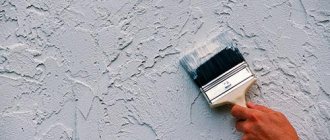
Effects and ways to achieve them
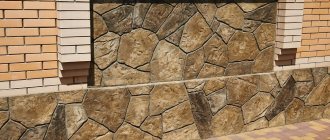
Rock
This effect is considered the easiest to create. Indeed, it is unlikely that you will find anything simpler. To create an imitation, you will need finishing putty on any base. If you are going to decorate the walls of a bathroom (or other rooms with a high level of humidity) like rock, it is better to take cement; in the rest, you can choose gypsum. It is best to take the mixture in buckets, that is, in finished form. True, it is more expensive, but you don’t have to bother with preparation. By the way, it is not recommended to take Vetonit, since it is too soft and friable. Other analogues with such shortcomings are also not worth buying.
The work order is as follows:
- The wall is cleaned and primed. In addition, it is advisable to putty it in one layer;
- material is applied to the wall. To do this, the surface is divided into small areas (for example, 0.5 sq.m.). The optimal layer thickness is 2-3 mm. The higher this number, the rougher the texture will be. Therefore, the putty must be smoothed as evenly as possible;
- a structure is created. To do this, you need to completely clean the trowel from putty. Then the tool is lightly pressed against the uncured layer, the lower edge is raised, and a movement is made over a short distance. The direction can be any, just like the movement itself. This is what creates a unique pattern;
- after treating the area, the trowel is smoothly removed (so that no marks remain) and cleaned;
- a new area is selected and the actions are repeated. The trowel must be applied overlapping so that there are no gaps;
- When the wall is treated, you need to leave it for about a day to dry completely. Then you can start painting (we’ll tell you how this is done separately).
Advice! You may not get the desired drawing right away. There is nothing wrong with this: the area can be smoothed over and processed again. You don’t need to apply the trowel over the entire surface, as it will simply get stuck in the layer and it will be difficult to peel it off.
Rain
This imitation is more complex to create than the previous one; Moreover, it requires time and patience. But the result is more effective.
Here's how it's done:
- After preparing the wall, markings in the form of inclined lines are applied to it. The distance between them should be slightly less than three strokers. For example, if its width is 12 cm, then you need to retreat from the line by about 30. You need to draw at one angle;
- masking tape is glued to the surface so that its edge lies on the line;
- putty is applied. Work should be started from the top corner: this reduces the risk of the putty falling onto the pattern. The width of the strip should approximately correspond to the width of the trowel, the length should be approximately 1 m. The thickness of the layer is approximately the same as in the previous case (3 mm);
- To create the necessary structure, you need to press the trowel a little and pull it along the line, lifting it a little. As a result, the drawing turns out to look more like a hedgehog;
- the trowel is cleaned of putty residues. Now you need to lightly press it onto the applied solution and smooth it in one direction. In this case, you need to lift one edge of the tool;
- When one area is covered, a strip of masking tape comes off. This results in a smooth edge. The next portion should be applied with a slight overlap;
- It is advisable to continue work until the wall is ready. Otherwise, the difference between the layers will be noticeable;
- after drying, you need to sand the surface (for example, with sandpaper) to remove irregularities;
- priming work is being carried out. After this you can paint the wall
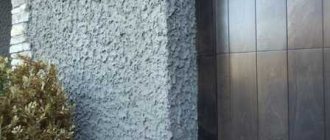
Decorative plaster with marble chips
The result is a very beautiful surface with a pronounced texture reminiscent of a bark beetle.
You will need:
4 kg of finishing putty, 1 kg of stone chips, water.
Preparation and application:
Mix dry putty with marble chips and dilute with water at room temperature. The mass should be homogeneous and viscous. Then it can be tinted and applied with a regular spatula.
Why is siding not the best option for upholstering a home?
Siding is a material for the external and internal upholstery of a house, a budget option for the facade of buildings. The following types of siding are distinguished.
Basement siding with a fastening edge and a latch lock, made of polyvinyl chloride, protects the house from high temperatures. Easy to install and does not deform.
Acrylic siding is made from acrylic styrene, looks modern, and is easy to attach. Disadvantages of acrylic siding: high price; if you purchase low-quality material, it will quickly become unusable.
Vinyl (plastic) siding is made of polychloride, material thickness 1 cm, width 10-30 cm, length 2-6 m. The material is environmentally friendly, breathable, easy to install, easy to maintain, low price.
Plastic siding and its negative aspects: heavy weight, not resistant to t, if the panel is damaged it cannot be restored, it is difficult to replace the panel, the panels can wobble in the wind, the sun's rays eat away the color.
Metal siding consists of a profiled sheet of steel coated with polymer and zinc. Material width 120-300mm. The surface is smooth and rough. The material can withstand high temperatures, is fireproof, durable, and impact resistant. Disadvantages: not plastic, does not fasten well, corrodes, makes sounds when it rains, protects from the cold, expensive.
Cement siding is made with the addition of cellulose fibers; it is innovative and in demand. Cement siding is installed with an overlap, fastened with self-tapping screws, highly durable, resistant to temperature changes, environmentally friendly, does not rot, fireproof, soundproofing. Negative aspects: allows moisture to pass through. Expensive, has a lot of weight, and if installed incorrectly, reduces its quality characteristics.
Siding materials consist of positive and negative sides; of the above materials, plastic siding is resistant to the external environment, but in severe frost it loses its positive properties and becomes fragile. The worst finishing material is metal siding.
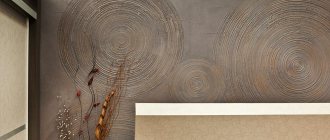
Metallized decorative plaster
The coating shines and has a metallic shimmer when light is refracted.
You will need:
2 kg of finishing and starting putty, 2 kg of aluminum powder, 2 kg of acrylic paint, color, water.
Preparation and application:
Mix putty and paint in equal proportions and dilute with water to a uniform consistency. Let the mixture sit for 5-7 minutes, stir again and add aluminum powder with color. Apply the plaster with a roller or spatula.
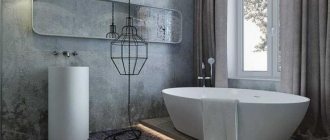
Features of choosing self-adhesive PVC film
PVC film is similar to wallpaper, but with an adhesive composition already applied. This is a good option for a bathroom, but here you need to take into account some features:
- preliminary preparation of the surface is required, since a thin coating will highlight all the imperfections of the walls. Accordingly, the cost of final finishing will increase;
- gluing requires a certain skill; distortions and bubbles will be difficult to correct;
- in wet areas the film will swell sooner or later, you need to be prepared for this.
A huge variety of design solutions and shades allow you to decorate a bathtub with PVC film in any style.
Imitation from putty
It is not necessary to prepare a special mixture if you need a textured surface. It can also be imitated from ordinary materials.
You will need:
Ready-made acrylic putty, colorless water-dispersion acrylic varnish, glue for non-woven wallpaper, color.
Preparation and application:
Apply a 2 mm layer of putty with a spatula and give it a texture with a trowel before it dries. After 15 minutes, lightly smooth the surface, and after 10 hours, walk over it with fine-grained sandpaper. Mix glue for non-woven wallpaper with color and apply it to the wall moistened with a sponge with a spatula and trowel, and after drying, cover with varnish.
Advantages of finishing walls with acrylic putty
More than 6 years have passed since the renovation - the walls look like new. I liked the result so much that later I decorated the entire apartment in this way. In addition, she also took up modeling and additionally decorated the walls with stucco.
Finishing walls with acrylic putty has many advantages. See for yourself:
- durable, inexpensive and beautiful coating that does not require frequent replacement;
- environmentally friendly material (unlike wallpaper);
- the walls can always be washed;
- if you want a change, the walls can be repainted or covered with colored wax;
- putty can be easily removed with a grinder;
- absolutely “cat-resistant” coating, which is what I needed;
One day my husband was carrying a plate of borscht, tripped and splashed the greasy borscht on the wall. Can you imagine what would happen if there was wallpaper on the wall? Otherwise, I just wiped the wall with a damp cloth, and everything came off, even the grease.
Cats can now jump on walls as much as they want - there is no damage from their claws. But now they have stopped doing this, because climbing on a hard surface is not easy, and it is not interesting, because before they were attracted by the rustling wallpaper that easily came off the walls.
Imitation from tile adhesive
The coating will be more textured and deliberately rough - as if created for a loft.
You will need:
Tile adhesive, varnish, spatula, enamel or paint.
Preparation and application:
Apply a layer of glue 5 mm thick and work with a spatula in successive circular movements. You can use a hard, wide brush to create texture. When the surface dries, lightly rub it with fine sandpaper, prime it and cover it with paint or enamel, and then with varnish.
Recycled or reclaimed wood
In addition to laminate, old boards are perfect for this purpose. Worn by time, with several layers of paint, rusty nails - the material has its own history. However, they must be restored to a safe state. To prevent porous wood from collecting dust, it can be coated with matte varnish or oil.
When is the best time to use drywall?
Is it possible to cover the walls with plasterboard instead of plaster? Installation of gypsum boards is used in the following cases:
- the house has wooden walls;
- when it is necessary to hide communications, and building walls is time-consuming, dusty and expensive;
- it is necessary to carry out additional heat and sound insulation;
- there is a large curvature of the wall or the vertical is blocked;
- work must be completed as soon as possible - 2-3 days;
- there is no financial opportunity to attract specialists to carry out the work;
- when you need to hide the seams from the mortar in aerated concrete and gas silicate walls, as well as when using foam blocks;
- it is necessary to level the protrusion inside the room of the foundation blocks.
In all other cases, whether to replace plaster with drywall or not should be decided taking into account other factors.