Choosing wall coverings for the perfect design and gluing them is only half the battle. The special beauty in each room of your apartment or house is made up of small “accents”. Without them, the effect will be incomplete. A border for wallpaper can become such a “touch”. It can become a center of attraction regardless of where it is placed on the wall - near the ceiling, near the floor or in the central part of the room.
Types of wallpaper borders
Depending on the wallpaper material and the budget you have, you can also choose an edge for the walls. The most popular and affordable is paper decorative element.
Paper wallpaper borders consist of one or more layers of paper. Unfortunately, this decorative edge is susceptible to high humidity and cannot be washed. In addition, the composition also does not contain substances that prevent the formation of mold. A wide range of products can save the situation. Starting from pattern and texture, ending with size (width) and shape. The classic version is straight edges at the top and bottom of the strip, decorative figured - in the form of curly cutouts.
The second most expensive option is vinyl edging. They have all the advantages of vinyl wallpaper.
And the third option is non-woven strips. The highest quality, but also the most expensive material. Naturally, the ideal combination will only be with non-woven wallpaper. It is also allowed to paste horizontally in the central part of the room in the case of combined wallpaper.
The least frequently asked question in our country is acrylic strips for trellises. Despite the high quality of the material, it is not so common. It is best to stick them on acrylic or paper trellises. In this case, the difference in surface texture will not be so noticeable.
According to the gluing method, it is customary to distinguish between wallpapering with a border using wallpaper glue and self-adhesive material. In the latter case, gluing the border to the wallpaper is as easy as shelling pears - remove the protective film from the tape and gradually apply it to the wall from left to right.
Characteristic
A border for wallpaper can be called a universal finishing material; in addition, in stores it is called edging, frieze, edging. All this will allow you to easily change the design and add interesting notes. There is an opinion that such an update is a thing of the past. But it is wrong, because you need to know how to fit it into the overall repair. After all, the edging has a large assortment and unusual color solutions.
What are his external characteristics? The product is a strip of different widths. Usually sold in rolls. But making a choice is not as difficult as it seems. In addition, in stores there is already a prepared edging for various wallpapers, so you don’t even need to spend a lot of time selecting. It is not uncommon for the wallpaper to be already on the wall, but the frieze has not been selected. In this case, you should carefully consider the selection. Stores may have the following wallpaper borders:
- Paper. It's a basic look and easy to stick on and remove. If you do not fix it carefully to the wall, the materials will easily tear and get wet. This is one of the cheapest options, but the service life is minimal.
- Vinyl. This is a more reliable type. They do not fade when exposed to sunlight, they are durable, so they have a longer service life. Can be washed if necessary. Due to these characteristics, this wallpaper border is found in bathrooms and kitchens.
- Acrylic. No less durable option. They are often compared to vinyl, but at the same time the price indicator is lower.
- Textile. This frieze has its own characteristics - the presence of two layers. The first is paper as a base, after which a beautiful layer is applied here, which serves as decoration. Velor is often used, but there are a lot of disadvantages. Thus, the material does not withstand mechanical stress and moisture. Dust settles quickly and can be damaged by animals. It is difficult to care for this type of tape because wet cleaning is prohibited.
- Fiberglass curb. This is one of the most durable types. It is this finishing material that will serve for a long period of time without reacting to external stimuli. It is unique and suitable for any room, but the price is higher than all previous ones.
If you don’t need a clearly defined contrast, then you should choose a decorative border for wallpaper made of the same material as the main covering. For example, if the wall has acrylic wallpaper with silk-screen printing, then using paper borders is at least inappropriate - the whole chic look will be ruined.
We can say for sure that sometimes a frieze helps to remove defects, transitions, and create zoning. But do not forget that this is only interior decoration.
How to choose an edge for wallpaper?
The general style of the wallpaper decorative ornament should fit into the overall concept. For example, for a children's room it is best to choose a decorative wallpaper border with cartoon or fairy-tale characters. And choose the location at the child’s eye level in the central part of the room.
In the case of combined wallpaper, if there are two different types of patterns in the upper and lower parts of the room, it is better to glue the border in the central part or to glue the wallpaper with a border on top . In this case, it will be possible to smooth out the transition effect and draw attention to the ceiling.
In addition, I recommend that designers follow some rules when choosing a border depending on the design of the room:
- In the case of a calm wallpaper pattern, it is best to choose a decorative border with similar motifs. For example, in the case of vertical stripes, choose horizontal ones.
- If there is a bright pattern, you should choose a plain frieze.
By the way, the border for wall coverings can also be glued vertically. This application is allowed in the case of a vertical combination of wallpaper.
Using this decorative material, you can artificially highlight certain areas in your room, from a door or window opening to highlighting ceiling or wall lamps. A border for wall coverings is an affordable means of creating a beautiful design.
How to combine wallpaper by color?
Monochromatic combination
A calm color combination, despite its saturation, can be called monochromatic. These are shades of the same color, differing in saturation. In the interior, a richer shade can be used to mark the desired areas or visually divide the space.
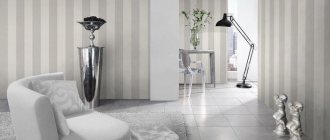
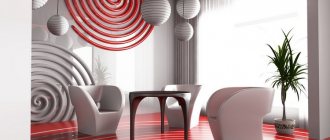
The photo shows a monochromatic combination of colors on combined wallpaper.
Complementary Combination
This is a combination of contrasting, opposite colors. For example, red and green, purple and yellow, orange and blue. A combination of this kind is suitable for finishing any room. A combination of calm shades can be used in the living room and bedroom, and bright ones are suitable for a nursery.
Similar
At first glance, similar colors are completely different, but their use in the interior looks harmonious, each shade smoothly flows from one to another. As a rule, this is a combination of two or three adjacent shades from the color wheel.
Combination of individual colors (table)
| Beige | Chocolate, white, red, blue, emerald, black. |
| White | Universal color. Combines with any shades. The most successful combination is with black, blue and red. |
| Black | Like white, it is a universal color that goes well with many shades. Successful options: white, red, lilac, pink, orange. |
| Brown | Ivory, beige, green, pink. |
| Grey | The whole palette of pink, from pastel to fuchsia. Red, blue, plum. |
| Black and white | The combination of black and white is already considered complete. Both shades are universal; the combination will complement almost any color. |
| Green | Yellow, golden, orange, chocolate, black, gray. |
| Pink | Grey, chocolate, turquoise, young green color, olive, soft blue. |
| Blue | Grey, orange, green, red, white, blue. |
| Blue | White, pink, gray, yellow, brown, red. |
| Lilac | White, green, pink, chocolate, gray, black. |
| Red | White, blue, green, black, yellow. |
| Yellow | Brown, grey, black, blue, turquoise. |
| Violet | White, yellow, orange, lilac, black. |
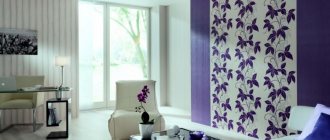
The photo shows a combination of three types of wallpaper in the interior of a children's room.
Decorative borders for wallpaper: what makes them special
Borders are most often glued to the upper segment of the wall. This does not mean that only this option is acceptable, but this can be called a typical case. Although, it would not be amiss to consider the option of having a border around the perimeter of the ceiling, or, which is also interesting, in the lower third of the wall.
Features of the location of the curb:
- At the top of the wall it plays the role of a decorative edging, which definitely makes the room more comfortable.
- Along the perimeter of the ceiling, the border serves as a separator and zoner.
- Edging a wall near the floor with a border is a way to hide unsuccessful wall hanging when you made a slight mistake with the height of the wallpaper.
The border can be the boundary between the panel and the main wall. In this case, it is located at a height of at least 80 cm from the floor level
But the vertical use of borders is not uncommon. For example, if you need to visually divide a wall into two zones, this option is often chosen in the nursery. The border borders doors, mirrors, etc., in short, what you want to highlight.
Calculation of the required amount of edging
Calculating the required quantity is quite simple - for this you need to know the perimeter of the room, that is, measure the short and long walls, add the two numbers and multiply the indicators by two. The result will be the footage of the edging that needs to be purchased. If the plans include decorating windows and doors with edging, the openings also need to be measured, and the resulting amounts added to the perimeter of the room. When purchasing borders, it would be better to play it safe and buy two or three spare meters of tape.
Master Class
The whole process is carried out in six simple steps:
- First you need to draw a base line along the wall, using chalk or a pencil. It is advisable to make the lines almost invisible; you can apply them with strokes. If there is no level, the base line can be marked by measuring the same distance from the floor at the desired height. All resulting points are then connected by a pale straight line.
- Next, you need to determine the position of the edging. If it is near the ceiling, then it must be mounted as high as possible. Sometimes the border is attached at a height of 90-100 cm from the floor, in this way you can enliven the walls, differentiate between two types of wallpaper, visually make the room wider and slightly reduce its height.
- Rolls of edging should be rolled out along the walls, cut into meter-long pieces (this will make them easier to work with) and the adhesive applied to them with a special soft brush. Then the tapes should be folded in half or like an accordion, with the glued side inward - this way they will be thoroughly saturated with the composition and stick to the walls more firmly.
- Having climbed onto the stairs (if the edging is attached to the ceiling), the folded border should be taken in your left hand, straightened and applied to the wall, along the previously marked line. Next, the strip must be smoothed with a roller, towards the edges from the middle, while removing air bubbles and excess glue from under it. So, moving along the perimeter, from the corner, you need to attach all the strips of the border. If there is a pattern, it must be combined. In the corners, the strips are glued using the butt method.
- The corner joints of the edging (on window or door openings) should be formed in this way: overlap the strips over each other, leaving an allowance of 15 cm, then draw a line diagonally and cut the vertical strip of edging along it. Next, bend the line diagonally and bring it to the longitudinal strip.
- The pasted borders should be processed again with a roller, carefully smoothing the joints and pressing firmly on the tapes.
That's all, the process of working with wallpaper edging is complete.
After the wallpaper and border are securely glued, it is important not to open the windows and vents for 24 hours so that they do not begin to peel off from the walls due to drafts. The result of walls decorated with edging can be seen in the photo
Paper borders for wallpaper in the nursery: specific application
Paper border is often used in the nursery. And this is a smart move.
The border will help in this case:
- Divide the room into a zone (work, play, neutral);
- Visually change the space, visually enlarge or expand it;
A border for wallpaper will help to separate the lower third of the wall, which in a nursery makes sense to cover with other wallpaper, denser, washable, and practical.
A clear mistake would be gluing a border in the middle of the wall. Not only does it not look very impressive, it cuts off a considerable part of the wall, visually, of course. But it is not forbidden to glue the border vertically in the middle of the wall.
Features of the design of a small room
- In a small apartment, for example in Khrushchev, it is preferable to choose light shades when combining.
- The vertical or horizontal direction of the pattern or lines will help adjust the space.
- Simple drawings and patterns can also visually enlarge a room. You can see what drawings can visually expand the space here.
- Mirror surfaces can significantly help expand boundaries.
- Pairs of tall mirrors framed will completely change the appearance of the interior.
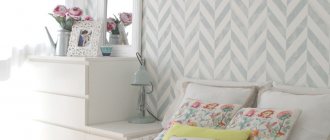
In the photo, one of the walls is decorated with wallpaper with horizontal stripes, which visually increases the width of the children's room.
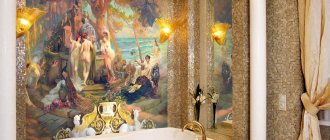
In the photo, one of the walls is decorated with wallpaper with an ornament; this technique will visually make a long room of a small area more proportional.
How to glue a border to wallpaper: step-by-step instructions
The gluing process is simple, your main task is to make the walls perfectly even, where the border will be fixed.
You will need a building level and a lead pencil.
Proceed like this:
- Measure the required height from the floor in several places (of course, the same everywhere);
- Place dots in these places and connect the lines to each other;
- The place has been determined, which means half the work is done;
- Roll out a small roll on the wall and cut it in the right places;
- Place the pieces with the pattern down, and apply special glue to the back side of the border;
- You can fold the canvas like an accordion so that the side with glue is inside;
- Take the canvas in your left hand, straighten the first fold and apply it to the wall;
- Smoothing the border from the middle, move towards the edges;
- Apply the canvas until it is completely glued to the wall.
Each new part must be combined with the previous one. At the corners, borders are glued like wallpaper, that is, overlapping. The allowance will be approximately one and a half centimeters
It’s great if you purchased self-adhesive borders, this will speed up the process. If you have an ordinary border, the question arises of what glue to use to fix it. Paper borders are glued with glue for the appropriate type of wallpaper; denser ones can be glued with liquid nails or Titanium glue.
Border for wallpaper (video)
Materials and tools
You don’t need anything special to stick the border; all the accessories that helped glue rolls of paper to the walls will come in handy. So, to decorate the walls with borders you should have the following “at hand”:
- tape measure and scissors;
- a thick, soft pencil of a neutral color or colored chalk;
- building level of sufficient length;
- special glue that will ensure strong adhesion of the edging to surfaces; it is sold in small jars or tubes;
- a flat tassel, its width should be slightly narrower than the width of the edging;
- roller for rolling pasted edges;
- if you plan to glue the border under the ceiling, you will need a ladder;
- brush for applying adhesive.
Border in the bedroom
Wallpaper with a border in the interior: important points
There are a few other helpful tips that may come in handy before you get started.
Tips to note:
- You shouldn’t stick a border on newly pasted wallpaper; wait a couple of days to avoid unexpected troubles;
- Special glue dries quickly, so glue the border in stages;
- When cutting, make the pieces a little longer so that the pattern can be compared.
A wide, dark-colored border distracts attention from the dirt that often occurs at the bottom of the wall.
The border serves as a stylish addition to the interior. It seems like a small detail, but the room becomes more elegant.
The delimiter border eliminates the need to use furniture as a zoner. One glued strip visually divides the room into zones, and it usually looks convincing.
It is important not to make a mistake in the palette. Do not confuse cold and warm color schemes; such a substitution will literally hurt the eye.
Specifics of gluing borders for wallpaper (video)
The border is not a new solution, sophisticated, interesting, classic. Modern standard apartments often lack the laconicism, rigor, and sophistication that the border brings to the interior.
Key points influencing the choice
A lot has been said, in order to organize the information and summarize the main results, we will highlight the main rules for choosing a border tape:
- To ensure the maximum level of compatibility between the frieze and the main wallpaper, do not neglect ready-made options.
- To fully imagine how this kit will look assembled, look through the catalogs. Reputable suppliers have a lot of them;
- If you clearly know that you want to use a border in your interior, but have not found anything suitable among the ready-made options, leave some space for it. Paste the main wallpaper, after you see how it plays on the walls, you will understand what exactly you will be looking for;
- If you can’t find anything, make your own regular wallpaper that matches the style;
- The border must necessarily match either the color or texture of the wallpaper. Then the combination will be harmonious;
- When choosing a tape for plain wallpaper, give preference to a darker shade;
- Wallpaper with a pattern will perfectly complement a plain border;
- Wide border ribbons with ornaments look very impressive. With their help you can very quickly diversify the interior;
- Wide borders of dark shades located along the lower edge of the wall will protect it from dirt;
- Window and door openings with decorative edging look very sophisticated and expressive;
- The style and nature of the pattern on the border tape should in no case contradict the theme of the room and the main wallpaper;
- Be sure to choose a border material that is identical in material to the wall wallpaper. This will help avoid not only visual contrast, but also thickness differences;
- The theme of the picture on the border must necessarily correspond to the room in which they will be located;
- Sometimes the color of the border may not be combined with the color of the main wallpaper, but, for example, with a single piece of furniture of a distinctive color. For example, in a black and white interior, an unusual red chair will create the necessary dynamics and contrast. If you choose a thin red border to support the composition, the room will instantly become more alive.
Don’t be afraid to experiment and try to bring something new into the interior of your apartment with the help of such a simple but effective solution as a wallpaper border.
Tags:Wallpaper
Wallpaper border: everything a beginner needs to know about selection and installation
What is a paper border for wallpaper, what is it used for and how to choose it? Previously, when faced with home renovation, I asked myself these questions, but now, having certain knowledge, I will try to answer them in detail for you myself. In addition, I’ll tell you how to properly glue this decorative element.
A border is a decorative element that allows you to give the finish a complete appearance.
What are moldings based on?
On the construction market there is a large selection of decorative skirting boards for walls and ceilings made from different materials. Each of them has its own technical characteristics, advantages and disadvantages.
Polyurethane
Moldings made from this material are most popular among consumers. This is due to the excellent quality-to-cost ratio of the product. The service life of polyurethane strips is 30 years.
The advantages of polyurethane moldings include:
- a wide range of;
- acceptable price;
- flexible surface, which allows them to be used when decorating walls with curves;
- ease of installation;
- durability;
- different color solutions;
- light weight;
- easy to use (can be wiped with a dry cloth).
What is a curb and why is it needed?
A border is a decorative strip, most often paper or vinyl, that is glued to the edges of the wallpaper. But why is it needed at all?
This decorative element can perform two functions:
- Gives the finish a finished look . The smooth edges of the trellises look unattractive. Therefore, a decorative strip pasted on top can change the perception of the finish for the better;
- Allows you to combine different wallpapers. If there are two types of wallpaper on the wall, then using a border you can beautifully decorate the transition between them. In addition, this decorative element can be used when joining trellises with other finishing materials;
Decorative strip allows you to match different wallpapers
- Allows you to perform zoning of space. If the room is divided into separate zones by different finishing materials, a vertical border allows you to emphasize the zoning.
In addition, designers often use stripes to visually correct the geometry of the room or hide some finishing defects.
Combining liquid wallpaper
Liquid wallpaper deserves special attention. They allow you to create unique paintings, even diagonally, while being easy to apply. According to tactile sensations, liquid wallpaper has a soft and warm surface. The material is applied according to the principle of textured plaster. For an ideal result, it is also necessary to prepare the surface.
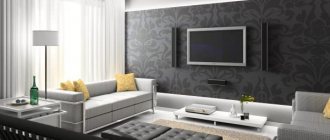
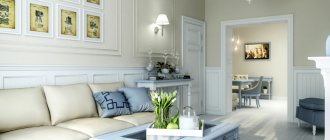
In the photo, the TV area is highlighted with liquid wallpaper.
Nuances of choice
To successfully select a tape, you need to pay attention to the following points:
The main differences between borders
Next, we will take a closer look at all the nuances of the choice.
Design
When choosing a tape design, you need to focus on the appearance of the wallpaper, namely the following features:
- Color . There is no need to match the strip to the color of the trellis, as it will blend in with the wall decoration, but at the same time, the tone of the border should be in harmony with the wallpaper. If you can’t decide on a color, to avoid making a mistake, choose a stripe that matches the pattern on the wallpaper. Another win-win option is to choose a strip to match the floor plinth;
Benefits of using moldings
Moldings have been used for quite a long time both for external decoration of buildings and indoors. They first came into widespread use back in Khrushchev's times.
Despite the fact that they are rarely used in modern design, since they look most appropriate in ancient styles, moldings have a number of advantages that make them relevant in our time.
The benefits of using planks in the interior and the features of their use are as follows:
- No problems with installation and maintenance. The back side of the parts is flat, which allows it to fit tightly to the surface and hold tightly. Therefore, during installation, an adhesive composition is simply applied to it and the part is pressed tightly against the wall. Maintenance is also quite simple - all surfaces can be simply wiped with a damp cloth if necessary.
- Cheapness. A wide selection of moldings from different materials and configurations allows you to choose a model to suit every taste and budget. Decorative skirting boards made of polyurethane are currently most in demand. This is due to their durability and reasonable price.
- It is possible to paint them in any color. Paint adheres well to moldings made of any materials, with which you can make a smooth transition between contrasting wallpaper.
- Eliminate surface imperfections. Using a decorative plinth, you can smooth out the transition between coatings with different textures and disguise any damage or unevenness on the wall.
- Can be glued to walls, including wallpaper, to the ceiling and to the floor around the perimeter of the room.
Also, an undoubted benefit of using moldings in the interior is the wide variety of models that allow you to select any types of moldings for different types of interior designs.
Installation
So, we’ve figured out the types and purposes of tapes, let’s now look at how to glue a border to wallpaper. The work can be divided into three stages:
Stages of tape installation
The work is carried out as follows:
- First of all, you need to mark the location of the strip. To do this, mark the level with a dot, and then draw a horizontal line through the dot using a building level;
- As a rule, border strips are glued on top of the wallpaper. In this case, preparation consists of cleaning the surface from dust.
If the wallpaper has deep relief, then it is better to glue the tape to the walls. In this case, cut the wallpaper with your own hands along the marked line with a sharp knife and tear it off the wall. Then the wall needs to be cleaned with a brush and carefully primed with a brush.
If the wallpaper was recently pasted, wait until the surface is completely dry.
- Measure the length of the walls and cut the borders into strips of the required length. Please note that they must be wrapped at the corners by at least 5 cm;
- Apply glue to the back of the tape, then fold it like an accordion.
If you are using a self-adhesive border, test it on a small area of wallpaper first.
Do not stick the tape along the “equator” of the wall. A room with a border in the middle seems narrower and more uncomfortable. If you are using a border to join different materials, it is better to divide the wall into three parts and glue it along the border of the lower third.
That's all the information I wanted to share with you on how to glue a border.
Tips for preparing and applying wallpaper borders
When pasting wallpaper, it absorbs moisture and becomes more susceptible to mechanical stress and contamination. Therefore, you should let them dry thoroughly and only after that start applying wallpaper edging . The drier the surface, the better the adhesion of the two materials after application.
Combination of vertical and horizontal borders
Border glue polymerizes (dries) fairly quickly. Therefore, in the absence of much experience, the pasting process should be divided into stages. This allows you to avoid situations where the smeared edge has dried out and become unusable. You should also make sure you have all the necessary tools in advance.
Some wallpaper has a pattern with horizontal guides that you need to follow. The lack of parallel between the frame and the main wall pattern can be very noticeable and negatively affect the visual perception of the design.
The location of the curb should be determined in advance
When cutting, the pieces need to be made a little longer, which will allow you to compare the images. This is true for borders with a pattern.
It is necessary to carefully check the surface of the walls on which you plan to place the tape. Any irregularities will appear sooner or later due to the thin material used. It is necessary to cover up all irregularities, cracks, and remove any remaining paint or glue.
A stylish border allows you to divide a room into zones
When using self-adhesive wallpaper edging, you should not rely entirely on its quality. Over time, it may begin to fall off. Therefore, it is much more advisable to additionally lubricate the surface with glue when placing it than to solve problems that arise in the future.
Sometimes the wallpaper border is glued end-to-end with the main covering. This is true for varieties with developed or high relief (two-layer wallpaper with embossing or with an additional layer of foamed vinyl). In this case, regular wallpaper glue is used.
The border in the bathroom should be secured with waterproof glue
Necessary tools for applying a border to a wall
To glue the frieze you will need the following tools.
Level . It is very important to maintain a strictly horizontal position of the edge, which allows you to perfectly align the border around the entire perimeter of the room and not spoil the appearance of the interior.
Smoothing roller . Serves to expel bubbles and excess glue. This tool can be replaced with a plastic spatula or soft sponge. However, the roller has an advantage: the likelihood of displacement when smoothing the border wallpaper tape is minimal.
The border tape on a plain wall stands out much brighter than in the picture
Pruning knife . It is recommended to use a utility knife and a ruler, which allows you to more accurately cut the tape along the intended lines. It will also be needed when combining patterns and cutting off excess.
Brush . The surface on which the frieze is glued must be as clean as possible. A soft brush will help remove dust immediately before pasting.
The border will look good at any height from the floor
Sponge or absorbent cloth . It is needed to remove excess glue from the wall. The fabric should not be fleecy. It is best to use natural white linen or cotton fabric so that the cloth dye does not smear the coating when wet.
Glue roller . Can be replaced with a regular paint brush. However, it should be taken into account that when pasting, the pile can cause a lot of inconvenience and slow down the work. If one person is engaged in pasting, it will be quite difficult for him to simultaneously hold the smeared frieze and at the same time get rid of the stuck debris.
When gluing borders to different textures, do not skimp on the adhesive.
Wallpaper glue . When choosing an adhesive, it makes sense to additionally consult with the seller at the time of purchase, indicating the material of the frieze and what surface it should be applied to.
Stepladder or table . If you plan to place the border on the walls at the top, then for work you will need a stepladder or a strong table that can support the weight of a person. It is necessary to remove in advance all objects that interfere with movement along the perimeter of the room. This will also reduce the likelihood of further injury from falling from height.
Desktop . Necessary for placing the tape when spreading. The working surface must be thoroughly cleaned of dirt and can be covered with plastic film to avoid any contamination during work.
The process of gluing a decorative border for wallpaper
Before you begin basic operations, make sure you have all the necessary tools and materials. Remove all unnecessary items from the room or protect them from accidental contamination, and arrange the work surface conveniently.
A border can decorate any room
Preparing the glue . It is strongly recommended that you carefully study the manufacturer's instructions, as some adhesive mixtures are diluted in a non-standard manner. According to the general rules, the dry mixture is placed in a container with water and mixed slowly. The subsequent infusion process takes approximately 20 minutes. After this time, the glue is mixed again until a homogeneous mass without lumps is obtained.
When using glue mixed with acrylic mass, mixing with water is not required. This material can be used immediately. It should be noted that thanks to the acrylic base, ideal adhesion to the surface is ensured.
Cute one border option for a nursery
Marking . In order for the edging to be glued evenly, you need to mark its location in advance with a simple pencil. This will greatly speed up and simplify subsequent work and make the result ideal. For marking, use a level and a long ruler (or other smooth drawing guide). The greater the distance between two points when drawing lines, the less likely there are deviations.
Designers often use a border to zone a room
An interesting approach that significantly speeds up the process of drawing lines is the use of a guide line. In this case, you can mark an arbitrarily long wall in one step. However, such work requires at least three people: two to maintain the guide and one to draw.
Tape cutting . This stage is very simple, but requires special care. After the surface is marked, measurements are taken and pieces of border tape for wallpaper are cut. If the length is chosen with a small margin, the process of combining joints can be significantly simplified. Excess can be carefully trimmed off immediately after placement on the wall.
You can decorate the border yourself with decorative elements
Applying glue . The adhesive is applied to the border tape with a brush or roller. The greased edge is left for 5-10 minutes. This time can be used to once again go over the surface of the wall with a brush and remove any settled dust.
Applying edging . The wallpaper border is carefully placed on the wall according to pre-made markings. When gluing in corners, the end of the tape should touch the adjacent wall. The next strip is glued overlapping, the allowance is 5-10 mm. This avoids gaps. You should not make sudden movements or strong bends. Otherwise, the border may tear.
Border and two types of wallpaper from one collection
After application, using a special roller (or clean cloth), air bubbles and excess glue are expelled from under the material. Next, excess glue is carefully removed with a cloth or sponge. After the entire perimeter of the room has been processed, the border glued to the wall should dry well. Drying time depends on the adhesive chosen, but often takes up to 24 hours.
How to glue
Since the installation of moldings is quite simple, you can install them yourself, without the help of repairmen. The main thing is to follow all instructions. The installation of molding can be carried out in various ways - using adhesives or self-tapping screws.
Preparatory work
It is advisable to glue decorative strips to a wall without wallpaper. This is due to several points:
- the wallpaper may not withstand the weight of the strip and come off;
- glue may leave marks on them;
- when changing the wallpaper, you will also have to take new moldings, since they cannot be reinstalled.
Surface preparation includes the following steps:
- Alignment.
- Removing contaminants.
- Degreasing.
The next stage of preparatory work is priming. To do this, it is enough to apply a primer to the wall in 1-2 layers.
After the walls have dried, it is necessary to apply markings using special tools. For vertical markings - a plumb line, for horizontal markings - a level.
Fastening methods
There are only 2 methods for attaching moldings - on a clean wall or on wallpaper. Each of them has both its advantages and disadvantages.
The main advantage of installing without wallpaper is durability. With wallpaper - no problems with joints.
The disadvantages of mounting on a clean wall are difficulties in adjusting the joints during the next renovation; on wallpaper - the impossibility of reusing the strips.