Fur coat plaster is one of the simplest and most cost-effective finishing methods. The process of applying the solution does not require careful surface preparation, special equipment or special skills, so all work can be done with your own hands. Decorative coating hides minor wall imperfections: cracks, recesses, small protrusions. Suitable for both building facades and interior decoration.
What is “fur coat” finishing?
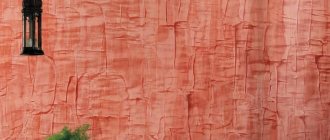
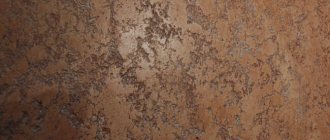
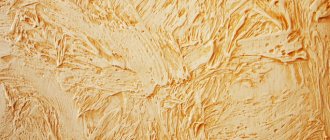
This technology of wall decoration received its name only because after applying the plaster mortar, a coating is formed on the wall surface, somewhat reminiscent of the back side of a sheepskin coat.
That is, the fur side. In this case, even ordinary cement-sand mortar can be used to form a fur coat. It's all about the way you apply it. And this method is the usual spraying or throwing of a mixture that forms a rough coating on the wall. Of course, today no one uses traditional methods of preparing a solution of cement and sand with the addition of pigments. Manufacturers of dry plaster mixtures offer a fairly large range of “fur coat” solutions with different colors.
The finishing process itself comes down to purchasing a ready-made dry mixture and diluting it with water in the proportions recommended by the manufacturer. With subsequent application to the wall of the house. Manufacturers have gone further, so you can buy “fur coat” in a ready-made diluted form on the market. This is a ready-made composition that just needs to be applied to the plane of the wall. And if dry mixtures are sold in paper bags, then ready-made diluted ones are sold in plastic buckets.
It should be added that the plaster mortar in buckets is a material to which polymers have been added. That is why this version of the plaster solution is applied to the walls without cracks and other defects that usually appear after the finish has dried. The thing is that polymers increase the plasticity of cement mortar.
Advantages
The fact that the textured finish in question has not lost its popularity over the years allows us to talk about the serious advantages of this material. These include:
- Cheapness. Among all decorative and finishing materials, “fur coat” is considered the most affordable. In addition, to decorate a building with such a mixture there is no need to purchase special tools, which also allows repairs to be made with minimal investment.
- Additional heat and sound insulation. In addition to acquiring a pleasant appearance, buildings with applied decorative plaster acquire additional insulation and decent sound insulation. Important! Here you need to understand that to use a “fur coat” as insulation, it is necessary to apply a thick layer of plaster, which is quite expensive.
- Easy to apply. Even a person who has never encountered plaster mixtures in his life can master the technology of applying a “coat”.
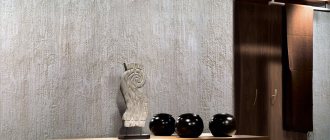
- Decent appearance. Perhaps the “fur coat” cannot boast of such sophistication and aristocracy as Venetian plaster, but such a finish looks quite dignified, fresh and attractive. In addition, such plaster can be painted in any color you like without any problems.
- Maintainability. According to experts, there is no other plaster that, if necessary, could be so easily restored, returning it to its previous appearance. In this regard, the “fur coat” is surprisingly repairable.
- Excellent vapor permeability. Despite its apparent density, the plaster in question allows the walls to “breathe”, and therefore helps maintain a healthy microclimate in the house.
- Light weight. It is worth saying that this facade coating has a low specific gravity, which means that before applying it you will not have to strengthen the foundation of the house.
- No seams. Finally, a coating such as “fur coat” has no seams or joints, so this material does not let cold into the house and does not accumulate moisture, and it lasts longer than finishing materials with seams.
Flaws
- Not too long service life. The sand-cement composition of the mixtures suggests that such external coatings are not durable. Silicone-based “fur coat” is the most durable in this regard, but it is not a serious competitor to other finishing materials for the facade.
- Moral old age. Numerous reviews say that “fur coat” is an outdated type of decorative finishing. And this, against the background of the variety of modern finishing materials, does not testify in its favor.
- Rapid contamination. The textured surface of the plaster quickly attracts dust and other contaminants. Therefore, such a façade should be washed periodically.
Advantages and disadvantages of “shuba” plaster
So, having dealt with decorating a house with fur coats, we move on to identifying its advantages and disadvantages.
- This decorative coating easily withstands serious changes in temperature and humidity , which means it is an excellent protection for the facade of the house from the negative effects of natural stress.
- The plaster applied to the wall can be painted with any facade paints, giving the wall a certain color shade. Many manufacturers offer ready-made material and dry mixtures to which pigments have already been added . All that remains is to choose the desired color. This type of plaster can be repainted several times. The main thing is to apply facade paint in two layers.
- At first glance, applying plaster mortar is a simple process . This is how it is if professionals do it.
- The surface design of façade walls can be modified. To do this, granular ingredients are added to the solution, for example, stone chips of small fractions. There are many options and masters use them.
- The plaster layer applied to the wall has a small mass. That is, the fur coat does not create loads on the walls and foundation .
A fur coat can be painted with any façade paints Source pobudova.in.ua
Where and what is it used for?
This type of finish is universal. It is used in the interiors of large premises. It is more widely found in the design of the exterior of buildings. Such decorative plaster of the facade is even more widespread than the well-known marble plaster. Taking into account the difference in working conditions, the compositions are produced for internal or external use, universal. To increase the ability to resist the influence of environmental factors, appropriate additives are used in the formulations.
The surface texture is obtained due to two factors: the structure of the composition (the main role is played by the size of the grains) and the relief laying (the main role is played by the method of application). Textures with a more pronounced relief are used mainly for facades. Decorative plaster with a fur coat effect for finishing the facade of a house can be made from pebble compositions and has additives that increase resistance to UV rays, frost resistance, etc.
Indoor conditions are milder. However, limited space imposes its own conditions. Pronounced reliefs conceal space and visually burden the room. Therefore, decorative plaster for interior wall decoration with a fur coat effect is usually fine-grained. Of the application methods, those that give a smoother relief are selected.
Compound
It should be noted that the composition of the “fur coat” may differ markedly. If in past years the mineral composition of plaster was predominantly used in construction, today ordinary people are increasingly choosing an acrylic or silicone base. It is worth studying their compositions, assessing the advantages and disadvantages of each.
Silicone plaster
And this is the most perfect composition of the “coat”, which does not have the disadvantages inherent in simpler and cheaper plasters. Polymer resins act as the binding component of silicone plaster, making this material extremely durable and less fragile. Its only disadvantage is the high price, and therefore it is quite obvious that silicone plaster is purchased extremely rarely to cover large areas.
Important! The silicone composition also has one more drawback. The fact is that this surface layer dries 1.5-2 times longer than its “competitors”. It is important to take this into account when working so as not to spoil the material.
Acrylic
Decorative plaster consists of an introductory polymer dispersion, dolomite fillers, as well as pigments and special additives that improve the performance properties of the mixture and also facilitate its application. The building material is resistant to low temperatures, rain and ultraviolet rays and provides microbiological protection.
An acrylic mixture is used for finishing building facades (it cannot be used indoors).
Pros:
- fast setting;
- ease of use;
- high elasticity;
- wide range of colors;
- easy care;
- resistance to deformation;
- low water absorption;
- resistance to abrasion and mechanical damage;
- affordable price;
- good adhesive properties;
- resistance to mold and fungi.
Acrylic facade plaster does not require painting, which simplifies construction work.
Minuses:
- low resistance to ultraviolet rays;
- gets dirty quickly;
- low vapor permeability.
Another disadvantage is that acrylic compounds stain easily. Dirt settles on them faster than on other mixtures.
If the house is located in the city center or on the highway, then it is preferable to choose silicone facade mixture and other types (with a self-cleaning effect). Follow these rules when applying decorative “fur coat” plaster:
- The ambient temperature should be above +10 degrees.
- It is important that it is not raining outside.
- Strong gusts of wind or heat also adversely affect the structure of the acrylic mixture.
Other types of building materials
Advantages of silicate compounds:
- low price;
- high elasticity;
- resistance to fungi and mold.
Minuses:
- low strength.
Mineral plaster is used for finishing insulated facades. The fur coat solution can also be used inside buildings. The composition prevents the growth of harmful microorganisms.
Facade plaster “shuba” is resistant to high and low temperatures, ultraviolet radiation and mechanical damage, and has good adhesive properties. Other advantages of the mixture:
- good vapor permeability (allows walls to “breathe”);
- strength;
- resistance to microcracks;
- low price;
- fast setting;
- long service life;
- resistance to mechanical damage;
- ease of use.
For wall finishing, plaster with a grain size of 1.5 mm is most often purchased.
Cement-lime plasters improve the thermal insulation properties of the wall. Suitable for surfaces subject to mechanical damage. The downside is that they get dirty quickly.
Popular manufacturers
Many manufacturers of decorative plasters have “fur coat” in their lines. But choosing from the variety of offers is not so easy. In this regard, experts recommend paying attention to the following manufacturers:
- Knauf
The line of this German company includes the Diamant mineral mixture, which is optimally suited for this type of finishing. This is a universal plaster, which is resistant to vibrations and is quite economical in consumption (3.8 kg per 1 sq. m.). In addition, this material perfectly withstands environmental influences, which means it can be used for facade finishing.
- Ceresit Dekor Plus
Perhaps the best plaster for making a “fur coat”, which boasts an affordable price. Practice shows that ideally such a mixture should be applied with a fine-pile roller. In this case, the consumption per 1 sq.m. fine-grained plaster will be only 1.8 kg, and medium-grained plaster - 2 kg.
- Bergauf Diadema
This Russian company also offers one of the highest quality products. Its ready-made mixture for making “fur coats” is produced using European technologies, but is sold at low, quite affordable prices. Bergauf Diadema mixtures are characterized by increased plasticity, they are easy to work with, and they are superior to most competitors in durability.
- Weber Vetonit
The company is a world leader in the production of finishing mixtures for facade finishing and external insulation, and therefore its ready-made mixtures are adapted specifically for external work. Such a “fur coat” will not only please the eye, but also warm the house, becoming a full-fledged insulator for it. It is frost-resistant and water-repellent, and its consumption is 1.2 kg per 1 sq.m. You will be pleasantly surprised.
- Lakra
Among Russian manufacturers of plasters for applying “fur coats” it is worth highlighting Lakra. This material is created using European technologies, which means it is characterized by constant quality and a minimum consumption of 1-1.15 kg per 1 sq.m. True, you need to work with such material very quickly, because its “lifetime” is only 20 minutes.
Decorative plaster “fur coat” proves from year to year that time has no power over this finishing material. It is still relevant and can compete on equal terms with the most modern finishing materials!
Venetian plaster: application, photos of completed work
Silicone plaster: composition, choice, photo, application technique
Properties of decorative plaster
Decorative textured plaster is used to create a finishing coating. It is excellent for exterior decoration of building facades and for finishing interior surfaces. It is often used for finishing borders and arches. This coating, in addition to its attractive appearance, has other positive characteristics. The advantages of a fur coat include:
- peat insulating properties;
- soundproofing qualities;
- protection of walls from destructive atmospheric phenomena;
- ease of use, finishing can be done by hand;
- possibility of easy restoration of damaged areas;
- aesthetic characteristics;
- affordable price.
Rules for working with material
- Work must be carried out in the warm season at an optimal air temperature of +5...+27 °C.
- While the coating remains wet, it is necessary to prevent exposure to ultraviolet radiation.
- You should not start work during rain or heavy precipitation, or decorate a wet façade.
- The “fur coat” is applied in 2-3 layers. Each new layer must be applied before the previous one is completely dry.
- Be sure to apply a primer to the walls and let it dry completely.
- Each manufacturer of formulations offers detailed instructions for dilution with water and appropriate proportions.
Video description
The video shows how the master applies the “fur coat” plaster mortar to the wall surface using a pneumatic gun:
See also: Catalog of companies that specialize in finishing materials.
Useful tips
In order for the facade of the fur coat to serve for a long time without changing its original appearance, it is necessary to adhere to some recommendations given by experienced craftsmen when applying it to the facade of the building.
- Optimal temperature conditions at which it is recommended to apply the “fur coat” plaster solution: +5C – +27C.
- Do not allow direct sunlight . The material will dry out quickly and begin to crack .
- Do not carry out finishing work in rainy weather .
- applied in three layers. Do not allow the preliminary dry completely before applying the subsequent coat. But it also cannot be applied to newly laid material. We need to find a middle ground .
- must be applied . But it must dry before applying the decorative layer .
- instructions exactly when mixing the dry solution with water. If you add a lot of water, the material will become liquid and will slide off the wall. If there is not enough water, the solution will become dense and difficult to work with.
Follow the manufacturer's instructions exactly when stirring the dry plaster mixture Source aviarydecor.com
Preparing the walls
Since fur coat plaster is a relief finish without seams, it does not require correction of minor defects in the base. The rest of the preparation is carried out in the same way as for other textured finishes.
Subsequence:
- the wall is inspected, the remains of the previous coating are removed, the wall surface is leveled if necessary,
- Large defects are repaired with a solution of sand and cement 3:1.
- stains are degreased,
- neutralize biological damage,
- large cracks are “healed” using a polymer mesh,
- the surface is primed according to the base material with a primer composition containing quartz sand,
- the prepared base is dried.
Facade plaster with fur coat relief for external use can be applied to sheet insulating material. To do this, the surface of expanded polystyrene or other insulation is covered with a “casing” of a solution (cement-sand 1:3) reinforced with its polymer mesh.
The sequence of installing the mesh on the glue: first, a layer of glue is applied, then the reinforcing mesh, the finishing layer of glue. Applying the mesh to the wall and covering it with glue only on top is NOT ALLOWED.
After it dries, decorative finishing is applied. Read more about how you can make a fur coat on the wall.
Brief description and advantages
Shuba plaster is the application of cement-sand mortar to the surface of the house by spraying. This process is easy and even a beginner in construction can do all the work, since you only need mortar, a stick, a broom and a trowel. The application process is not labor-intensive and will take a little time if you compare it with other finishing methods (log house, siding, stone cladding, etc.). Material costs are minimal, and the only thing you have to buy is cement and a colored pigment to color the solution in the required shade.
The advantages of making a fur coat at home are the following:
No costs.- Beautiful view of the building.
- Easy to apply the mixture
- Excellent thermal insulation and sound insulation performance.
- Excellent protective properties.
The disadvantages include the fact that the final result (appearance) will not fit into modern garden styles (for example, hi-tech), as well as the fact that such a coating is a dust collector due to the surface topography.
Preparation of the solution
“Fur coat” in the form of a dry mixture can be purchased at any store. Before use, this composition should simply be diluted with water according to the instructions and mixed thoroughly. If you decide to prepare the composition yourself, this will also not be a big problem. All you need is river sand (which should be sifted first) and cement as a binding component.
- Combine one part cement with three parts sand.
- Fill the mixture with water at the rate of 200 ml of water per 1 kg of dry mixture.
- Using a construction mixer, mix the solution thoroughly.
- Let the mixture sit for 5 minutes and stir again.
As a result, you should get a homogeneous mixture with a consistency reminiscent of sour cream. It should not be too thick, because in this case it will be inconvenient to work with. And the material consumption will increase noticeably.
Components.
Basically, façade plaster coats are prepared independently - it’s very simple. After all, the solution is made from ordinary cement and sand. Nowadays, fine sand is increasingly used: with it, the coating turns out to be more finely structured. You can use gypsum instead of cement, but then you need to be prepared that the coating will absorb moisture very quickly. It will have to be protected with special paints or compounds.
One of the recipes for preparing fur coat plaster with your own hands assumes the following ratio of components: one part cement and three parts sand. Another option suggests taking sand and cement in half, the third option is 1:2. Do-it-yourself fur coat plaster is diluted with water, which is added until the solution acquires a consistency that resembles liquid sour cream.
Materials and tools
Coat plaster can be applied in different ways, and depending on the specific method chosen, the list of accessories for the job changes. In addition to the plaster itself, primer, container and mixer, you need to prepare:
- roller, brush, broom or net;
- construction float;
- sprinkler;
- compressor.
Application area
Decorative plaster “fur coat” is suitable for finishing the following surfaces:
- facades of private houses and municipal buildings;
- walls in rooms;
- street fencing;
- columns and bas-reliefs;
- basement rooms.
Important! Practice shows that textured, pronounced reliefs with coarse stones are used for finishing facades. If the walls are finished indoors, fine-grained plaster is usually used, giving a smoothed relief.
By the way, depending on the type of plaster, the “coat” can be applied both to a concrete or brick wall, and to drywall.
Applying plaster with different tools
The process of plastering surfaces with a fur coat is quite simple; it is only important to familiarize yourself with its sequence and nuances in advance.
Manual styling
Typically, non-professionals use hand tools in their work, which are inexpensive and allow you to get the desired texture without much expense. Such devices are well suited for small areas.
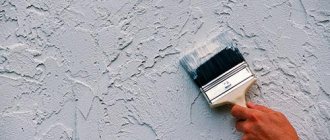
Applying a “fur coat” with a roller
Fur coat can be applied in different ways.
One of them is application with a fur roller. The finished solution for application should not be too thin or thick. There are two application options. In the first case, you can apply the mixture to the wall with spatulas in a thin layer, and then roll it out with a roller. In this case, the decorative layer is uniform.
In the second case, you can simply dip the roller in a bucket of solution and paint the walls with it. If you apply the mixture to the wall in this way, the texture of the finished plaster will be rougher.
After applying the mixture to the surface of the wall, wait 5-10 minutes, depending on the temperature outside, and smooth the surface with a light circular motion using a moistened plastic trowel. This will remove excessively protruding parts of the plaster and slightly smooth the surface.
In order to get a different texture, you can use a roller with long pile. In this case, the texture on the wall will be larger. You can also buy a textured roller with special holes in the store. This will diversify the surface of the wall.
Brush
This method also does not belong to the category of modern ones. It does not make it possible to apply a thick layer of plaster, but is used only for making thin coatings that do not serve as noise and heat insulation. To work, you will need a stiff brush and a small wooden plank. The sequence of actions is as follows:
- a flat rectangular brush is dipped into the plaster;
- turn the tool over with the bristles up, placing it horizontally;
- move the board along the brush towards you;
- the hairs of the brush bend, then straighten and “shoot” the plaster directly onto the wall, forming the desired relief.
With a broom
Another well-known method is to use a broom. To complete the work in this case, you will need a wooden block and a broom with thin rods. When finishing, the broom is dipped into the pre-prepared mixture so that it evenly covers the rods. After this, you need to place the block parallel to the wall, and hit the stick with a broom. When performing this movement, the mixture from the rods will fly to the wall, forming an interesting pattern reminiscent of a fur coat. The disadvantages of the presented method are the duration and complexity of the work. You can use this method only when decorating a small surface.
Net
Applying decorative fur coat plaster using a mesh is a less popular option, but it is also used when performing finishing work. In this case, a chain-link mesh with small cells is attached to the wall. After this, the finished solution should be applied using a trowel in an even layer over the entire surface of the wall. When the mixture passes through the mesh, an unusual pattern will remain on the wall. At the final stage of applying the mixture, the mesh is removed from the wall. A solution will remain on the surface, which will give the coating the effect of a fur coat.
Master OK
A construction float (trowel) will also serve as a tool for applying a fur coat. Additionally, for the work you will need a spatula, which is used to apply the plaster to the trowel. Next, press the trowel against the wall so that it is imprinted into the mortar, and sharply tear it off. A rough textured surface is formed, which is then slightly smoothed with a grater moistened with water.
Mechanized application
Professional finishers use special equipment to cope with plastering work faster and without unnecessary labor costs.
Manual sprinkler
This application method allows you to significantly simplify the process of decorating walls. The mixture is loaded into the container of a manual sprinkler to a certain level. After this, the person turns the handle of the device to distribute the mixture along the wall. This option allows you to apply an even layer of the mixture to the wall in a short period of time. The presented method is perfect for carrying out repairs and finishing work in large quantities.
Manual sprinkler
Gun with compressor
Mechanical options for applying the mixture are most often used by professionals to cover large surfaces. The device of the gun with a compressor consists of a container for the solution, a nozzle and a pressure blower. The mixture from the container under high pressure is sprayed over the entire surface of the wall, forming a uniform plaster layer.
The fur coat is applied mechanically
The principle of applying plaster using a gun is as follows:
- The gun is placed at a distance of 25-30 centimeters from the wall.
- After this, the solution is distributed in an even layer from top to bottom.
- The applied solution forms a pattern in the form of a fur coat.
- After completing the work, you just have to wait until the mixture dries completely.
Using a gun with a compressor allows you to complete large volumes of work in a short time, but professional equipment is expensive.
Prime well.
Prepare the base for plastering work as usual before application. The wall is thoroughly cleaned of everything foreign, including old finishing materials.
Expert advice: On a smooth surface you need to make notches using a hammer and chisel. This is necessary to ensure good adhesion to the base.
Be sure to prime the base. The composition for this can be purchased at a building and finishing materials store. A large brush is suitable for application. It is important to wet the wall very well. You can do this using a spray bottle. Then you need to wait until the primer is completely dry.
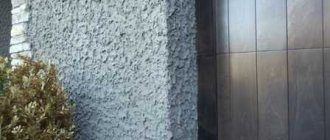
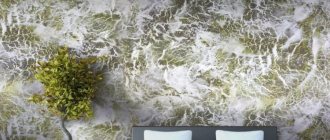
Features of the “grated fur coat”
This type of coating differs from the traditional “fur coat” in having a smoother structure. The protruding parts are leveled, and the roughness remains in the recesses. This surface looks unique and is more suitable for external surfaces.
The application technology consists of two stages. Initially, the decorative mixture is applied to the walls to be treated using one of the above methods (whichever you prefer). Using a gun with a compressor allows you to speed up the work.
Next, when the plaster begins to dry, grouting begins with a metal float or trowel. The tool is held from top to bottom with light pressure. As a result, neat islands are formed on the surface interspersed in the recesses of the surface.
The “Grated Fur Coat” coating looks completely different from the usual version
We knit brooms.
The third type of plaster mixture can be applied with a broom. But not the ones who sweep the floors.
Important point: The broom must be knitted from thin twigs of willow or other trees. It is important that the branches are rigid, otherwise the desired effect will not be achieved.
The process is as follows: a broom is dipped into a bucket of solution, quickly spraying the mixture onto the wall. The coarseness of the coating texture depends on the thickness of the twigs used to make the broom. You can smooth the surface again with a damp trowel. Instead of a broom, you can use a brush with metal bristles. It is dipped and then brought to the wall by running a wooden plank along it. This sprays the solution.
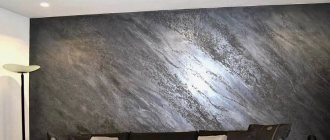
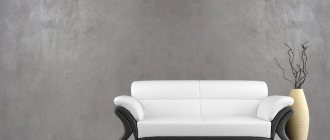
Dyeing and tinting the “fur coat”
The technology for forming a “coat” does not end with plaster alone – the painting stage is necessary. At least this applies to the white and gray mixture. There are colored materials on sale, which allows you to do without painting the surface. True, such options are more expensive than colorless or neutral products.
Painting is done after the solution has dried or by adding color during the preparation of the mixture. In this case, an aesthetic appearance is obtained that will highlight the interior design. However, it takes time to thoroughly stir the plaster. And at the same time take into account two main factors:
- The applied mixture turns pale after drying, so when selecting paint it is better to make test “strokes” on a separate and inconspicuous area.
- In the case of large areas, a lot of solution is required, which it is advisable to do in small portions. At the same time, it is difficult to give each batch of the prepared mixture the same color. Then the only way out is to paint the finished surface after the solution has dried.
For the desired color, you can use dry coloring components such as powdered coal, red iron ore, manganese, cobalt glass. After adding it to the solution at the mixing stage, you will not have to paint the walls in the future - they will already acquire a shade that will last for a long time.
There is one significant nuance in coloring a finished “fur coat” - due to its texture, the work is more difficult to do, but with a smooth surface it is easier. After all, the paint must penetrate into all the recesses. Therefore, it is recommended to use a spray gun or a fleecy roller.
The color of the plaster can be changed by painting
Note!
Here are a few recommendations from professional finishers who will help ensure that the decorative plaster under the “fur coat” is applied to the highest possible quality:
- work can be performed if the air temperature is not less than plus five and not higher than plus twenty-seven degrees Celsius;
- if the mixture is applied in two or three layers, you need to apply them immediately one after the other, before the previous one has time to dry;
- it is important to pre-prime the walls very well;
- mineral powders of red iron ore, white asbestos, manganese, cobalt glass, white marble, coal and others are suitable as dyes;
- the consistency of the mixture is of medium plasticity, such that the composition does not slide off the surface;
- if you want to make a larger texture, you can take a metal mesh or a stick with a broom at the end;
- a finer texture is achieved using a metal brush.
data-matched-content-ui-type=”image_stacked” data-matched-content-rows-num=”2″ data-matched-content-columns-num=”3″ data-ad-format=”autorelaxed”>
Description of popular brands of plaster mixture for exterior use
The mixtures create a high-quality coating on the wall.
Decorative plaster Knauf Diamant
It is characterized by increased hardness and strength and provides a good indoor microclimate. Suitable for all types of rooms. Decorative plaster under a fur coat can be used in any heated room (bathroom, kitchen) where air humidity does not exceed 70%.
Other benefits:
- resistance to mechanical damage and abrasion;
- does not shrink when drying;
- moisture resistance;
- vapor permeability (allows walls to “breathe”);
- high strength.
“Fur coat” is suitable for finishing surfaces subject to mechanical damage (for example, public places, schools, stairs).
Lakra
Main advantages:
- provides an even layer;
- hides minor defects;
- weather resistant.
Elbrus
White decorative plaster is sold in buckets weighing 15 kg, and is immediately ready for use. The composition can be applied to brick, concrete and other types of surfaces, creating an ideal, snow-white coating. Thanks to the texture of the composition, the surface looks optically voluminous. The “fur coat” effect can be achieved by applying it with a regular long-haired roller. This composition can be used for internal and external work.
Among the advantages of the material:
- affordable finishing cost;
- low material consumption: with one 15 kg bucket you can process about 25 m2 of surface;
- high strength indicators, good resistance to atmospheric factors;
- perfect for finishing wall finishing work;
- may be subject to frequent wetness, suitable for washing with a damp cloth.
Special sprinkler.
The second way to apply fur coat plaster with your own hands or factory-made is by spraying. It is done using a special tool - a sprinkler. A manual fur coat plastering machine looks like a small box, inside of which there is a shaft equipped with rigid cables, as if disheveled. When a manual plaster machine rotates, the cables grab the solution and spray it onto the wall. If the cables are thin, the texture of the “fur coat” turns out to be finer.
The thicker the cables of a manual machine for plastering a fur coat, the larger it is. This tool is usually made by hand. A classic of the genre is to use a trowel with a spatula. First of all, grab the mixture with a spatula and place it on the surface. The layer should be thin. Then, using a trowel, the structure is made. The tool is simply pressed tightly against the wall, and then quickly torn off. The rather rough texture that results is usually smoothed out with a wet trowel.
Cost per square meter of “fur coat”
The average consumption of the finished mixture when applied to the wall will be approximately 3 kg per m2. Depending on the cost of a bag of mixture, it will be from 100 to 200 rubles per square meter. Ready-to-use mixtures will cost you much more.
The work of specialists in applying decorative plaster “fur coat” costs from 350 rubles per square meter. Thus, the finished wall will cost you about 600 rubles per square. You can save money and apply a “fur coat” to the walls with your own hands. It is enough to practice on small surfaces to understand the essence of the work.
Factory product.
Ready-made mixtures - in dry form or already suitable for starting work, have different compositions and characteristics. Thus, under the Cerezit brand, pebble-type plaster is offered, with which you can create a “fur coat” effect. In addition to cement, it contains small stone granules. It tolerates mechanical and atmospheric influences well. To make a “fur coat” out of it, experts recommend using a short-haired roller.
“REAL” brand plaster is proposed to be used for finishing concrete walls. They can be used to create a decorative coating when arranging a thermal insulation system for walls.
ATLAS CERMIT SN (CERMITE SN) has mineral inclusions measuring one and a half or two millimeters. Allows you to create a decorative “fur coat” type coating.
Another decorative option is “Lakra Shuba”, packaged in 15 kilograms ready for use. Its composition contains minerals and acrylic. The ready-made mixture “Aura Putz Fur Coat” can be used for finishing concrete walls, brick, stone, plywood, plasterboard, chipboard.
What do we have as a result?
In conclusion, I would like to note that the method of finishing facades with fur coat plaster is quite affordable for most homeowners according to the following parameters:
- an inexpensive and reliable means of protecting the outer surfaces of building walls from the negative effects of various natural factors;
- A fairly simple application technology that a home craftsman can handle.
Sources
- https://building-ooo.ru/suxie-stroitelnye-smesi/shtukaturka-shuba-chto-eto-takoevidyprimeneniesposoby-naneseniefoto/.html
- https://stroyka-gid.ru/supplies/dekorativnaya-shtukaturka-shuba.html
- https://DekorShtukaturka.ru/dekorativnaya-shtukaturka/shtukaturka-pod-shubu
- https://1beton.info/shtukaturka/shuba
- https://nikastroy.ru/kak-sdelat-subu-na-dome-samostoatelno-posagovaa-instrukcia/
- https://RDStroy.ru/akademia-rds/kafedra-otdelki-sten/dekorativnaya-shtukaturka-shuba-metody-naneseniya/
- https://kraska.guru/smesi/shtukaturka/pod-shubu.html
- https://dekor.mobi/kak-sdelat-dekorativnuyu-shtukaturku-shuba/
- https://1oschtukaturke.ru/dlia-fasada/sposoby-naneseniya-dekorativnoj-shtukaturki-shuba
- https://PoShtukaturke.ru/steny-snaruzhi/dekorativnaya-shtukaturka-naruzhnyx-sten/dekorativnaya-shtukaturka-shuba.html
- https://1pofasady.ru/shtukaturka/dekorativnuya-shtukaturka-shuba
Large relief.
If you throw large portions of the mixture onto the wall at once, you will get a do-it-yourself “fur coat” plaster with a large relief. A thick, coarse-textured layer will help hide serious surface irregularities.
Metal mesh is also used during application. First, a metal construction mesh is installed at a short distance from the wall to be finished. It is prepared in advance by stretching it over a wooden frame. The solution is poured through this mesh, scooping it up from the container with a trowel. Having completed one section, the grid is transferred to another - and work continues.