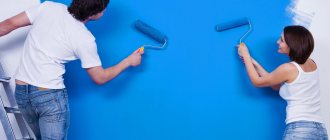
Today, to significantly extend the service life of certain structures, auxiliary materials are used that act as a protective barrier between the coating and the corresponding harmful effects of moisture or other atmospheric phenomena. To decorate ceilings and walls in such situations, putty is applied with a roller or other improvised tool. Applying putty with a regular roller requires certain skills and attention, which is why the process of creating a smooth surface should be considered in detail.
Technology of applying putty to the wall with a roller
Tool
Most people associate applying plaster with a trowel. But most often it is used only for leveling walls, applying a thick dense layer of material, and other complex manipulations. But to prepare walls for applying paint/wallpapering or to create a beautiful texture, it is more advisable to use a roller.
The article will discuss in what cases you can and should use a roller and how to use it correctly.
Applying putty with a brush. Can putty be applied with a paint brush?
/// Is it possible to apply putty using a paint brush?
We have a battery under our window, which cannot be removed - the pipes are old, the threaded connections have become stuck over time and you can simply rip them off. We are doing some cosmetic repairs and have come to this battery. The wall behind it is plastered with lime mortar. I want to make a bespeschanka in this area. It's impossible to get to it with a spatula. And if I use a curved brush for batteries, can I apply a layer of putty with it? If so, what kind of putty should I use and what consistency should it be?
you reminded me of me in my youth, when I covered the entire wall with putty under a brush) You can do this, but the layer will be thin and there will be stains, sanding will be problematic. But it’s still not visible, so what difference does it make, it’s clean and good. But the putty will not stick to every surface without first cleaning it. If you have a thin layer of lime there, first prime it with an acrylic primer twice, but unfortunately no one can give you a 100% guarantee that the putty will not fall off without completely cleaning the base.
You won't be able to apply putty properly this way. To apply it with a brush it must be very liquid. It is better to attach an extension to the spatula and putty with such a device in those places where you cannot reach it. But still, most of it can be easily removed with a regular spatula.
This kind of work cannot be fully completed with a brush; you end up with circles and roughness that can also be cleaned up with sandpaper; just prime this part and, after drying, apply the finishing touch on top, be it paint, plaster or wallpaper.
Instead of coming up with all sorts of tricks, it’s easier to remove the battery while it’s summer and then screw it back in place, just unscrew two couplings.
СryukOff: July 10, 2015 at 0:01
Instead of coming up with all sorts of tricks, it’s easier to remove the battery while it’s summer and then screw it back in place, just unscrew two couplings.
Unscrewing means exerting force, tearing off the nuts. They are all stuck there, so you can break a pipe and flood your and your neighbor’s apartment with water. Therefore, I am more inclined to use the option of “masking” roughness and unevenness. Against the background of a zebra, for example.
Preparing the composition
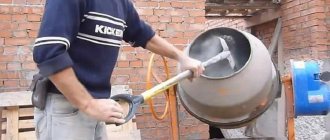
The finished compositions are already ready, but they can be diluted with water by 10% if you think they are too thick. It is better to mix the putty using a drill or hammer drill with a whisk attachment; a spatula will take a long time and lumps may form.
To mix the putty, take or purchase a plastic bucket.
I recommend: Do-it-yourself drywall putty, how to putty drywall
Let's add water, about a third of the bucket to begin with. Pour the putty into the water. You can pour it directly with your hands, or you can take some kind of container. There is no need to lift a 25-30 kg bag and pour from a full bag into a bucket until you have used at least half of the bag.
You need to add enough putty so that a small hill of 5 centimeters is formed above the water.
Next, take a drill or hammer drill with a mixer whisk and mix the putty.
Mix the putty with a mixer
When mixing the putty with a mixer, pay attention to the bottom of the bucket and its edges, passing there with the mixer, as well as the fact that the putty at the bottom may become thinner than at the top, mixing it evenly, moving the mixer from bottom to top.
Be sure to check to see if any lumps have formed; if there are any, you can wait until they are saturated with moisture, about 5-15 minutes. and mix again with a mixer.
What types of putty can the roller handle?
Of course, it will not be possible to level crooked walls with one roller. Even in several approaches. Unless you use it simply as a tool for application, and then again smooth it out with a spatula. But is it worth it? Applying putty with a roller is no easier or faster. Therefore, this tool is used for puttying mainly in two cases: when it is necessary to “whiten” a surface that has already been leveled with plaster or another relatively flat surface, to give it an even color for subsequent painting or wallpapering. Or to create a decorative texture.
Leveling putty
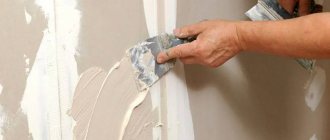
For those who do not know how to putty at all, but want to prepare walls or ceilings for wallpaper or painting, experts advise using a special method - “scraping” putty with a roller. The instructions below will help you understand what this is. But first, let us remind you: this method is only suitable for flat surfaces. For example, walls or ceilings made of plasterboard:
- First, complete all the preparatory work: sealing drywall seams, eliminating gross defects. There is a lot of information on how to do this correctly on the site. You don't need mastery of a spatula here, you can do it easily;
- After the seams have dried, treat the entire surface with a deep penetration primer and wait until it dries;
- Prepare a fur roller with a pile 2-3 mm long and a large spatula with a working surface of at least 60 cm;
- Puttying drywall with a roller is done in the same way as painting - just dip the tool in the solution and roll it over the wall;
Advice. The solution for this work should be of a thinner consistency than usual. It is best to choose ready-made putties or mixtures with a long hardening period.
- After treating a small area, take a spatula and literally rip off the mixture applied to the surface with it, holding it at an angle of 90 degrees to the surface;
- All the putty, of course, will not be removed, but you don’t need that. It will fill all the pores and irregularities and will remain a thin layer on the wall/ceiling;
- Walk this way over the entire surface, let it dry and repeat the procedure one or two more times, depending on how satisfied you are with the result. Moreover, each time the stripping should be done in the direction opposite to the previous one.
This type of puttying with a roller guarantees high-quality leveling of plastered walls - it helps to get rid of roughness and creates a durable, uniform coating. A professional finisher, using a spatula, will cope with such work in one approach, immediately applying a layer of putty of the required thickness. Without experience, you will not repeat this trick, besides, several thin layers are always more reliable than one thick one.
Advice. If at the end of the work there are traces of the spatula left on the surface, they can be removed by sanding with fine emery cloth.
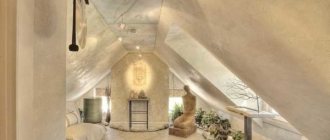
Decorative putty
If the first method is not known to everyone, and is perceived by many experts with a degree of sarcasm, then decorative puttying of walls with a roller is a very common finishing option. True, it is performed completely differently. It is worth noting that anyone can master this method - it does not require perfect smoothing of the surface. Of course, provided that the base is again fairly level. If you want to cover the walls with textured putty yourself, you have to do the following:
- After traditional preparation, priming and drying, apply putty to part of the wall, trying to distribute it in a layer of equal thickness;
- Special precision is not needed here; small errors are quite acceptable. Just as you don’t have to try not to leave marks from the spatula;
Advice. Before you begin, practice on a large piece of drywall or an inconspicuous area of the wall to get the hang of it and understand how to achieve the desired thickness of putty.
- In this case, it is advisable to use ready-made putty - it has an optimal consistency and takes longer to set. Its price is higher than that of dry mixtures, but it can be mixed with tinting pastes, immediately obtaining the desired surface color and saving on paint;
- While the solution on the treated area is still fresh, take a special roller with an ornament or design applied to it and roll it in one motion from top to bottom along the entire height of the wall;
How to properly putty a ceiling for painting
Step #1. Prime the ceiling
Do you want to make the ceiling of your home perfectly smooth and beautiful yourself? It's real! But to achieve this goal, it is necessary to begin an important task - puttying the ceiling.
- Ceiling putty for painting ↓
- Puttying a plasterboard ceiling ↓
The main thing in this labor-intensive process is to avoid mistakes and do everything efficiently and accurately. We suggest using some rules and advice that will help you properly putty the ceiling for painting.
Ceiling putty for painting
- First of all, it is important to prepare the working surface: remove previous finishing material, whitewash, and correct uneven surfaces with plaster.
- Prepare tools: a clean container for diluting the putty mixture, a low-speed mixer, a roller with a synthetic coat, large (45-59 cm) and small (9-13 cm) spatulas, an abrasive mesh (sandpaper), a lamp.
- Prime the prepared surface using a special acrylic primer. To do this, it is best to use a paint roller coated with synthetic material. Wait until the primer is completely dry.
- Prepare a putty mixture (usually there is a description of the method for preparing the mixture on the packaging container). It is recommended to first pour water into the container, and then add the required amount of the dry mixture to it. Mix with a mixer and allow time to brew, stirring the solution after 15-20 minutes. Achieve a uniform consistency. During further work, it is advisable to add water or directly add the dry mixture in order to maintain the thickness necessary for high-quality work.
- The dried primed surface can be puttied with the first layer. Using a small spatula, take a little diluted mixture from the container with the solution and spread it evenly over the working surface of the large spatula. It is better to apply the mixture to sections of the ceiling starting from one of the corners of the room, gradually reaching the middle of the ceiling, and then over the entire surface. Guide the tool correctly at an angle of about 15˚ to the ceiling surface, performing cross movements. Try to apply putty to all areas of the ceiling, applying equal pressure on the tool. The thickness of the putty layer is no more than 0.4 mm.
Step #2. We putty the ceiling in two layers with a wide spatula
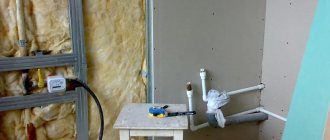
Puttying a plasterboard ceiling
Step #3. Leveling the corners first with a small spatula, then with a large one
- For the work you will need the following materials and tools: primer base, serpyanka, Fugenfühler putty for sealing seams, finishing putty; low-speed mixer, buckets, foam roller, construction knife, two spatulas (100 and 300 mm), sanding mesh, scraper and grater.
- If there are cut drywall joints, it is imperative to process them correctly to avoid cracks:
- Glue serpyanka (plaster mesh for joints) onto the seams and draw lines along them at a distance of 3-5 mm from the glued mesh.
- Cut the paper along the marked lines using a construction knife and select plaster 1 mm deep.
- Using a scraper along the seam line, make a beveled edge of the drywall (chamfer).
- Carefully prime all seams and screws and wait until they dry completely.
- Putty the chamfers and screws. To do this, we dilute “fugenfühler” in a container in small quantities. Allow to dry and rub the edges of the joints and screws with a float.
- Putty the serpyanka itself with a Fugenfühler solution and let it dry.
Moisten the resulting strip with water and let it soak.
How to putty walls for painting - the nuances that you will encounter when puttingtying walls.
A guide to whitewashing the ceiling yourself - how to prepare the solution, what to use for whitewashing and much more.
Painting the ceiling with a roller - choosing paint, preparing the ceiling and the painting process.
So, we can confidently say that self-plastering the ceiling is quite possible, and the process itself does not cause any particular difficulties for the performer. The only requirement is accuracy and attentiveness.
Follow the above recommendations for proper puttying of ceilings for painting and plasterboard correctly and efficiently, and the result will meet all your expectations.
Types of putty for roller application and workflow
It is almost impossible to level walls that are too crooked with a roller. It is worth using it if the base is already quite flat, or if you need to make decorative cladding.
Leveling putty
For beginners, the stripping roller puttying method is ideal. It is suitable for finishing smooth plasterboard walls or well-leveled bases. First, they prepare the walls or ceiling - remove dirt, eliminate any, even small, defects and seal seams and joints. Then apply a primer and let it dry thoroughly. This step will help improve the adhesion strength of the base to the putty and bind any remaining dust, as well as strengthen the rough coating.
Then they work like this:
- dip the roller in putty and carefully roll it over the surface;
- they try to fill all the pores with material so that not the slightest dry area remains on the wall;
- after finishing 1-2 square meters of surface, take a spatula and, as it were, rip off the mortar from the wall, holding the tool at an angle of 90 degrees (this stage is needed to fill even tiny defects and leave only a thin layer of material on the wall);
- pass with a roller over the remaining areas, then use a spatula in the same way;
- Allow the material to dry; if necessary, repeat all stages of work again, but peel in the opposite direction.
For this technology, putty with a more liquid texture than usual is suitable. Solutions with a long hardening period, which are sold in finished form, are ideal for this purpose. If, after drying, small imperfections remain on the wall, they can be removed by sanding with fine sandpaper.
Decorative putty
Applying decorative materials is considered a simpler method, so even a beginner can handle it. You can work with a roller on a base that is not too smooth - all defects will still be hidden, although, of course, there should be no serious flaws.
Technology 2: applying a textured coat to the walls
This technology allows for decorative finishing. Its advantage is that there may be cracks and small flaws on the wall that do not need to be repaired, because... the texture will cover all the irregularities.
Materials and tools for performing work
To apply the putty you will need a foam or wool roller. The longer the pile (wool) or the larger the texture (foam), the greater the relief.
To make a fur coat colored, you will need a dye.
Puttying workflow
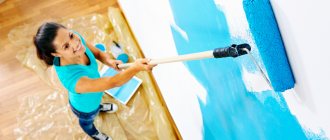
The working surface is treated with primer, wait until it dries completely, and then begin applying the textured coat. The dye can be immediately added to the putty, which will save time. Another option is to paint the wall with a spray gun after the mixture has dried.
Puttying the walls with a roller should be done from the corner (or joint) with uniform translational movements in one direction, for example, up and down or left and right. In one go, you need to immediately process the entire wall (from corner to corner).
Tool selection
To apply liquid putty you will need the following tools:
- roller;
- sponge;
- pneumatic sprayer;
- putty knife;
- palette knives;
- brushes of different sizes and shapes;
- sheets of sandpaper;
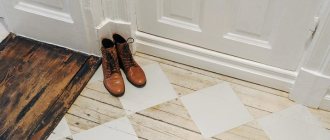
- masking tape or covering cloth to protect unpainted items;
- ladder.
Filling cracks
Applying finishing putty to a wall before painting requires filling the cracks. That is why the final coating is very rarely applied right away.
Gypsum putty is used to fill defects, dents, and cracks. First, you need to use a brush to remove dust and dirt, then cover the dent with the material. Gypsum takes a long time to dry, so you will have to wait at least several hours for complete drying. After this, the coating is smoothed with sandpaper so that there are no bumps left on it.
Is it possible to apply finishing putty to drywall if the coating is damaged? Yes, it is only recommended to seal the damage and completely cover the surface.
If the crack is large, it is recommended to scratch its surface with a small knife. This will improve adhesion, since the crack cavity cannot be perfectly cleaned anyway.
To fill minimal damage, a primer is used, the use of which is relevant in any case.
Is it possible to apply finishing putty with a roller to previously damaged walls - yes, it is possible. True, the distribution of the thin layer can be made more accurate with spatulas - the choice is up to the person doing the repairs.
Main types
The following types of putty are produced:
- Starter (leveling, putty of the first layer), intended for the initial leveling of surfaces, slopes, etc., the choice of variety is determined by the base material, the composition must have good adhesion (reliably adhere to the surface), such a solution must create a high-strength and durable coating, it is important that the material could be applied in a layer 0.25 mm thick.
- The finishing agent is used at the completion of puttying work to eliminate minor defects and scratches, the solution is applied to the surface in a uniform thin layer (about 1 mm), during processing the composition is applied several times to the well-dried previous one, the thickness of the mixture should not exceed the specified norm, if applied too much putty, the finished surface may crack.
Example of finishing putty for drywall
Based on the binder, the finished putty is differentiated into:
- gypsum, which is distinguished by its special whiteness, plasticity, is convenient to work with, easy to apply and sand, gypsum itself is able to absorb excess moisture and release it in a too dry room, and gypsum putty is able to maintain a favorable microclimate in a residential building;
- cement can be used when carrying out internal and external repair work, it is usually used for treating concrete bases, brick and similar surfaces, the material is quite moisture resistant, so it can be used when finishing wet rooms (kitchen, bathroom, etc.), the composition tolerates low temperatures well;
- polymer is recommended for use when performing final finishing work; the material is intended for filling seams, joints and any cracks that appeared as a result of exposure to water.
Return to contents
Decorative finishing "fur coat"
Novice craftsmen doubt whether it is possible to apply finishing putty with a roller. In fact, professionals often do the final puttying with this tool. This finishing option is called “fur coat”; it is the simplest and most effective way to create a decorative coating using putty.
To perform decoration, the surface must be smooth, only minor defects are acceptable. Before you begin, you need to prepare all the materials and tools that may be required:
- Putty. It is better to choose a ready-made mixture, as it will be of higher quality and also have the necessary consistency.
- Primer. This is a mandatory material that will be needed both at the initial stage and in the final part of the finishing.
- Pigment for putty. It will allow you to avoid painting and immediately create the surface of the required shade.
- Brush. Used for applying primer or putty in hard-to-reach places.
- Roller. This tool should be chosen depending on the desired effect. There are fur and foam rubber, large and small textures.
When choosing a tool, you should take into account the length of the pile: the longer it is, the more prominently the putty will be applied to the base.
The process of applying the finishing putty with a roller does not cause any difficulties. First, you need to cover the entire surface with a primer solution, then, after waiting for complete drying (at least a day), proceed to the next step - preparing the putty. Initially, it is better to make a thinner composition and adjust the density as you work. If necessary, a coloring pigment is added at this stage.
Preparing the mixture
In order not to waste time preparing the mixture, you can buy it ready-made in the store. But if there is a need to breed it, this process must be approached correctly. The main stages of this process:
- Pour water at room temperature into the bucket for mixing the solution. For 1 bag of plaster with a capacity of 25 kg, 9-10 liters of water are enough. But you should not dilute the entire dry mixture at once, especially if it has a gypsum base, which hardens quickly. To prepare the putty, it is enough to take 1/2 or 1/3 of the powder at a time.
- Gradually add the dry mixture into the water poured into the bucket, stirring it periodically using a drill mixer. As a result, a homogeneous mass should form without the slightest lumps. Particular attention should be paid to the walls and bottom of the bucket, since this is where the dry mixture, undiluted with water, is often collected.
Decorative putty with a roller
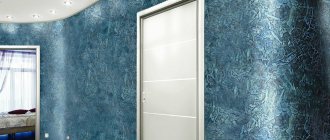
Putty, especially decorative, looks very impressive. And it seems that only professionals can do such work. But this is a fairly simple method of creative finishing. Roller putty has been used as an application technology for many years.
The surface finished using this technology looks great, which is why it has been popular for many years. Small irregularities on the surface do not matter; a flat plane is sufficient.
A primer is applied to a leveled surface, plastered or puttied, sometimes twice. When the primer has dried, the well-diluted or prepared putty is evenly distributed. Application is carried out from a corner or joint. For a small surface - from corner to corner. If you don’t want to paint it later, the composition can be pigmented to the desired shade. The roller you need to choose is fur (large texture) or foam rubber (relief). The longer the roller pile, the larger the texture and relief of the pattern.
If the putty is colored, then after drying, apply a primer, then a finishing varnish. This will prevent abrasion, dirt, and provide resistance to moisture.
Technology 3: creating a finishing texture
In this technique, puttying with a roller involves creating a finishing texture. The relief will depend on the chosen roller.
- rubber;
- fabric;
- leather;
- plastic;
- fur, etc.
You can use a homemade roller. To do this, thread is wound around the roller or wrapped in other textured material.
Required materials and tools
- relief roller;
- putty knife;
- primer;
- dye (if necessary to add color).
The entire puttying workflow
After sealing the seams and all irregularities, the wall is treated with a primer. When the base layer is dry, putty is applied. It shouldn't be liquid. The construction mixture is applied with a spatula. Its layer on the wall should be about 3 mm. If it is smaller, you will not be able to make an even impression.
After 10-15 minutes, when the putty begins to dry, you need to go over the wall with a roller. To understand whether the texture can be applied, you should press with your finger on an inconspicuous area of the wall. If the trace is not deformed, they begin to create a relief. You should move the tool evenly to get the same pattern.
When the putty dries, it is covered with primer and then painted.