A paint roller is a tool that helps speed up the process of painting walls, ceilings, and floors. But achieving the ideal result of uniformly painted walls without smudges and streaks is quite difficult if you do not know some of the secrets and subtleties of the process.
Experienced craftsmen note several points, taking into account which you can get perfectly painted surfaces without streaks
Choosing the right roller
Painting tools will differ in size and material used to make the soft part (coat). So, the larger the surface to be painted, the wider the roller must be used (maximum size 30 cm).
Depending on the paint used, a certain type of roller “coat” is selected. A tool with a soft foam part is ideal for painting with water-dispersed compositions. You should not use this tool for emulsion paint (during the application process, the paint is saturated with air, after which it lies on the wall in uneven stripes).
A roller with a velor soft part will help you get a wall or ceiling evenly painted with oil or emulsion paints.
Also, the length of the roller coat pile is selected based on the type of surface to be painted. For smoothly plastered walls, the ideal option is 6mm, for structural wallpaper - 15mm, for brick walls or concrete blocks, a tool with a pile of at least 19mm is well suited.
Secret: regardless of what material the soft part of the roller is made of, before first use the tool must be soaked in water for several hours and then dried thoroughly.
Tool selection
A significant criterion for successful painting is the choice of a quality roller:
- To paint wide surfaces, it is worth using a roller of a larger diameter and width, for hard-to-reach places - short and small tools;
- The quality and material of the “coat” are also important: polyester and foam rubber are suitable for water-based paints, fur rollers for varnish paints, polyamide and velor for alkyd compositions;
- No less important is the design of the handle. It should fit comfortably in the hand and not cause discomfort during prolonged use.
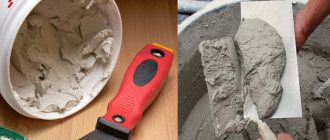
Preparing surfaces for painting with a roller
In order for the paint to lay evenly, without streaks, the surfaces must be thoroughly cleaned and coated with a primer before painting. The protective layer is applied several times.
Related article: How to store out-of-season items without spoiling the interior?
Attention: to protect plastered walls, choose only acrylic or water-based primer compositions.
Preparatory stage
To obtain uniform coloring, it is necessary to carefully prepare the surface.
- Level as much as possible and clean from dust, dirt and debris. Undesirable elements on the base contribute to the appearance of streaks and bald spots;
- Don’t forget about a high-quality primer: it allows you to make the color more even and the paint will adhere better;
- The roller also needs to be cleaned of dust and dirt, even if you just purchased it at the store. Before starting work, the tool should be cleaned with running water, wrung out and dried;
- The paint reservoir into which the roller is dipped must be clean and suitable for this type of work; dipping the roller directly into a paint can or bucket is not recommended. It is most advisable to purchase a special rolling tray with a ribbed surface to evenly distribute the composition on the tool.
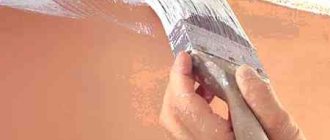
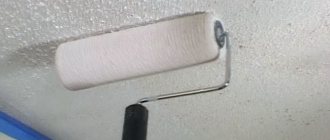
How to put paint on a roller correctly
The paint is poured into a special tray in a layer that does not cover the axis of the roller wheel. The tool is dipped in paint and rolled over a pallet. This way the roller picks up a sufficient amount of paint.
You can avoid smudges, streaks and splashes if, before painting, roll the roller lightly over the pallet, and then several times over the clean surface of the board or drywall.
Secret: paint must be added as it is used, exactly at the level of the axis of the soft part of the roller. An excessively small amount of paint, as well as chaotic movements on the painted surface, are the most common cause of unsightly stripes on the wall.
Stripes when painting walls and ceilings
Stripes when painting walls and ceilings, permanent marks from a brush/roller when applying paint overlapping
Description
This problem is similar to the Brush and Roller Streak problem.
The appearance of streaks of darker/richer color or areas of higher gloss where paint strokes overlapped during paint application.
Possible reason
- It was not possible to maintain a “wet edge” during painting. It is important that in some areas the coating was applied in two layers.
- The surface was not primed before painting.
- Staining took place at high temperature.
SOLUTION
- Allow the coating to dry completely, then replaster the surface.
- If the room is dry and hot: try turning off the heating system, cool the room, install humidifiers. Ideal conditions for painting with water-based paints: 50% humidity and 16-22C°.
- Avoid drafts.
- Use deep matte paint.
- Do not roll the roller over the surface until the paint runs out.
- If necessary, you can add up to 10% water to the paint.
- Touch up only after the coating is completely dry.
- Use proper paint application technique.
- Follow the recommendations on the label and technical documentation. description when choosing a painting tool (for smooth walls and ceilings, the height of the roller pile should be 0.55-1.5cm)
- Follow the recommendations on the label and technical documentation. description according to the corresponding thickness of each layer.
- Follow the recommendations on the label and technical documentation. description according to the relevant weather conditions.
- Prime porous surfaces.
- Follow the “wet edge rule”. When painting, apply each subsequent stroke to the wet edge of the previous one. Thanks to this application technique, the paint will spread evenly and the coating will look uniform. Work in small sections, scheduling breaks near places such as windows, a door, or a corner.
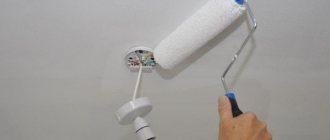
Application Technique:
- It is better to prime the ceiling several times until the ceiling becomes almost mirror-like and uniform, not forgetting about drying breaks.
- Adjust the lighting in the room so that the freshly applied strip of paint is clearly visible.
- The telescopic handle should allow you to cover as large an amplitude as possible; if necessary, you can work with two people.
- Get everything out of the way so you don't waste extra time.
- Avoid drafts.
- If possible, install humidifiers.
- Roller – 0.95 cm microfiber.
- If necessary, dilute the paint by 10%.
- We dip more often.
- The goal is not to roll it thinner, but to grab more, so we don’t roll it 100 times in one place, we use the “wet edge” rule.
- As we saw that it rolled out well (3-4 strokes no more), we moved on.
- Don't skimp on paint.
SYSTEM
Inside Outside
SOIL for interior work / SOIL for façade work
Prime Peel Bonding Primer/Prime Peel Bonding Primer
Recommended Topcoat/Recommended Topcoat
Reapply the same or better quality/Reapply the same or better quality
Eminence/A-100
ProMar200 Flat/Duration Exterior
Solo/Solo
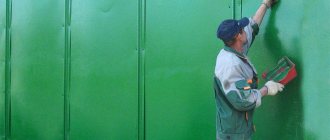
We follow painting technology
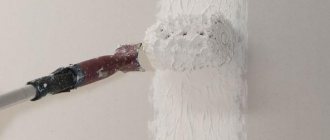
Experienced craftsmen advise, before starting work, to roughly divide the wall into sectors, and paint the upper, right corner first. The paint is applied in several layers. The first time with vertical stripes, the second with horizontal, and then again with vertical stripes.
Important: during the painting process, do not put too much pressure on the roller. All movements must be smooth and careful. It is necessary to avoid chaotic strokes to prevent streaks from appearing on the wall.
Following the advice of experienced craftsmen, painting walls with a roller can be turned into an exciting activity with high-quality results.
DON'T PAINT THE WALLS WITHOUT WATCHING THIS VIDEO (1 video)
Painting walls with a roller (11 photos)
"Square" technique
Professional painters often use this method to obtain an even color without streaks or streaks. Its essence lies in the conditional division of the surface into squares. Each square is no more than five roller widths. When painting walls, work should start from the top squares, dividing each into five stripes.
Staining is carried out in the following sequence: first the second and fifth stripes, then the fourth, first and third. The next layer is applied in reverse order. Thus, the entire surface is painted. Next, the squares are “connected” with stripes of paint. An important condition for such equipment is the speed of work and the absence of long breaks.
By following the recommendations described above, you can achieve an even tone of the painted base without bald spots, stripes and stains.
Painting in two layers - first layer not dry
The most common situation. Usually, when something is painted with a second coat, they try to make it smooth, but here it’s the opposite. The fact is that the paint, looking frozen and not pressing through, is not ready for the second layer. If you do not wait the required time (usually 24 hours), the top coat will slightly dissolve and soften the base, causing streaks to appear.
Solution: wait for the time specified in the instructions.
Stains and stains on the ceiling after painting: what is the reason and how to fix it?
dated December 7, 2014
Probably everyone who has had to do their own repairs has at least once encountered the problem of uneven painting. It seems that he tried hard, selected paint and tools, prepared the base, and the result was stains and stains, clearly visible in bright daylight. The “saving” thought immediately comes to apply a second layer. However, this, as a rule, does not solve the problem, but, on the contrary, aggravates it. Make at least five layers - it won't do any good. Stains and stains will become even more noticeable. What is the reason for the failure? How to fix the situation? What rules for painting the ceiling will allow you to avoid streaks and stains?
Bad paint
“Bad” materials include not only the cheapest ones, but also those with expired shelf life. Yes, paints have a shelf life, albeit a long one. But it decreases after opening and can be up to a year. If the expiration date has expired, the paint may either not harden or, as in our case, streaks may appear.
Important! After the expiration date, many paints emit toxic fumes.
Solution: do not use old materials and carefully inspect the jars before purchasing them for opening.