Each construction or renovation work must be approached with full responsibility. For example, if you want to paint the ceiling in a room, it is best to use a roller. With its help, you will be able to cover the surface with a high-quality finishing composition, without leaving any streaks or unsightly smudges. To do this, you need to know which rollers are best for painting ceilings so that the process goes faster and the result is of high quality.
Ceiling preparation
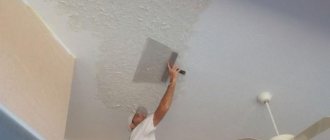
To repair a ceiling, you must first identify all its shortcomings and understand how to work with it. One of the most common situations has the following signs: the plaster has crumbled abundantly, there are noticeable darkenings in the corners, and the ceiling itself has practically no differences in height.
In this case, preparing the ceiling for painting will consist of the following steps:
- First you need to remove the old coating. If the ceiling was previously covered with whitewash or plaster, then the ceiling will need to be cleaned. To do this, the ceiling is moistened with water and left in this state for some time.
- When all the water has been absorbed into the coating, you need to scrape it off with a metal spatula. The need for preliminary wetting with water is due to the fact that in this case the coating peels off from the concrete floor much more easily. In the case of wallpaper, the technology will look the same, but you will have to remove not only the wallpaper, but also the glue that held it in place.
- If the ceiling was previously covered with a water-based composition, then not only water will be required, but also wind - the room will need to be exposed to a draft after wetting the ceiling. The combination of water and air will swell the emulsion, making it much easier to clean up. An alkaline solution with soda is best suited for rinsing.
- After cleaning the ceiling, you can proceed to the next stage of work - applying a primer with an antiseptic. Today, there are many variations of primer compositions - for example, some of them contain chlorine, which is an excellent antiseptic. However, such compositions do not fully perform their functions for long. When choosing a primer, you must make sure that it is compatible with the paint used to cover the ceiling.
- When the base layer of primer has dried, you need to cover it with a primer - a polymer primer that improves the quality of the coating. The standard technology for this stage consists of applying the first layer of starting putty, sanding, another layer of starting solution, finishing putty and final sanding, during which you need to level the surface of the ceiling to a perfectly smooth state.
Having completed the preparation of the ceiling, you can begin painting it with water-based paint.
Buying a roller and tricks for using it
Having decided on the material and properties of the tool, you can go to purchase it. However, there are several more factors that you should pay attention to already in the store. First of all, carefully inspect the working device. It is very important that the pad of the roller is the same along its entire length. Threads and fibers should not stick out from it in different directions. The handle of the tool must be in perfect condition, without any cracks or other damage. When inspecting the device, you should not see any seams on the pad. In addition, its surface must be smooth across its entire width, without bulges or dips.
To determine the quality of the tool, you need to squeeze the pad tightly, hold it a little and release it. It should immediately return to its original size and shape. In addition, you will need to check the quality of the attachment of the pad to the axle. To do this, twist it - if you did not notice any play while moving, then you can confidently buy such a device. Choosing the right tool for the job is half the battle. You also need to be able to work with it correctly. First of all, the tool pad must be evenly dipped into the paint. Make sure that the composition is properly distributed over the entire surface of the instrument! Try to roll the composition over the coating as evenly as possible. Only in this case will the paint adhere correctly to the ceiling.
Do not roll out the pad of the tool anywhere. You will end up leaving unsightly splatters and ruining the surface. You only need to roll out the paint in a paint tray. This way you won’t lose the composition and use it to the last drop. If you start painting the ceiling, then you should not take a device that is too large and heavy for this purpose. To purchase a roller of the appropriate size, you need to approximately compare your physical capabilities, the weight of the tool and its productivity, as well as the ceiling area. Having done this, you will probably buy a lighter tool with which you can paint fairly large areas without effort.
Features of water-based paint
Since in most cases water-based paints are used to treat the ceiling, it is worth considering their features in order to know how to work with them. The material is really very good - it does not smell, can be cleaned with wet water and is easily applied to the surface of the ceiling, as a result giving it a rather attractive appearance.
In short, the main advantages of water-based compositions can be reduced to the following list:
- Environmentally friendly composition - the paint does not contain synthetic and toxic impurities;
- The paint has no characteristic odor;
- After application, the paint forms a uniform coating, i.e. we can talk about the high visual qualities of the material.
Water-based paints are classified depending on the main component into the following types:
- Acrylic;
- Silicate;
- Silicone;
- Mineral.
Each option has its own characteristics. For example, after hardening, acrylic paints are almost impossible to wash off - they contain adhesive and latex components that improve adhesion to the ceiling surface and ensure its waterproofness.
In turn, silicone paints are resistant to temperature changes, without losing the other advantages of water-based paints. This material is excellent for finishing surfaces in kitchens and bathrooms.
Quality check
Before buying a paint roller, you need to make sure of its quality. First of all, we inspect the joints of the seams of the material.
They should be practically invisible. After all, they directly affect the quality of painting. If your choice is pile material, it is checked according to several characteristics:
- Try to pull out the fibers; they should be tightly seated on the frame. If they remain in your hand, this is a low-quality roller.
- Invisible seams.
- The previous two points will determine how well the tool absorbs paint and the quality of the finished coating.
Thanks to these methods, you can choose a decent roller.
Choosing a roller for water-based paint
To work with water-based paints, you need the appropriate tools. Such a tool is a roller - and you need to be very careful when deciding which roller is best to paint the ceiling with. The main goal when choosing a roller is this: a good tool should have long and soft bristles made from natural materials.
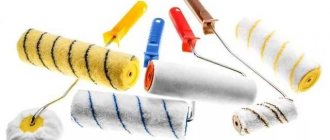
It is worth considering the classification of rollers in order to understand the differences between the main types of such tools:
- Fur or velor
. Such rollers show excellent results. The material captures exactly the amount of paint that is needed for its normal application. The disadvantage is the cost - fur products are more expensive than their foam and nylon counterparts. - Painting
. Rollers in this category have a high degree of absorption, so you have to dip the tool in paint much less often. The most noticeable drawback is that if you press too hard on the roller, the paint will come out of it. There are situations where this shortcoming turns out to be critical. - Long-haired
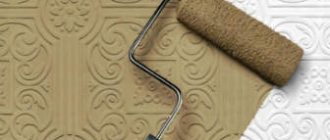
. Such products use long pile, the rigidity of which is ensured by an woven metal thread. Rollers with long pile are expensive, so they are used relatively rarely. - Embossed
. Relief-type rollers are designed for applying paint in a specific pattern. Such rollers have a fairly narrow specialization, so they are used extremely rarely. - Foam rubber
. Rollers made of foam rubber are quite cheap and simple, but they are not used for painting ceilings and walls due to uneven paint application. The main area of application is the protection of indoor pipelines. - Terry
. Quite simple and affordable rollers. However, they are used only for working with synthetic compounds.
When figuring out which roller is best for water-based paint, you need to take several parameters into account. For finishing large and flat surfaces (and the ceiling is such a surface), it is best to use wide rollers. It is also worth paying attention to the weight of the product - the smaller it is, the easier it will be to work with such a tool. There are no special requirements for the handle - they are always quite comfortable, which is achieved due to the correct shape.
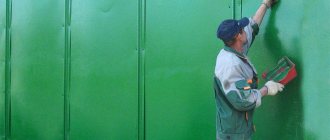
The size of the roller directly depends on the area that needs to be painted. The point here is not only in the speed of work, but also in its quality - reducing the number of strokes will create a more uniform coating. Most often, paint rollers are used to finish the ceiling, and small brushes work well for painting corners and awkward areas. You don’t have to think for long about which roller to paint walls with water-based paint either - the rules for choosing a tool come down to the same points as in the case of ceilings.
There are three standard roller sizes:
- Small – no more than 100 mm;
- Medium – from 100 to 200 mm;
- Large - from 300 mm.
There is no clear answer to the question of which roller is best to paint the ceiling. However, the most popular option is medium rollers, which are great for most situations. However, if you need to paint a large area, you can always purchase a larger roller.
In any case, if you use long-pile products, you need to squeeze them out properly and make sure that the pile does not fall out. However, with proper use, the rollers can last quite a long time.
Polyamide or velor instruments – where to use them?
A great advantage of velor is its ability to resist aggressive components of paints, solvents and varnishes. Rollers made of this material are equally good for use with different coatings. Velor rollers are often used for painting ceilings with emulsion. Such instruments do not have any significant disadvantages. The only negative is the ability to quickly absorb paint, so the roller will have to be regularly lowered into a container with the composition.
Polyamide roller
Polyamide instruments are made from textiles. In this case, the cushion pad is stitched with strong threads. Devices of this type are popular among specialists, as they are excellent for applying enamels and varnishes. A polyamide roller also works well for acrylic paint. When working, you need to be extremely careful, otherwise the coloring composition may fly apart.
To summarize, we can say that for painting the ceiling it is best to take a roller with medium pile, as well as a polyamide or velor tool. A device with a velor pad absorbs a large amount of paint, so working with it can turn into a real torture.
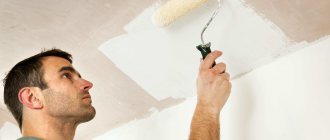
Ceiling painting technology
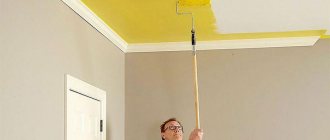
Regardless of which roller you use to apply water-based paint to the ceiling, the finishing of the latter must be done correctly, because the quality of the coating and its decorative properties depend on this. You need to apply the paint in several layers, with the last one applied in the direction away from the window - this allows you to mask small errors. In addition, each layer should be applied in one pass, so that areas with different colors do not appear in the future.
You can check the uniformity of paint application by looking at it at a slight angle. If you look closely, you won’t be able to notice the difference, but if you look at it from an oblique angle, all the problem areas will be in plain sight. To remove fresh deposits, use a dry sponge. Of course, after this you need to paint the area again. After applying each layer, you need to wait until it is completely dry and only then continue working.
The painting technology itself is as follows:
- The roller is moved in one direction and paints the entire surface of the ceiling in stripes;
- The next layer will be applied perpendicular to the previous one;
- Then these operations are repeated as many times as required layers of paint.
The movements of the hand with the roller when painting should be slightly zigzag. Each subsequent stroke should overlap the previous one by 2-3 cm. You should try to make the layers as thin as possible. For uniform painting, you can purchase several rollers and change them each time you apply a new layer.
It is also worth using a number of recommendations that can significantly simplify the process of painting the ceiling:
- The work is best done with an assistant, whose role is to observe from below the quality of the painting. Often, when applying the first layer, noticeable spots appear that need to be covered with a liquid paint solution.
- The ceiling must be prepared very carefully before painting. As a sanding tool, you can use fine sandpaper mounted on a wooden block. If you have little experience, you should practice on surfaces that will not be so noticeable.
- Only one brand of paint can be used for painting. If the paint has frozen several times, or if there are noticeable lumps in it, then it is better not to use it, but to purchase a new one. The composition used must be stirred before use so that it is extremely homogeneous.
- Some types of paint are not suitable for use in certain conditions - for example, low humidity. If there is an inscription on the can of paint that says this, then such a coating is not suitable for kitchens. You can also find paints that are resistant to dry abrasion - and these should be preferred because they are the most reliable. Paint that has not yet cured should not be exposed to drafts, otherwise the coating will peel off as a result.
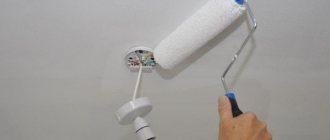
- Before painting, you need to figure out which roller is best to paint the ceiling with paint. The best option is rollers with long retractable handles - then you don’t have to bother with stepladders, ladders or tables. You need to make sure in advance about the quality of the roller you are using - damaged or deformed products are not suitable for the job. Immediately before painting, the roller must be rolled out in a paint container or on some material (but not on the ceiling surface).
Read also: How to properly glue two colors in the living room
It is worth noting that in some models of this tool the material itself can be removed from the nozzle, that is, it is time to replace it.
You can really check this by the presence of seams; if there are none, it means that the material is glued on and cannot be replaced. If seams are observed on the surface, this means that it is advisable to remove the material and replace it with a new one. As a rule, natural materials are removed.
The nozzles come in different sizes, their length can vary from 4 to 40 centimeters. The longer the length, the better and more efficient the work with the tool, but do not forget that painting the ceiling with a very long nozzle will be inconvenient, so you need to choose something in between.
The diameter of the nozzle also plays a significant role; the larger the better. The fact is that a nozzle of considerable diameter rotates much more slowly, and therefore the paint will splatter less.
The method of attaching the nozzle plays a rather important role. As a rule, nozzles with a shell up to 8 millimeters thick are secured using special couplings.
Thicker ones are attached using a special frame system. It is also possible to come across a tool that does not have the ability to remove the attachment. As a rule, this is a tool from the cheapest category; after wear of the bearing part, you can throw away the nozzle along with the handle.
What is the best way to paint the ceiling? In this case, the most suitable tool is one in which the attachment is attached to the handle using a special coupling. This type of tool is convenient to use, painting efficiency will increase, and after wear of the bearing part, the nozzle can be simply replaced, which will save costs.
It is worth noting that there are quite a few designs of this tool.
For example, three nozzles can be put on one handle at once; this design is perfect for painting various pipes. In order to handle corners, a hexagonal nozzle is perfect; naturally, this model is in no way suitable for painting flat surfaces. There is also a model equipped with an automatic paint supply mechanism; such a tool is certainly convenient, but not for working at heights, since it is not compatible with extension cords.
Whatever the painting tool, the best design for the ceiling remains the usual one, that is, the nozzle has a cylindrical shape; there should be no additional devices. The material you need to choose is either foam rubber or fur; foam rubber is best.
Natural drum upholstery
Sheepskin is used as a natural fur coat. This upholstery is the best choice for working with surfaces of any complexity. All types of paints are well retained on sheepskin, which allows for high-quality work with minimal consumption. Another advantage of natural fur coat is its long service life. When painting a ceiling with water-based or acrylic paint, a sheepskin coat will be the best choice.