To maintain heat in the house, a method of insulating its walls with polystyrene foam is used. This method allows you not only to retain heat in the winter, but also to keep the room cool in the summer. Reinforcing the foam with a mesh, in turn, protects the foam from various mechanical damage and the effects of climatic conditions. It will help extend its service life and prepare the surface of the foam for further finishing.
Technological features of foam reinforcement
The process itself involves the creation of a protective reinforcing layer. The barrier prevents the destruction of foam due to exposure to ultraviolet radiation, precipitation and other external factors. The reinforced surface requires further finishing, which is performed in different ways, depending on the location of the work and functionality.
The sequence of insulating surfaces by attaching foam plastic is performed in the following order:
1. Preparing the surface for installation of insulating boards (cleaning off dirt, sealing cracks and holes, dismantling protruding decorative elements).
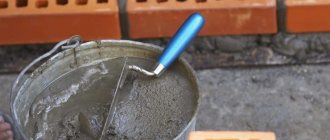
2. Mixing the adhesive solution.
3. Attaching the starting profile.
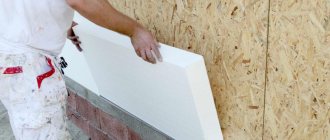
4. Laying the slabs on the surface with minimal gaps. The rows are laid out in a checkerboard pattern.
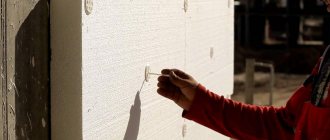
5. Installation of polystyrene foam boards with special dowels is carried out only after the glue has completely dried. It is possible to use 5-6 fasteners per sheet.
6. Sealing joints and seams using sealant and polyurethane foam.
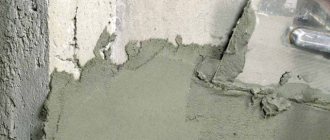
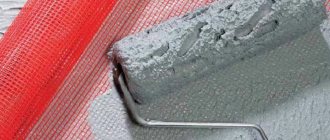
Next, reinforcement is performed. The process does not require haste, so it is worth considering all the nuances. For the work you will need a reinforcing mesh with a mesh size of 5 mm. For outdoor work, it is recommended to use a product with a density of 140-160 g/m2. A denser mesh will better level the surface. The first layer of the mixture is 2 mm, after which the mesh is laid and pressed against the foam with smoothing movements. It is recommended to use an adhesive composition special for polystyrene foam, and not the one used for installing polystyrene foam or ceramic slabs.
How to plaster polystyrene foam with mesh: step-by-step work
The entire workflow consists of the following steps:
- Preparatory work. Selection of materials, tools and leveling of the base.
- Preparing the plaster mixture and fixing the reinforcing mesh.
- Rubbing plaster.
- Priming and leveling the plaster layer.
- Final decoration of the walls.
To ensure quality work, each item needs to be considered in more detail.
Necessary tools and compositions
Initially, before plastering, you need to acquire a number of the following tools:
- a container for the mixture and a drill with a special attachment for mixing it;
- glue, knife and reinforcing mesh for fixing to walls;
- primer and roller or paint brush for applying it;
- plaster and spatulas of various sizes;
- sandpaper or sanding machine for rubbing the mixture.
To process polystyrene foam, you need to use special plaster compounds. The final result and service life of the thermal insulation material will largely depend on their choice. Facade plasters for polystyrene foam come in 2 main varieties:
- Mineral. They contain cement and sand. They are distinguished by their affordable cost, but also their relatively low durability. 2-3 years after application, surfaces treated with mineral plasters become covered with cracks.
- Acrylic. They have high adhesive and protective qualities, and also have the possibility of textured finishing, for example, with bark beetle. Unlike mineral plasters, their cost is higher, but these mixtures have a longer service life. One significant drawback of acrylic compounds is fading, which occurs under the influence of ultraviolet rays.
Alignment of walls
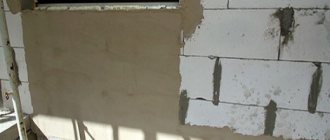
Before plastering the foam, you need to make the base level. The joints between adjacent sheets of insulation should be located at the same level. It is quite simple to make sure that they are even by running a rule or a wide spatula along the wall.
Note! Leveling the rough surface should be carried out immediately, since in the future it will be very difficult to eliminate this defect with a layer of plaster mixture.
It is important to fully seal the seams between the foam panels - all these places must be sealed. In addition, it is necessary to cut off excess polyurethane foam. After leveling the walls, it is necessary to clean them from dirt.
Important! Polystyrene foam is a fairly smooth material to which the adhesive composition weakly adheres, which is why it is recommended to first increase the level of adhesion. To do this, you can use a needle roller and go over the walls with it. As a result, the plaster will adhere much better to the small pores that have arisen.
Preparing the mixture
You can give preference to ready-made formulations or those that need to be prepared. In the first case, the products of Ecomix and Ceresit have proven themselves to be excellent. It is advisable to carry out the work using plaster from one manufacturer. A good solution is to use a universal composition for polystyrene foam, which is suitable not only for fixing the material to the walls, but also for creating a protective coating on its surface.
Note! Some manufacturers produce mixtures of two types: one for securing insulation boards, and the other for their external processing.
If you need to prepare the solution yourself, then you should follow all the recommendations specified in the packaging instructions. Basically the process occurs in the following sequence:
- Initially, you need to add a small amount of water to the container. After this, you need to pour in the dry solution. During further mixing, water should be added regularly until the mixture reaches optimal thickness.
- The composition should sit for 5-10 minutes, and then it should be mixed again.
Important! To open 1 sq. m of reinforcing mesh requires about 4 kg of plaster. When leveling the walls, about 6 kg is required. In addition, craftsmen recommend attaching the plaster mesh with a slightly thinner solution than the manufacturer specifies. In this case, the composition penetrates the pores of the foam an order of magnitude better.
If you use cement-based plaster, then you don’t have to worry about its rapid hardening and initially prepare a larger amount of solution so that there are no long interruptions during application.
Note! The tool used to mix the plaster should be thoroughly washed after preparing each portion.
To prepare the mixture, you must use only clean water so that no harmful elements get into it.
Fixing the plaster mesh
Its installation allows you to increase the strength of fixing the mixture layer to the walls. If you apply plaster to polystyrene foam without a mesh, then soon enough it will become covered with cracks or even fall off. Its use prevents the likelihood of such negative consequences.
When carrying out external work, it is better to choose a mesh with a higher density, since the plaster mixture fits better on it, but it should be borne in mind that in this case it becomes more difficult to process the corners. A suitable option is a material with a density in the range from 130 to 160 g/m2. m. It is advisable to give preference to a mesh that can withstand the effects of alkalis, which is important for further contact with cement.
Initially, you should finish the corners, as well as door and window slopes. In the first case, the work must be done as follows:
- Reinforcement of corners with mesh is necessary in strips 30 cm wide. The length of the material should reach the length of the slopes. When processing the corners of buildings, the mesh should be cut into strips of about 1 m.
- Then the material needs to be bent in the middle.
- At the next stage, using a wide spatula, you need to apply the solution to the wall. The length of the strip should reach the length of the cut mesh, and the width should exceed 10 cm (5 cm should be left on both sides for overlap).
- Next, the material should be applied to the corner and smoothed out using a spatula. The tool must be moved from top to bottom, as well as from the center to the edge. The mesh should be fully embedded in the plaster.
Its fixation on the walls is carried out as follows:
- The first step is to cut the mesh into blanks. The length of each of them should be no more than 1 m. You can cut it into larger pieces, but in this case the work should be carried out by several people, since it will be difficult alone.
- Next, you can begin to sequentially fix the mesh. It is best to do this in small parts, since the solution dries quite quickly.
In accordance with the size of the workpiece, you need to apply the mixture to the surface using a spatula. - Next, the workpiece must be applied to the treated area, pressed and leveled with a tool. Next, the mesh must be fully fixed using smoothing movements. If it is not completely drowned in the solution, then an additional amount of plaster should be applied to it with a spatula and leveled again.
Note! The workpieces should not be opened completely with the mixture, leaving about 10 cm for gluing the joints.
- In this way, it is necessary to process the entire surface of the walls, observing the offset to the side, as well as fixing the mesh with an overlap.
The joints must be processed upon completion of the work, but they should not stand out against the general background.
Rubbing the plaster mesh
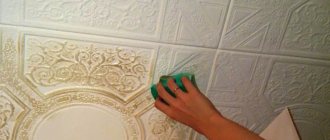
After the mixture has completely hardened, grouting should be done using a plastic float or emery cloth. In hot weather, drying occurs in 2-3 hours, and in cloudy weather it lasts at least a day.
Rubbing must be done in a circular motion in a counterclockwise direction. If uncured plaster mixture gets on the emery cloth, it must be replaced with another one. Only after complete completion of this stage can you proceed to the next one.
Priming and leveling surfaces
This work must be carried out as follows:
- Initially, you need to apply the solution onto a large spatula (at least 35 cm) with a smaller one.
- Next, you should treat the walls with the composition using smooth movements. With previously qualitatively perfect rubbing, a 2 mm layer of plaster is optimal to level the surface.
- The joining line of the leveling coating should not coincide with the area in which the mesh joints pass. In this case, the seams stand out less against the general background.
- Once the plaster mixture has hardened, it must be rubbed. It is better to start this stage no later than 4 days after treating the walls with a leveling layer, since otherwise the solution will dry out and an order of magnitude more effort will be required.
- Then you can start applying the primer.
For this purpose, antifungal compounds that prevent the occurrence of mold are a good option. The tool you should use is a roller with short pile or an ordinary one made of foam rubber. This stage should not be excluded, since during application the mixture absorbs excess material after rubbing and increases the adhesion of the finishing and leveling coating.
After the primer has completely dried, you can begin the final decorative finishing.
Finishing walls
Decorative finishing is the last stage. On the outside of the building, special facade plasters should be used that can withstand temperature fluctuations and changeable weather conditions. The qualities of such mixtures largely depend on the type of binder and the presence of additional elements. For this task, acrylic, mineral and silicate plaster compositions are used.
Application of decorative plaster must be done in the following sequence:
- The first step is to prepare the composition in accordance with the instructions.
- Applying plaster. Before completing this stage, you need to plan actions taking into account the selected mixture. The thickness of one coating should not be more than 4 cm. The next layer can be applied only after the previously applied one has completely dried.
- Mashing. You can begin this stage when the coating is half dry and can still be adjusted, but is already holding well on the walls. Giving a special structure to the facade can be done using a special roller or grater.
Note! Façade plaster should only be applied under suitable weather conditions as specified by the manufacturer.
Having learned how to plaster polystyrene foam with mesh with your own hands, observing all the nuances and the correct sequence of actions, you will be able to complete the work efficiently and avoid a number of possible mistakes that can significantly reduce the service life of both the plaster mixture itself and the insulation.
Video:
Tips/recommendations for carrying out work
• Apply a layer of adhesive mixture to the foam using a wide spatula. The composition should not be distributed under the comb, as a thick layer will form. Subsequently, it will be more susceptible to cracking and deformation.
• Smooth the mesh placed on the glue with a wide spatula. All internal and protruding corners are pre-processed by installing metal perforated blanks.
• The recessed mesh is usually poorly covered with glue, so another ball of the mixture must be placed on top of the fixed mesh.
• To prevent the formation of cracks due to the application of a thick layer of adhesive solution, experts recommend covering the reinforcing mesh in two stages with intermediate drying.
• The ideal time of year to carry out façade insulation work is early autumn. At other times, it is recommended to focus on average air humidity and temperature indicators in the range from +5 to +25 degrees. The temperature regime determines the drying time of the treated surface (at +20° - 1 day, at +5° - up to 3 days).
• The foam sheets are laid from bottom to top, while the mesh is attached from top to bottom.
• Irregularities on the wall are eliminated by applying a slightly larger layer of plaster. Small differences can be removed with a grout mesh.
High-quality work will maintain the presentable appearance of the facade for more than 35-40 years.
Types of reinforcing mesh
Fiberglass meshes that are used for reinforcement are divided into:
- painting;
- façade;
- road.
Types of mesh
To perform facade work, a mesh is mainly used to reinforce foam plastic, the density of which is from 145 to 265 g/m2. This type of material can provide:
- reliable reinforcement of surfaces during plastering and puttying of surfaces both when performing internal and external work, including the process of thermal insulation;
- reinforcement of waterproofing of roofs or floor slabs;
- imparting strength to the flooring when using self-leveling mixtures;
- giving strength to the base for ceramic tiles;
- an additional reinforcing layer of the basement room, after which it is plastered or finished with another type of finishing.
In addition to the reinforcing mesh, elements such as plastic corners, drip edges, and elements for strengthening foam junctions to window and door openings are recommended during the thermal insulation process.
Types of facade mesh for plaster and its installation
A special façade mesh is used as a protective material for exterior work. It serves directly to fasten the plaster mortar and is generally used in various finishing works. Most often, facade mesh is used for fastening reinforced plaster and waterproofing, for restoration work with plaster and for sealing joints or corners.
Thus, small cracks do not appear on the surface, and the mechanical strength of the finishing material increases significantly. This is especially true for large and high-rise buildings.
In modern installation work, in addition to the facade mesh, special loads are laid, which are necessary to ensure that sudden temperature changes do not adversely affect the integrity of the finishing layer. So, currently available are fiberglass mesh, metal, plastic and fiberglass mesh.
Advantages of facade mesh and plaster
In order for the facing work to last a long time and have an attractive appearance, it must be done correctly. This concerns not only the quality of building materials, but also the execution technique. Thus, meeting all the requirements, the end result is high-quality work for many years.
The advantage of facade plaster is that it looks pretty good, is ideal for various installation options and does not require restoration for a long time. As for the façade mesh, in this case all the advantages are obvious. This:
- additional protection of the plaster from possible cracks;
- fastening joints and small cracks on walls;
- ease of working with different finishing mixtures;
- fiberglass mesh facilitates convenient leveling of the plaster layer;
- promotes the passage of air through the walls;
- Fiberglass mesh does not decompose when exposed to various alkaline components.
Technique for laying façade mesh
Before laying the facade mesh, you need to first prepare the surface. Regardless of the building material, the walls must be prepared, be it brick, slabs or cinder block.
Installation work is carried out in turn:
- if possible, the walls are treated with Karcher and dried for several hours in good weather;
- all greasy stains are treated with a special degreasing solution;
- all irregularities and small cracks must be covered with ordinary starting plaster, which is the immediate first layer;
- after drying, you can apply a second layer of plaster on top and immediately put a façade mesh on top of it;
- the final work consists of finishing leveling the wall using special building mixtures.
This technology is not complicated and the most important thing is that it is of high quality. Decorative plaster is held in place by the façade mesh, so we can say that these two materials are designed to work in tandem.
What other mesh options are there?
In addition to the fact that there is a special facade mesh, construction stores offer an even wider range of similar meshes for cladding work. Whatever reinforcing mesh you choose, it should in any case serve as a fastening base.
In construction stores today you can also find special fiberglass meshes that are used for cladding work. In addition, it is worth noting that such fiberglass mesh is very durable and can be used to correct fairly deep cracks. As for the comparative indicators of the strength of conventional facade mesh and fiberglass, their positive features are on par.
Modern building materials also include fiberglass mesh and metal mesh, which are used directly in cladding work for the facade. This mesh is especially often and widely used in large-scale construction projects, as it is distinguished by its strength, durability and ease of use.
The advantages of this grid are that:
- like fiberglass mesh, metal is resistant to severe frosts and sudden temperature changes;
- prevents cracks;
- Fine-grained and coarse-grained are available for sale, which is very convenient for choosing large-scale works and small-scale works;
- widely used for fixing self-leveling floors;
- fine-grained mesh can be used for cladding interior walls.
Choosing adhesive for facade mesh
In addition to the fact that the facade mesh is applied directly to the plaster, it can also be glued with a special glue. This glue has many positive aspects compared to other building materials for facing work. It is frost-resistant and is not afraid of sudden changes in temperature, and is also not susceptible to exposure to high humidity.
This glue does not contain components harmful to the human respiratory system, so it can also be used inside a residential or office space. But in any case, the surface must be pre-prepared. The surface must be dry, free of grease and free of any other large cracks.
It is recommended to use the finished glue within two hours after mixing to avoid premature drying. It is worth remembering that after applying the first layer of glue, you need to wait a certain time if re-application is required. Each layer should dry on average for at least a day.
In order for the glue to hold the façade mesh well, it is recommended to follow some rules:
- the temperature outside should not be below five degrees Celsius;
- each subsequent layer of facade adhesive is overlapped and also touches the facade mesh;
- The glue must be applied evenly and not in a very thick layer, otherwise premature cracks may simply appear.
What should you watch out for?
At the moment, there is a huge selection of different meshes and, in particular, different manufacturers who can offer fakes, regardless of whether it is a fiberglass mesh or a metal one. Therefore, if there is a need to choose a facade mesh and lining with various facing materials, then it is best to consult with professionals.
If this is not possible, then it is necessary to take into account the stability of the grid itself against various influencing factors. It is also worth paying attention to the integrity of the grid itself. It should not be torn and at the same time it must have even seams. If during the inspection any defects were revealed, then it is best to choose another option.
This is especially true for fiberglass mesh, which requires more gentle handling compared to metal mesh. Fiberglass mesh itself is quite durable, but unlike metal mesh, it requires more careful handling.
Facade mesh for plaster: its types and application technology In order for the plaster to stay firmly on the walls of the house, not crack or swell, it is necessary to use a special facade mesh for plaster. Its types...
FOAM REINFORCEMENT – WHAT IS IT? Reinforcement is the improvement of the properties of one material by combination with another material. Reinforcement of foam plastic is carried out in order to give the foam layer more wear-resistant properties. When is foam reinforcement required? For example, we bought a new house and have the desire and opportunity to turn such a house into an attractive, cozy home. We also need the operation of such a house to be as economical as possible. What do we do to make our dreams come true? First of all, we insulate such a house. We insulate with polystyrene foam. Insulation of external surfaces (walls) of buildings with foam plastic is a technology that appeared in Russia relatively recently. This technology appeared recently, but already has significant popularity in Russia. This is explained by the fact that we have many buildings that need to be restored, reconstructed, and insulated to save energy resources, which, in turn, tend to rise in price. While insulating the external surfaces of walls with polystyrene foam is an inexpensive procedure, it allows you to change the appearance of an old house and insulate it so that heating such a house in winter and air conditioning in summer will be tens of times cheaper. So, we covered the surfaces of the walls with foam plastic, the next stage is foam reinforcement. We reinforce foam plastic to protect against: mechanical damage, exposure to climatic phenomena, etc. Reinforcement of foam plastic significantly extends the service life of foam plastic as insulation. Reinforcement of foam plastic involves applying reinforcing material to its front surface. The reinforcing material for polystyrene foam is fiberglass mesh. The mesh for reinforcing the foam plastic that serves as insulation for the house is made of fiberglass. The reinforcing mesh is strengthened on the surface of the foam plastic with special facade mixtures. Reinforcement of foam plastic (insulation) allows you to increase the strength and rigidity of the foam depending on the use of reinforcing materials. Reinforced foam plastic will serve as an effective insulation for as long as the house lasts, but on the condition that all operations (insulation, reinforcement) will be carried out strictly according to the technology for carrying out these operations. Reinforcement of foam plastic can be carried out mechanically by manually applying reinforcing materials to the surface of foam plastic already fixed on the wall, or you can buy foam plastic already reinforced for insulation of walls. Reinforced foam is made using special equipment.
The need for plastering foam plastic
Even despite its many positive qualities, when mechanically or directly exposed to sunlight, this material dries out and begins to deteriorate. During plastering of polystyrene foam, it is possible to solve a number of the following problems:
- Protect the insulation from mechanical damage. Due to its fairly high fragility, a hole may appear in it upon impact. Applying plaster avoids the formation of dents and other damage to the outside of the foam.
- Protect the material from moisture penetration. Polystyrene foam does not absorb water well and dries too slowly. When exposed to moisture for a long time, it loses its own thermal insulation qualities, without which the insulation becomes less durable.
- When plastered, the foam acquires protection from the negative effects of ultraviolet rays.
- Increased fire resistance. Plaster prevents the material from igniting.
Foam reinforcement - detailed instructions and video
In the material: technology of foam reinforcement during facade insulation. The article discusses the main nuances of the process, provides detailed instructions, as well as a video of the work being performed.
Probably no one will argue with the fact that today the most popular way of insulating a house is insulation using polystyrene foam. And this is not surprising, because thermal insulation of the facade of a house using polystyrene boards is the simplest, fastest and cheapest option for insulating a home.
However, today we will not talk about the entire technology of facade insulation, but only about one of the components of the technological process - foam reinforcement. I recommend that you first familiarize yourself with the following materials (so you can get a more complete picture of the process in question):
- Insulation of facades - brief instructions;
- Reinforcing fiberglass material;
- Fastening foam plastic to the wall with dowels.
So, why is it necessary to reinforce polystyrene foam with mesh? Everything is very simple. Firstly, thanks to this, the strength of the entire thermal insulation significantly increases (the surface of the facade to which the foam is glued turns out to be monolithic). Secondly, this prevents the occurrence of cracks at the joints of the plates. Thirdly, thanks to reinforcement, it becomes possible to plaster the surface of the insulation boards and, as a result, obtain a smooth, durable surface. Fourthly, the possibility of the appearance of so-called cold bridges between sheets of foam plastic is completely eliminated.
Reinforcing adhesive mixture - what is it?
Adhesive for mineral wool and expanded polystyrene with a reinforcing effect is a dry cement-based construction powder with polymer additives and modifiers. To obtain a working solution, the dry reinforcing adhesive mixture is diluted with water in certain proportions. The resulting adhesive solution is a gray plastic mass.
Ready-made glue is used to create facade thermal insulation systems. Reinforced adhesive mixture is used for gluing mineral wool or expanded polystyrene slabs to the surface of a building wall. It is also used to reinforce insulation, create a base plaster layer on slabs of extruded polystyrene foam and mineral wool, and reinforce various architectural elements of a building. Manufacturers offer glue for winter work; it is used at temperatures from -10 degrees Celsius.
Photo 2. Special glue for mineral wool and polystyrene foam
Technical characteristics of reinforcing mixtures:
- High covering ability and creation of a thin layer of working solution, due to the elasticity of the reinforcing adhesive mixture. Achieved due to the presence of polymer composition components.
- Obtaining a durable protective layer due to the presence of reinforcing microfibers. The finished mixture helps strengthen the base and create additional protection from various external factors.
- Good adhesion to stone, concrete, brick and cement-lime surfaces.
- Frost-resistant. The mixture can withstand numerous freezing cycles without losing its declared properties.
- Vapor permeability. The resulting reinforcing layer has vapor permeability, it does not accumulate condensation and ensures the timely removal of excess moisture to the outside.
- Environmental Safety. The reinforcing adhesive mixture is made from organic, safe substances. It contains a cement binder component with polymer additives.
The main advantages of the reinforced mixture for foam plastic, basalt wool, are that it hardens quickly and does not shrink. The finished adhesive has good adhesion to any construction substrate.
Photo 3. It is important to mix the reinforcing adhesive mixture thoroughly
Work on external insulation of the walls of the facade of a building is carried out in a certain sequence.
Reinforcement work - detailed instructions
We have figured out the purpose of foam reinforcement, and we can safely move on to considering the process. To complete this work we will need the following materials and tools:
- reinforcing mesh for foam plastic;
- glue for attaching the reinforcing material (can be the same one that was used to attach the foam);
- spatulas (one large and one small);
- a small piece of wire (absolutely any soft one).
Stage 1 – mix the glue
The adhesive mixture must be sufficiently liquid and thoroughly mixed. The preparation process itself is not complicated at all: we take water into a suitable container and pour the dry adhesive mixture into it. Pour in the dry mixture until it slightly covers the water. Stir the solution thoroughly. The most convenient way to do this is with a mixer attachment installed in a drill.
Photo 1 – preparing glue for reinforcement
Stage 2 – using a tape measure, determine the required mesh dimensions
Photo 2 – use a tape measure to determine the required mesh size
Stage 3 – use a construction knife to cut off a fragment of the mesh of the obtained dimensions
Photo 3 – cutting off a fragment of the mesh
Stage 4 – prepare small staples from wire
Using staples, we first fix the reinforcing mesh on the foam.
Photo 4 - fixing the mesh on the foam using wire staples
Installation of reinforcing mesh
Installation of reinforcing mesh
The reinforcement process should be carried out according to this algorithm:
- The reinforcement process begins from the corners. For self-reinforcement of corners, a mesh for external work is used. The higher the density of the material, the smoother and better the angle will be. You can use ready-made plastic perforated corners.
- To reinforce the corners of the walls, strips of 30–60 cm should first be cut from the mesh. For slopes of windows and doors, the strips should be the same width, and the length should correspond to the height of the corners of the structure. Then the strip is folded in half. Using a spatula, apply an adhesive mixture to the surface of the corner with a thickness of about three millimeters and a width of about seven centimeters on both sides of it. We press the reinforcing strip to the surface and smooth it using the same spatula.
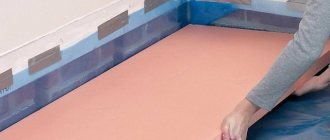
- The walls are reinforced in small sections. To do this, cut the material to dimensions of 1×1 m. First, an adhesive mixture with a thickness of about 3 mm is applied to the surface of the wall. Place the mesh so that its edge rests on the clean insulation. Next, smooth the material using a spatula so that it is immersed in the adhesive composition. If necessary, you can add more glue. The glued material is secured correctly if it is completely immersed in the mixture, but is still visible.
- The mesh should be joined equally along all edges. The width of the overlay must be at least 7 cm.
After completing the process of attaching the mesh, you should allow time for the first layer of glue to dry. Then apply a second layer of adhesive mixture. Only after this can you plaster the walls. It should be noted that all work must be carried out at air temperatures from plus 50 to plus 250C.
and Does thickness affect the quality of plaster?