You don’t always have the time or money for a full renovation, but you still want to update the interior. Then use self-adhesive. This is a real lifesaver in such cases. With its help, you can quickly “repaint” furniture and doors and update the interior. Over time, the material becomes unusable and requires replacement. Before you stick on new decor, you need to get rid of the old one. Let's talk about how to remove self-adhesive film quickly and without a trace.
How or with what can you peel off adhesive furniture film?
The auto store sells a special aerosol composition. Its label says: Sticker and Label Remover . Simply spray the product under the edge of the film, and slowly tear off the film as the composition penetrates under it. This product is highly penetrating. VD-40 also belongs to such means .
This is what is written on the packaging of a container of penetrating multi-purpose lubricant:
- cleans surfaces of glue;
- peels off labels;
- removes dried adhesive tape;
- makes it easier to peel off stickers;
- even removes bitumen stains;
- and leaves no traces.
So, as they say, I bought it for my car, and after reading it, I now use it in everyday life, and I wish you the same.
The self-adhesive film, in principle, will come off easily, if it is tight and there is a danger of the furniture covering being torn off (although it is probably not so great there anymore, that is why they were sealed), it needs to be heated with a construction hairdryer, the glue will soften and go more fun, you need to warm it up and pull it, and Don't heat it up completely and then try to rip it off.
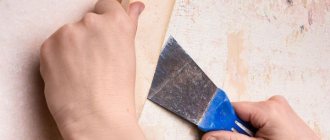
If the coating is to be repaired, then safely remove the remaining film and glue with sandpaper; if you need to preserve the coating, then this is more problematic; you need 646 solvent and a soft cloth.
Wet the corner of the cloth, wipe it with solvent, apply it to the remaining glue and quickly wipe it off until the solvent evaporates.
Attention! The solvent evaporates very quickly and you cannot rub it, as you will rub it even deeper and ruin the coating, if you get wet and immediately wipe the area clean, you need to act quickly and confidently!
Do not forget about safety precautions, work in protective gloves and goggles, in a well-ventilated area, and even better in a respirator,
It is best not to try to immediately tear off the film from the furniture, since basically all self-adhesive films now are of good quality and the glue in them is quite sticky, which will not be so easy to remove from the surface. So here's what you need to do:
- Take a hair dryer; you can use either a hair dryer or a regular home hair dryer to style your hair. The goal is to heat the film to a certain temperature, which will facilitate better film removal. I won’t say what the temperature should be, I always do it by eye, the main thing is that the film begins to lag on its own.
- Next, if possible, wipe off the remaining glue with a soft cloth soaked in hot water, but without an abrasive, so as not to scratch the furniture.
- Remove all glue that remains with a non-greasy solvent, but first test the solvent in some less visible place on the furniture; if the solvent leaves traces, then try changing the brand.
In principle, it is not so difficult to remove adhesive film from furniture; it is problematic to remove the glue that remains after it, which has firmly grasped the surface. To remove the film, you need to heat it with a hairdryer; the hot film can be removed very easily. Heat to a temperature that is not dangerous for furniture.
And remove the remaining glue with white spirit or gasoline. Some offer another option, using unrefined oil. Apply the oil to the glue, leave for 20-30 minutes and then use a soft cloth or paper napkins to collect the remaining glue. Depending on what material the furniture is made of, oil can leave greasy stains. Then there will be another question: how to remove greasy stains from furniture.
The adhesive film can be easily removed if it is preheated. I once did this with a hair dryer (hot air supply), but if you don’t have one, you can heat the film with an iron. First, of course, place a damp cloth on the surface of the film.
You can stick another film on top - however, flaws may be visible. It will be easier. As it is, it’s quite difficult to peel off the film. Take a spatula and gasoline, slowly pry it up with a spatula, wipe with gasoline. You can use white spirit. The work is long.
Source: remotn.ru
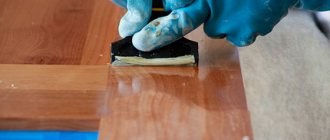
Method No. 3: Sunflower oil
Despite the high water tightness, most protective films can be removed using regular sunflower oil. To do this, wipe the furniture surface covered with film protection with a cloth soaked in oil and leave for 20 minutes. The process of removing the film is more labor-intensive than when exposed to heat. Therefore, it is necessary to help with a spatula. Some craftsmen advise using a bank card, since plastic will not be able to scratch the surface of the furniture. This method is used if the base material cannot be subjected to thermal effects. The only unpleasant moment is the need to remove a greasy stain from a piece of furniture that has been removed from the film.
If the furniture material can withstand exposure to aggressive solvents, then a more effective method can be used. Namely, a special label remover or technical aerosol wd-40. They are applied in the following way. It is necessary to slightly lift one of the edges of the protective self-adhesive film and apply one of the solvents under it. In the process of penetration under the adhesive layer, the film coating can be easily removed.
Advantages and disadvantages of self-adhesive film
Self-adhesive film has the following positive qualities:
- Resistant to moisture. The material can be used when finishing kitchens and bathrooms.
- Insensitivity to elevated temperatures. The material is suitable for decorating pieces of furniture in contact with household appliances.
- Resistance to mechanical damage.
- Affordable price.
- Wide range of colors. This will create a coating that fits well into any interior.
- Versatility. The film can be glued to wooden, plastic, glass and metal surfaces. The pasting process does not take much time. During operation, no dust, construction debris or dirt is generated.
- Easy to dismantle. If necessary, the coating can be removed without damaging the surface. After this, you can immediately begin further decoration.
- Durability. The coating can last more than 3 years without losing its attractive appearance.
- Easy to care for. The surface can be easily cleaned of dirt using a soap solution.
The disadvantage is the need to properly prepare the furniture for decoration. A loosely fitting film forms bubbles and comes off. The material does not allow hiding large defects in furniture or door panels. It can only be used once. The dismantled film must be recycled.
Temperature effect
The glue becomes pliable and softens under the influence of temperature.
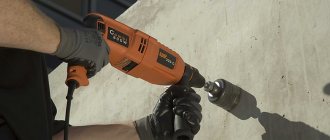
- Take a regular household hair dryer or a construction hair dryer.
- Hold the hair dryer approximately 10 cm from the surface.
- Select the required temperature regime. Test in an inconspicuous area.
- Heat up a small area and remove the softened glue with a spatula, plastic card or other suitable object.
- Remove residues using a cloth with soapy water or a dry sponge if the furniture cannot be wetted.
Thus, it is quite possible to clean the surface of glue after filming. The main thing is to get the hang of it and choose a safe and effective temperature. But the process is quite long.
You can also try softening the glue with an iron. Place a cloth on the surface to be treated and use it to treat the desired area.
Pasting furniture with self-adhesive film
Pasting furniture with your own hands takes a lot of time. You need to be patient and try to carefully complete each step.
Surface and material preparation
To properly prepare the surface and the product for pasting furniture, perform the following steps:
- Leveling the surface. The base to be decorated must not have chips, protruding areas or cracks. Defects are covered with putty and sanded with sandpaper. Otherwise, the furniture will become covered with bubbles or will not adhere well to the base.
- Cleansing. Dust and other contaminants are removed from the surface. To do this, use a clean sponge and soap solution.
- Removing decorative elements. It is necessary to temporarily remove linings, handles, glass shelves and other parts. After gluing the film, they are returned to their place.
- Degreasing. At this stage, you can use special chemical compounds or simple dishwashing detergent. Wooden surfaces are treated with acrylic varnish.
- Open it up. Before purchasing a finishing product, create a drawing containing elements intended for gluing. This will help to correctly determine the width of the roll and eliminate the need to create a large number of joints. The joints should not have small surfaces. The sketch is applied to the wrong side of the canvas. There is a marking grid with a mesh size of 1 cm. After cutting out the parts, you can glue the self-adhesive film to the furniture.
Gluing technology
If a small area is to be treated, for example, the facade of a kitchen unit, the film can be applied using a dry method. When decorating a cabinet or other large object, the surface is first moistened with soapy water or soap. This provides the material with mobility and eliminates unevenness. This method is suitable for people performing such work for the first time. Pasting a cabinet with self-adhesive film is done as follows:
- The edge of the canvas is installed on the upper part of the base. The doors can be dismantled before decoration. The top layer of the film is separated from the paper base by several centimeters. The material is pressed tightly against the surface to be treated. In this case, you need to smooth the surface with a cloth, moving downwards. The lower part along with the backing should hang down.
- Gradually remove the top layer from the paper base, carefully smoothing the glued area. They go down in small sections, removing bubbles.
- Inspect the processed item. If bubbles are found, they are pierced with a needle. By pressing the film to the surface, air is removed. When smoothing, wrinkles may appear. The damaged area is heated with a hairdryer and smoothed out again.
If pasting was done wet, you need to wait until the material dries and sets to the base. After this, you can proceed to installing shelves and fittings.
Difficult areas
Difficulties may arise when processing corners and other difficult areas. The following tricks will help you properly cover your cabinet with self-adhesive film:
- You can use a hair dryer to bend the fabric. The material is heated with a stream of hot air.
- Difficulties may arise at the stage of comparing coverage elements. To prevent gaps from appearing, the sheets are glued with an overlap of 1.5 cm. A ruler is applied to the allowance. Using a construction knife, make an incision and remove the excess strip. The result is an even joint.
- You need to work in good lighting. If you paste over complex parts in a dark room, you may miss minor imperfections. They will stand out in daylight.
- If the film quickly adheres to the surface, use talc. The base is sprinkled with powder, after which the canvas is applied.
Features of the film
The main classification of protective self-adhesive film is carried out according to its area of application. Its thickness, the composition of the adhesive mixture and some other parameters depend on what material it will come into contact with, as well as what external influences it will be exposed to. By area of application, the following types of self-adhesive polymer coating are distinguished:
For bathroom. The material is ideal for protecting any surfaces in rooms with high humidity; its use keeps furniture items intact and prevents the formation of rot, mold and mildew. Which has a positive effect on the longevity of the furniture and the health of the occupants.
For kitchen furniture. An abundance of sharp objects, mechanical stress, high humidity and constant temperature changes negatively affect the work surfaces and facades of kitchen furniture.
Children's furniture. It's no secret that little pranksters, in a fit of inspiration, draw on the first surface they come across. Very often such a base is the façade of furniture or a tabletop. Therefore, their protection is a primary task in families where creative and imaginative children grow up. It should be noted that the film coatings used are completely hypoallergenic and biologically neutral. During operation, protective PVC coatings do not emit strong smelling or carcinogenic substances.
For windows. Protective film is also used for PVC profiles and window frames. This significantly reduces the risk of damage to windows, as well as the effects of temperature.
Protective self-adhesive PVC film for furniture is supplied in the form of transparent and translucent material in rolls up to 15 m long. For wholesale purchases, at the request of the customer, the length can be changed within a fairly wide range. At the same time, the roll width is offered in an assortment. For restoration and protection of furniture, rolls with a width of 450-675mm are usually used. for facades and 53 and 106 mm for overhead decorative elements. This allows you to choose your protective material in such a way as to use it as efficiently as possible without unnecessary cutting, scraps and waste.
How to remove self-adhesive film from furniture?
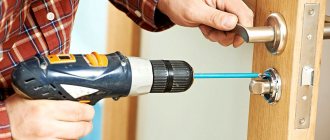
You need to know not only how to paste over furniture, but also how to remove coatings that have lost their attractive appearance. The principle of film removal is based on heating the adhesive base. To treat small areas, use a hair dryer designed for drying hair. You can remove the self-adhesive film from a large surface using a construction tool.
By supplying a stream of hot air, the coating begins to be separated from the base. Pull the film slowly, otherwise traces of glue will remain on the chipboard or wood. If this does happen, the composition is removed with alcohol or a solvent. The product is applied to an inconspicuous area. If the surface is not damaged, the composition is used for its intended purpose.
What you need to know about self-adhesive
The finishing material is completely synthetic. It consists of two layers. The first is decorative. It is most often made from polyvinyl chloride, but propylene, polyester, or a combination of these polymers are also used. It is this layer that determines the appearance of the finish. It can be transparent or colored, with a pattern or plain, matte or glossy. The performance characteristics of the coating depend on the thickness of the film and its properties.
The second layer is adhesive. The composition of adhesive mastic can be different, so one self-adhesive can be easy to remove, while another can be very difficult. Most often, the manufacturer applies acrylic or rubber glue to the base. They are durable and hold the material well. To prevent the mastic from hardening ahead of time, it is covered with a layer of waxed paper during production. It is removed before gluing.
Multilayer self-adhesive films have appeared relatively recently. Their decorative coating consists of two layers. The first is paper or fabric. They determine the appearance of the material. On top there is a protective layer of plastic. Otherwise, the decor is similar to its two-layer counterparts. This finish is beautiful, but less durable and practical. When removed, it is sometimes removed in layers, which makes work difficult.
Instagram dcfixbrand
Instagram samokleika_tgn
- Decoration Materials
How to remove wallpaper from walls: 4 methods for different materials
Using self-adhesive film is a great way to update your kitchen set
A good quality kitchen set can last for decades. But time passes, and the shine of the new furniture fades, stains, chips and scratches appear, and your favorite set or any of its cabinets are no longer pleasing.
There are two ways out of this situation: do some repairs and buy new furniture, or update existing cabinets and pencil cases. Moreover, in the second case, the cost of the issue will be minimal, and you will not have to deal with rearrangements. All you need is decorative self-adhesive film.
Unlimited possibilities of self-adhesive film
Kitchens covered with film look impressive both in photos and in real life. Surfaces are updated using vinyl or other film. The range of this material is amazing in its diversity, and the price pleases with its affordable price.
Decorative “self-adhesive” imitates:
- natural wood of different species;
- natural stone;
- ceramics and tile texture;
- leather and fabric.
In the photo - imitation wood
In its texture, it can resemble patterned silk, a colorful tapestry or cute chintz. The material is produced in matte and glossy versions. There are films with holographic and mirror patterns. And all this can be combined with each other, creating interesting effects, changing an ordinary kitchen cabinet beyond recognition, as in the photo below.
The price of the film depends on the manufacturer and the decorative surface.
Vinyl “self-adhesive” is quite practical because it:
- not afraid of moisture;
- does not fade in the sun;
- does not respond to temperature changes.
With its help, you can completely update the design of both the kitchen and the bathroom, transform the kitchen cabinet or the entire set.
Adhesive film is a good budget replacement for a full-fledged repair. Of course, you need certain knowledge and skills, but the video will help you quickly understand the intricacies of the process.
How to cover furniture with self-adhesive film: master class + tricks and tips
- Description
- Comments 1
About the types of self-adhesive film, about its properties, the subtleties of its gluing and care for it - in our review.
Self-adhesive film is a simple and affordable way to quickly update furniture and hide its defects (scratches, abrasions). Of course, in terms of resistance to external influences, the film cannot compete with, for example, wood or natural stone, but with proper care it can last for quite a long time, and besides, it can be quickly changed.
Painting furniture: 5 main rules and master class
What is self-adhesive film and how to choose the right one
* Self-adhesive film, also known as self-adhesive film, is a film with a decorative design on one side and an adhesive layer on the other side. To protect the adhesive layer from dust and damage until use, it is covered with a paper backing. When gluing, the paper base is removed, and the film is glued to the surface to be decorated with the adhesive side.
Wood-effect film on a coffee table
* The top layer of self-adhesive can be different: it can be made of glossy or matte vinyl or plastic, it can be dense or translucent, metallized or paper. Plastic and vinyl films are usually the most durable and can be wiped down and washed frequently. Metallized is usually more susceptible to water, its top layer can be damaged, so it is better to use it on those items that will get dirty less and be wiped less often. It is generally better not to expose paper film to water.
It is better to use metallized film to cover surfaces that are not very exposed to external influences.
* The base most often has markings - this is convenient.
* Thick film is usually used to cover furniture, window sills, doors, while translucent film is used for glass and mirrors. There is also a special colored translucent stained glass film for creating a stained glass effect on glass.
Translucent matte film on glass
* In terms of color and texture, the film can be very different - for different types of stone, wood, fabric, leather, plain, with a pattern, patterned, textured, glossy, matte, velor and so on.
* The film can also be protected from ultraviolet radiation - this means that, when exposed to direct sunlight, it will not fade or change its color.
* The choice of film also depends on the surface you are covering. For a surface that is not completely smooth, it is better to choose the so-called cast film. It is somewhat more expensive, but more flexible. If there are protruding heads of screws, rivets, or nail heads on the surface, it is also better to use cast film. The so-called clandered film is usually cheaper, but not so flexible: it is better to use it when you need to cover large, flat surfaces.
* Textured, textured, patterned film will help hide flaws and unevenness of the original surface. And smooth, metallized, glossy, on the contrary, will emphasize them.
*Usually, water, a cloth and liquid detergent are enough to clean the film. Do not use abrasives or acetone.
Which film should I choose?
First of all, you need to look at the thickness of the material and the manufacturer. German “self-adhesive” tapes are of good quality; their price depends on the thickness.
Dutch and Italian manufacturers have proven themselves to be excellent. You can choose something from budget series or take a closer look at exclusive products, but then the price will be quite high.
The most inexpensive are Chinese adhesive decorative materials from unknown manufacturers. However, low price should not be the main selection criterion, otherwise a beautiful kitchen decorated with self-adhesive vinyl film can quickly lose its appearance.
Not all adhesive materials intended for promotional products can be used in the interior. Some of them are designed for short-term use. Choose high-quality decor, and then the restoration will be durable, and a simple kitchen cabinet will become an interior decoration.
The color can be any. If you want to take a creative approach to kitchen design, place photos of fruits, vegetables or flowers on the facades, thereby decorating ordinary old furniture. The drawing can also be applied using photo printing.
Do I need to take it off?
If this film is so useful, then maybe it can be left on the metal? You shouldn't do this. And that's why:
- Firstly, during transportation and installation the integrity of the film is inevitably compromised. Even if a high-quality thick film of 60 microns was used, glued with a composition with high adhesion (as is the case with products), it will inevitably fray, tear and peel off in several places.
- Secondly, the film is not designed for a long service life. When exposed to UV rays, it begins to deteriorate and over time its insulating properties will be reduced. The result is the appearance of cracks, swelling and other defects.
All this leads to the fact that instead of an almost invisible, ideal, even protective film, a “fringe” of scraps appears on the metal surface - while some of the material is firmly held on the base, some hangs down, and some forms unsightly bubbles. And problems with aesthetics are only half the story: when moisture begins to penetrate under the film, conditions are created in the gap between the metal and polyethylene for rapidly developing corrosion.
Therefore, the answer to the question in the title will be unequivocal: you need to remove the film!
Technology of pasting furniture with polymer films
If you decide to update your kitchen furniture using self-adhesive film, then first prepare the base. It should be understood that the decorative covering will not hide potholes and bumps, it will only disguise the stains, so all unevenness must be removed before pasting. A video with tips will simplify the workflow.
12 rules for working with self-adhesive tape
- The fittings and doors must be removed, and each kitchen cabinet (facades and frame) must be inspected for the presence of depressions and bulges.
- If there are defects on the furniture, all irregularities are filled with putty and sanded well.
- To calculate material consumption, you will need measurements of all parts of the kitchen unit. You need to carefully measure all the parts that you plan to paste over.
- All dimensions are transferred to the back side of the film. It is usually made of white paper, on which the drawn lines are clearly visible.
- When cutting, you should always leave a margin of about 1 cm. This will help in your work: if you start gluing the vinyl at the wrong angle, the margin will make it possible to correct the situation. All excess is easily cut off with a breadboard knife.
- Decorative self-adhesive film is cut with a stationery knife, curved lines are cut out with scissors.
- Then you need to degrease all the surfaces to be decorated so that the “self-adhesive” does not come off over time. Window cleaning liquid or other products are suitable for this. Grease stains need to be treated especially carefully so that the decorative finish does not come off.
- Pasting of kitchen units is carried out on a dry and clean surface, otherwise the “self-adhesive” will begin to bubble and peel off from the base.
- The film must be applied evenly.
- The backing is removed in several stages: first, only a few centimeters are peeled off, after gluing them, a little more is removed, and so on until the entire panel covers the part to be decorated.
- Smooth out the plastic decor from the middle to the edges. Air bubbles must be removed during operation. It is convenient to work with a plastic scraper, stroking the surface with a soft cloth.
- Small air inclusions are removed with a needle. The finished part can be processed through the fabric with a warm iron.
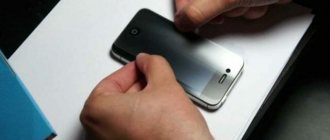
How to remove old Self-adhesive?
You can remove the self-adhesive from the glass using a hair dryer. The oracal needs to be warmed up well with a warm air stream, while the distance should be controlled so as not to deform the main surface. Next, the self-adhesive is pryed off with a utility knife and carefully pulled off by the peeled part.
Interesting materials:
What is the difference between a load switch and a circuit breaker? What are the differences between 1080i and 1080p? What are the differences between a 2 and 4 stroke engine? What are the differences between an acoustic guitar and a classical guitar? What is the meaning of civil liability? How is it different? What is the difference between the judiciary and the legislative and executive powers? 1 how to calculate customer retention rate? 5 copper sulfate how to prepare? How to fill out the reconciliation report for mutual settlements? How to calculate depreciation of fixed assets?
Difficulties in work and their solutions
Problems often arise with processing the ends and shaped parts of kitchen units made of MDF or other material. An industrial or household hair dryer will be a good helper in this case.
The restoration will go faster if you work together: one person stretches the material by heating it with a hairdryer, the other carefully glues it to the base.
It is easier to apply the self-adhesive tape evenly on a damp surface. To do this, lightly moisten cabinets and doors with a spray bottle. Water will not allow the material to immediately grasp the surface and will provide an opportunity to correct the work.
When cutting the material, you need to make allowances on each side. For parts with ends, do not forget to make cuts in the corners. First, they paste over the part itself, and then proceed to the ends. The rounded ends of MDF facades are treated with a hairdryer for a better fit.
Is it possible to change the film on kitchen facades?
Technically, it is possible to remove the film, however, you need to weigh everything to understand how advisable it is. It is worth taking into account that when the PVC layer is removed, the top layer of the MDF board is also damaged, which means that without treating the base, re-coating is impossible - “craters” will remain on the surface.
Interesting materials:
How to dissolve superglue from hands? How are the neighborhoods divided? How to unlock the number keyboard? How to unlock a Samsung washing machine? How to share internet on Mac? How to distribute the Internet from a PC to Android via a USB cable? How to divide a room into zones? How to separate a mixture of alcohol and water? How to iron a bologna jacket at home? How to smooth eco leather?
Restoration of facades with decorative film
The appearance of the kitchen largely depends on the cladding of the facades. If your kitchen has smooth doors without a relief made of chipboard, then they can be easily covered with vinyl film.
Updating kitchen MDF facades with convexes will be easier if you use an industrial hair dryer. Only a well-heated film can take the desired shape. If there are decorative details on the facades, they must be removed before pasting.
Replacement of the old film is carried out only after removing the previous layer. Remember that decorative film is only applied to prepared surfaces.
It should be taken into account that in production, MDF film facades pass through a special press, which makes it possible to obtain a smooth surface without flaws. At home, MDF can only be covered with self-adhesive.
Mechanical cleaning
It happens that a sticky layer or glue residues after removing the self-adhesive film remain only in some places. Then, at home, a method of mechanically cleaning the surface from its residues is suitable. This can be done with:
- eraser that will effectively clean small areas. First, the surface must be wetted with a sponge and wiped. Then wipe dry with a rough cloth. Then go over it with an eraser;
- melamine sponge , it can also help wipe off any remaining adhesive. The area should be slightly moistened with cold water and try to scrub off the coating with a sponge. You have to be careful with paint layers. It will not work if the surface is in direct contact with food.
There are still dubious methods. For example, try to clean the surface using masking tape.
Interior renovation using film
Designers love polymer films. They have good plasticity and decorative properties; with their help you can quickly update almost any surface. Material suitable for decoration:
- tiles in the bathroom or kitchen;
- wall panels;
- doors;
- different furniture.
Films are available in different colors, with and without patterns. With their help, you can update your kitchen set and change old furniture in your home without extra costs. After all, the price of even the most expensive film will be cheaper than a new headset.
Restoring tiles using vinyl is not difficult. It is important to choose the right drawing here. Delicate chintz designs or films with textured embossing are suitable for the kitchen.
Complete the design with a decorative kitchen apron. Its restoration using film usually does not cause difficulties. The main thing is to carefully read the instructions on the roll.
Before gluing the tiles in the bathroom, you need to carefully prepare the surface - degrease it well. Otherwise, the film will quickly peel off.
What to do if the film comes off?
It will take time to reupholster kitchen MDF facades. And I don’t really want the film to come off after a month or two and the film on the headset or cabinet to peel off. If you follow the gluing technology and operating rules, this should not happen.
But if in some places the film moves away from the base, it can be glued. You will need a syringe and glue (for example, “Moment” or “Titan”). It is inserted under the film and pressed into the restoration site.
With the help of adhesive-based films, you can give a new breath to MDF kitchen facades and kitchen units made of any material. An ordinary, neatly papered cabinet and set looks quite aesthetically pleasing. Follow the instructions and enjoy the results of your work.
Source: idealkuhnya.ru
How to remove tape marks?
Aggressive substances that easily dissolve the adhesive layer. These are all organic solvents, including acetone and white spirit, gasoline, and any degreasers for painting. This is perhaps the most effective solution than scrubbing the adhesive from tape off glass or unpainted metal.
Interesting materials:
When they cut how many salaries are paid? When are interim financial statements prepared? When will the 2022 green card draw take place? When will police officers be allowed to travel abroad? When does Social Security transfer child benefits? When does social security transfer children's benefits? When does Social Security transfer child benefits? When does Antonovka ripen? When do cranberries ripen in Ukraine? When does medlar ripen in Sochi?