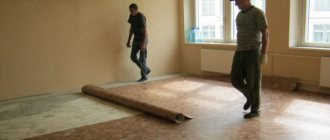
When you first have to install a self-leveling self-leveling floor with your own hands , many questions arise. For example, which materials to give preference to, which technology is considered the best and how not to make mistakes, due to which the finishing coating will soon have to be redone.
To order a self-leveling floor or screed device at the best prices in Moscow, visit this website: STROI-F.RU
What is a self-leveling self-leveling floor?
When spread, the liquid self-leveling floor creates a flat and smooth surface. Such models are an ideal option for the further installation of many types of floor coverings. A popular type of self-leveling floors are self-leveling structures, which are the final finishing.
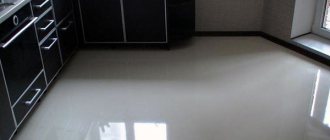
Self-leveling floor is a type of coating obtained by filling the floor surface with a certain self-leveling mixture. It is characterized by high strength and perfect evenness. Outwardly it resembles linoleum, has no seams or gaps.
An important technical characteristic is the minimum thickness of the self-leveling floor. In the technology of self-leveling coatings, every millimeter is of great importance.
In an apartment, a layer of 1 mm is considered sufficient to forget about repairing the floor for a long time.
A self-leveling floor is not just a uniform, smooth surface on which there is nowhere for dirt to hide. Modern achievements make it possible to make the result of the work a real work of art with a colorful image in 3D.
Characteristics of levelers, evaluation criteria for selection
Such mortars, of course, have certain characteristics. Some of these indicators simultaneously become criteria for choosing the required mixture.
- So, the purpose of the mixture must be indicated - for what specific purposes it can be used. Enough has already been said on this matter.
- Usually the description indicates the composition - binder, filler, modifiers, and sometimes reinforcing additives (fibers).
Fiber fibers can also be included in the leveling agent - for micro-reinforcement of the screed, to increase its strength characteristics.
When listing the components, the size of the filler fraction may also be indicated.
- If this matters to someone, then you can pay attention to the indicated color of the frozen surface - from dark gray to light gray.
- The most important criterion, which has already been mentioned more than once, is the permissible range of thicknesses of the poured screed (leveling layer). This basically determines the purpose of the leveler.
- The amount of water required to mix the mixture must be indicated. As a rule, solutions are prepared from full factory packaging, therefore the volume of water is most often indicated in a standard factory bag.
- Floor leveling mortars, especially those made using gypsum binders, have a very limited pot life. That is, during this period it is necessary to have time to distribute the composition over the entire area being poured and provide it with conditions for self-leveling of the surface. A very important criterion, especially for those who are going to level the floor for the first time. If you do not meet the deadline, it is possible that you will have to completely remove the damaged coating.
- Leveler consumption. By the way, there is no unity among manufacturers on this issue. For example, many indicate consumption in kilograms per square meter of area for a poured layer thickness of 1 or 10 mm. This approach seems to be the most convenient, since it allows you to easily calculate the total amount of composition to create a screed of a certain thickness over a certain area.
But there are also other “units of measurement”. For example, it is indicated that a standard bag is enough for 0.5 m² with a screed thickness of 30 mm. Or even worse - as shown in the illustration below - a 20 kg bag is enough for about 5.7 m² with a layer thickness of 2 mm. It’s not a big problem, of course, to read the consumption in this case, that is, also convert it to kilograms per “square” with a thickness of 1 (or 10) mm, but still, it’s not so convenient.
Different approaches to indicating the consumption of dry mixture for leveling the floor
We still have to talk about calculating the leveler consumption below.
- If the leveler is used in open areas or in unheated rooms, then an important selection criterion should be its frost resistance. This parameter is denoted by the Latin letter F and a number. And the number just shows how many freezing and thawing cycles the poured floor is guaranteed to endure without any loss of strength or deformation. The norm is considered to be at least F50.
- The hardening period of a poured floor is usually indicated by two indicators. The first is the period of necessary exposure until free movement on the surface is possible. For different levelers, depending on the component composition, it ranges from 4 ÷ 6 hours to 1 ÷ 2 days. The second indicator is the time until the screed or leveling layer reaches a degree of maturity that allows the resumption of work on this site - from a week or more.
As a rule, manufacturers indicate on the front of the package the curing period of the screed until it can be moved on the surface. But this does not at all mean that after this time you can safely move on to the next floor creation operations. Read carefully what is written in the instructions in small letters!
- It is worth noting that the indicated deadlines are also for certain conditions of pouring and maturing of the screed. And these conditions, primarily temperature, must also be specified in the list of main characteristics of the composition.
- Standard packaging. Here, by the way, some attention is also needed. Many are accustomed to the fact that 25 kilograms are packed in paper bags. Meanwhile, among the levelers you can also find packages of 20, 30 and even 40 kg. So it’s not far from making an error when calculating the required volumes of material purchases.
Yes, most often packaging is carried out in 25 kilogram bags. But often there are packages of 20, 30 and even 40 kilograms, which requires some care when calculating.
- Another extremely important criterion for choosing any dry building mixture is the date of its manufacture and the warranty shelf life.
Dry mixtures begin to lose their quality over time, so you should definitely ask about the production date of the batch and the expiration date.
The problem is that no matter how high-quality the packaging is, the dry mixture still begins to absorb moisture from the air, and therefore lose its original qualities. Unacceptable lumps appear, bonds in the prepared solution are broken, the screed may not be strong enough, crack, begin to gather dust, etc.
Therefore, you should only purchase goods that have not expired within the permissible shelf life, which can be very short, calculated in just a few months, or a maximum of one year.
But that's not all. The leveler in its original packaging will retain its quality if it has been kept in a warehouse with optimal humidity and temperature conditions. It is worth visually and by touch assessing the quality of the packaging bags - whether there are any spots of dampness on them, whether they clearly smell of moisture. And of course, you should categorically refuse to purchase torn packaging, even if the defects in the bag seem to be very small.
* * * * * * *
As for choosing a specific brand, it’s difficult to give advice. The fact is that the offer is very large, and you should first of all choose levelers based on their main performance characteristics. Of course, preference is usually given to proven brands that have already won full trust among construction specialists. These include mixtures “Bergauf”, “Vetonit”, “Plitonit”, “UNIS” and others. Among gypsum compositions, mixtures have perhaps the greatest “credibility of trust.” The compositions of the brands “Volma”, “Starateli”, “Hercules”, “Alfa-pol”, “Perfecta” and others deserve good reviews.
Much depends, of course, on local specifics. Who knows, maybe your region has its own manufacturer of mixtures that are no worse in quality than the “promoted” brands. By the way, there are other situations when a product under a seemingly “famous” brand turns out to be very far from expectations. The fact is that the products of even different factories of the same company, according to numerous consumer reviews, can differ greatly in quality. Therefore, it will never be superfluous to read the reviews left and ask for the opinions of experienced builders.
In addition to the information presented in the publication, the reader will probably be interested in the proposed video on the same topic:
Video: Recommendations for choosing floor levelers
Features and advantages of self-leveling floors
In apartments and private houses, linoleum, laminate or ceramic tiles are used as flooring. In comparison with them, a self-leveling self-leveling floor has a number of advantages:
- linoleum lasts no more than 20 years, and self-leveling flooring lasts 2 times longer. In addition, when replacing the coating, the old linoleum is always removed, which is not required when updating the self-leveling floor;
- Laminate reacts negatively to moisture, so installing such flooring in a kitchen or bathroom is not recommended. In addition, the service life of the laminate is only 12 years;
- Ceramic tiles are not inferior to self-leveling floors in strength and resistance to moisture penetration. However, the presence of seams between tile elements contributes to the accumulation of bacteria and dirt;
- self-leveling floors are made from materials that are not subject to fire. They do not require complex maintenance, can withstand heavy loads, and are resistant to abrasion and moisture penetration;
- The high sound insulation characteristics of self-leveling floors have allowed them to be widely used in residential premises, whose owners prefer a quiet lifestyle.
Self-leveling floor, video:
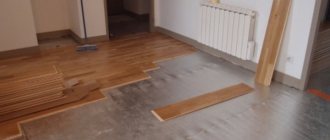
How to prepare the base: leveling and waterproofing
Before pouring a self-leveling floor, you need to prepare the base. The preparation process depends on what kind of base is located in the apartment. This is usually concrete, but can be ceramic tile or wood.
In any case, it is necessary to remove stains of paints, grease, plaster and others from the surface. That is, the floor in the apartment must be clean, then it is dusted.
The next operation is priming the floor or waterproofing. If you are sure that the liquid filling mass will not leak onto the lower floor, then you can do priming. To do this, it is better to use a deep penetration primer.
Usually there is no such confidence, so it is better to carry out waterproofing. To do this, polymer films are used, which are laid so as to cover the walls of the room to a height of 10-15 cm from the surface of the base. If a floating floor is formed, then you will have to use a damper tape, which is attached to the wall at the junction of the floor and the wall. The tape will create a gap that will further compensate for the thermal expansion of the self-leveling floor.
Main types of self-leveling floors and their thickness
The following compositions are used for the finishing layer when installing self-leveling floors.
Epoxy
They are used in laboratories and medical institutions where sterility is of great importance. The presence of a large number of coating methods has made epoxy self-leveling flooring popular in residential premises, and its high durability and wear resistance in factory workshops. Provides excellent protection for metal and wood surfaces.
Polyurethane
Coverings of this type are often installed in shops, warehouses, swimming pools and bathrooms. Polyurethane floors are resistant to conditions of high humidity and temperature changes, however, when the floor dries, moisture should not enter it due to the likelihood of bubbles forming.
Able to withstand mechanical loads and maintain strength under impact.
Polyurethane coatings are recommended for residential premises, as they are considered the most hygienic and safe for health.
Methyl methacrylate
The technology of laying the floor requires accelerated completion of the work, because the viability of the solution is short. The floors are not afraid of temperature changes and chemical influences.
Laying self-leveling floors made from methyl methacrylate mixtures is advisable in industrial facilities and even in open areas.
Polymer-cement
This is a separate category of coatings for industrial use. They are installed at facilities with difficult operating conditions: significant fluctuations in temperature and humidity, excessive loads.
These floors differ in their composition, but all belong to the group of polymer coatings.
The thickness of the self-leveling floor when using polymer materials is within a few millimeters. Polyurethane compositions make it possible to make a layer with a cross-section of up to 2.5 mm; this indicator is considered optimal.
If there is an intention to apply different colors to the coating surface, apply a thin layer of the composition, no more than 0.3 mm. The maximum recommended thickness of the polyurethane coating is 5 mm. A further increase in thickness does not make sense, especially since polymer floors are not cheap.
It is also preferable to apply epoxy-based compounds in a layer of 2.5 mm.
This thickness is enough for the floor to gain the necessary strength characteristics and not be fragile.
Rapid-hardening or methyl methacrylate mixtures can be used at moderate thickness. However, given that such floors are installed in rooms with heavy loads, you should not save. A coating that meets quality requirements must have a layer of 8–10 mm.
How to level
Compositions that are fluid enough to self-level to a smooth horizontal plane are called leveling or leveling compounds. Different manufacturers give the maximum thickness of the leveling layer at 12-15 mm, but this is under ideal conditions, as discussed below. It is highly advisable to limit yourself to a level layer no thicker than 5-6 mm. This is also important because the level is very expensive.
Most often, a leveler is placed under the level - a coarser mixture. If you dump a batch of leveler out of a bucket, it will just harden in a heap, only it will sag a little and spread out. Therefore, the leveler has to be additionally leveled under the level, but it is cheaper, and the layer thickness can reach 60 mm for cement-based compositions and up to 150 mm for gypsum-based ones. With a leveler, the thickness of the level layer can, with careful work, be increased to 2-3 mm.
Adjustable beacon for filling with leveler
Looking ahead, let's say that when pouring leveler, screw beacons provide great assistance, see fig. The solution is poured along the lower edges of their threaded pins, which were set in advance using a cord or a laser plane builder. The beacons are removed after the solution has set for a time sufficient for technological movement, i.e. when it will be possible for one person to walk on it without a load.
The technological setting time is indicated in the instructions for the mixture. Typically this is about 8 hours. It must be observed; if, for example, you forget or give up and leave it until the morning, the solution will completely harden, and the beacons will no longer be pulled out.
Based on all of the above, based on the results of the audit, you can choose a single-layer or two-layer method of leveling the floor:
- Smooth, no more than 3 mm of total unevenness, solid base - with one layer of leveling.
- The base is strong, but very uneven, with shifts in the slabs, deep potholes - level the layer according to calculation, see below, then level. We calculate the depth from the top of the largest convexity.
- Wooden base - a layer of gypsum leveler of at least 30 mm, then also a gypsum level to calculate the thickness, see below. We use gypsum mixtures because their specific gravity is 20 percent lower than that of cement ones. The leveler and level are with fiber filler, also see below.
- For insulation in dry rooms - gypsum mixtures over fiberglass mesh or reinforcement.
- In wet ones, cement mixtures are used, but always on a reinforcing mesh, due to the heaviness and less plasticity of cement compositions.
Note: you cannot apply a layer of leveling agent just to hide the highest bump. To avoid explaining for a long time, try putting a brick in a container and filling it with liquid mud; it is similar in consistency, adhesion and fluidity to leveling agent. In order for the contours of the brick to stop appearing, you will have to pour quite a lot in excess of its height.
How to make a self-leveling floor with your own hands step by step?
First of all, you need to prepare the tools: a plastic or galvanized bucket for mixing the mortar, a construction mixer, usually a laser level, a roller with needles to remove air bubbles.
In the process of work, you will need a lot of all sorts of secondary tools and devices, but there is no need to list them, because this equipment is necessarily present in every home.
Preparing the base
It is a mistake to believe that if the base is hidden under the finishing layer, its preparation can be taken lightly. The base is the foundation of the future floor, and the final result of the work depends on how it is prepared.
By laying the solution on a dusty base without priming it, you can soon see the appearance of cracks, which can lead to peeling of the material. Therefore, the floor on which the finishing layer will be applied should be cleaned of debris, dust and any contaminants.
Weak areas should be removed and cracks and voids filled with epoxy putty.
When the base is heavily contaminated with fatty substances and its strength is questionable, experts advise using a separating layer. The damper tape for self-leveling floor will ensure a strong floor screed and the tightness of the structure.
The last stage of working with the base is its primer. The primer composition is applied to the surface with a brush or roller in several layers.
The primer for self-leveling floors requires mandatory drying of at least 12 hours between layers.
It is not necessary to buy the material in a store; you can prepare it yourself from a dry composition for self-leveling floors. The main thing is that the primer composition has deep penetration or strengthening properties.
Mixing the solution
Instructions for use are always included on the packaging of the purchased material. One of its main points is the consumption rate of components.
A precisely measured volume of water with a temperature in the range of 15–20 °C is collected in the bucket. The liquid must be clean and free of impurities. Gradually, the dry mixture is added to the bucket and mixed with a mixer to form a homogeneous solution.
During work, it is necessary to use personal protective equipment: goggles, gloves, respirator. They will be needed when installing self-leveling floors using cement-based materials.
Such materials, when in contact with water, form an alkali, which is dangerous if it comes into contact with skin or eyes.
Pouring the mixture
Despite all the responsibility, this stage is not considered difficult. Using a laser level, the height difference of the base is determined, which allows you to calculate the thickness of the finishing layer.
If a floor heating system is installed, it should be turned off two days before the start of work, and turned on again 5-7 days after the floor is installed.
Pouring of material begins from the corner of the room farthest from the entrance. The mixture itself will immediately begin to spread over the base, taking its final position, but it still cannot be done without manual finishing.
To maintain the required floor thickness, you will need to use mathematical knowledge: it is necessary to link the area of the room with the flow rate of the mixture.
Floor hardening time
Before starting work, it is important to know how long it takes for the self-leveling floor of the selected type to dry. The main thing is that the need to use the floor does not occur before the drying process is completed.
Typically, a self-leveling or polymer floor dries from 2 to 6 days; the drying time is affected by the structural composition of the mixture, the quality of the fill and the thickness of the layer being installed.
The drying time of a polyurethane floor is about two days, and you can walk on it after 6–10 hours. The time for complete drying of an epoxy floor increases to 5 days.
To ensure that the self-leveling floor dries correctly, you should use a few tips:
- when the distributed mixture dries a little, it must be covered with a film that will protect the surface from dust, debris and foreign objects;
- After the first stage of drying, allowing you to move on the floor, it can be coated with a protective varnish containing a polyurethane base. Varnish will add durability and beautiful shades to the coating;
- It is recommended to protect the floor from direct sunlight and ensure a constant temperature in the room. This will reduce the drying time of the coating.
How to fill a self-leveling floor? Video:
Installation of beacons
When pouring a self-leveling floor in an apartment with your own hands, beacons are not always used. Especially if the material needs to be applied in a thin finishing layer. It is liquid, so it spreads well on its own, leveling horizontally.
It's another matter if you need to form a thick floor. You can't do without lighthouses here. Purely structurally, this is a device on three legs, in the center of which there is a screw that moves vertically along the thread. By raising or lowering its lower end, the fill level of the self-leveling floor is set.
Attention! Beacons are installed in a checkerboard pattern every 1 m.
Before pouring self-leveling floors, beacons are installed, and their lower ends are aligned using a laser level. The process is not easy and will take some time.
If the floor base in the apartment is a plywood structure, under which insulation is laid, then instead of tripods you can use ordinary self-tapping screws. They are simply screwed into a wooden base every meter, both along and across the room. To increase alignment accuracy, the distance can be reduced to half a meter. The self-tapping screws remain in the body of the self-leveling floor, additionally performing reinforcement functions.
How to properly fill a self-leveling self-leveling floor with your own hands?
The decision to fill the floor yourself is made when there is a desire to test your abilities or save money that you will need to pay a specialist for the completed order.
Anyone who has at least basic knowledge can cope with the job. The main thing is less improvisation and more compliance with the requirements of the instructions.
Basic recommendations on how to make a self-leveling floor yourself have already been discussed. At the final stage of work, several useful tips will come in handy:
1. If the layer thickness is less than 1 cm, the prepared mixture must be poured onto the base and carefully distributed with a rule or squeegee.
If the thickness is more than 1 cm, it is recommended to install beacons for the self-leveling floor. These reference devices are installed on the work surface at regular intervals.
2. After finishing pouring the floor, it’s time for aesthetic measures, for which you will need a needle roller for self-leveling floors. By rolling it over a coating that has not yet hardened, you can prevent the formation of bubbles and further compact the mixture.
If expansion joints were installed in the base of the floor, they will need to be restored in the finishing layer. In order not to leave footprints on the drying surface, it is recommended to wear paint shoes - special soles with spikes.
3. During work, drafts in the room are not allowed. All windows and doors in the room must be closed so that drafts do not disturb the evenness and strength of the coating. After applying a thick layer, it is advisable to cover the surface with plastic film - this will ensure uniform drying.
4. You should not work on floors if you have not had any practice before. Theoretical knowledge does not guarantee a successful result. For the first time, you can be an assistant to a neighbor or friend.
Surface grinding
If you couldn’t avoid mistakes when pouring the floor, you shouldn’t be upset: no one is immune from them. Sanding the self-leveling floor will help correct many visible defects.
You need to start it after marking the boundaries of the holes and bulges. If the self-leveling floor does not serve as the front surface, then the holes can be covered with the main mixture. After it has dried, you can begin to remove the bumps with a grinding machine.
How to choose an air conditioner for an apartment or house? - there is more useful information here.
It is not recommended to sand polymer floors to a depth of more than 2 mm: the applied layer may lose its strength.
In addition, the presence of reinforcement and other metal products in the processed plane is excluded. Otherwise, it will be impossible to complete the grinding process.
When sanding, a large amount of dust always arises. Because of this, you should not wet the floor with water: the sander will begin to slip, and wet chips will begin to accumulate on the working surfaces.
You will be interested in this article - Monolithic house: construction technology, pros and cons.
Preparing the base
The pour-on floor leveling technology is generally more forgiving of the condition of the base than conventional or dry screed. With the exception of one point - the moisture content of the base. Water vapor, pushing through the fill, destroys the polymer films between the granules of the mixture, and the coating begins to crumble. Therefore, it is highly advisable in any case, before filling, to install waterproofing with a wide vent around the perimeter so that fumes do not penetrate into the leveler. How? More on this below.
Concrete
Preparing a concrete base for pouring includes the following operations:
- Sealing cracks.
- Primer.
- Waterproofing.
- Thermal insulation and mesh laying.
The primer and mesh have already been mentioned; thermal insulation is a separate big topic. Sealing cracks with waterproofing is the same, but for filling these operations there are features that we will consider.
Small cracks are repaired using conventional methods. If there are gaping (2 mm or wider) and active ones located along the perimeter and diagonals, then you must first check using non-destructive testing methods to see if the entire ceiling is destroyed. If so, what kind of alignment is there, the house is in disrepair.
If not, then in the process of cutting cracks, cuts are made perpendicular to them with a width of 2-3 mm, a depth of 40-50 mm and a length of 150-200 mm, in increments of 200-250 mm. The cuts will create technological seams that “spread” the load. They are sealed along with the cracks.
Now about waterproofing. It is almost always needed; a zero result in a floor moisture test is a rare exception, and even then the situation can change, especially if the house is new. Firstly, polyethylene cannot be laid under a continuous covering; moisture diffuses through it. The floor filled with leveler should only breathe around the perimeter, so you need waterproofing or other special material. But before laying down the film, you need to paste over the corners.
Foam tape for gluing corners
The corners are covered with polystyrene foam tape. In addition to an outlet for fumes, it will also create an expansion joint. Foam tape is available in different types, incl. to create hidden expansion joints in concrete monoliths, but we need a special one for corners. It can be recognized by its color (not white), smaller thickness (3-5 mm) and, most importantly, by the groove extruded along the axis, along which it bends, see fig. The tape is glued with drops of silicone in increments of 100-250 mm; nitro glue can corrode it.
Tree
Wood flooring needs to be play tested first. To do this, use a plumb line in a tripod hastily made from scrap materials (pipes, slats, fishing rods) with a height of at least 1.5 m. The device is installed in the center of the room. The tip of the plumb line should almost touch the floor; a sheet of paper with a drawn cross, concentric circles, etc. is slipped under it. markers.
Then they walk around the room, monitoring the deflection of the load. More precisely, due to the slope of the floor, because the load still hangs vertically. The size of the floor play is related as the height of the suspension to the length or width of the room, depending on which direction the greatest deviation is noticed. The limit value is 1.2 mm per 1 m of the corresponding size; if more, the flooring needs to be sorted out or completely removed and poured over the base.
For example, a tripod 1.8 m high; room 2.5x4 m. The largest deviation of 2 mm in length was recorded. Overall game (4/1.8)*2 = 4.44 mm. There are 1.11 mm per 1 m of length, you can fill it.
Note: The room being tested must be completely empty.
Next, we open any board (or parquet block, or laminate slab) near the wall that is most suspicious of moisture, and inspect its underside and joists, if the flooring is laid on joists. Suddenly, traces of dampness, rot, mold, or a bug are discovered - again, we put off the leveling and start laying.
If everything is OK with the stability and integrity of the flooring, then you need to fill the cracks with sawdust mixed with liquid nails until the thickness of sour cream. You can also use ready-made wood putty, but not water-based. Roughly planed wedges are driven into wide (wider than 2 mm) cracks before puttingty and then planed flush with the surface. Now all that remains is to cover the corners with foam tape, apply waterproofing, as for concrete, and mesh, as already described. We remind you that wood leveler is needed on plaster and polyurethane with microfiber.
Decorative self-leveling floors
Construction stores offer a large selection of self-leveling floors with decorative patterns and three-dimensional perception. After preparing the concrete base using the traditional method, the further technology for pouring a self-leveling floor with a 3D effect is as follows:
- a synthetic banner canvas is selected, onto which the image you like is applied using high-precision laser printing;
- the fabric is ideally smoothed over the primed surface and glued to it using polymer glue; excess pieces of material near the walls are carefully cut off;
- After 1–2 days, necessary for drying the adhesive layer, you can begin to create a highly filled coating. Quartz sand, marble chips, and various decorative elements are used as fillers, which are scattered over the canvas and carefully leveled;
- if necessary, a hardener is added to the polymer mixture, after which the compound is poured onto the floor and leveled, with the obligatory removal of bubbles;
- The floor should be poured in several stages until the fillers are completely covered with the mixture. In addition, layer-by-layer pouring allows you to reduce the polymerization time;
- the formation of the coating ends no earlier than after 10 days.
Despite the fact that the effect of a three-dimensional image is perceived only from one point in the room, the resulting result will meet expectations.
Creating an absolutely flat surface is a mandatory requirement when installing modern floor coverings.
Having studied all the recommendations on how to make a self-leveling floor, you can do the work in your own house or apartment yourself, if necessary, involving not an expensive specialist, but a good friend. Already as an assistant.
Consumption
It remains to calculate the consumption per 1 m² of the selected mixture. This is where the main highlight of the method appears: we get the flow rate immediately in the dry weight of the sales material, without bothering with calculating the density of the finished solution, for which we would have to make arbitrary assumptions. We just need to multiply the calculated layer thickness by the floor area and the specific material consumption; all these values are accurate and reliable.
In our example, for a room of, say, 16 square meters. m will yield 259.2 kg of leveler and 72 kg of level. All that remains is to reduce it to bags containing 25 kg. We round them according to the rules of arithmetic, from half to more. Calculation according to our data will give 10.368 bags of leveler and 2.88 bags of level. We take 10 bags of the first and 3 of the second.
And now your homework: go to the website of any hardware store, find out the prices and calculate the savings compared to traditional estimates.
Right choice
Which self-leveling floor mixtures are best to choose? In stores and hypermarkets selling building materials, self-leveling mixtures of various brands are presented: KNAUF, Vetonit, Ceresit, Bolars, Volma, Horizon. The name of the manufacturer does not play a decisive role when choosing the required material. If you follow the technology for preparing the solution, the result will be good regardless of the fame and popularity of the brand.
It is impossible to definitely and accurately say which self-leveling floor is better and which is worse. When choosing, you need to start from what base and in what room the floor will be poured. For each specific case, a specific composition is required. Therefore, in order to make the right choice, it is better to first answer the following questions:
- In a room with what level of humidity will the floors be leveled?
- On what base will the self-leveling mixture be applied?
- Is long-term contact with water possible when using the floor?
- What is the mixture used for: for rough leveling or for finishing?
Self-leveling mixtures are selected according to their composition depending on the answers to the questions listed above.
What you need for work
Having planned the installation of a self-leveling floor, you must first of all prepare the necessary tools and calculate how much material will be required for the work.
How to calculate material
To calculate the amount of mixture required, use the formula:
1.8 x H x S = V.
In this formula:
- H – thickness of the required screed layer in millimeters;
- S – room area in square meters.
- V – required amount of dry mixture in kilograms;
- 1.8 is a coefficient that shows how many kilograms of mixture you need to take to fill one square meter of floor with a thickness of 1 mm.
For example, we need to fill the screed with a layer of 1.5 cm in a room of 18 square meters. According to the formula: 1.8 kg x 15 mm x 18 sq.m. = 48.6 kg. Since one bag contains 25 kg of mixture, for this room we need 48.6 / 25 = 2 bags of mixture.
In addition, to prepare the base of the floor, you will need a deep penetration liquid primer, at the rate of 200-300 mg of liquid per 1 sq.m. This primer is sold in 5 and 10 liter bottles. For the intended room you will need a little more than one five-liter bottle, or it is better to take one ten-liter bottle and cover the floors twice.