Before laying the finishing floor covering when renovating an apartment, it is necessary to prepare the base. The service life of the floor in the future will depend on this.
The base must be made strong and absolutely level. Self-leveling flooring is fully consistent with these qualities; it is a self-flowing and quick-hardening mixture.
If desired, everyone can fill a self-leveling floor with their own hands, regardless of the manufacturer, the technology is almost the same for everyone.
Self-leveling floors can be poured onto concrete, wood, metal and other substrates. After complete drying, ceramic tiles, laminate, carpet and other floor coverings can be laid on it.
Kinds
All self-leveling floors can be divided into several large types depending on the binding material:
- polyurethane;
- epoxy;
- gypsum;
- on a cement base.
Polyurethane self-leveling floors
As the name suggests, their base is polyurethane. They have high strength, immunity to chemical influences, and wear resistance. Increased elasticity prevents cracks.
Can be used in both residential and industrial premises.
Polyurethane flooring can be poured onto almost any substrate: floorboard, laminate, metal, concrete.
Epoxy self-leveling floors
The basis of the epoxy floor is epoxy resin and hardener. These are the most beautiful polymer self-leveling floors; a good craftsman can use it to create a real work of art.
The floor can be transparent with any pattern, glossy like glass or matte. It is very hard, resistant to various chemicals and mechanical stress, but is afraid of pinpoint impacts.
Epoxy floors are recommended for areas with high loads (schools, cafes, offices) and for residential premises due to their high decorative properties.
Due to the more complex manufacturing technology, it is recommended to entrust their filling to specialists.
Self-leveling cement-based floors
These are cement-based dry mixtures to increase plasticity and greater spreadability, special modified additives are added to them.
Suitable for leveling large differences, cracks and other defects on the subfloor.
Used as a base for laying the finishing floor covering on it:
- laminate,
- tile,
- linoleum, etc.
One of the leaders in the modern construction market is the fast-hardening mixture OSNOVIT SKORLINE T-45; using its example below, step-by-step instructions for pouring a self-leveling floor in an apartment will be given.
Osnovit Skorline T-45 is used for surfaces with unevenness up to 10 cm, both for final leveling and preliminary leveling. It is non-shrinking, high strength and crack resistant.
It is also suitable for those who want to install a “warm floor” system. This is facilitated by its high self-leveling and spreadability.
Founder Skorline T-45 complies with all hygiene standards in force in the Russian Federation, it is environmentally friendly and does not contain harmful impurities. When hardened and completely dry, the surface is completely smooth and does not require further sanding.
Video instructions for pouring self-leveling floor:
Tools for work
Pouring self-leveling floor
The work is carried out in two ways: manual and mechanical.
Let's consider equipment for manual pouring:
- Synthetic padding roller – used for applying primer. The pile should be from 12 to 14 millimeters.
- Spatula - used to apply the mixture in hard-to-reach places, for example, under radiators.
- Squeegee – will help to evenly distribute the coating material.
- Needle roller – removes air bubbles. Its moving part must be in close contact with the surface.
- Container – for mixing the mixture.
- Mixer or drill with attachment - for effective mixing of components.
- Flat shoes are a special sole for shoes covered with spikes. It will not leave any traces on the coating that has not yet dried.
- Respirator - will protect the body from caustic fumes that emit mixtures for self-leveling floors.
- Gloves – will prevent contact between skin and material. The choice should be made of cotton ones.
- Masking tape – applied around the perimeter at the bottom of the wall, protects the wall from adhesion to the self-leveling coating material.
- Film with adhesive tape – protects the freshly applied coating from dust. Must be applied to untreated walls.
The list of tools is given directly for installing the self-leveling floor. Other equipment will be needed for preparatory work and rough finishing.
Advantages and disadvantages
Below we present the general advantages and disadvantages of self-leveling floors.
Advantages:
- aesthetic appearance;
- relative ease of filling;
- hardness, high impact resistance;
- durability 10 years or more;
- high adhesion, the ability to pour on almost any substrate;
- hygiene, ease of cleaning and operation;
- there are no seams or joints;
- fireproof;
- resistant to various chemicals;
- maintainability.
The self-leveling floor will meet all the described advantages if the technology for filling it is fully followed.
Flaws:
- high price;
- complexity of technology;
- the floors “do not breathe”, regular ventilation of the room is necessary;
- cold, it is necessary to insulate;
- difficulty of dismantling.
Recommendations for choosing a self-leveling mixture for floors
A wide range of mixtures allows you to choose the optimal self-leveling composition, but makes it difficult to choose. When purchasing self-leveling floors, pay attention to the following factors:
- Determine the type of room - residential or not, what load will be applied to the surface, how many people will be in the room during the day;
- The purpose of forming self-leveling floors is whether it will be a subfloor, or you need a smooth finishing surface with a pattern. For the subfloor, a coarse mortar with coarse aggregate is suitable; for the finishing layer it is necessary to use finely ground aggregates;
- The initial appearance of the surface is determined by the presence of large defects. For an uneven subfloor, choose a mixture that can form a thick layer of mortar;
- Price of self-leveling floor - this parameter depends on the volume of plasticizers in the mixture;
- If the floor will be poured over “warm floors”, then it is necessary to use compounds with high thermal insulation properties;
- When purchasing, find out the shelf life of the mixture and the time it takes for the solution to completely harden. Standard self-leveling floors on a central concrete floor set in 30-40 minutes, quick-hardening mixtures - in 15-20 minutes.
Work with quick-hardening compounds should be carried out by two people in order to have time to fill the entire area before the floor begins to harden.
How to choose a self-leveling floor
The choice of type of self-leveling floor depends on:
- future load;
- the material from which the initial base is made, on which the pouring will be performed;
- presence of defects;
- thickness of the future layer;
- type of finishing floor covering.
For living rooms in an apartment, a polyurethane self-leveling floor is better suited, and in the bathroom, an epoxy floor with increased moisture resistance is recommended. Both types can be used without finishing.
An industrial self-leveling floor is suitable for administrative and commercial buildings; it has increased strength and can easily withstand heavy loads from various loads and traffic of a large number of people.
Polyurethane self-leveling floors are more hygienic, waterproof and safe and are the best choice for residential premises.
Price per square meter of self-leveling floor
The unsurpassed quality and affordable price per meter of self-leveling flooring gives everyone the opportunity to add a “zest” to their home. But, of course, the price will not be low everywhere; the closer to the capital, the higher the cost of work. The average cost of installation of single-color self-leveling floors along with the material in Moscow is from 4,000 rubles/m2. As a rule, the larger the area, the greater the discount companies give.
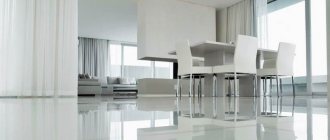
The unusual design of the hallway will surprise even unsurpassed connoisseurs of beauty
Required Tools
You can fill the self-leveling floor with your own hands using the following tool:
- bucket or other container for mixing 20-25 liters;
- needle roller;
- drill or special mixer with an attachment;
- squeegee for drawing out the solution with an adjustable gap;
- wide spatula;
- special paint shoes;
- polyethylene film;
- level.
DIY self-leveling floors: video, instructions, pros and cons
To make it easier to perceive the information, we will describe all the work step by step:
- Pour the pre-prepared solution onto the floor surface. To ensure that the composition is distributed evenly, you need to use a wide spatula.
At the first stage, the solution is distributed over the surface using a spatula
- After applying the composition to the floor, you need to roll it over the surface with a needle roller.
To distribute the composition evenly, use a needle roller
- Pour the next portion of the prepared solution, smooth it and roll it.
- Cover the floor with plastic film. This way, you will avoid uneven hardening of the solution.
- To make the coating beautiful and shiny, it is recommended to apply polyurethane varnish to it.
Helpful information! It is better to start pouring the floor from the far wall located from the entrance.
A perfectly flat floor is a well-prepared and poured mixture
To make it easier for you to understand this issue, we recommend watching this video:
Pouring self-leveling floor step by step instructions
As mentioned above, here are instructions for pouring the fast-hardening mixture Osnovit Skorline T-45.
Preparing the base
The base under the self-leveling floor in the apartment must be cleaned of all kinds of stains, paint, crumbling coatings, vacuumed and dry.
All further operation of the self-leveling floor depends on this stage.
DIY pouring technology
When the design and type of floor has been selected, materials and tools have been purchased, you can begin to work. For convenience, all operations can be divided into several stages.
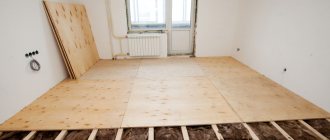
Surface preparation
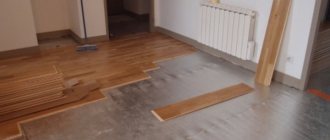
Most often there are two base options: concrete floor and wooden base.
There are no difficulties with a concrete floor. The surface is cleaned, the humidity is checked - no more than 4%. If the foundation has been poured recently, it is advisable to wait at least four weeks. The tiles are tested for strength, dust and dirt are removed, and uneven surfaces are filled with fiberglass. Check the level deviations from the horizontal, correct the bending with a screed, if necessary.
Preparing the surface for self-leveling flooring
Wood floors usually require more attention. First, we remove the old baseboards and remove the paint using a wire brush and spatula. We finally bring the boards to condition with sandpaper, after which we thoroughly vacuum and wash the floor.
Attention! Now you can secure the loose individual boards and begin sealing the cracks with sealant. This mandatory procedure is done in order to prevent the solution from leaking into the joints.
If the base is heavily contaminated or its strength is in doubt, manufacturers recommend using a special separating layer made of ordinary polyethylene with a thickness of 100 microns.
A special damper tape is glued around the perimeter to compensate for thermal expansion and possible movements of the floor covering.
Damper tape sticker
For an expected layer with a thickness of 1-2 centimeters, reference beacons may be needed. We install them level at an equal distance from each other. For an opaque floor, you can use regular self-tapping screws.
- Priming the floor must be done to improve adhesion, fill micropores in the surface and better fillability with the solution. The primer can be penetrating or strengthening (Betonkontakt, St-17, Putzgrunt). Apply with a roller or brush over the entire floor area with mandatory drying between layers for 12 hours. From this stage, the air temperature in the room should be constant, drafts are excluded.
- Preparation of the solution. To do this we need a plastic bucket or basin, a drill with an attachment or a construction mixer. Detailed instructions for preparing the solution and proportions are always indicated on the packaging.
A strictly measured amount of water at a temperature of about 20 degrees is poured into the container, then the dry mixture is introduced, continuously stirring, and finally brought to the desired consistency, stirring for 10-15 minutes. The lifetime of the finished solution is 40-60 minutes and depends on the base binder component. The longest-drying ones will be cement-based.
Important! For a high-quality self-leveling coating, the proportions must be observed very accurately. Excess moisture leads to delamination and deterioration of strength. A solution that is too viscous will be difficult to install.
You can do a simple readiness test. The prepared solution is poured into a ring made from scrap materials with a diameter of 5 centimeters and the same height. Then the ring is removed, the mixture spreads over the surface and the diameter of the resulting spot is measured. It should be between 16 and 18 centimeters.
Preparing to pour the floor
The tool at this stage is as follows:
- squeegee;
- wide spatula;
- needle roller with a long handle;
- solvent and polyethylene film;
- paint shoes;
- laser level (or similar device for determining the horizontal).
Before pouring the main component, it is necessary to calculate the volume of the mixture with a reserve. It is convenient to do this using a laser level, when height differences and the thickness of the intended layer are clearly visible.
If you are planning a backing with a pattern or a built-in composition with a 3D effect, then its placement occurs at this stage. Individual fragments are well fixed with glue or “liquid nails”.
Required Tools
How to fill correctly
We always start on the far wall from the entrance. Pour the solution onto the floor and level it with a spatula. Pour the next portion next to it and also level it. Use a squeegee to adjust the thickness of the fill. The interval between fillings should not exceed 10 minutes.
We roll each section with a roller and smooth it out to release all air bubbles, the surface will then be dense, smooth and uniform.
Now it can take from 6 hours to several days until it dries completely. At this time, it is recommended to cover the floor with polyethylene for uniform drying. Drafts during the curing process of the solution are the worst enemies and should be avoided.
After complete drying, inspect the floor for defects and cracks. If necessary, you can repeat the filling with a finishing thin layer. We coat the finished and cleaned surface with varnish or leave it as is. It will be possible to bring in and arrange furniture and other equipment 4-6 days after completion of the work.
Calculation of mixture consumption
The consumption of self-leveling floor components is affected by the quality of the base - the worse it is leveled, the greater the consumption. High-quality application of primer in several layers also helps reduce the required materials.
The average universal value for calculating the consumption of dry mixture is 1.3-1.8 kg per 1 square meter of floor with a layer thickness of 1 mm.
A more accurate consumption can be found on the packaging of the dry mixture; it may vary depending on the type of floor and manufacturer.
How to prepare the correct solution?
When preparing the solution, it is necessary to correctly determine the consistency. If you fully adhere to the manufacturer's recommendations, you should get the correct consistency. First, you need to pour water into a deep container, and then the dry mixture will be poured into it. The resulting solution must be stirred for ten minutes; the easiest way to do this is with a construction mixer.
A construction mixer will significantly save time and effort on preparing the solution.
To determine the quality of the solution's spreadability, you need to perform a simple test. To do this, take a plastic ring, the diameter and height should be five centimeters. There is no need to buy a special plastic ring; if you have a can of shaving foam at home, you can use the cap from the can. The bottom of the lid must be cut off, and then installed on the table or floor. Next, you just need to pour the solution into the lid and lift it so that the mixture spreads over the surface of the table. If the consistency has spread more than 18 centimeters, this is good, when less, you need to add water to the solution.
The spreadability of the solution is the most important parameter for a high-quality work result.
Cracks in the self-leveling floor
If the pouring technology is not followed, cracks may appear on the self-leveling floor. They can be large all the way down to the base or superficial and small.
The main causes of cracks:
- Pouring onto a wet concrete base.
- Movable, fragile foundation.
- The required amount of water when preparing the mixture was exceeded.
- The expiration date of the dry mixture has been violated.
If small cracks up to 1 cm appear, there is no need to refill the entire floor. You can fix them by doing some minor repairs:
- widen the crack;
- remove dust using a vacuum cleaner;
- apply primer and dry;
- Fill the crack with new mortar.
Compliance with the pouring technology will make it possible to create a strong and even base for the installation of any floor finishing covering.
At what temperature
Many users are interested in the question of how to make a self-leveling floor in an apartment. When performing such work, it is necessary to strictly adhere to the manufacturer’s instructions and ensure the correct temperature and humidity conditions in the room. Here you need to be guided by individual parameters for a specific solution. At a temperature lower than the specified value, the solution will spread poorly over the surface, take longer to harden, and its consumption will increase. If the temperature is higher than the specified limit, the mixture will harden faster than necessary, but this will affect the quality of the coating. Cracks may appear on the surface and the durability of the self-leveling floor will decrease.
When laying the screed, the recommended temperature parameters must be maintained until the material has completely hardened. If the room is too hot, air bubbles may form on the coating. The temperature in the room should be constant even at the stage of applying the primer; sudden changes lead to the formation of condensation on the base. It is prohibited to apply the mixture under such conditions; the humidity of the base surface should not exceed 2%.
Important! A freshly laid self-leveling floor is protected from moisture for 24 hours from the moment the installation work is completed.
3D self-leveling floor
3D floors are a multi-layer floor covering with a pattern on the top. This can be any photograph, picture, coins, river sand or other images. The colored design is covered with a transparent protective layer; the thicker it is, the more voluminous the image will look.
Interesting article on the topic: Self-leveling floors - types and characteristics
There are two types of floors with a 3D effect; the first has a simple image printed on the surface. In the second case, the drawing takes on new features if you look at it from a certain angle. Construction standards for surface preparation and application of primer are no different; differences are present only in the process of installing the base and leveling layers. Let's take a closer look at the technology.
The base layer allows you to create a background for the future drawing. It is necessary only in cases where individual elements and patterns will be applied to the surface, and not a general photo. The base layer of the self-leveling floor is selected with the same care as the main pattern. The starting composition is mixed in small portions with a drill with a special attachment and leveled on the base. Such requirements are due to the fact that the specified solution hardens quickly. After laying the layer, the surface is carefully rolled with a needle roller, which will free the screed from air bubbles.
Important! Before correcting unevenness, the frozen screed is checked with a building level. In places with elevation differences, apply the required amount of base layer.
At the next stage of work, the design is glued to the floor; this is a difficult and crucial moment. Thick fabric with thermal printing is often used as a decorative pattern. This allows you to avoid deformation of the pattern during operation. When sticking the image, it is necessary to completely get rid of air bubbles; areas with air bubbles are redone. The canvas is attached to a liquid base composition, it is laid on the prepared surface, after which the air is dispersed with a roller in movements from the center of the product to the edges.
At the final stage of work, the finishing coating is laid under the self-leveling 3D floor. The thickness of this layer is maintained at 3-4 millimeters (every m2 of flooring requires 3 to 4 kilograms of the mixture). Material consumption depends on the preparation of the base and composition. Before applying the protective layer, you must read the instructions on the manufacturer's packaging.
The finishing mixture begins to set 20-40 minutes after preparing the working solution, so the builder’s actions must be organized and coordinated. The user calculates the required amount of solution and only after that begins the main work. The finished composition is evenly distributed throughout the room, taking into account the protruding parts of the enclosing structures, columns, if they are in the room, and other interior details. It is necessary to move on the floor covering in paint shoes. After laying the finishing layer, the surface is carefully treated with a needle roller.
Types and features of material
Materials are classified according to various criteria, but primarily according to the binder. The most popular coatings are based on gypsum-cement (complex mineral) binder. They do not require reinforcement. The finishing coating can be laid on them after 3-7 days (tiles, stone) or after 7 days (laminate, linoleum). You will be able to walk on the surface 4-6 hours after pouring.
Cement-based compositions with the addition of fractionated sand and modifying additives are in demand Such compositions are easy to work with. They harden, forming a smooth surface, the floor can be walked on after 24 hours, and the topcoat can be laid after 3-7 days.
The "Starateli" trademark produces self-leveling floors that comply with GOST 31358:
1
2
3
4
5
- Thick (cement based). Used when there are significant differences in floor level. The recommended layer thickness is from 30 to 100 mm. Suitable for basic and final leveling of concrete or cement bases in rooms with normal and high humidity (including without heating). Can be used for outdoor work.
- High strength (cement based). It is used in places with high traffic, where there are increased operating loads (garages, basements, industrial workshops, warehouses). Suitable for underfloor heating systems. Layer thickness – from 30 to 100 mm.
- Practical (mineral binder based on gypsum and cement). This is the most popular material that is suitable for rooms with normal humidity in any buildings - from residential buildings, clinics and kindergartens to sports complexes, administrative facilities, and industrial enterprises. Layer thickness – from 5 to 70 mm.
- Fast-hardening (mineral binder based on gypsum and cement). The optimal solution under tight deadlines: you can walk on such a surface in just 4 hours. Suitable for any building - from residential buildings and schools to industrial workshops. Layer thickness – from 5 to 100 mm.
- Thin (mineral binder based on gypsum and cement). Used for finishing leveling of gypsum, concrete, cement-sand and other bases. Layer thickness – from 1 to 30 mm.
Advantages of the listed compositions:
- Ideally smooth, even surface.
- Excellent spreadability.
- Strength, wear resistance.
- Resistant to moisture and cracking.
- Frost resistance.
- Affordable price.