The floor screed is the part of the base that is located between the ceiling and the finishing coating. Without it, it is impossible to make the floors perfectly level - so that even the most demanding finishing material in terms of installation conditions can be laid on them without danger. You can’t do without it when building a house and even during a major renovation, but how to make a floor screed is a very difficult question for many. Let's try to figure out how to create it with our own hands.
How to make a floor screed
What is it for?
A screed is not only a structural element of the floor responsible for its leveling. It also performs other equally important functions - for example, it takes on and redistributes all the loads experienced by the floor covering. But still, the most important function of the screed is leveling the base. It is necessary in order to easily and correctly lay the floor covering, some types of which are quite demanding regarding the evenness of the subfloor. For example, laminate, ceramic tiles, parquet and other materials will quickly become unusable if they are used while lying on an uneven floor. They will begin to break and collapse, and when moving across the coating it will make an unpleasant squeak.
What is a floor screed
Another function that the screed performs is to increase the heat, sound and waterproofing properties of floors . It also makes it easy to raise the base level to the required level if necessary.
DIY floor screed
Semi-dry screed in the construction of heated floors - water and electric
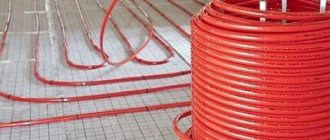
This type of subfloor is very suitable for organizing “warm floor” heating systems, both for electric and water versions.
The initial stage should be waterproofing and - absolutely! – thermal insulation of the base. The heat-conducting elements are laid on the prepared base and filled with mortar, followed by leveling. The layer thickness ranges from 25 mm (for electrical cables) to 50...60 mm or more for water pipes. The distance from the surface of the screed to the top mark of the heating element must be at least 10 mm.
Since “warm floor” systems are often mounted on insulation made of expanded polystyrene or polystyrene boards, a semi-dry screed with such insulation is often called a “floating” screed - due to the fact that there is no rigid adhesion of the screed itself to the base. The insulation and damping tape around the perimeter give the entire floor the ability to move slightly, expanding and contracting under the influence of temperature fluctuations.
What kind of screed is there?
Floor screed can be divided into different types according to several criteria. For example, depending on the manufacturing method, it can be dry, wet, or combined.
Table. Main types of screeds.
| View | Description and characteristics |
| Dry | This option is made without the use of heavy mortars. The technology is used to level floors with very large differences in height (up to 11 cm), as well as in rooms where floors cannot experience significant loads. In this case, the dry screed can be laid along the joists and made of plywood or chipboard, or made from sheets of gypsum fiber, which is laid on an expanded clay backing. The thickness of the screed can be quite large. Dry screed is easy to use, does not require drying after production, is very light, and does not put a load on the floors and foundation of the building. |
| Wet | This screed can also be called concrete or cement. The most familiar and most frequently used method of leveling and raising the floor. As a rule, it is used for the initial stage of leveling floors or subfloors. It is made on the basis of cement with the addition of fillers, laid in a layer of 3 cm or more. Difficult to work with, takes a long time to dry, but is very strong and durable. Unfortunately, it exerts significant pressure on the ceiling due to its considerable weight, and therefore cannot be used for all types of buildings. For 1 sq.m. there are at least 100-120 kg of mortar - the mass is quite impressive. |
| Combined | This type of screed combines the main advantages and, in some way, the technology of wet and self-leveling screeds. |
| Self-leveling | This method is good because there is no need to use beacons and somehow monitor the evenness of the finished base. The fact is that special mixtures are used for production, which tend to self-level on the surface of the subfloor. Such compositions are quite expensive, and they can be used to fill floors with uneven surfaces up to 2 cm. Often, using this method, you can additionally level a regular cement screed. |
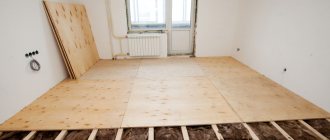
Dry floor screed device
Screeds are also divided into different types depending on the number of layers. Thus, they come in single-layer (poured at once to the required thickness) and multi-layer . The latter have the so-called rough and finishing surfaces. As a rule, the rough base has a thickness of 2 cm or more, and the finishing base has a thickness of 3-20 mm.
Based on the type of connection to the floors, screeds can be divided into solid and floating . The first has a reliable connection with the rough base, the second has no connection with anything. Hydro- and heat-insulating materials are used for installation.
Floating floor screed
Arrangement of the floor in the apartment
The arrangement of the screed is carried out in several standard stages:
- Preparing the subfloor. Removing the old floor, if any. If there are gaps between the floor slabs, they are sealed with mortar or foam. After dismantling the old coating, the surface is cleaned of dirt and dust.
- Laying the insulation cake. It is recommended to install hydro- and sound-proofing material. The panel house is thermally insulated.
- Reinforcement and installation of beacons. The process depends on the solution used and the thickness of the floor. Laying is carried out at the selected height.
- Filling. At this stage, the solution is poured and leveled. The quality of the result depends on the accuracy of the work performed. The solution is evenly distributed over the entire area of the room.
After pouring, the drying process occurs. It takes a certain amount of time. It all depends on the thickness of the laid layer and the chosen type. A wet screed takes the longest to dry. Further finishing work is carried out only after the solution has completely dried. Otherwise, it may be damaged and reduce its strength. It is important to determine whether a dry screed or a cement screed is better.
What criteria should you use to choose a type?
When choosing a type, pay attention to the following parameters:
- Bearing capacity of the base. The floor has a certain weight. The supporting base must have a margin of strength to withstand the load created by the freshly laid mortar.
- Room location. If the room is located above living quarters, the risk of flooding of neighbors below is taken into account. Laying a waterproofing layer is mandatory, especially in rooms with high humidity. The waterproofing material is applied to the walls above the height of the mortar pouring.
- Condition of the load-bearing floor. If the base has significant defects, it is not rational to use an expensive type for leveling. Filling is performed in several stages. The first layer eliminates defects, and the second creates a smooth floor.
- Ceiling height. Each type provides a coating that has a minimum thickness. In rooms with low ceilings, laying thick-layer flooring is not rational. The strength of the floor depends not only on the thickness, but also on the quality of the materials used.
- Requirements for the finished coating. The flat surface allows you to finish the floor with different materials. Laying of parquet and laminate boards is carried out on a high-quality prepared floor.
At the same time, the need to use special equipment and tools is taken into account. If you make the floor yourself, you need to know the specifics of using the technology.
What can be used to create a screed?
Depending on the type of screed, they can be made of various materials. So, cement, water and sand are used to create a wet screed. In this case, cement acts as a binding material, and sand becomes a filler. To improve the quality of building mixtures, various components can be added to them to improve strength and reduce drying time.
On a note! To prepare such a mixture, you need to mix 1 part cement with 3 parts sand. The required amount of water is added to them. This is a fairly economical option.
Leveling concrete using the rule
To create a wet screed, ready-made sand concrete sold in stores can also be used. Its main disadvantage is the high shrinkage rate. Because of this, the thickness of the screed layer cannot be less than 3 cm, otherwise it will quickly become covered with cracks.
Advice! To reduce the risk of cracking of the screed, fiber fibers are added to the raw composition or layers of reinforcing mesh are laid on the rough base.
Fiber fiber for screed
For wooden floors, gypsum-based mixtures are used. This material can be laid in a thin layer, as it practically does not shrink. Drying times are also attractive - only 1-2 days. The only exception to the use of such compounds is high indoor humidity.
Self-leveling or self-leveling floors are usually used for final leveling of conventional wet screed. The reason is the fairly high cost of the material. This composition is used to level floors with unevenness of 2-7 mm.
Gypsum self-leveling floor
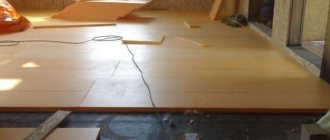
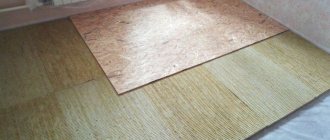
To make a dry screed, you will need sheet materials such as plasterboard, as well as medium and fine expanded clay for filling the base. The joints of individual sheets of material are treated with adhesives.
Dry floor screed and installation of gypsum fiber boards
Additional components for mixtures
To speed up drying, as well as greater plasticity, various components are introduced into the mixture: thinners, pore-forming agents, resins, mineral fillers, polymer additives. They can be pre-mixed with the main components or added to the mixture immediately before pouring the floor, so as not to shorten the already short working time.
Thanks to various additional additives, it has become possible to create special compositions suitable for various substrates, including wood, as well as for heated floors. There are also ties that can block electromagnetic waves emanating from electrical appliances, for example, underfloor heating cables.
Thomsit SE 93 Quick-drying screed (25 kg)
- Thinners are needed to make the solution more plastic. Such a mixture will require less water to achieve optimal consistency, and the less water, the faster the finished screed dries. In addition, they allow you to achieve a more uniform distribution of moisture throughout the thickness of the screed, which is important during drying.
- Pore formers speed up the process of moisture removal, although the pores that appear during drying reduce the strength of the finished coating.
- Resins and polymers, on the contrary, increase the strength of the floor and make it possible to give it additional useful properties, for example, frost resistance, chemical inertness, non-flammability, and wear resistance. The addition of such substances allows you to reduce the amount of base, which also speeds up drying, while reducing the likelihood of cracks.
These screeds are poured quickly, which requires some skill, but they dry out much earlier than traditional ones. Cement-based mixtures may take up to 2 weeks, and gypsum mixtures even less. Polymer compositions can be ready for further repairs within a day.
It is very important to comply with the conditions recommended by the manufacturer. They usually relate to temperature and humidity. If all the specified parameters are perfectly observed, the screed will dry faster and gain strength.
How to make a floor screed
The installation of floor screeds invariably raises questions among beginners. Below are instructions for creating dry, wet and semi-dry screed. However, no matter what option is chosen by the craftsmen, in any case, before starting work, it is important to prepare a rough foundation.
How to make a floor screed. We use the ADA CUBE 360 laser level
Features of base preparation
To begin with, if the house was not built from scratch, you will need to get rid of the old floor finishing. Moreover, you will have to remove the old screed down to the ceiling. It is especially important to repair any flaws present on the base. These could be cracks, chips, or any gaps. All this must be sealed with a sealant or cement composition after preliminary priming in order to avoid too much consumption of mixtures (relative to a wet screed) and to increase the adhesion of the compositions to the base.
Preparing the base for the screed - photo
On a note! Sometimes a new screed is poured directly on top of the old one, but this is only permissible if the previous version of the base is strong enough. However, most likely only an experienced specialist will be able to assess the condition of the old screed. Sometimes it is even enough to simply use self-leveling compounds to make the old base perfectly level.
You can clear the ceiling from the old screed using a jackhammer. Next, the base is cleared of construction waste, which is placed in durable bags and taken to a landfill.
Dismantling a floor screed with a jackhammer
Small protrusions on the old screed can be removed using a grinding machine. After preparation, it is important to prime the base in order to increase adhesion.
Making a wet screed
Step 1. First of all, prepare all the necessary tools and materials. This is a building level, slats that will act as beacons, screws and dowels, building mixtures, sand and cement, usually a hammer drill.
What is needed to arrange a wet screed
Calculator for calculating the amount of ingredients of a mortar for floor screed
Go to calculations
Step 2. The base is cleared of debris and thoroughly prepared as described above.
The base must be properly prepared
Step 3. Using thread, a marker and a tape measure, mark the places for screwing in the screws - they will help install the beacons. The places where the self-tapping screws are screwed in should be located on the same line. In this case, the distance between separately located points should not exceed the length of the rule.
Places for screwing in self-tapping screws are marked
The places where the self-tapping screws are screwed in should be located on the same line
Step 4. Self-tapping screws are screwed into the rough base. To do this, holes are drilled in the floor, and then dowels are inserted into them, into which the fasteners are screwed.
A hole is drilled in the floor
Dowel is inserted
The dowel with the self-tapping screw is clogged
Step 5. The height of the screws is adjusted using a screwdriver. They should be located at the same level relative to each other. Determining the horizontal level is simple - to do this, you need to find the zero mark on the wall, that is, draw a line around the perimeter that will have the same level everywhere. The most convenient way to do this is using a laser level. The minimum thickness of the screed will be in the place where the highest point of the base will be located.
The height of the screws is adjusted using a screwdriver
Step 6. The horizontality of the installed screws is checked using a building level. It is applied to all elements, that is, the determination of horizontality is made over the entire surface of the floor.
Using a building level
Step 7. Beacons are installed. In the area of the self-tapping screws, a small amount of mortar is applied to the base on both sides.
A little mortar is applied
Step 8. The beacon strip is placed on the mortar so that its lower part rests against the head of the screw. Slats made of oak or metal can be used as beacons. The distance between beacons usually does not exceed 1.5 m. Beacons are installed. A damper tape is glued around the perimeter.
Beacon installation
Beacons installed
Step 9. Prepare the mortar. To do this, cement of a grade of at least M400 is mixed with sand in a ratio of 1:3. The mixture is mixed with a construction mixer, water is gradually added to it to make it plastic (approximate consumption - 1 liter per 5 kg of mixture). The result should be a homogeneous, evenly mixed mixture with the consistency of thick sour cream, which is kept for about 5 minutes and mixed again. The prepared mortar is applied to the base between the beacons. It is recommended to start laying out the mortar and creating the screed from the corner farthest from the exit from the room.
The prepared solution is laid out
Attention! Experienced experts advise adding ingredients to water, and not vice versa. Then it will be easier to stir the composition without forming sediment at the bottom of the container.
Step 10. Using the rule, the solution is leveled. In this case, the rule bar is placed with its edges on the beacons and moves along them. This makes it possible to level the screed. All work on creating a screed is carried out in a similar way.
The solution is leveled using the rule
The minimum thickness of the screed is 2 cm in the case of pouring without reinforcement, and with it - all 4 cm. The dimensions of its single piece should not be more than 4 m, otherwise it may crack under the influence of temperature and humidity changes.
Attention! If the screed is poured onto any communications (for example, a heated floor system), then its thickness above them should not be less than 2 cm.
How to dry screed
When working with a cement mixture, it is important to follow some requirements so that the screed dries properly and does not crack:
- The solution sets quickly enough, so it is recommended to complete the work of pouring screed in one room in a day. Typically, the initial hardening of the mixture occurs within a day at a temperature of +20 degrees;
- You cannot dry the screed quickly - it may crack if it does not have the opportunity to dry naturally;
- You cannot move on fresh screed for the first 7 days;
- the period for complete drying and the possibility of further work indoors is 28 days;
- For the first 2-3 days, it is recommended to spray the screed with water, compensating for the evaporation of moisture. The floor can also be covered with plastic sheeting, which is removed after about 2 weeks.
How long does it take for floor screed to dry?
On a note! After a couple of days, the beacons can be removed if desired by filling the resulting cavities with cement mortar. But you don't have to do this.
We evaluate quality
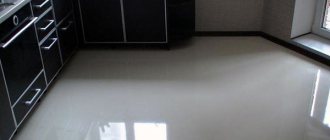
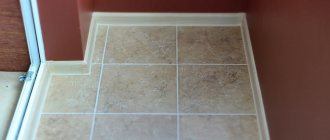
Determining whether the screed turned out well is easy. The color of the finished base should be gray, and the surface should be perfectly smooth. The last indicator will help determine the building level laid on the floor - if the gap between it and the floor is only 2 mm, then the screed is level. Also, the base should be hard to the touch - even when hit with a hammer, the latter will leave minor marks on the surface.
Example of a finished floor screed
Video - How to make a wet screed
Recommendations for choosing a mixture
When choosing a mixture for forming a screed, you need to take into account many different factors, including:
- the exact composition of the mixture for preparing the solution;
- humidity conditions in the room where the pouring will take place;
- the time required to achieve residual moisture (this will be discussed a little later);
- operating conditions of the screed (presence/absence of heated floors, type of finishing coating);
- design load of the room;
- climatic conditions in a particular region.
Screed device
When choosing a mixture for screed, it is important to carefully read the information on the packaging, analyzing whether the material is suitable for use in a particular case. Particular attention is paid to the relationship between climatic conditions and conditions of use of the mixture. Quick-drying screeds dry optimally quickly at temperatures from +17 to +20 degrees and air humidity up to 65%.
Table. Comparative characteristics of mixtures from different manufacturers.
| Name | Layer thickness, mm | Binding component | Strength, MPa | Pedestrian load, hour. | Complete drying time, days. |
| Vetonit 5000 | 5-50 | Special cement | 20 | 2-4 | 1-5 |
| Thomsit DG | 3-30 | Complex: binders, mineral fillers | 15 | 8 | 1-7 |
| BIRSS Rapid-2 | 3-100 | Cement | 20 | 6-10 | 5 |
| Prospectors | 5-80 | Complex: binder, sand | 15 | 4 | 7 (in case of laying tiles - 3) |
| Ivsil Express-Basis | 20-100 | Special cement | 20 | 3 | 12 (for tiles) |
| Mapecem | 35-60 | Cement | 47 | 2-3 | 4 (for tiles), 24 (for parquet) |
| Founds Scoroline T-45 | 2-100 | Gypsum, fractionated sand | 15 | 2-4 | 5 (in case of laying tiles - 3) |
CERESIT CN 88. Quick-hardening, easy-leveling mixture for screed 5-50 mm
CERESIT CN 88
Let's take a closer look at the most popular types of screed mixtures. These are Vetonit 5000, Thomsit DG and Mapecem.
Vetonit
The first option is ideal for preparing the base for the finishing coating, and is also used for installing heated floors. This is an easily leveled, waterproof mixture made using limestone, sand, and special quick-setting cements. Material consumption is about 1.8 kg per m2. Installation can be done at air temperatures from +10 to +25 degrees. The material has good adhesion to the base.
Characteristics of different brands
Thomsit DG is characterized by high adhesion rates and is often used for laying underfloor heating systems and poured onto cement-sand, concrete, and anhydrite floors. An environmentally friendly solution that is also used for installing screeds on foundations with low strength characteristics. Consumption is about 1.6 kg/m2. Installation can be done at air temperatures from +5 to +30 degrees.
Thomsit DG
Attention! The mixture dries quickly - it needs to be used in just 40 minutes from the moment of mixing.
The Mapecem mixture dries in record time thanks to the special binder it contains. The material can be used both for pouring a fresh screed and for repairing an old one. However, before using this type of mixture, you will have to carry out mandatory waterproofing of the floors. The material sets instantly - in just 30 minutes. Installation can be done at air temperatures from +5 to +35 degrees.
Mapecem
How to make a dry floor screed
Step 1. The base is prepared in the same way as for installing a wet screed. The horizontal level of the future floor is determined using a laser level.
Preparing the base
Step 2. Damper tape is glued to the walls around the perimeter of the room. Also, the latter can simply be laid around the perimeter without gluing - the main thing is that it is at least somehow fixed.
Fixing the damper tape
Step 3. The floor is partially backfilled with expanded clay with a fraction size of up to 4 mm. Expanded clay is simply poured onto the floor in those places where the guides for the gypsum fiber will be located.
Partial filling with expanded clay
Attention! When laying dry screed, using beacons will also not hurt. They will help make the expanded clay layer smoother. They just need to be removed before further work.
Step 4. Guide rails are laid on the expanded clay layer and leveled.
Installation of guides
The guides need to be level
Another photo of the process
Step 5. The floor between the two installed guides is covered with the remaining expanded clay.
The remaining expanded clay is poured
Step 6. The expanded clay is leveled using the rule. In this case, the rule is laid on previously mounted guides. The level of expanded clay should be slightly lower than the level of the upper border of the guides. It is not worth moving on the leveled layer of expanded clay.
Leveling expanded clay using the rule
Step 7. Laying of gypsum fiber sheets begins. Since the corners of the individual 4 sheets should not meet at one point, the sheets are laid staggered. To do this, you may need to cut individual sheets into two parts or elements of the required size.
Cutting gypsum fiber
Step 8. The first sheet of gypsum fiber is placed in the corner of the room, its locking edge is coated with adhesive.
The edge of the first sheet is coated with glue
Step 9. The second sheet of gypsum fiber is laid, followed by the third and so on.
Laying the second sheet
Step 10. The technology for laying sheets in subsequent rows is exactly the same - first, the edges of the laid sheets are coated with glue, and then the next floor elements are laid.
Laying subsequent rows
Step 11. Additionally, the floor elements are fastened together using special gypsum fiber screws, which are screwed along the perimeter of the sheets. The screed is ready.
Screwing in plasterboard screws
Prices for GVL for dry floor screed
gvl for floor