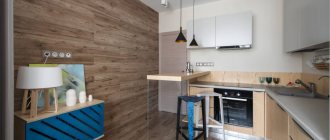
Laminate is a floor covering for finishing floors, consisting of individual plates assembled into a single structure using interlocking joints.
The peculiarity of laminate plates is their rigidity and inability to take the shape of the base. And their most vulnerable point is special locking connections.
An uneven base can lead to deformations, creaks, and broken locks.
- bulging ends and joints;
- breakage of lock connections;
- the appearance of squeaks and pops;
- rapid wear and deformation of coatings.
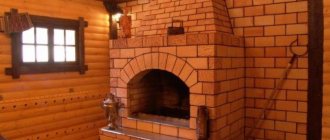
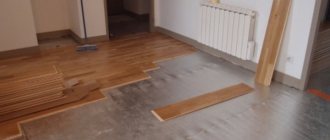
Figure 1. Laminate flooring.
During installation, the coating is not attached to the base; it is mounted in a floating manner. A gap is created around the perimeter of the walls to prevent possible deformations from changes in humidity in the rooms and temperature changes.
Base requirements
The main requirements for a base under a laminate are evenness, strength and rigidity. The permissible curvature of the coating per linear meter of premises is no more than two millimeters, and linear deviations are allowed within four millimeters
The surface for laying laminate must be dry and clean.
To meet such conditions, there are several ways to prepare the base for a laminate, depending on the type and condition of the floor, time constraints and financial capabilities.
How is the alignment issue resolved?
There are at least three effective methods that can be used to eliminate differences, close cracks, and deflections in the base.
Laying on a continuous screed
Make a continuous (monolithic) screed. This includes wet and semi-dry technologies.
In the first case, various types of mixtures based on cement, gypsum, polymer binders, as well as self-leveling (self-leveling) floors are used. Sand-cement mixtures are classified as semi-dry.
Dry
Dry (prefabricated) screeds are installed without the use of solutions. Any sheet materials that meet the strength requirements of building codes are used here:
- wood-polymer,
- cement-bonded,
- glued,
- gypsum fiber.
They are laid either on a pre-assembled wooden frame, or a bulk base is provided.
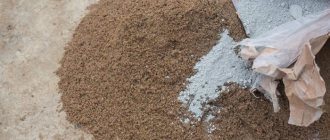
Note: Preparing a screed for laminate flooring using bulk materials is the best choice when it is necessary to insulate the floor. Artificial or natural granular materials are usually used as backfill:
- expanded clay,
- perlite,
- agloporite,
- compevit,
- vermiculite
They have a low thermal conductivity coefficient and are an excellent sound insulator. This is also the most effective way to level a base with significant differences in elevations.
On slabs
Laminate can also be laid on rigid slabs of extruded polystyrene foam. It will, of course, hide some defects in the base base, but if there are large differences, the subfloor will still have to be leveled with cement mortar.
Or, as an option, they make a frame, in the cells of which any insulation is placed. In this case, differences can be leveled by installing backing bars under the logs.
Now let’s take a closer look at how to do a screed under a laminate with your own hands in one case or another.
Preparing the base for the screed
When installing any screed, you must first prepare the base.
The preparation of concrete floors is prepared in the following sequence:
- We clean the surface of old coatings, remove flaking and damaged areas.
- If there is exposed reinforcement, clean it and treat it with phosphoric acid to remove rust
- We carefully repair the cracks and clean the seams between the slabs.
- We cover the areas prepared for repair with primers and seal them with cement-sand mortar or special repair mixtures.
As a result, we get a rigid, solid, clean base, ready for installing any screed.
I recommend! Apply two layers of concrete primer to the repaired base to increase strength and better adhesion to subsequent layers.
Base waterproofing
Waterproofing a reinforced concrete base can be done
- thick polyethylene film;
- roofing felt;
- roofing membrane;
- liquid bitumen mastic.
We apply or install insulation on the walls 10-15 centimeters above the backfill mark.
Figure 2. Waterproofing the base under the screed.
We lay the film sheets and the membrane in whole sheets, if necessary, fasten them together with tape.
We glue the roofing material onto the bases with an overlap and gluing with bitumen.
To waterproof the passages of risers through the ceilings, we use sleeves and silicone sealants.
Important! In places where pipes pass through risers of engineering systems, install sleeves and seal the joints with silicone sealants.
Performance characteristics of laminate depending on thickness
When planning a renovation budget, wondering what thickness of laminate is best to choose, the owner of an apartment or cottage should not forget that locks are the most important component in this cladding. Wear resistance depends on the thickness of the outer melamine coating. Thus, the thickness of these two layers is a major factor when choosing specific modifications.
Wear resistance class 33 is typically used in high traffic areas. In other places, cheaper class 31 laminate is installed. In utility rooms there are enough slats of class 23 - 21, as well as under furniture.
Dry screed
Dry screed can be used if the height of the room allows, as well as if it is necessary to insulate and soundproof the floors.
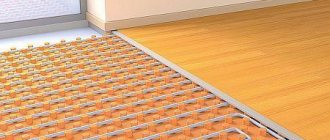
First of all, we install beacons made of timber or metal profiles on the prepared base, following the marks of the top of the backfill.
We place the beacons at such a pitch that it is convenient to level the dry backfill with a rule or a wooden lath.
We check their horizontality using a hydraulic or laser level.
Important! Attach a damper tape made of foamed polyethylene to the wall around the perimeter of the room to prevent deformation of the coating.
We fill expanded clay between the beacons.
Figure 3. Expanded clay backfill device.
To create a dense base, it is better to use a mixture of expanded clay of various fractions.
We carefully compact the backfill and level it. Give it a day for the mixture to thicken.
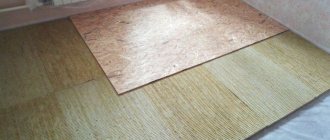
On the backfill we lay two-layer gypsum panels of the Knauf system, specially designed for flooring. You can use GVL sheets, laying them in two layers, fastening them together with self-tapping screws.
The joints between the sheets and panels, as well as the recesses from the screws, are sealed with putty. We remove excess putty and sand the surface to give it a perfectly smooth state.
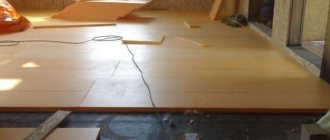
Figure 4. Dry screed device.
The dry screed is ready for laying the laminate immediately after production.
I do not advise! Install dry screed in kitchens and bathrooms where flooding is possible. If water gets into the thickness of the expanded clay, it can only be removed by dismantling the coating and removing all the wet backfill.
This screed does not burden the floors and underlying structures due to the lightness of the expanded clay used in its composition.
The insulation is not susceptible to microorganisms and rodents, is fire-resistant and durable.
Excellent heat and sound insulation properties allow it to be used over unheated and noisy rooms: garages, boiler rooms, pumping rooms. It is easy to hide engineering communications and wiring in it.
Semi-dry screed
Semi-dry screed is very popular when installing screeds in new buildings and existing premises; it is excellent as a base for laying linoleum.
Due to the presence of reinforcing fiber in the solution, it is not subject to shrinkage and does not crack. The almost dry consistency allows it to be laid in existing multi-storey buildings without fear of moisture from the solution getting onto the lower floors. High mechanization during its installation allows for large volumes to be completed in a short time.
The peculiarity of this screed is the minimum amount of water in the solution. When preparing it, water is needed only to hydrate the cement.
Sequence of production of semi-dry screed
- The screed is performed using the floating method, without connection to the base, so it is better to isolate it from the reinforced concrete covering with a plastic film or membrane.
- Along the perimeter of the room we glue a damper tape to the wall, which protects the screed from deformation.
- Using a hydraulic or laser level, we mark the marks of the top of the screed and transfer them to all walls, along the perimeter of the room, using a tapping cord.
- We install beacons made of a metal profile, secured with a screed solution, strictly according to the level.
- Prepare the solution. To produce large quantities of screeds, we use a pneumatic compressor installed at the construction site. In small volumes, we prepare the solution at the installation site from ready-made building mixtures for semi-dry screeds, in strict accordance with the instructions on the packaging. For mixing, we use a construction mixer or a hammer drill with attachments designed for this.
Figure 5. Grouting a semi-dry screed.
- We begin laying the mortar from the far wall of the room, compacting and leveling it using a rule and a vibrating screed. After 2-3 hours, the beacons can be removed, and the resulting seams can be sealed with mortar.
- We use a trowel to complete the final leveling.
I recommend! Cover the screed with polyethylene to ensure uniform drying and prevent cracking.
An ideally level base is ready for laying the laminate after complete drying, but not earlier than two weeks.
The benefits of screed layer
To make a final decision on the need to install a screed, you need to pay attention to the possible consequences of its absence:
- The weight of the furniture will affect the laminate if there are voids underneath due to uneven floors. The slats will first bend and eventually crack.
- Large changes in the surface of the subfloor will cause cracks and swelling.
- The laminate flooring will creak when walking.
- If the base is uneven, the locking joints will separate, causing moisture to get under the laminate and starting the process of rotting.
- There will be a feeling of instability of the floor.
Any of the above problems will lead to the fact that the laminate will not last long and will soon need to be replaced.
Wet screed
Traditional cement-sand screed for leveling concrete bases.
For greater strength and to prevent cracking, it is better to reinforce it with steel or special plastic mesh.
We install beacons from a metal profile. Steel pipes can also be used for these purposes. We fix them with quick-drying mixtures of plaster or alabaster.
We prepare the solution in a mortar mixer or any suitable container using a hammer drill with attachments or a construction mixer.
Pour cement and sand into a container with water in a ratio of 1:3 and mix thoroughly.
I recommend! To prepare the screed mortar, use ready-made building mixtures. They contain a balanced composition of the necessary components that increase the plasticity of the solution and the quality of the base.
Place the finished solution between the beacons and level it using the rule.
After a day, we remove the beacons, and the cavities from them are sealed with a solution and rubbed.
The finished screed must be covered with film or moistened regularly.
This screed will dry for at least a month.
After drying, cover the surface with two layers of primer.
Laying the laminate is allowed after the screed has completely dried.
Figure 6. Construction of reinforced cement-sand screed.
Kinds
There are many options for leveling the subfloor, but the most common are:
- Dry screed;
- Cement-sand;
- Self-leveling.
All of the listed types contain different components and different application techniques. The choice in each specific case will be determined by the thickness of the layer and the tasks set (strengthening the floor, leveling, hiding communications). Another important factor is the drying time.
Self-leveling floor
Self-leveling screeds are made from ready-made dry compositions, including binder fillers made of sand and cement, modifying additives and plasticizers.
To ensure an even application of the filling composition, it is better to use special beacons made in the form of metal tripods with an adjustable core.
Beacons can be easily removed a day after pouring the floor.
The solution is prepared in accordance with the recommendations on the package.
Figure 7. Self-leveling screed device.
The mixture is poured onto the finished base and leveled using a spatula or a special comb
It is recommended to prepare the mixture in small portions and use it within 15 minutes after preparation, since the finished solution sets quickly.
I recommend! When laying self-leveling mixtures, roll the surface with a needle roller to prevent the formation of bubbles and voids.
You can walk on such a screed the very next day, and lay the laminate in 5-15 days, depending on the thickness.
After pouring, the coating must be protected from even the slightest drafts.
Figure 8. Rolling the self-leveling floor with a needle roller to remove bubbles.
Prefabricated decking
There are situations when it is advisable to carry out all interior work dry. For example, if you built a house from cellular concrete or wood and want to quickly do the interior and exterior decoration.
These materials are hygroscopic, and the use of wet technologies indoors creates additional, unnecessary problems. One of them is the inability to immediately begin exterior finishing.
Screeding under laminate flooring on a wooden floor is always done using a dry method. Or almost always.
When using a laminate to refresh an old plank flooring, or when the floors of the second or attic floor are being assembled over a beamed floor, you can, if desired, make a wet screed.
However, cement compositions are not suitable for this; only polymer ones can be used. But they are expensive, and no one is interested in paying more.
We have already mentioned that a prefabricated floor can be made in two versions: on a frame and on a dry backfill. Both technologies can be used on both a concrete base and a wooden one, but in the second case, preference is often given to the frame.