The screed in the bathroom is necessary to level the upper edges of the floor slabs, which are the base of the floor of the upper floor. Additionally, engineering systems and insulating layers (insulation, soundproofing mats) can be built into it, increasing the quality of living. Under the screed in bathrooms, heated floor systems are often installed for comfortable walking barefoot.
There are several manufacturing methods with different project budgets for different floor coverings.
Purpose of screed in the bathroom
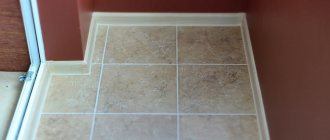
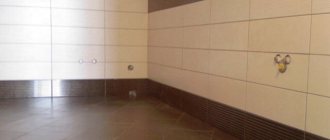
A limited number of floor coverings are suitable for a bathroom with high humidity and the likelihood of a break in cold water, hot water, and sewer pipes. The best of them is traditionally considered to be tiles - tiles, porcelain tiles, mosaics, attached to the base with tile adhesive.
Manufacturers of adhesive mixtures recommend a layer thickness of 3–5 mm; the material is expensive. Therefore, using it to level out existing unevenness is either impossible or economically unprofitable.
According to existing standards SP 29.13330 (clause 4.8), the height of the floor in a separate/combined bathroom should be 15–20 mm lower than the finished floor in adjacent rooms, or a threshold is provided. According to the idea, this will allow you to avoid flooding of the remaining rooms in the event of a pipe break, but in practice such a threshold is enough for 1-2 minutes, and you will stumble and contemplate this disgrace all your life. In modern renovations, it is not customary to lower the level of the bathroom or make thresholds, but rather to install leakage protection systems.
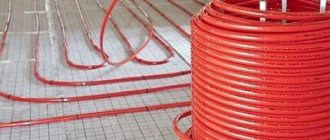
The maximum number of communications is located in the bathroom, so some of them are often laid hidden. Water electric heated floor systems can reduce energy consumption and the number of heating registers. A warm floor in the bathroom under the tiles improves tactile sensations when walking on the flooring barefoot.
Thus, the screed is used to solve several problems:
- floor soundproofing;
- raising the level of the finishing coating to the required height;
- hidden communications wiring;
- integration of heated floors;
- leveling the base;
- insulation of floors on the lower floor without a basement or technical underground.
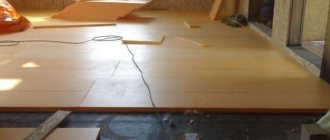
Leveling the floor with a screed can be done on your own. However, the nuances of each existing technology should be taken into account.
Preparatory work: tools and materials
Before screed work, the base is prepared. If there is an old coating, it is completely removed.
The screed is a solid layer distributed evenly over the entire area of the room. Uniformity of the layer is a prerequisite, otherwise the screed may crack. The floor is cleared of dirt, potholes (if any) are filled with cement mixture. Additionally, the surface is coated with a primer, and the floor is left until the composition dries.
A layer of expanded clay or sand - reducing the weight of the screed and reducing the pressure on the floor slab. The material is poured and compacted. This will also hide uneven floors.
Installation and wiring of communications is underway.
Installation and wiring of communications is carried out
For a bathroom, a semi-dry screed mounted along beacons is perfect. Tools required for this:
- main mixture;
- primer;
- level or level;
- insulating materials (if necessary);
- roller, usually spatula;
- beacons made of aluminum or wood;
- drill, hammer drill.
Preparing the base
According to the standards of SP 29.13330, the floor screed in the bathroom under porcelain stoneware and tiles must be laid on a base whose strength is higher than the newly formed layer. Depending on the technology used and construction materials, the thickness of the screed is 10 – 120 mm.
Preparation of the base consists of several stages:
- dismantling existing cladding as necessary;
- audit of the load-bearing capacity of the floor, concrete strength, flatness of slabs;
- sealing cracks, removing loose concrete layers, mechanical leveling;
- priming floor slabs with special compounds to increase adhesion;
- level marking, identification, marking of upper/lower points on the walls;
- pasting the walls around the perimeter with damper tape;
- calculation of layer thickness, choice of screed material, manufacturing technology.
Comparative characteristics of screed technologies are given in the table below:
| Characteristics | Wet | Semi-dry | Self-leveling floor | Dry | |
| Material | concrete | self-leveling mixture based on gypsum, cement | GVL sheet in two layers on top of expanded clay sand | ||
| Material Density | 500 – 2200 kg/m3 | 1800 – 2200 kg/m3 | 1.2 – 1.65 kg/l | 1250 kg/m3 | |
| Presence of wet processes | + | – | + | – | |
| Layer thickness min/max (mm) | 30/200 | 35/100 | 1/100 | 120/250 | |
| Walking time | 24 hours | 24 hours | 4 – 24 hours | straightaway | |
| Flooring installation time | Day 29 | Day 9 | Day 2 | straightaway | |
| Reinforcement | wire mesh | propylene fiber fiber | No | – | |
| Rental of special equipment | – | + | – | – | |
| Integration of heated floors | + | – | |||
| Cost of 1 m2 with a layer thickness of 30 mm | 74 | 100 | 480 | 120 | |
| Strength | high | average | low | ||
| Thermal insulation qualities | low | high | |||
| Location of the waterproofing layer | on top of the screed | under the screed | |||
The cost of Superfloor Knauf differs slightly with a thickness of 40 – 120 cm. Expensive self-leveling floors are usually used to level out minor differences in height. This is the only material that allows you to reduce the screed to zero.
A semi-dry screed requires higher qualifications than when pouring a wet concrete screed. The developer will have to additionally rent a trowel - a “fan”.
Installation of beacons
An even screed guarantees the quality of the finishing coating and saves glue when tiling the floor.
To achieve evenness of the screed and create slopes, we install beacons.
A metal profile for drywall, installed on slides of the mortar used for screed, is better suited for these purposes.
Helpful advice! Under no circumstances should beacons be screwed to the base, so as not to damage the integrity of the waterproofing. And also use gypsum or alabaster to secure the profile so as not to compromise the strength of the screed.
We install the first row of beacons at a distance of about 15 centimeters from the wall. Subsequent ones - in increments less than the length of the rule with which we will level the solution, by 10-15 centimeters.
We control the horizontality of the beacons, relative to each other and the marks on the wall, using a building level.
The height is adjusted by pressing the slats into the cement-sand mixture or by placing additional mortar under the slats.
Figure 4. Installation of beacons on an insulated base.
When using wooden slats as beacons, before installation, they should be soaked in water so that the wood does not absorb moisture from the solution.
After the screed has set, the guides should be removed. Seal the resulting cavities with the same solution as the screed and rub it.
You can start installing the screed only after the solution under the beacons has dried.
Technology
The choice of base leveling method depends on several factors:
- availability of communications - hidden hot water/hot water pipes, heated floors, sewerage;
- height difference relative to the horizontal - self-leveling floor for small values, other technologies for leveling significant defects (usually no more than 2-3 cm);
- level of flooring in the corridor;
- the type of ceiling covering of the lower neighbor - wet technologies can damage the whitewash and paintwork (measures must be taken).
Commercial lightweight, lightweight concrete can be made on your own; self-leveling floors and materials for dry screed will have to be purchased in the store.
Wet
You can level the base for tiles with your own hands using several types of concrete:
- commodity - crushed stone, sand, cement, water in a ratio of 3.7/1.9/1/0.6 by volume;
- lightweight - sand, cement, water in a volumetric proportion of 3/1/0.6;
- light - sand, filler, cement, water in a ratio of 3/3/1/0.5.
Fillers for lightweight concrete are usually: expanded clay sand, polystyrene foam balls, perlite. In addition to reducing structural loads on the slab floor, a lightweight concrete screed allows you to insulate the floor and increase the sound insulation of the room.
The main disadvantage of lightweight fillers is their high buoyancy. In solution they rise to the surface, making it extremely rough. Subsequently, additional grinding using various methods or finishing with a self-leveling floor is required. According to existing standards SP 29.13330, the thickness of the concrete screed must be at least 30 mm from the base in the highest area or above the underfloor heating pipes or utility systems embedded in it.
Similarly, the floor level rises to the design height:
- a layer of expanded clay is poured below the zero level by 70 mm;
- 50 mm screed is concreted along linear type beacons.
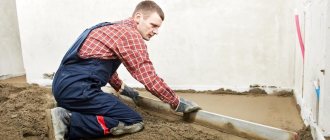
To fill the screed using the classic “wet” technology, you need to perform the following sequence of actions:
- installation of linear beacons - mortar, from a special rolled metal profile;
Beacons in the bathroom. - filling - a solution is placed between the beacons;
- leveling - excess mixture is cut off according to the beacon rule.
Pulling concrete along beacons.
On day 2 you can walk on the screed, on day 29 you can lay tiles, porcelain tiles, and mosaic the floors. The maximum quality of the screed is ensured by the use of a vibrating screed.
Semi-dry
The technology of semi-dry screed differs at the initial stage for a bathroom with heated floor contours and mesh reinforcement without heating. In the absence of a heated floor, the wire mesh/reinforcement is covered with the same solution from which the screed will be made. The mesh is laid on polymer pads. Scraps of reinforcement and rolled metal. The use of brick, concrete, and wooden spacers is prohibited.
When using several meshes of small size and complex configuration, a mutual overlap of at least one cell is required.
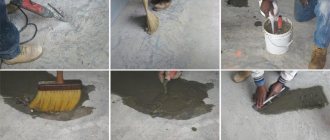
When performing a semi-dry screed in a bathroom on your own, the sequence of actions is as follows:
- preparation of a mixture of CPS with polypropylene fiber reinforcement;
Consistency of semi-dry mixture. - laying point beacons;
Point beacon. - combining point beacons into linear ones;
Linear beacons. - filling the space between the beacons with solution;
- compaction of the solution by slamming with a polymer float;
- leveling the solution along linear beacons;
Leveling the mixture. - grinding with a trowel (in a small room you can grind by hand);
Processing with a trowel. - hydration.
The main difference between semi-dry screed and classic wet screed is that semi-dry mortar has a water-cement ratio of 0.35 - 0.43. This allows you to avoid intensive absorption of moisture into the floor slab and damage to the ceiling linings of the lower neighbor. You can walk on a freshly made semi-dry screed in special shoes when grouting at the last stage of the technology.
The proportions of sand and cement remain the same - 1:3 (c/p, respectively). Only cement grade 400 and higher is allowed. Medium-sized sand fraction, PP fiber consumption 150 g per 50 kg of cement.
At the specified W/C ratio, the mixture does not release water when squeezed by hand and retains its shape after unclenching the palm. Instead of mortar beacons, linear modifications from a profile pipe on screw lifts can be used.
A semi-dry screed was invented to reduce the budget, increase productivity, and eliminate wet processes. Initially, a semi-dry screed was created for the mechanized method of carrying out work:
- mixing in a hopper of a special machine, the volume of which is designed for at least one 50 kg bag of cement;
- supplying sand concrete pneumatically through a hose into the room;
- laying out in heaps from a special damper;
- alignment along the beacons using a screed-laying machine;
- surface treatment with a trowel.
Equipment for mechanized semi-dry screed.
The pneumatic compressor and screed layer are very expensive, and rental of this equipment is not practiced. However, the operations performed by these machines can be done manually. But there is no such alternative to a trowel - you will have to rent it from a specialized company.
Without moisture on day 6, concrete may not reach its design strength before tiling. According to professional calculations, the own moisture for hydrating the cement stone inside the mixture is only enough for 5 days.
Self-leveling floor
Distinctive features of the technology and material of the self-leveling floor are:
- self-leveling properties - under the influence of gravity, the solution is independently distributed over the surface of the base, the surface is leveled horizontally;
- air saturation - when kneading with a mixer, air penetrates into the solution, which, after being distributed over the surface of the base, is expelled by the spikes of the rubber roller;
- the use of point beacons - a reference tripod, self-tapping screws, mortar marks, plastic sticks (not necessary for a small area);
Benchmarks for self-leveling floors. - walking on mortar - a “paint shoe” is attached to the sole of the shoe - a plastic insole with spikes on the bottom and straps on top.
Paintshoes.
Under the floor coverings, a budget cement-based self-leveling floor is usually poured. Some manufacturers call it a leveler, a self-leveling, self-leveling mixture.
The manufacturing technology for self-leveling floors is as follows:
- mixing the solution in the proportions specified by the manufacturer on the packaging;
- distributing the mixture in buckets around the perimeter of the room;
Pouring the solution. - dismantling beacons on a tripod with a screw reference;
- rolling out the layer with a needle roller to remove air and distribute the solution evenly.
Rolling the floor with a roller.
You can move loads on the surface the next day, glue tiles - on the 4th day.
A detailed article about self-leveling flooring is here.
Dry
The most popular among individual developers is the Knauf Superpol dry screed made from two-layer gypsum fiber boards on top of expanded clay sand. For wet rooms, dry screed is made from GVLV boards with water-repellent properties. The technique is much simpler than other types; tiling the surface is possible on the same day.
This technology is primarily suitable for wooden floors without significantly increasing the structural load. Installation of Knauf superfloor looks like this:
- waterproofing the supporting structure - laying polyethylene film, coating, painting the floors and walls with special compounds to a height of 20 cm;
Film waterproofing. - installation of linear beacons - taking into account the dimensions of the bathroom only near the walls;
Recessed linear beacons for Superpol. - backfilling of expanded clay - sand is distributed between the lighthouses;
- laying gypsum fiber board - two layers with offset seams, fastening with glue and self-tapping screws.
Installation of two-layer GVL blocks.
The classic version of beacons are recessed linear profiles, the grooves of which must then be filled with expanded clay sand.
Dry screed tool kit.
Manufacturer Knauf has improved the tool for Superpol. The rule has side cutouts, beacon slats are laid on top of the zero mark, filling the grooves is not required.
Strengthening the structure
Concrete floors with topping
You can make the base more stable with the help of topping - a special solution applied on top of the screed to make it stronger. The mixture is made with a filler of quartz or metal.
The composition is applied to the screed over its entire surface. The use of topping is necessary if the final covering will not be installed in the future: tiles or other material.
Waterproofing
For wet, semi-dry screed and self-leveling floor technology, waterproofing is performed from above after the solution has completely dried. Waterproofing is initially a separating layer, so the screed on top of it has no adhesion to the base. Unlike a concrete slab with two reinforcement belts, with a thickness of 100 mm or more, a 50 mm screed is not able to withstand operational loads.
It is the leveling layer of the main supporting structure - the floor slab. Therefore, the screed is treated with waterproofing materials before laying the tiles. The exception is dry screed, the bulk material of the lower layer of which cannot be rigidly bonded to the concrete floor slab.
Typically, coating waterproofing materials are used, applied in two layers to the surface of the screed, walls in places adjacent to the floor slab to a height of 20 cm. The adhesion and strength of the waterproofing layer must be similar to the characteristics of tile adhesive, otherwise peeling is inevitable. In this sense, dry cement-based waterproofing mixtures (for example Ceresit CR 65) are an ideal option.
Marking
Before you start pouring the solution, make markings.
Using a hydraulic level or laser level, mark a line at a height of half a meter from the floor. We take measurements from this line and find the minimum distance to the base.
From this point we subtract the thickness of the screed and mark the line of the screed surface. We transfer the line of the screed surface along the entire perimeter of the bathroom.
The minimum thickness of the screed must be at least 30 millimeters.
When marking the screed in the bathroom, it is necessary to take into account that the floor here should be lower than in other rooms, in order to prevent water from entering other rooms in case of accidental leaks.
Basic mistakes
In the absence of specialized education, a home craftsman makes mistakes when making screeds on his own:
- laying semi-dry mortar between the beacons without compacting with trowel blows;
- non-compliance with the water-cement ratio when mixing the solution;
- ignoring rolling the self-leveling floor with a spiked roller;
- the layer thickness is less than the minimum value for the screed material used;
- waterproofing under wet and semi-dry screeds;
- the use of a large fraction of expanded clay in the bottom layer of the dry screed;
- turning on the heated floor before the screed has reached its full strength;
- drafts during drying;
- poor preparation of the base (removal of loose areas, dust removal, priming).
Consequences of technology violations.
When using large, light fractions of ready-mixed concrete filler (crushed stone, granite, perlite, expanded clay, expanded polystyrene chips), it is almost impossible to ensure a smooth surface of the leveling layer. Additional surface putty is required. Such problems do not arise with dry, semi-dry screeds or self-leveling floors.
Advice! If you need bathroom renovation specialists, there is a very convenient service for selecting specialists from PROFI.RU. Just fill out the order details, the experts will respond and you can choose who to collaborate with. Each specialist in the system has a rating, reviews and examples of work, which will help with the choice. Looks like a mini tender. Placing an application is FREE and does not oblige you to anything. Works in almost all cities of Russia.
If you are a master, follow this link, register in the system and be able to accept orders.
Self-leveling floor
This type is very popular nowadays. It allows you to create an unusually beautiful design. And thanks to its smooth mirror surface, it visually enlarges the room.
- To prepare the base, it must be carefully primed, the surface should be slightly rough, the filling will lie better.
- Then, if desired, a special 3D pattern is attached, and the mixture is poured onto it in thin layers (you should start from the highest point of the floor, so the composition will be evenly distributed over the entire surface).
- After finishing filling the floor, go over it with a roller with needles to remove air bubbles. After drying, the floor can be used.
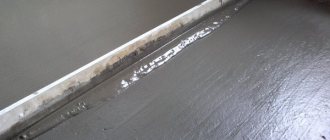
Expansion seams
Photo of expansion joint
When making a concrete floor screed, attention is drawn to an important point: as it hardens, the solution presses on the walls and the fragile screed begins to deform. To avoid cracks, special seams are cut. They are made around the perimeter of the room.
Construction of expansion joints
There are several cutting methods:
- a seam is laid on the “raw” base using a forming strip;
- lines are executed after the initial hardening of the composition.
The seam width is about 2 mm, the depth is 1/3 of the thickness of the screed. If the base does crack when the concrete hardens, this will happen only near the drawn stripes.
The lines are closed after the screed has dried: a special cord is placed in the groove, and the gap is filled with sealant.
Bathroom floor screed is the main and labor-intensive part of the floor renovation job. But if you take into account all the subtleties and nuances, then the implementation of the design will not become an obstacle to self-repair.