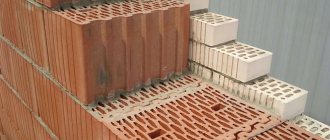
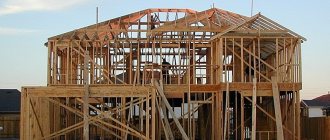
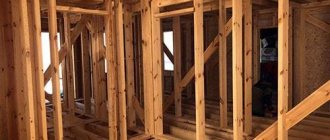
Frame construction is gaining popularity among those who want to build a country house. The construction of a frame house is carried out in the shortest possible time and is quite cheap. This is due to the use of inexpensive, comfortable and lightweight construction materials.
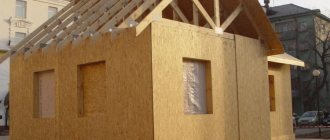
OSB boards are often used for wall cladding. These large-format wood boards can be used quickly and conveniently to cover large surfaces of the exterior walls of a house. But many owners decide to use them, including when installing internal interior partitions. However, after the construction stage of the entire house, finishing work begins. And here the question arises: was the use of OSB indoors justified? In order to understand the rationality of such a decision, it is necessary to study all the properties of this material and the technology for its installation and finishing.
Characteristics of OSB board finishing
OSB boards are multi-directional layers of wood chips that have been sandwiched and glued together. In this case, pressing and gluing occurs at a temperature of 1700C. They are made from coniferous wood, and the size of the shavings used is: thickness from 0.5 to 1.5 mm, length 1-20 cm, and width 1-50 mm. Wax and adhesives based on phenol-formaldehyde resin or boric acid are used as binding materials.
The abbreviation OSB stands for Oriented Strand Board, which translates as oriented strand board (OSB). The layers in which the shavings and chips are located in perpendicular directions, as well as the properties of the binder material, give OSB the following characteristics:
- moisture resistance;
- sufficient strength;
- elasticity;
- easy workability.
OSB boards have a pronounced surface structure, consisting of a mixture of large and small chips. For cladding work, the most popular are slabs with dimensions: 1250x2500 and 1200x2400, the thickness of which ranges from 12 to 18 mm.
Also, when choosing slabs for interior decoration, you need to pay attention to the class of products. At high humidity levels, the use of a third or fourth class is required. Also, the lower the class of OSB, the lower its mechanical strength, and therefore its ability to withstand loads.
Varnish
Since the sheets are 90% made of wood shavings, the plane itself looks very good. All it needs is a little shine and a protective film of paintwork, and several layers of applied varnish can provide this. At the same time, at your request, the surface can be either shiny or matte - depending on the type of coating chosen. In addition, tinted or colorless compositions are also sold, which can be tinted to any shade of your choice.
There are models of panels made from shavings that have already undergone preliminary preparation such as grinding. If the smoothness of the surface is important to you, it is better to choose polished models - the coating fits better on them and creates a polished feeling. The varnish must be of a type that is intended for wooden parts.
When working with particle boards, you can use the technique of applying several layers for different purposes - patina, mother-of-pearl and a tinted layer. As a result, you can get a very beautiful and unusual coating that looks very extraordinary. The order of work and execution technique are reminiscent of working with decorative plaster.
Wall cladding with OSB boards
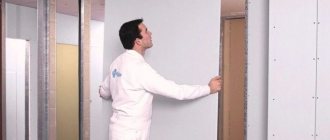
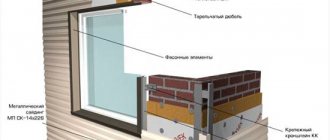
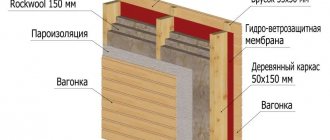
Before starting interior work, it is necessary to insulate the external walls, completely cover the frame from the outside and the insulation with a vapor barrier material. Installation of OSB boards for internal partitions should be carried out on a supporting wooden frame or on a metal profile.
It would be preferable to use a metal profile, since it is cheaper, easier to install, and is not subject to moisture and deformation. If the choice was made in favor of wooden blocks, then you should ensure that the wood is well dried - otherwise, after installation and complete drying, swelling or depression may form on the surface of the walls.
The technology for installing lathing made of metal profiles or wood is not fundamentally different from each other and is carried out in the following sequence:
- Guide bars or profiles, called starting profiles, are placed on the ceiling and floor. The plane formed by these guides must be strictly vertical. This needs to be checked by level.
- Next, the location of the vertical guides is marked. This is done based on the width of the planned OSB board. The joints of two adjacent slabs must fall on one vertical guide. In addition, you need to add at least one guide in the middle of the slab. If you plan to place heavy objects on the wall in the future (kitchen set or water heater), then a vertical profile is also marked at their locations.
- A vertical profile is installed with fastening to the guides using self-tapping screws. It is important to monitor the level and adjust it if necessary.
After installing the entire sheathing, we begin to attach OSB to it. This procedure is carried out using self-tapping screws, which are screwed at a distance of at least 5 mm from the edge of the slab. The slabs must be installed with a gap of about 3 mm between them, which compensates for the deformation of the slabs due to their expansion when humidity and temperature change.
When the cladding work is completely completed, you can begin finishing.
Finishing options for OSB boards
The use of fairly large shavings and chips in the production of OSB, despite their pressing at high temperatures, gives the surface a significant roughness and rough structure. There are options for sanded OSB on the market, but the cost of such material is much higher, which neutralizes all its other advantages. The process of interior finishing using traditional methods for this type of work requires an additional surface preparation operation, the complexity of which will depend on the material of the finishing coating.
Varnishing
OSB has a characteristic appearance, and in some cases this property is used in the design of the room. The slabs are used as a finishing material and the walls retain their structure. However, it is not enough to leave the material without any processing. Varnishing is used - a method that allows you to preserve the appearance of the slab and increase its moisture resistance. Immediately before applying the varnish, it is recommended to thoroughly sand the surface to remove burrs using sandpaper and prime it.
Coloring
Painting is the simplest and most affordable option. However, before applying paint, the surface should be leveled to hide the relief of the slab.
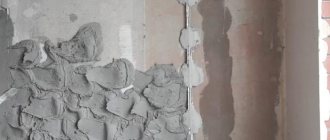
First of all, cover the joints of the plates and the places where the screws are attached with elastic putty and clean them after drying with sandpaper. Next, the surface is primed in two layers, and then wood putty is applied and leveled. Only after the putty has completely dried can you begin painting.
Water-based paints (water-based, acrylic or latex paints) are used as the finishing material. They allow steam to pass through perfectly and thus provide a good microclimate in the room.
Wallpapering
To obtain maximum quality when wallpapering on OSB, it is necessary to completely putty the entire surface of the slabs. Large surface roughness will be visible under the wallpaper, so maximum leveling is required. In addition, PVA glue is added to the wallpaper glue, which will give the composition greater strength.
Decorative putty
One of the exotic types of interior decoration. In this case, it is necessary to finish the joints of the slabs with serpyanka mesh or fiberglass fabric, then the surface of the wall is carefully primed in several layers with a special primer with the addition of PVA glue and non-woven fabric. After this, puttying begins.
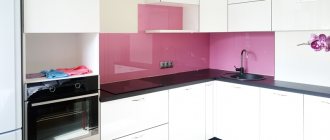
Laying ceramic tiles
For the kitchen area or bathroom, ceramic tiles are often used as finishing. Finishing OSB boards with tiles can only be used in exceptional cases, when there is a guarantee that the wall surface will remain dry and there will be minimal changes in temperature and humidity in the room.
The fact is that ceramics and wood have different linear expansion coefficients, and the slightest changes in the state of the OSB will lead to the tiles falling off. The situation is also aggravated by the low adhesion of adhesives to the OSB surface. If you still decide to glue the tiles, you need the highest quality primer and the use of glue with the possibility of using it on wooden surfaces.
Varnish and paint
One of the simplest finishing options is varnishing. However, when choosing how to cover smallpox walls inside the house, you need to take into account that although varnish will be a fairly budget option, its application will be a very labor-intensive process - you will have to sand the entire surface with fine sandpaper so that the varnish lays down more evenly
In addition, this will significantly improve adhesion, which is important in this situation - the varnish must lie flat so that everything looks neat
Tip: First coat the entire surface with a layer of primer and wait for it to dry. The so-called “lint” may rise up - small particles of wood shavings that make up the sheet. If this happens, everything is processed with sandpaper and again covered with a layer of primer. This way you will get the best result.
Working with paint is practically no different from applying varnish. The same preparatory activities are carried out in the same order. When sealing joints between sheets, in this case it is better to use acrylic sealant, since the paint will adhere better to it. In general, painting OSB walls inside the house, like varnishing, is a budget design option.
Disadvantages of OSB for interior decoration
Despite the popularity of OSB in frame construction, you should not make hasty decisions about their use for interior decoration. The material has a number of disadvantages, due to which, even with full compliance with all finishing technology, you can get an unsatisfactory result:
- low surface adhesion - there is no guarantee that paint or wallpaper will not come off in 1-2 years, and maybe even earlier;
- the need to leave a temperature gap between the plates - additional elastic putties are required;
- low moisture resistance - the slabs may swell, rot and destroy, and the purchase of high-quality materials significantly increases costs;
- increased roughness - a labor-intensive operation to level the surface is required.
Also, this material has increased toxicity, which can adversely affect the condition of people living in a room decorated with OSB sheets.
Using Quick Deck instead of OSB
For finishing interior walls, it is recommended to use Quick Deck Professional building boards. These boards are made on the basis of moisture-resistant high-density wood chipboard and are equipped with a tongue-and-groove joint around the perimeter. Compared to OSB, Quick Deck Professional boards have the following advantages:
- Smooth and even surface.
This property allows you to significantly save time and money on preparatory operations for finishing. The cost of primer and putty for leveling the surface of an OSB board can reach from 50 to 100% of the price of the board itself, and labor costs are commensurate with installation work. While the Quick Deck Professional surface is completely ready for any type of finishing immediately after mounting on the wall. - No gaps in joints.
Sealing joints and seats of self-tapping screws also causes considerable difficulty when working with OSB. After installation of Quick Deck Professional, the tongue-and-groove connection creates a perfectly flat, continuous surface without gaps. - Increased rigidity.
The strength of the slabs and the connection of all elements into one whole gives additional rigidity to the wall structure and the entire building frame. - No warping or deformation.
Quick Deck Professional slabs are not subject to temperature and humidity changes, which allows them to maintain their shape throughout their entire service life - Convenient format.
The dimensions of Quick Deck Professional slabs make them quick and easy to assemble and install on the wall.
Quick Deck Professional slabs with a thickness of only 12 or 16 mm are used for wall cladding, which does not create additional loads on the structure of the building.
Step-by-step instruction
This must be compiled in order to properly make a reliable and durable ceiling from OSB boards. Carrying out the work will seem inconvenient and difficult for one person, so it is better to work with an assistant. But it is quite possible to do the work yourself, using cutting the sheet into segments. It is almost impossible to install a solid particle board 2.5 m long alone.
When installing OSB panels, you need to make markings. The frequency of placing jumpers is determined by the need to strengthen the structure, as well as the number of cut fragments. Their number is dictated by the complexity of the ceiling configuration.
Frame assembly
The sheathing begins to be installed from one of the walls. Then the cord is pulled and the coordinates of the second similar part are set. Then the transverse posts are secured with metal anchors. The distance between them is determined by the thickness (and therefore the weight of the OSB boards, as well as the finishing, if any). At this stage, all necessary communications are laid, and the future location of lighting fixtures is outlined.
Fastening plates
One of the advantages of particle boards is the ability to attach them to walls or ceilings without first drilling holes for self-tapping screws. However, experts are confident that even an amateur can hem parts correctly, preventing distortions from occurring only if the holes on the marks are marked and drilled so that the screws can be inserted freely. Starting from the wall is not the only technique. You can do it from the center, but this will require additional marking and tensioning of the installation cords, which will create unnecessary difficulties.