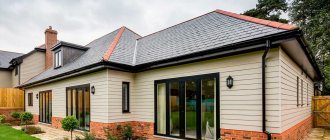
Cement-bonded particle boards (CSP) are in all respects an advantageous material for cladding the foundation of a house. They are inexpensive and allow you to give the base an aesthetically attractive look in a short time.
DSP can be confidently considered a universal finishing material that has not lost its relevance for several decades. Among its advantages are versatility, environmental friendliness, and a fairly wide range of standard sizes and textures.
DSP facade slab
Features of choosing and installing a DSP on a plinth
DSP boards are installed on the plinth to improve the appearance of the base. Additional coating on the foundation walls has a positive effect on the performance characteristics of the structure, regardless of what material it is made of (concrete, brick). In some respects, cement-bonded particle board material is not inferior to its analogues, but is much cheaper.
Advantages
Thanks to these and many other advantages, the DSP facade panel is one of the most popular options in the interior design of buildings.
The DSP facade board has significant positive properties:
- environmental friendliness, non-toxic;
- due to the increased cement content, the material does not smoke or catch fire;
- are not susceptible to the negative effects of fungi and insects even during high and prolonged climatic humidity;
- increased moisture resistance: even if the slab is in water for 24 hours, it will swell by less than two percent of its original size. Therefore, façade DSP panels are often used on the base of a building;
- able to withstand more than one hundred freezing cycles without loss of quality;
- durable, does not chip, shock-resistant;
- endowed with excellent sound insulation.
Painting CBPB is also not difficult - the created coating does not require labor-intensive finishing work - any paint used for external work together with preparatory priming is suitable for this.
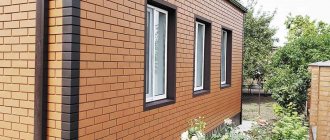
The DSP façade is easy to install and easy to process. Due to the fact that natural stone chips can be applied to the top layer, this makes the material for exterior finishing quite beautiful and modern. Many people are interested in how to cut CBPB? DSP panels are easy to cut, drill, grind and mill. It is necessary to take into account that the composition of the CBPB board contains cement, so the tool used to process the slab will quickly become dull. In this regard, to process such slabs it is necessary to use special tools for cement-based particle board material.
Thus, DSP for external work in the form of finishing buildings can be used in all climatic conditions, since such boards are characterized by excellent frost resistance.
You might be interested in reading an article about other types of facade slabs.
Characteristics of DSP
Such slabs are made from shavings (the content in the mixture during production is 24%), cement (8.5%), water (65%) and auxiliary components that improve the properties of the material: aluminum sulfate, liquid glass (the total amount is 2.5 %). Main parameters of the slabs:
- roughness - 80 microns;
- tensile strength - 0.4 MPa;
- bending strength - 12 MPa;
- humidity - 1300 g/m³.
There are different types of cement bonded particle boards. They differ in their intended purpose: for the floor of attic floors, walls, screeds under a flat roof, columns, and the base of a subfloor. Products differ in dimensions (width, height). The key factor when choosing is thickness.
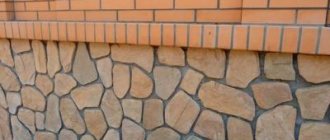
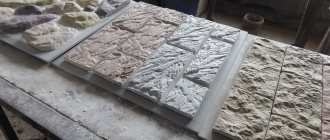
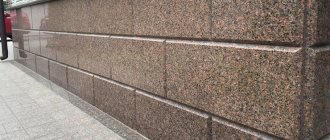
The degree of reliability of a CBPB coating is determined not only by the main parameters (strength, moisture, ratio of chips and cement), but also by the dimensions. Thus, a product that is thick is characterized by improved properties. Possible thickness options: 8, 10, 12, 16, 20, 24, 36 mm. Standard dimensions of the slabs: 320x125 and 270x125 cm. You can purchase such products with an untreated surface (rough), painted, with cork coating or stone chips, or a milled surface.
When performing finishing work, a plinth made of cement-bonded particleboard imitating brick or stone (with milling) is used to create the illusion of using the appropriate materials.
What can be used
To prevent such a scenario, the following finishing materials are ideal:
- decorative plaster;
- porcelain stoneware;
- plastic panels;
- cement bonded particle board;
- corrugated sheeting
How to properly protect the foundation? The use of such materials makes it possible to give the building a colorful appearance and provide complete protection of the base from the effects of precipitation. Moreover, each of these materials has its own characteristics that must be taken into account during their installation.
Advantages and disadvantages of DSP
Positive qualities of the material:
- temperature resistance;
- moisture resistance, which is due to the composition of the material and the presence of special additives;
- fungus does not appear on cement particle boards;
- given that the material is resistant to moisture, the likelihood of rot development is reduced;
- coating reduces heat loss;
- improves the appearance of the structure;
- a wide range of slabs, different in size and composition;
- due to resistance to a number of negative factors, the service life of the coating increases;
- DSP boards are characterized by increased plasticity, due to which such products can withstand various deformation loads (compression, tensile);
- during operation, the coating does not lose its properties, even if it is exposed to a number of negative factors over a long period;
- The material is easy to work with (can be cut);
- there is no need to invite specialists, since the installation process is quite simple;
- soundproofing properties.
The popularity of DSP is also due to the fact that boards of this type are used as a forming material in the construction of walls of frame houses. The strength level of such products is sufficient to withstand negative loads when installed on objects made of other materials.
Disadvantages of cladding using this material:
- a significant mass of the slabs, which is why it is necessary to invite an assistant to install them on the base;
- for the purpose of installation on load-bearing structures and base walls, it is recommended to use slabs with a thickness of more than 16 mm, since thin products can withstand smaller loads;
- to cut cement-bonded particle boards, you should prepare a tool that is designed to work with concrete and stone structures, due to the composition of the cement-bonded particleboard (cement firmly holds the reinforcing fibers of wood chips together);
- Great care should be taken when processing seams, since insufficient sealing of joints will lead to loss of properties.
Preparation of cement bonded particle boards for installation
In order to properly prepare a cement-bonded particle board for installation, you need to familiarize yourself with the features of this material. DSP consists of cement and wood fibers, and therefore has relatively low impact resistance. Installation rules require careful handling of these slabs.
DSP is easy to saw. It is easy to drill holes of the required diameter and depth, including through holes. This is the work that will need to be done when preparing the panel for facing the foundation.
The need to drill holes is due to the fact that the DSP will need to be attached to the racks of the sheathing pre-installed on the base. In order to simplify this task, experts recommend drilling the required number of holes in advance.
DSP: drilling surfaces
This work is guided by the following rules:
- to fix the panel, use screws or self-tapping screws with a countersunk head;
- the optimal diameter of fasteners is 3-6 mm;
- the cross-section of the hole in the slab must correspond to 1.2 times the diameter of the screw used;
- fasteners should be located at a distance of 2 cm from the edge of the panel;
- the optimal pitch between screws is 20 cm, but this figure can be adjusted depending on the lathing scheme;
- the pitch between screws should not exceed 40 cm.
Step between screws
If it is not possible to pre-drill holes in the chipboard, during the installation process, exclusively self-tapping screws with a strong and thin point are used to fasten the panels. The head of these fasteners must be equipped with special blades designed to form recesses and allow it to be hidden.
How to fasten the DSP
To fix chipboards to metal or wooden sheathing posts, you cannot use self-tapping screws designed for working with plasterboard and gypsum fiber board. To drill holes in the DSP, use drills for working with metal or with a pobedite-coated tip.
At the stage of preparing panels for installation, they may need to be cut. For sawing, you can use a circular saw or grinder. A diamond-coated segment disk is installed on the tool.
Prices for popular models of circular saws
Circular saws
DSP: cutting material
DSP: grinding the boards
Before you start sawing, you need to take into account that during this task a large amount of cement dust will be generated. Therefore, when working indoors, it is recommended to use a dust collection device.
DSP installation method
First, the surface area of the plinth is calculated. A 20% margin is added to the resulting value. For installation you will need waterproofing material (it also acts as a wind barrier) and thermal insulation (in the form of slabs). To secure the insulation, bars are used. The width of the thermal insulation material must correspond to the height of the fasteners with which the horizontally oriented elements of the sheathing will be fixed (or U-shaped suspensions if a metal profile is used). Instructions:
- Attach the sheathing strips. First, install the horizontal elements.
- The insulation is being installed, for which mushroom dowels are used.
- The protective film is fixed. In this case, mushroom dowels are also suitable, but they are installed more often (3 pieces on each slab).
- Vertically oriented sheathing is being installed. The distance between it and the windproof covering should not be less than 10 mm.
- Install the base panels. Pre-drill holes in the sheathing. The finishing material is fixed to the bars using self-tapping screws. To strengthen the structure, preference should be given to metal profile lathing.
Minimum gaps (1-3 mm) should be left between the panels, which will allow the material to expand under the influence of moisture and temperature changes. Suture joints are sealed with an elastic cement-based compound.
How to paint DSP on the facade, what paint to choose
This coating has only one function: it improves the appearance of the panels. It is not advisable to use paint to increase reliability, since DSP products are already durable. Possible material options:
- Acrylic paints. Water-based formulations should not be used. A material containing a solvent will do. Such paints are characterized by high adhesion and combine well with cement.
- Latex - in addition to the main function, they create a protective coating in the form of a durable film. This paint has moisture-proof properties and is vapor permeable.
- Silicate - firmly fixed on the rough surface of the base. Such compositions are resistant to external factors and allow steam to pass through.
For the base of the house, a material is selected that matches the color of the facade. In order not to spoil the appearance, it is recommended to use unpainted DSP boards. After installation, they are coated with paint.
Budget finishing option
If a house is built, stone and substitutes, plastic are expensive, you can use cheaper options for finishing the foundation from flat slate or DSP. Flat slate has been used for finishing for a long time; all its main positive and negative properties are well known. Its gray color can be eliminated by covering the trim with paint and applying some kind of pattern. DSP appeared on the building materials market relatively recently and quickly gained popularity due to its lower cost.
Basement cement bonded particle boards
The first versions of CBPB consisted of wood chips and cement mortar and had an unpresentable appearance. Subsequent versions began to be produced with a surface covered with stone chips. The latter option retained the best qualities of wood and cement. DSP does not change its properties at low temperatures and resists moisture well.
DSP base
Please tell us how to make a plinth from DSP near a house on screw piles and whether it is necessary to make a blind area. Thank you.
Oleg, St. Petersburg.
Hello, Oleg from St. Petersburg!
A blind area is always highly desirable around every house, including around a house on screw piles. It is needed for several reasons, among which the most important are the drainage of water from the house due to the slope of its surface (water does not flow under the house with all the ensuing consequences); as well as a good aesthetic appearance, which is what designers advocate so much for.
And the installation of a basement around the house, no matter what it is made of - basement siding, flat slate sheets, sheets of fiberboard or other materials, in addition to a presentable appearance, also implies a warmer space under the floor of the house. No matter how there are no drafts and, accordingly, there is no cooling of the soil under the house and the floor itself.
Cladding with slabs
The popularity of CBPB for cladding pile foundations is explained by the availability of the material. It consists of cement mortar, mineral additives, and sawdust, which perform a reinforcing function. In terms of performance properties, it is in no way inferior to other methods of arranging a basement, but will cost much less. The advantages of DSP include:
- non-flammability;
- resistance to moisture and rodents;
- low thermal conductivity;
- increased resistance to deformation;
- durability.
For convenience, panels are available in thicknesses from 8 to 24 mm. Correct installation of a DSP base guarantees a service life of at least 50 years. In this case, facing the foundation can be done by a person with a minimum of experience.
The disadvantages of DSPs include their fairly large weight, which is difficult to handle without an assistant. The seams between the panels must be treated, closing the ends from moisture. The slabs are not highly decorative, so the next step is facing the foundation. You can use natural and artificial materials for it. Their main properties should be strength, durability, resistance to moisture and ultraviolet radiation.
Advantages and disadvantages of finishing the base
According to building codes, the height of the decorative basement of the house should not be lower than 50-70 cm, but there are cases when it is raised to a height of 150 cm from the soil surface. This is justified if there are basements and garages under the building. Do-it-yourself decorative finishing of the base solves the following problems:
- protection of the foundation and its above-ground part from the effects of moisture that reaches its surface from the atmosphere. The barrier allows you to maintain optimal humidity parameters in the basement and throughout the house;
- protection of houses from temperature changes, which allows smoothing the indoor microclimate in winter and summer;
- decoration of the facade, making the building look more holistic and respectable.
Despite the obvious advantages, the use of finishing can lead to the formation of condensation on the surface of the plinth walls. How does this happen? Water vapor that forms in the interior of the room escapes to the outside, hitting the waterproof barrier that serves as the finish. The low hydrophobicity of the finishing material can also lead to its peeling off in winter.
To avoid this, you must follow the rules for compatibility of the plinth structure and finish. For example, paint is well compatible with brick, but unnatural for concrete surfaces. This must be taken into account when choosing finishing materials.
Finishing with plastic panels
The main advantage that plastic panels demonstrate is the absence of wet work. The panels are attached to the surface of the facade of a private house using a wooden or metal frame. After mounting it, a starting profile is installed at the bottom of the structure. Then the rest of the material is installed using the tongue-and-groove method.
The treatment of the base with plastic panels on the outside depends on its shape. If it is built in the form of a ledge, then it is necessary to use a special ebb; if it is built flush with the wall, then a transition strip is needed that will connect the panels and the finishing material of the upper part of the facade of the house.
When finishing the protruding part of the foundation with panels, you must adhere to the following rules:
Finishing the base with plastic panels
- screw the screws into the foundation surface horizontally to avoid tilting as much as possible;
- Do not screw in the screws all the way. It is necessary to leave a thermal gap of 2 mm;
- It is better to cut the panels with a cutter, saw or jigsaw;
- if the first panel that is mounted on the frame needs to be trimmed, then there is no need to install a starting profile;
- the starting strip and curb are attached in increments of 300 mm;
- To install one panel, you must use at least five self-tapping screws.
Finishing with decorative plaster
This material consists of small grains with a diameter of 0.8 to 3.0 mm, which, when applied to the surface of the foundation of a private house, create the impression of a multi-colored mosaic. Its main component is resin, which protects the base from the penetration of moisture from the outside, but releases vapor masses from its internal part.
Before treating the wall with decorative plaster, you can prepare the surface using cement or gypsum plaster. This is not necessary, since it interacts normally with concrete. The preparatory solution is used to level the surface and improve adhesion. When using the material, it is necessary to avoid contact with lime or heat-saving plaster.
Decorative plaster is applied to the surface of the foundation of a private house manually.
The only tool that is used is a stainless steel grater. The mass is thrown onto the wall in a layer with a thickness equal to the size of the grains included in its composition. Before it dries, the mass must be smoothed evenly with a grater.
Movements of the grater should be made in one direction. To avoid the appearance of transitions between strokes of plaster, it is better to perform the work using the “wet to wet” method. After completing the work, the base must be protected with a water repellent for several days from the harmful effects of sun and rain.
Execution of work
Making the basement of a brick house is not difficult, it just takes desire and free time. To work you will need tools:
- Shovel.
- Bucket or other container for cement.
- Concrete mixer.
- Trowel.
- Building level.
- Measuring tape.
- Brush or roller.
Materials for masonry:
- Solid brick of plastic molding M100/Mrz50.
- Reinforcing mesh with cell size up to 200 mm.
- Cement.
- Sand.
- Water.
- The waterproofing material, in this case, Isoplast EPP 2.5 was chosen.
- Bitumen-polymer mastic MBP 50.
- Primer.
Let's look at how to make a base around a house; this method is relevant for strip, slab and grillage foundations as a base. Work algorithm:
- Treat the upper edge of the completely dried foundation with a primer using a brush or roller. Apply a layer of MBP 50 mastic using the primer, lay a layer of waterproofing material, and roll it for a better fit. Apply a second layer of waterproofing.
- Lay out the first row of masonry corners of the house dry, use a measuring tape to check compliance with the design dimensions: length, width and diagonals must match within 3 cm. In case of discrepancy, disassemble the masonry and redo it.
- Mix cement-sand mortar for masonry with a composition of 1:3... 1:5.
- Lay the corner masonry on the mortar, scooping up the mortar with a trowel and tapping each brick with a handle on the surface and side edge.
- Complete the first row of masonry around the perimeter (not forgetting about the doorways), lay reinforcing mesh in a layer of mortar.
- Perform the 2nd row of masonry with dressing of seams.
- Carry out subsequent rows of masonry with laying reinforcement mesh and bandaging the seams.
Typically the height of the plinth is 450–600 mm, or 6–8 rows of brickwork 65 mm high with a joint height of 10 mm.
TIP: A cord stretched along the perimeter of the building from corner to corner or formwork along the inner perimeter of the walls greatly simplifies the work.
It is advisable to carry out the work on the plinth in one day, this will avoid voids in the masonry and make the seams more evenly. In case of bad weather, the made base must be covered with film until the solution has completely set.
Any construction work requires methodical adherence to technology. Laying out a plinth is not at all difficult, but if you want to make your home durable and comfortable, do not try to save money on the construction of the plinth at the expense of materials - this way you will avoid costly repair work in the future.
The base around the house is a ground continuation of the foundation, the height of which is up to 70 cm. The main purpose of the base belt is to protect the building structures from moisture penetration during precipitation, cold and wind. In addition to protective functions, they try to make the base of the house from materials that emphasize the overall decorative style of the site. But it is still worth remembering that the basement around the house is erected not only to decorate the structure - this building element of the building performs the most important protective functions, which we will discuss below.
Types of tiles and panels for finishing the base
Tiles are used to imitate natural surfaces - stone, brick, etc. Its advantage is a thinner surface and faster installation. The following tiles are produced for finishing the foundation:
- clinker;
- stone tiles;
- polymer sand tiles;
Clinker tiles imitate the surface of brick. It exactly repeats its dimensions, except for the thickness. When installing the material, it is important to lay out the first row correctly.
To do this, you need to calculate the layout level. The calculation is done as follows: divide the height of the base by the width of the tile, increased by the width of the seam. If you end up with an empty gap, after all the tiles have been laid, it can be sealed with acrylic or polyurethane compound.
Base installation
The line of facade tiles includes textures that are most suitable for finishing the base, for example BSK (Big Chip Stone) or slate.
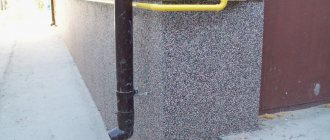
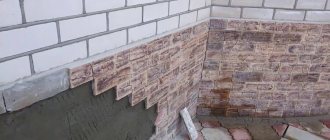
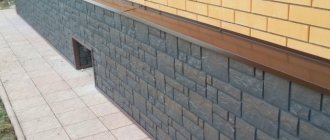
To close the base of a screw-pile foundation, it is necessary to make a horizontal piping of the piles with a 40x25 mm profile pipe in two rows. Attach the DSP sheets to the profile pipe. Artificial or natural stone can be mounted on DSP sheets.
Now let’s consider the option of finishing the base of a monolithic foundation slab with the texture of Big Chipped Stone.
When installing a slab foundation, after removing the formwork, we obtain a smooth, insulated 100mm EPS side surface. The facade is already ready - because The scaffolding installed for construction will interfere with the work on the plinth; it is advisable to first finish the facade.
The lathing for finishing the facade should be made level at the calculated height from the top of the slab, and finishing should be done starting from the second tile. Then we install a 20mm cement-bonded particle board on the side surface of the foundation using dowel nails. The DSP should protrude 100mm above the top of the foundation.
At the same time, you can begin installing the stone; You also need to mount a metal ebb clothespin if it was not installed before installing the vertical sheathing.
Next, we coat the bottom of the house trim and the foundation with bitumen mastic, and install the first layer of 50mm EPS.
We attach a 50x50mm block to the side surface of the DSP, pressing the first layer of EPS with it.
We fasten a 50x100mm board around the perimeter of the house, sawn to the angle of the low tide. The board should be installed below the metal clothespin to the thickness of the DSP (12mm), which will be mounted on top. We fill all voids with polyurethane foam. We install the second layer of 50mm EPPS.
We install the stone: the installation height of the first tile is calculated so that the last row is at the same level as the top of the DSP.
We install the ebb from 12mm DSP, fastening it with self-tapping screws to the block and board; We fill the voids with polyurethane foam.
We mount a metal ebb on top.
We install the first row of tiles with a small gap relative to the low tide to ensure ventilation under the facade of the house.
Now the foundation is reliably thermally insulated and will serve as a heat accumulator (in the case of a USHP device), and is also pleasing to the eye, in harmony with the facade of the house.
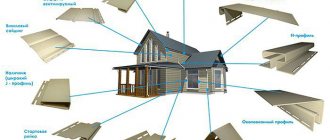
How and how to finish a facade from DSP
Construction practice and manufacturers' recommendations indicate that cement particle boards are best either painted or plastered. Other options - trying to glue clinker or artificial stone - are doomed to failure.
I have experience working with DSP on facades. Paint is a normal solution, but due to its thin layer, it does not cover the joints of the slabs and fasteners well. I tried gluing clinker tiles onto cement particle boards. The result is that 120 square meters fell off the façade. m.
So, the developer is faced with a choice of how to properly finish the DSP. The most important thing is the preparation of the seams, because... in case of hackwork, all the jambs will then appear on the facade. In the first article, we already wrote that it is imperative to leave a deformation gap of about 6-8 mm between the plates. Now the question arises: should the seam be open or closed? An open seam is, in most cases, not suitable for aesthetic reasons. In addition, you need to protect the wooden block (vertical posts of the sheathing) on which the slab is attached with waterproofing material.
Another option is to cover the seam with a decorative strip - flashing. This option is most often used if the façade from DSP is stylized as a false frame.
Important: decorative strips can be sawn from wood, DSP about 16 mm thick, or fiber cement siding with a wood-like texture. For example, a portal participant with the nickname SergeyU did this, fastening layouts with a length of 3600 mm and a cross-section of 10x190 mm with four self-tapping screws.