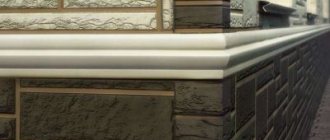
Paving stones – Tile – Border
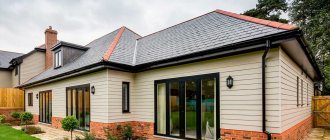
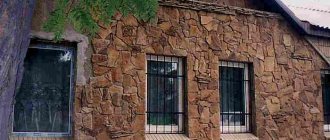
Natural stone is considered the best material for cladding facades not only from an aesthetic, but also from a practical point of view. This applies to both operational qualities and technical characteristics, and a purely aesthetic component.
For any building - no matter whether it is a residential building or a good business center, attractiveness and beauty are very important. These qualities give significance and respect to the office, and in a beautifully decorated country house the family feels much cozier and more comfortable. Finishing facades with natural stone additionally allows you to achieve maximum aesthetic performance.
Facing the base with granite not only gives it an impeccable appearance, but also protects it well from adverse environmental factors. In terms of its qualities, granite is in many ways superior to other materials that are more affordable. Therefore, the owner of the building must choose a finishing material, focusing on its performance characteristics, and only after that pay attention to the price.
Finishing facades with natural stone is quite popular due to the unique properties of this material:
- enviable aesthetic indicators; strength; resistance to external factors; insensitivity to ultraviolet - cladding the base with granite guarantees a long service life; durability - the facade lasts for many decades; the widest range of colors, an abundance of original textures; environmental friendliness and so on.
At the same time, one should not ignore the fact that natural stone is an expensive material, and if economic requirements come to the fore, then it is better to immediately choose another, more affordable material. In addition, the significant weight of such a facade means the need for more powerful foundations, which further increases the cost of construction.
However, these two disadvantages begin to seem insignificant if we consider them not in isolation, but in conjunction with the undoubted advantages and benefits of this unique material. This is why finishing facades with natural stone is so popular among owners of buildings for various purposes.
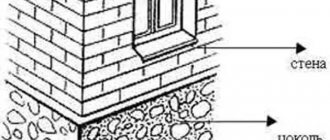
Types of finishing stone
To perform finishing work, limestone, sandstone and slate, mined in open-pit mines, are most often used.
But the clear leader among all types of natural stone used in finishing work in terms of its technical characteristics is granite. Finishing the facade with granite makes it possible to obtain unique results. This stone has significant advantages over others:
- richness and variety of types and colors - black and gray are very appropriate for finishing facades, but quite rare colors are also found in nature, including green, rose-red and yellow; the presence of original “spotting” caused by feldspar inclusions; ease of maintenance - ventilated granite facade is easy to wash and clean from dirt; high heat capacity; good sound insulation qualities; immunity to large temperature changes; fire resistance; environmental friendliness; durability; high strength; moisture resistance.
These qualities, as well as many others, are the reason why façade finishing with granite is in many cases the most preferred option for building design.
Some tricks in constructing a rubble base
To achieve a fairly good result, you need to know something about how to simplify your work and at the same time increase its efficiency:
- the solution that will be used for pouring must be stirred periodically with a vibrator until the end of work;
- if something interferes with your work and you are forced to suspend it for more than one day, you need to create a special coating that will protect the structure from drying out. When resuming work, do not forget to clean and slightly wet the entire structure with water. Without doing this, you can break the adhesion with the other layer;
- To continue laying the rubble, you need to prick the mortar that has frozen with something sharp and remove all unnecessary parts. As a result, the cement mixture will adhere well;
- if laying is carried out in a trench with gentle slopes, then a working platform is created in the space between its wall and the structure itself;
- steep slopes of the trench must be equipped with scaffolding, installing them on the outside of the foundation;
- for convenience, it is best to use the help of at least one more person;
- If necessary, the walls in the trench are reinforced with wooden panels with supports.
In order to build a strip foundation from rubble stone, you need to prepare a cement mortar. It is almost the same as for laying brick materials. Powder grade M 400 or M 500 is used for preparation. To prevent the concrete from cracking in the end, the sand should not contain clay particles. It also needs to be cleaned of various debris and all kinds of impurities.
Initially, you need to mix cement and sand, and then add water. The consistency of the solution should resemble sour cream.
When laying a strip base made of rubble, you can use 3 methods: pouring, “under the blade” and “under the bracket”.
The first is chosen when constructing small buildings no higher than 10 meters. The stone used is different and is not selected. On top of the laid blocks, pour crushed stone (a layer of 5-10 centimeters) and compact it well.
After the preparatory work, the rows are filled with concrete mixture. Remember that the material is initially laid dry, and only then the solution is poured. Using a vibrating compactor, it is distributed over all the voids that have arisen. These measures will greatly increase the strength and reliability of the foundation.
The other two methods are characteristically different from the first. First of all, it requires careful selection of stones. When laying them there should be minimal gaps and voids. These options are of course optimal, but require a lot of time and additional labor costs. The stone blocks are laid out horizontally, and in order to achieve absolute evenness along the entire length of the foundation, a rope is pulled. And the main aspect is the presence of rubble stones of approximately equal size.
Price for facades and plinth made of granite
There are several known methods for finishing facades with granite. The most common is gluing granite tiles to the prepared surface. For this purpose, special adhesive mixtures are used.
The price of a granite facade is quite high, which is determined by the solid cost of the natural material. But even here you can choose more economical options, focusing on color.
The cheapest granite is gray. But this type of stone is the least durable. Although this does not prevent it from being used for finishing most often.
Traditionally, the most valuable material is the one with rich shades of black and red. Entrance groups made of granite of this type look very presentable and do not lose their appearance for a long time. That is why entrance groups made of granite are very often made in country mansions, banks and office buildings.
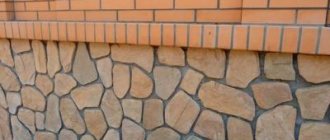
Finishing the base with natural stone is extremely popular among owners of country houses and cottages. Due to the small area of the plinth, which amounts to 1/5 of the entire area of the facade of any house, facing the plinth with stone is quite affordable for most homeowners.
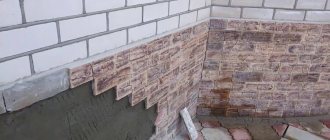
The process of finishing the lower part of the facade with stone from artificial and natural materials
Finishing work on the ground floor, using artificial or natural materials, is carried out according to strict rules and according to the appropriate scheme. All the steps below are extremely important and should be followed as described. Any failure to comply with the rules will lead to a decrease in the effectiveness of the work done.
Preliminary surface preparation
The first stage of preparation for finishing the basement floors with artificial or natural stone should be taken extremely seriously, since the durability and quality of the structure as a whole depends on it.
Attention! Before starting this work, it is necessary to assess the condition of your foundation (its strength, durability); it would be useful to invite a specialist to determine whether the base can withstand the weight of the finishing material. Artificial stone is not heavy, but natural stone, on the contrary, has more weight.
Step one. Initially, it is necessary to make the lower area of the facade as clean as possible, completely removing any remaining dirt and previous materials. To do this, it is better to use a wire brush. If the old plaster is very strong and this tool cannot cope with it, you can do this work with a chisel and a hammer.
Step two. Having completed the cleaning, you will need to make so-called “notches” on the base using an ax. This procedure can be omitted if the seam is deepened by 1 centimeter - this option will be more effective and will double the adhesion of the surfaces.
Step three. Next, the working surface is treated with a primer. You need to approach its choice responsibly and purchase only a primer with deep penetration. The liquid is applied using a spray bottle or brush.
We prime the base
Step four. If the surface has a heterogeneous composition, you will need to attach a construction mesh to it, thanks to which the connection of the surfaces will be stronger. The mesh is secured with anchors, which are driven into pre-drilled holes in the foundation.
Scheme of fastening the reinforcing mesh
Scheme for attaching the mesh to a surface made of OSB or plywood
Attention! If you plan to use a construction mesh, you should not lay stone on it. First you need to “throw” the cement mixture onto the surface. A ladle is suitable for this - there is no need to “pouring” the mortar, it is important to spray it, then let it dry.
Sketching the mixture onto a chain-link mesh
Leveling layer
Plinth prepared for laying stone
After applying and leveling the spray, prime the surface again.
Professional primer
Stir the primer before application
Apply primer to the base using a brush or roller
Next, in order for the work to be completed correctly, you will need to determine the installation line. Regarding the building, the ground surface is not perfectly flat in all places. This requires drawing a strict installation line. This mainly affects the exterior of the structure.
Step one. We establish risks in the area where the work will be carried out.
Step two. Next, it must be distributed on all other walls. The ideal tool for this is a hydraulic level, which can be purchased at any hardware store; it is also not difficult to make it yourself. It is he who will allow you to complete this stage correctly.
Step three . After installing all the risks, they will need to be connected. An ordinary nylon thread will help with this. All the risks entwined with it form a line, which was needed to begin finishing work.
Step four . We secure the starting profile using dowels. Such a bar will prevent the finish from “sliding” below the marked line.
The photo shows the starting profile
Necessary tool
It is important to prepare tools before starting cladding so as not to waste time searching for them during the laying process. So, for work you will need the following tools:
- Bulgarian. This tool will cut stones. You will also need to acquire special discs for cutting stone;
- electric drill. A necessary item for preparing the solution. It is also worth equipping it with a special mixer for mixing;
- building level. You will need to measure the level of placement of the order, so it is better to purchase this tool with a length of 90 centimeters;
- trowel and spatula;
- a template used to create the perfect seam;
- mallet with a rubber working part and a block. This tool will be needed to adjust the prepared stones;
- brush for metal surfaces, large brush;
- jointing necessary for finishing seams.
Prices for popular drill models
Drill
Solution making process
The cladding of the lower area of the facade will be carried out with high quality and strictly at above-zero temperatures. Although there are mixtures that allow this procedure to be carried out even at sub-zero temperatures, their service life will not be that long. The masonry mortar largely determines the appearance and durability of the structure. Proper manufacturing will ensure high-quality and quick finishing. Although the modern market offers various adhesives and compositions, a cement mixture is often used.
Attention! High temperatures, more than 23 degrees, will also negatively affect the work process. In hot weather, moisture evaporates from the solution very quickly - the adhesion will be short-lived.
Step one. First you need to select a container for making the batch. Do not use a container with uneven edges and bottom.
Step two . We fill the container with cement and then with sand in accordance with the proportion of 3 to 1 (for M300).
Step three. By stirring we obtain a dry, homogeneous composition.
Step four. Add some water.
First we pour water
Pour the dry mixture into the water
We mix using a drill with a mixer attachment.
Pour dry ingredients into a container with water. Using an electric drill with an attachment, mix the mixture. Add water in small portions. As you stir, it will become clear whether you need to add more or whether you should stop. The mass should not be liquid.
Preparation of cement mortar
Attention! If you make a solution not with mountain sand, but with river sand, the mixture will shrink. To prevent shrinkage, you should add a little of any washing powder.
Stone laying
There are two types of masonry: using a seam and seamless. In the first, often used type, the correctness of the seam and the correct placement of the stone are important. The second type is much simpler than the first; here you only need to choose the right cut parts of the stones.
Unpacking the finishing material
Without using glue, lay out all the stones to fit
It is better to mark the laid stones before attaching them to the plinth
Step one. The masonry begins at the corner of the building. Each row must be bandaged. This is not difficult to do; you just need to ensure that the seam does not overlap when arranging.
Applying glue to the element with a spatula
Glue the corner element
Gluing the stone
Plinth cladding process
Step two. An important requirement when laying stone (namely tiles of the correct geometric shape) is the constant use of a level. The laying of each row should be checked. You need to achieve a perfectly even masonry, only after that start working on the next level.
Gluing finishing material to the base
Step three. We apply the previously mixed composition to the stone and lean it against the required area on the wall, pressing it down. We perform small rotational movements that will evenly distribute the cement composition and will not allow empty space to form in the masonry. In some cases, a rubber mallet can be used for effective shrinkage.
Step four. The seam line must be correct, that is, even, a template will help with this.
Laying natural stone
Step five. During laying, it is necessary to focus on finishing the corners, which must be done without any deviations. Using a plumb line, deviations in stone fastening are identified.
Step six. First you need to lay two stones at the corners of the building. Next, you will need to stretch a nylon thread from the top of the stones, with which you will mark a strict fastening line for the remaining stones. All discrepancies will be immediately visible.
Laying stone with jointing
Step seven. The facing of the base will be correct if the stone is divided into the required parts with a grinder. The cut piece is first “tried” into place; if everything matches correctly, a solution is applied to it and the stone is pressed against the surface of the wall.
Stone cutting
Step eight. Using the same principle, plinth stone is laid along the entire wall.
Crosses are placed between the seams so that the seam is of the same thickness
Step nine . The next thing to do after finishing laying the stone is to sand the seams.
Grouting the seams between the facing elements of the plinth
The final part of facing the base with stone is grouting the resulting seams.
When the composition connecting the surfaces has dried (up to three days), you can begin to grout the seams. This process cannot be skipped, since moisture penetrates under the facing surface through the empty areas left in the seams, destroying the entire structure. To seal the seams, a variety of compounds are used to fill the gaps. A trowel or a wide metal spatula are perfect tools for the job. It is very convenient to apply the solution into the seams from a syringe.
Applying grout from a syringe
Filling the seam between stones
Applying grout from a bag
In order for the gaps to be filled evenly and beautifully, it is necessary to unstitch the seams. Not only a special tool is ideal for this work, but also a rubber cable of the required thickness, which is inserted into the still damp solution.
Joining
Carrying out seams
The process of unstitching
After the grout has dried, all excess is removed with a coarse brush. On the first day, the area where the grouting took place must be reliably protected from moisture. Also, the finishing surface must be protected from direct sunlight and frost for at least seven days. 24 hours after the grouting procedure, the surface can be wiped with a cloth soaked in water.
Cleaning the seams with a brush
The modern market offers a wide variety of different grouting compositions: frost-resistant, elastic, and others. There are also mixtures of different colors. To give the base a natural look after finishing, you need to choose a grouting mixture of the same tone as the stone itself.
Video - Master class on façade cladding with natural stone
Video - Finishing the base with a boulder
Video - Cladding with decorative stone
Making a blind area
The blind area is a mandatory structural element. Finishing the lower part of the foundation will be incomplete without it.
The blind area protects the basement area from the effects of natural factors and prevents the penetration of moisture into the foundation, as a result of which the shrinkage of the building becomes more uniform.
The width of the blind area depends on the height of the eaves overhangs. Also, this value is also influenced by the degree of planting of the land plot. If it is not so big, then the blind area should be more massive. It must be remembered that the width of the blind area should not be less than 60 centimeters.
How to make a blind area
The work is performed as follows.
Marking
Step one. Initially, we make formwork from unnecessary boards, which should be sprinkled with earth or reinforced with pegs so that the solution does not flow over the sides.
Step two. We fill the formwork with crushed stone, you can also use any stones that are aimlessly located on the site.
Technology of filling the blind area
Filling the formwork with gravel
You can use broken bricks
Formwork with reinforcement and expansion joints
Step three. We produce cement mortar. It must be liquid enough to completely fill the contents of the formwork.
Step four . Having completed filling and leveling, leave the formwork until the solution dries completely.
Pouring and leveling the solution
Poured and leveled concrete layer
Now we give the blind area a complete look by filling the entire surface with gravel. This is also necessary during rain - splashes will not fall on the base.
Gravel decor
To further protect the base made of natural stone from moisture penetration, it is recommended to coat it with colorless moisture-resistant varnish. If you did everything according to these instructions, the original finish of the base will delight your eye for many years.
Prices for different types of cement
Cement
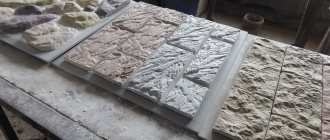
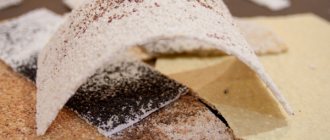
Types of stone
Rough stone
Rough stone is stone of various sizes and shapes, mined in the form of sheets, cobblestones or pebbles. The use of raw stone when finishing the base allows you to create surfaces with truly original texture, pattern and color.
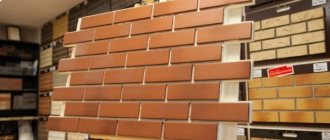
Processed stone
Processed stone is divided into the following main types:
- tiles - made by cutting stone, of arbitrary length and fixed height, as well as with or without pinning around the perimeter of the tile; there is directly such a subtype as finishing the base with tiles, but this, often, will not be stone; “noodles” or “ hump” - produced by cutting along the outer edge of a flat stone, one side is sawn, 3 - natural; tumbled stone - produced using a tumbling machine, rounding the sharp edges of both sawn and unsawn stone; strip - produced by cutting flat stone into strips of a given width of 35-50 mm.
Treated stone can be made from any type of stone. In addition, factory processing of stone can significantly simplify its installation.
Mainly used for finishing the base:
- shungite; marble; sandstone; limestone; dolomite; siltstone; lemezite; slate; quartzite sandstone; wild stone; goldstone; granite.
Other types of stone can also be used.
How to make a stone foundation with your own hands - technological nuances
Regardless of the chosen method of laying rubble, the stone foundation is constructed in a previously prepared pit in which the formwork will be installed. Before installing the formwork, a crushed stone-sand cushion is formed in the pit, which should be thoroughly compacted. The need to install a formwork structure is related to the soil characteristics:
- on stable soils, the construction of the foundation can be carried out in a trench;
- foundations on sandy soil, sandy loam or soft soil require the installation of panel formwork.
It is important to correctly mark, prepare the site and dig a pit of the required size. The following points must be taken into account:
- when marking, you should be guided by the requirements of a previously developed project;
- the construction site must be planned and thoroughly cleared of vegetation and debris;
- the correctness of the markings is checked by the difference in diagonals, it should not exceed 2-3 cm;
DIY stone foundation
- it is necessary to go deeper into the soil below the freezing level by 20-30 cm;
- prepare a trench whose width exceeds the thickness of the masonry by 20 cm;
- Roofing felt or polyethylene must be secured to the inner surface of the formwork to facilitate dismantling.
To increase the strength of the stone base, the lower level of the foundation masonry should be made wider than the rest of the masonry and the masonry should be reinforced with steel reinforcement.
Advantages of finishing the plinth with natural stone
The service life of a plinth finished with natural stone, provided that all installation rules are followed, exceeds the service life of a plinth made of any other finishing material. Natural stone requires virtually no maintenance. It absolutely does not absorb or transmit moisture and has very low thermal conductivity, frost resistance and high environmental friendliness.
Many types of natural stone undergo additional heat treatment, which further improves their performance qualities, such as strength and resistance to the external environment. After installation is completed, the finished surface of the natural stone plinth is varnished or treated with a special solution.
This avoids natural changes in the facial structure of the stone, such as:
- the appearance of efflorescence; the appearance of mold; the appearance of moss.
No further processing is required in the future. The exception is washing the base, which is performed only in the case of washing or repairing the facade.
Another advantage of natural stone is its exceptional compatibility with any type of materials used for finishing facades and creating landscape design.
Advantages and disadvantages
Natural stone for cladding a house has both pros and cons. The main advantage of this material is its environmental friendliness and safety for health. In addition, it is very durable and ready for any load. These properties are explained by its structure.
The stone for finishing the base does not require complex maintenance. It can be wiped with a regular damp cloth. It is not advisable to use chemical cleaning agents.
The advantages of natural material include:
- resistance to weather changes;
- practically unlimited service life;
- relative simplicity and speed of installation (especially if the material is in slabs);
- decorative effect;
- ease of cleaning.
The only disadvantage of natural stone is its price. It is much more expensive than other materials used for basement finishing. In addition, at the initial stage it is difficult to make calculations and often more material is purchased than needed. Of course, you can cover the basement level of the house with an artificial analogue. Outwardly, it is almost no different from natural, but costs less. The technology for their installation is also almost the same.
Many note that natural material has another drawback - irregular shape. This complicates the construction of the structure, since a lot of time is spent on cutting. This is especially true for rubble stone.
Cost of natural stone
There is an opinion that finishing the base with natural stone is the most expensive type of finishing, mainly due to the high cost of the stone itself. But by looking at the different types of stone and their costs, you can easily see that this is not the case.
Of course, lining the base with expensive marble, granite or other rare types of stones requires a significant amount of money. However, it is possible to clad the base with natural stone with a much smaller budget by choosing a less expensive type of stone, for example, flagstone, sandstone, rubble, limestone and others.
At the same time, the appearance of the base will not suffer at all, because the color range of any type of stone is very diverse. This makes it easy to select the stone of the required shade according to your design project.
The surface of the base needs additional protection from moisture and adverse weather conditions, especially in the off-season. The porous structure of the building material is subject to temporary destruction due to the penetration of water inside.
As a result of freezing, the ice expands and, as a result, damage occurs. To create a protective layer, various methods are used, one of which is stone cladding. When choosing a finishing material, you should take into account not only its decorative qualities, but also properties that will help prevent premature destruction of the base of the building.
Artificial base stone. Key Features
Artificial stone for plinth
Artificial stone is used much more often for plinth cladding compared to natural stone and this is explained by the following reasons:
- the cost of artificial material is much lower than natural material;
- non-natural stone for cladding the lower part of the facade is light in weight. Thus, there is no need to significantly strengthen the foundation;
- this material copes well with temperature changes and high humidity;
- responds well to sub-zero temperatures. Thanks to this, artificial material can be used in any climate zone;
- The building materials market offers artificial facing stone of any shape, size, color. Thanks to this plinth, the building can be given an original and unique appearance;
- You can do all the work yourself without outside help.
Decorative rock
Watch the video on how to finish a base with stone
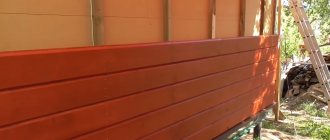
In the old days, the outside of the foundation was finished with plaster.
Nowadays the method is used less and less due to the short preservation of the original appearance. Exposure to moisture and temperature changes are the main reasons for the delamination of the plaster layer; it only lasts for 3-5 years. Periodically, the surface should be restored, repairing exfoliated fragments. Another thing is modern technologies and materials, which make it possible to carry out finishing work much less frequently. The properties of natural stones provide reliable protection for the foundation, extending its service life.
“Dry” and “wet” stone laying
Builders practice “wet” and “dry” masonry using a mortar based on:
- construction glue;
- sand-cement mixture;
- clay kneading
It is better to lay hewn stone of the same size on 2-3 levels without any mortar, carefully adjusting each block according to the shape of the adjacent material.
Garden and park hedges with dry stone masonry look very natural, especially if the back side is covered with earth to resemble natural terraces. The stone is gradually overgrown with growth and a picturesque landscape is obtained, reminiscent of the ruins of an ancient fortress or castle.
In “dry” masonry there is only a large stone of arbitrary shape, close to cubic. It is more important not only to fit each stone to each other, but also to calibrate the building material so that a wall is formed in width and height
If a stone fence is made to be filled with earth from the back side, then it is important to level only the front surface - using a plumb line. In the same way you can make a low laying of ceramic stone
The largest stones are laid on the lower level, but the rows must be maintained, as with wet masonry. Such work is somewhat reminiscent of a puzzle connecting fragments, and dry masonry is no different. The voids or seams between rubble or stone blocks can be filled with compacted soil if it is low masonry in the form of a garden border or fencing for a flower bed. The bottom row of stones is sometimes partially dug into the ground, like a foundation.
For buildings more than half a meter high, only wet masonry is used, based on one of the types of binder mortar. If natural stone is used for low hedges in mixed-type agricultural buildings, for example, as the basis of adobe masonry, then it can also be fastened with a clay mixture with the addition of dry cement. This guarantees the masonry durability and stability.
Advantages of facing the base with stone
excellent performance characteristics;
provides reliable protection from external factors;
high resistance to temperature fluctuations, frost resistance;
the stone protects from moisture and fire;
easy care;
presentable appearance;
durability.
The market for facing materials is presented in a wide range, which is divided into natural minerals and artificial stones. Both options deserve attention, but natural raw materials must have frost-resistant properties and strength, which are sufficiently available in the artificial analogue. There will be no problems with the selection of tonality and texture. You can find examples of marble, slate, granite and other rocks.
Pouring concrete
For installation of the cabinet, a sand-cement mortar of high rigidity is made. Humidity should be low. Sand should not be allowed to spill. A weak solution is not suitable for such work.
Cement laitance is applied completely over the entire area of the reinforcement. Concrete is poured into the trench so that the beam is supported and located in the concrete. The structure is sprinkled with dry soil on top. The distance between the gaps is two mm or less.
After pouring, the joints are grouted. Cement is mixed with water until it reaches the consistency of sour cream.
First, the long part of the flower bed is carefully removed and a concrete solution is laid. The middle remains empty to drain water when it rains
A slight downward deviation is allowed so that rainwater does not collect near the monument. The seams are sprinkled with cement and deep cleaning is done. The remaining parts are also installed. The solution quickly sets and hardens.
Disadvantages of facing the base with stone
Artificial stones have the appropriate technical characteristics for finishing the foundation, but products from the cheap segment do not have sufficient strength. Yes, some difficulties may arise during installation. Therefore, it is worth choosing high-quality cladding that fully meets the functional requirements.
If the choice fell on a natural mineral, then you should be prepared for difficulties during installation. In addition, most likely, you will have to carefully prepare the surface beforehand.
The main mistakes made when purchasing a stone. Incomplete knowledge causes the choice of a fragile material, endowed with hygroscopicity and low density. These factors provoke premature destruction of the structure, and as a result, replacement of the cladding.
What to attach the stone to
The adhesive composition is selected according to the following characteristics:
- For work on laying natural stone (fillers with a certain hardness);
- Type of slab (porous, medium-porous, low-porous);
- Climate additives;
- Color (optional).
The solution is used for facing work with a plasticizer. Density depending on the type of installation: separately, by pouring between the slab and the base of the house. The pouring method is chosen for finishing monolithic surfaces, the separate method is used for brick, insulated walls. Rows are counted from below. It is not fundamentally important to start work on the right or left, the main thing is to be consistent.
Watch the video on how to fasten stone plates with your own hands.
Each stone is washed and dried before being placed in the solution. The adhesion of dust and soil particles will not be of high quality. The same requirements apply to the surface of the basement of the house.
The stone is immersed in the composition so that the relief protruding part is in a relatively flat plane without drops. The distance between the fragments must be properly maintained taking into account thermal expansion. When assembling from different rocks, the maximum value is taken.
The lower edge of the first row is covered with a blind area. If the soil of the adjacent area is prone to shrinkage, the first row of finishing is supported on a steel corner. The upper part is leveled along the horizontal mark and covered with a visor.
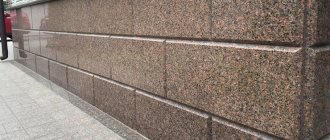
Types of natural stones
Granite is the most common option for finishing the base among other rocks. The material is produced in the form of tiles with a thickness of 1 cm or in stone blocks of different tones. The cut is distinguished by an original pattern, which gives the structure high cost and sophistication.
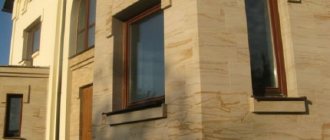
Sandstone is also popular in finishing work. The color range is limited to one tone, in contrast to the sizes, which are presented in a wide range. The structure of the stone is not strong enough, so it is used mainly as cladding.
Features of the material and its choice
The first thing you need to consider before purchasing stone for your plinth is the expected cost. If you do not have a very large budget, then sandstone and shell rock will be the best solution. Quartzite is also an economical option. If a sufficient amount has been allocated for finishing, you can choose something more attractive, for example, granite or rubble stone.
Rubble stone.
Then you should think about the color scheme. Basement finishing material should always be selected to match the design of the entire building. In some cases, you can choose a stone that is two shades darker than the house. This could be an interesting design solution.
When purchasing, be sure to ask the seller for certificates about the safety of the material and its origin.
Stages of plinth cladding with natural stone
The foundation above the ground is most often built from fire-resistant red brick, which is characterized by high strength. It can easily withstand heavy loads. If other materials were used to form the base, the structure will need to be pre-strengthened.
The working surface must be smooth and intact (without gaps or cracks). In this case, additional leveling with concrete mortar will not be necessary. When performing concreting, reinforcing mesh should be laid.
The stone is secured to the base surface using a concrete solution. It is irrational to use adhesive mixtures. Concrete is distributed over the work area, covering small areas to secure several elements at once. The solution is not applied to the back side of the rock.
To adjust the dimensions of the material, it is recommended to use a tile cutter or diamond wheels. Cutting work should be carried out wearing safety glasses to prevent eye injury.
The concrete mixture has a grayish tint that will be visible through the seams. If the tone does not match the main color of the stone, it is recommended to add pigment to the solution.
Cladding process
The technology for installing the slabs is not entirely simple, but after carefully studying the instructions, you will be able to carry out the work yourself.
The process of covering the base.
Surface preparation
Installation can only be carried out on prepared walls. First, you need to make a blind area around the perimeter of the entire house. It is a small protrusion that will protect the base from the destructive effects of moisture.
Next, it is necessary to treat the surface of the base so that the facing material can better attach to it. Make sure there are no potholes or cement leaks. Now it's time for primer. Coarse-grained concrete contact is well suited.
If you decide to insulate a building, it is better to use polystyrene foam. It is convenient because it simplifies the facing process a little - there is no need for priming. Attach the panels throughout the plinth using fastening dowels. Place a metal mounting grid on it.
The last point is skipped if the work is carried out using rubble stone.
Choice of solution
Regular concrete mortar will do. It is recommended to add a plasticizer to it. This will allow a closer connection between the base material and natural stone.
Mixing the solution.
Facing
Laying is done from left to right and from bottom to top - this is much more convenient. The facing material must be selected according to size, lubricated with a solution and attached to the wall. Essentially, you need to assemble a mosaic by choosing the most suitable and beautiful pieces. As a last resort, you can trim some pieces with a grinder to get the desired shape. Most likely, you will have to resort to this at the corners of the building.
Sometimes the material needs to be pre-washed. Thus, rubble stone is often contaminated with dust and soil, which makes it impossible to attach it to the walls. Installation will be much easier if you thoroughly wash and dry each stone.
When you finish laying the base decorative stone on one wall, immediately sand the seams. This must be done before the solution hardens. Then you can move to another wall. The bottom and top rows need to be aligned horizontally. Upon completion of the work, the top line of the base is trimmed.
Rubble cladding
Rubble stone requires an additional installation method. The technology in this case is somewhat simpler than described above.
- Build the formwork.
- Pour in the liquid solution. The layer thickness should be 20 cm.
- Lay out the rubble stone so that there is 5 cm left to the surface of the formwork.
- Once the concrete has hardened, repeat these steps. Continue building rows until the wall is the desired height.
- Once the concrete has hardened, dismantle the formwork, insulate it and continue construction.
If you work intermittently, cover the concrete with a tarp to prevent the rubble layer from drying out.
Final works
It remains to further protect the base material from moisture. Under its influence, natural (including rubble) stone will gradually deteriorate: first, microcracks will appear, and then it will begin to peel off. To prevent this, it is worth covering the finished surface of the base with a colorless moisture-resistant varnish.
Thus, facing the base with stone is one of the most popular finishing methods. If you have some construction experience, laying the slabs can be done with your own hands. The final result will definitely please you. Relatively simple installation, durability, excellent decorative effect and weather resistance - and these are not all the wonderful properties that this base material has.
artificial stone for plinths for sale on favorable terms
. It has the same colors, shapes and reliefs, and even traces of time on the surface, that is, it completely imitates natural stone. Like thousands of years ago, modern people also want to have their own stone house. However, at the same time, he faces problems, since natural stone is very heavy and fragile, and its transportation is expensive, and it is almost impossible to select the required amount of material of the same texture and color. But don’t give up on your dream, because thanks to the latest technologies you can easily make it come true.
However, when comparing the finishing stone for the plinth with the original, you can see that the artificial stone is several times lighter, it is much easier to transport and much easier to work with. To decorate your house, you won’t need back-breaking labor from builders or a pile of heavy stones. The process of laying artificial stone for a plinth is no more complicated than laying ceramic tiles.
Laying fence posts
In the process of creating pillars, experienced craftsmen carry out luggage in different ways:
- Rubble luggage, which requires natural material of irregular shape. This stone is usually used to decorate the inside.
- Tesovaya. The treasure requires stones with parallel sides.
- Tesovaya improved. The seams in this case lie parallel or perpendicular.
To keep the stone masonry as level as possible, you should perform a number of important actions:
- Connect the outer pillars with twine.
- Using a square, set a 90° angle to the structure.
- Draw a straight line along the foundation.
- Measure the distance formed between opposite corners of the material. Ideally, it should match the dimensions of the side of the post.
- Prepare a solution by mixing 3 buckets of sand, a quarter of a bucket of Ceresit-CM11 glue and one bucket of cement. The composition is diluted with 5 liters of water and mixed again.
Next, lay the first corner stone and check its correct position with a level. Do the same with each subsequent sample. You can take different stones for the pillar, but the voids formed between them need to be filled.
Let's look at how to do this job correctly:
- We measure the width of the space.
- We are looking for a stone with a smaller width, focusing on the size of the seam. The permissible error on one side is 15 – 20 mm. The height of the selected specimen should correspond to the size of one of the corner stones. If there is no suitable stone, we close the space with two neat pieces.
- Fill the seams with mortar on both sides.
- After the joints have hardened, fill the internal void with mortar.
- As soon as the layer hardens, lay out the next row and tie the seams. We increase the quality of work by avoiding placing some seams above other joints.
- The permissible height error is ± 1 cm for every 200 cm.
How to further protect the surface
Despite the high performance characteristics, maintenance of a stone plinth is mandatory. In particular, a special soap for stone is used to wash the finish - it not only cleans the surface, but also helps preserve the natural color of the natural material and even forms a protective layer on the surface. This is the product that needs to be used to treat marble, granite and travertine.
Caring for porous surfaces involves a filling step, which closes the pores, preventing them from becoming clogged with dirt. The filling is a transparent acrylic film that closes all pores. After the procedure, even porous material acquires water-repellent properties. This surface is less dirty while remaining attractive.
Before using any product, you must carefully read the instructions, since not all compositions are suitable for all types of cladding. In particular, it is enough to wipe durable rocks with a cloth periodically, but it is undesirable to use chemicals for cleaning.
In general, it can be noted that facing the base with wild stone looks attractive, but such decor requires systematic maintenance. Only in this case can you obtain a durable, durable and beautiful coating.
House made of rubble stone or granite
House made of rubble stone.
As a rule, building a house entirely from natural stone is expensive and difficult. Just building the walls will take a huge amount of time, but the results are worth the time and money spent. The house will be unique, it will have a beautiful and unique design, the load-bearing structures will last for as long as possible, up to several centuries. The main advantages of granite residential buildings:
- This is a completely environmentally friendly building with its own microclimate;
- The building is always cool in summer and warm in winter, which results in significant savings on energy resources;
- You can build almost any building in terms of design ideas;
- The walls and foundation, subject to technology, will last for centuries.
Disadvantages of granite buildings
- It can only be built with your own hands; no automation technologies simply exist;
- The construction of the foundation and walls will take a lot of concrete, because... you need to carefully adjust the granite;
- You need to select the material with full responsibility and immediately check the products for radioactivity;
- It is necessary to build such a house directly near deposits of building material, taking into account the high cost of construction. Otherwise, additional costs may include the cost of delivering the material.