In most cases, utility networks are installed in bathrooms. They need to be serviced periodically and readings from various meters are taken. In addition, access to water shut-off valves is necessary when performing repair work or connecting new plumbing equipment. Such hatches are located on the wall of the room, but there is another place for installing inspection hatches - under the bathtub on a decorative screen. These hatches are designed for repairing and cleaning the bathtub siphon; the method of placement differs from those installed on the wall.
Bathroom hatch
Inspection hatch
Why do you need hatches in the bathroom?
Pipes, water metering devices and other technological equipment in the space under the bathroom look visually unattractive, so often when renovating a room, the opening is covered with a decorative screen, masonry (brick, glass blocks, foam blocks) or plasterboard.
In the event of a breakdown of the overflow, bathroom siphon, or the need to replace meters, in order to comfortably resolve the problems, it is imperative to leave a technological window in the wall covering the space into which an inspection hatch is mounted.
A niche in the wall, equipped with an opening door, will also serve as a place to store detergents, hygiene and cosmetic products, washcloths and towels.
ATTENTION! It is undesirable to cover a cast-iron sewer riser with a screen: to repair the pipe, access along its entire height will be required, and the structure will have to be completely dismantled.
Purpose and scope of use
The main problem of bathrooms is the concentration of all known household communications and appliances in these small rooms:
- risers and cold water/hot water circuits;
- sewerage system;
- wiring;
- cold and hot water meters;
- filtration equipment;
- distribution manifold of the heated floor system;
- shut-off valves.
In the stylistic design of bathroom interiors, urban and high-tech engineering systems can somehow be played up. In all other cases, the owner prefers to disguise communications with boxes and false panels under a layer of decorative tiles and porcelain stoneware.
However, a new problem arises - access must be provided to pipes, meters, taps, filters, water seals of siphons of sinks, showers, bathtubs, and toilet cisterns. Therefore, in gypsum plasterboard/gypsum plasterboard systems, an opening is left and a hatch is installed under a metal bathtub for subsequent finishing with tiles, mosaics in the same style as the entire wall, or screen.
Homemade bathroom hatches
You can make a hatch yourself using magnets and tile adhesive.
Magnetic hatch
Frameless design, the inspection door of a small size (the size of a tile) is mounted on magnets.
Special kits are sold in construction stores, and if these are not available, you can use furniture magnets and galvanized perforated sheets up to 1 millimeter thick.
- try on the tile that will serve as a door against the opening and mark the places corresponding to the corners of the lamella - this is where the magnets will be located;
- attach the magnets to the frame of the opening, cover them with wide transparent tape, and also lay adhesive tape around the entire perimeter of the window;
- attach the metal plates to the magnets;
- apply glue to the tape on all sides of the opening, including the surface of the plates;
- install the tile in the window, pressing it so that the mixture adheres well to it, immediately remove excess composition with a rag or sponge;
- fix the door in this position for 6 hours, you can use masking tape for this purpose;
- after the glue has dried, remove the tile: the metal plates will be fixed to it and the connection to the magnets will be precise;
- seal the seams with grout or silicone.
If there is access from the reverse side during installation of the hatch:
- just glue the plates to the door, fix the magnets on them;
- Place the tile in the opening, mark the location and screw the magnets to the frame.
To open the hatch using magnets, you need to pry the door open with any hook or install a small handle.
ATTENTION! When diluting the dry mixture for installing the hatch, add PVA glue to it (take it in the same amount as water).
Hatch on glue
This type of fastening is recommended to be done in places where you do not have to open the hatch too often (for example, to inspect the siphon, provided it is installed correctly):
- try the tile to the opening: the hole should be 10-15 millimeters smaller than the size of the door;
- trim the lamella if necessary;
- Apply glue or silicone to the door in dots (2 dots on each side);
- fix the tile in the opening and secure it with tape until the adhesive dries;
- grout the joints.
If it is necessary to dismantle the door, carefully remove the grout and pry off the tiles with a knife.
IMPORTANT! After completing the finishing work in the bathroom, always leave a few slats; if the hatch door is cracked, it can be easily replaced.
Let's consider the second option - for painting
Brands such as Praktika and LukeLand produce hatches for the bathroom that can be painted and walls covered with wallpaper. Such hatches are installed on top of walls or in ceilings.
It is recommended to carry out work in a material made of plasterboard, but if desired, the hatch can also be built into a concrete wall.
- The Knauf company produces such a hatch, which is installed for painting; it is chosen for its best qualities, despite the high price.
- The products include non-standard models. Such as laboratory hatches that do not need to be painted.
- Compared to other companies that produce conventional designs, this brand is worth taking a closer look at.
General requirements for secret invisible hatches
Technological hatches, regardless of the type of structure and size, must meet the requirements:
- The material of the product lends itself well to filling and painting;
- manufacturability: the dimensions and type of the installed product must correspond to the operating conditions;
- the structure must have strength, be sealed, resistant to deformation and meet the requirements of safety and aesthetics.
Selection of finished product
Algorithm for selecting a factory hatch suitable for gluing tiles:
- Determine the approximate size of the structure at the location of installation of plumbing fixtures and water flow meters. At the same time, the dimensions of the wall and the presence of water mains or electrical wiring are taken into account. If you plan to install a swing structure, then you should provide free space for opening the lid.
- Specify the dimensions of the ceramic tiles that will be used to decorate the room.
- Calculate the number of tiles that will cover the area of the technological hole.
- Determine the dimensions of the hatch based on the area and dimensions of the tiles (taking into account the seams). The design is selected according to manufacturers' catalogs. When choosing, it should be taken into account that the tile should overlap the surface of the lid on the sides by 5-10 mm or more (up to 50% of the total area of the tile). During the repair process, the installation location of the structure is adjusted taking into account the laying of tiles on the wall surface.
The hatch in the bathroom is needed not only for taking meter readings, but also for carrying out repair work.
Classification of inspection hatches
Depending on the method of opening the door, the material of construction and the installation location, all products are divided into several types.
By opening method
- sliding models: the fastener consists of three links, due to which the hatch has a two-stage opening (initially the door moves forward 1-2 centimeters, then moves along the wall to the side). Sliding structures are placed in difficult to access places: behind the toilet, bathtub;
- hinged hatches: they are attached to the frame on hinges, are easy to open and have a long service life. The door is equipped with a handle or a snap lock. When tiling a swing hatch, the finishing material should not protrude beyond the door by more than 5 centimeters;
- tilting hatches: after opening the fixing fastener, the door goes from a vertical position to a horizontal one. Designs of this type are convenient to use where it is not possible to open or move the door to the side, also in places that require rare inspection;
- push hatches: open by lightly pressing the door, after which it slides forward. Further opening is swinging open or moving to the side. Such hatches are almost invisible in a wall lined with relief tiles, mosaics, natural or artificial stone.
IMPORTANT! When choosing a hatch model based on the opening method, analyze the installation location and only then decide what type of opening mechanism will be appropriate.
According to the material of manufacture
- metal hatches: made of stainless steel grades, characterized by high-quality, durable fasteners. The models consist of a frame and a door; these products can be any method of opening. Manufacturers also present models made of aluminum, which are light in weight and highly resistant to moisture, but less durable than steel hatches;
- plastic structures: characterized by low specific gravity, ease of installation, low price, but have low strength;
- mixed type: models made of reinforced plastic, resistant to temperature deformation and have low thermal conductivity, which makes it possible to do without thermal insulation during installation.
Homemade inspection hatches are made from plasterboard, wood, plastic, and sometimes a metal profile is used for the frame.
IMPORTANT! When choosing a material for making a hatch with your own hands, take into account its waterproofness and wear resistance: for example, when using ordinary drywall or wood, the door will quickly deform when exposed to moisture and become unusable.
At the installation location
Depending on their location, technological hatches are divided into groups:
- ceiling: often used in industrial or commercial premises;
- floor: must have good strength to withstand constant load, installed in country houses for access to communications located in the basement of the building;
- wall-mounted: convenient and practical for installation in apartments.
To size
The range of designs produced by various manufacturers is represented by products with a width of 100-700 millimeters, a height of 100-1600 millimeters, with a pitch of 50 millimeters on each side. The most common standard hatches are 100x100 mm.
Thanks to this variety, choosing the required size is not difficult for the consumer; in cases where a hatch of a non-standard size is required, it is possible to individually manufacture a product of any design according to an individual order.
Design Features
To attach a hatch to enter the basement, you can use ordinary door hinges. These are reliable fasteners that require a minimum of effort and cost. It is advisable to use them only for a light wooden lid.
Another way to organize the entrance is to use hood hinges from the car in the hatch design. Spring-loaded latches allow you to secure the door in a stable position. Thanks to the lifting mechanism, even a fairly heavy door can be opened without much effort.
The metal structure of the door makes it not only strong, but also prohibitively heavy. In this case, the hinges must have shock absorbers. In addition, you can build something like a safe door using an electric motor and several aluminum pipes. But such a cover can only be opened if the engine is connected to a source of electricity.
Operation and care
The basement door requires periodic maintenance as it is exposed to strong temperature changes and high humidity. About once a year, the hatch hinges and shock absorbers should be thoroughly lubricated.
From time to time, solutions are applied to a wooden door that repel moisture and prevent the development of fungus. The metal hatch should be cleaned of rust and painted.
Review of manufacturers of hidden hatches under tiles
The Russian manufacturing company Hammer has been specializing in the manufacture and supply of hatches for walls, basements, and ceilings for more than 10 years. Models from this manufacturer have a wide range of sizes. All products comply with international quality standards. At the moment, in addition to inspection hatches for painting, the company produces 2 well-known models that include tile finishing: “Zeus” and “Glory”.
"Zeus"
The push-type product has high strength, thanks to the reinforcement of the structure with additional stiffening ribs (models are designed for openings up to 1600x1600 millimeters, and the thickness of the facing material has an acceptable value of up to 15 millimeters);
"Glory"
Hatches with a push opening mechanism are very easy to install and operate products, characterized by a long service life and a reasonable price. The system of connections and hinges of the hatches allows you to not use handles (suction cups) to open the door - you just need to press the place where the latching mechanisms are located, and the alignment of the frame and the door is carried out automatically. Products of the “Slava” model can be installed on any surface; the additional insulating layer of the cover protects hidden communications from moisture. You can attach material to the hatch that is larger than the door, which eliminates the additional work of cutting tiles.
State - production of a wide range of hatches Inspector of various designs: can be used for wallpaper, painting, tiles and other materials. The company manufactures products for ceilings, floors, walls, basements, and produces inspection hatches made of aluminum, steel, and polymer materials. Metal areas are treated with special compounds that have anti-corrosion properties.
All manufactured hatches undergo a three-level quality control system:
- Inspector hatches for wallpaper (painting) – used for installation on walls or ceilings, the opening mechanism is push-button;
- Inspector floor hatches – designed for use in residential premises, have a safe and reliable design;
- AluKlik, T-34 hatches (under tiles) – have different opening mechanisms, are designed for rooms with different layouts and are provided for finishing with facing materials.
– production and design of high-quality floor and wall products made of aluminum profiles, with door adjustment units with fluoroplastic bearings, which eliminates acidification of the moving units. The company's products are certified to the highest quality category.
Conclusions and useful video on the topic
When purchasing and installing an inspection hatch under a tile, many factors should be taken into account. To avoid confusion and successfully complete the task, check out the useful video materials on the topic.
Video about the variety of designs and mechanisms for opening hatches:
The need for inspection hatches arises infrequently: preventive inspections are carried out every few months. But it is these simple designs that help out in difficult situations when you urgently need to fix a leak, clean a siphon or replace a meter.
Thanks to invisible hatches, you can beautifully decorate your interior without focusing on the elements that ensure its functionality.
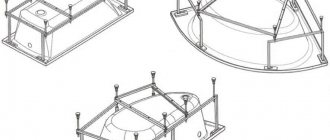
Installing a hatch on foam block partitions
Remove the hatch door, place the frame on a flat surface and drill mounting holes at a distance of 10 centimeters from each other (their number depends on the size of the product);
- check the dimensions, evenness of the walls and corners of the opening, correct the problem if necessary;
- fix the hatch in the opening and check its position with a level. Large distances between the frame of the product and the wall should be sealed with cement mortar or eliminated using construction foam. When installing a hatch with a push mechanism, keep in mind that the door should protrude 2-3 millimeters above the plane of the frame;
- mark the locations of the fasteners on the foam blocks through the holes in the frame;
- remove the hatch from the opening, drill the foam blocks in the designated places and hammer in the dowels;
- reinsert the product into the window and use self-tapping screws to secure the frame, then the door;
- adjust the gap between the frame and the door.
IMPORTANT! Adjust the position of the movable structural element under load: attach a weight to it approximately equal to the weight of the door lining material.
Opening mechanisms
Manufacturers install the following door opening mechanisms:
- swing;
- push;
- folding;
- sliding
Each type of opening has its own advantages. When choosing, you should focus on ease of use.
This is the most familiar and popular type of door
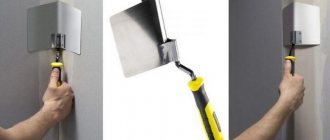
Invisibility hatch with push mechanism
Sliding mechanism with three-link hinges
Hinged hatch for hard to reach areas
It is hardly possible to come up with a more convenient opening mechanism than a hinged one. However, an audit is often needed where access is difficult due to equipment or furniture. Then folding and sliding models come to the rescue.
If there is space on at least one side, then it is better to choose a sliding mechanism. And for areas with difficult access, folding structures with the ability to completely remove the door are more suitable.
Installing a hatch on plasterboard boards
- attach the product to the drywall and mark the places where the hatch will be attached, adding 12 millimeters to the results obtained;
- carefully cut the hole;
- remove the door, insert the frame into the opening and secure it with self-drilling screws (for small sizes of the product, 2 fastenings on one side will be enough, for large dimensions - 3);
- caulk the seams between the drywall and the frame.
Installation location
A standard inspection hatch is installed on vertical walls or partitions that cover niches under the bathroom. There are ceiling windows used when repairing or servicing ventilation ducts or pipelines of an emergency fire extinguishing system.
In private homes, there are floor covers under which sewer or water mains are located. Floor hatches are used in multi-apartment buildings in case of additional insulation of floors.
How to cladding a wall with a hatch installed?
- make a preliminary layout of the tiles, taking into account the location of the inspection window, mark the lines on the floor or walls with a tapping cord;
- start working by gluing the facing material to the door, then move to the sides of the hatch;
- wait until the adhesive has completely dried, grout the joints between the door and the wall (floor) and along the entire rest of the surface.
IMPORTANT! Professionals recommend making a hole for the hatch after you start laying tiles on the walls. This method will make it much easier to ensure the correct layout: there should be intact tiles on the outer corners, near the floor or ceiling, and the seams should completely match.
If you are not new to the construction business and know how to cladding walls, installing an internal cabinet in the bathroom yourself and installing an inspection hatch will not pose any difficulties for you.
Selection of tools and materials
In order to make and install a hatch under the bathroom yourself, you will need the following tools and materials:
- Push-to-open mechanism, which allows door opening without handles;
- moisture-resistant plasterboard (except for options with a brick or concrete wall) and plywood;
- wooden beam;
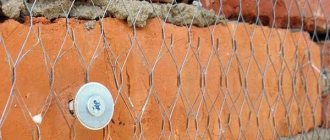
- reinforced mesh;
- PVA glue and tile adhesive;
- the ceramics itself is the size of the entire surface for cladding, since its installation will be carried out immediately after installing the hatch;
- drill and screwdriver;
- self-tapping screws;
- tape measure and pencil.
The material for the door and hatch itself can be plywood, chipboard or OSB - it all depends on the number of tiles glued to it. The more ceramics, the stronger the structure should be. The most stable option is oriented strand board, while plywood is suitable if the door is designed to only accommodate one tile. When choosing OSB, the thickness of the opening part of the hatch must be at least 12 mm.
Overview of methods
DO YOU HAVE ANY QUESTIONS?
Ask a specialist
How to do it yourself
There are several methods for making hatches from scrap materials:
- from a sheet of plasterboard or tiles with magnetic fastening;
- made of ceramic tiles, which are attached with sealant.
On magnets
When making a homemade structure in a plasterboard partition, it is necessary to install a metal frame on which magnets for furniture doors are attached. The wall is covered with tiles; a slot is provided in the tiles for installing a service hatch.
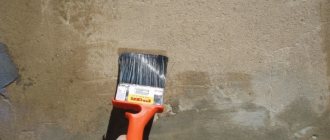
Then a cover is cut out of a sheet of plasterboard (according to the size of the window), the surface of the material is primed and covered with ceramic tiles. On the opposite side of the lid, metal plates located opposite the magnets are attached to liquid nails.
There is an alternative way to make a tile lid. After installing the magnets, counter steel strips are attached to them. The opening is then protected with masking tape, which is covered with a thin layer of tile adhesive. The tiles are pressed against the glue, which must dry for 4-6 hours. Then you need to separate the tiles with metal plates stuck to the glue. After removing the remnants of the tape and cleaning off the excess adhesive mass, the homemade hatch is ready for use.
On glue
The owner of the premises can make a hatch from tiles glued with silicone sealant. The design is installed on plasterboard screens under the bathtub, allowing you to clean or replace the drain siphon. The screen provides a window with dimensions 15-20 mm smaller than the dimensions of the tile. Then the tiles are laid on the screen and the joints are grouted with a special mixture. Holes for attaching handles are drilled in the tile that will cover the opening.
The resulting ceramic plug is glued with sealant, the seams around the perimeter are filled with grout or filled with sealant. Before removing the cover, you need to remove material from the joint line and then tear the tile away from the base. The disadvantage of this method is the risk of breaking the tiles under force, so it is recommended to keep 3-4 spare tiles.
Advantages and disadvantages
Plastic inspection hatches have many advantages:
- reasonable price;
- long service life without loss of quality and appearance;
- aesthetic appearance;
- a wide range of;
- can be painted at home;
- resistance to adverse factors (high humidity, temperature changes);
- non-flammability, resistance to chemicals;
- relatively low installation cost;
- the ability to install it yourself, without the involvement of specialists.
There is only one minus here - appearance. such hatches are not hidden from view and are visible on any wall.
Dimensions and prices for plastic hatches
Pleasant moments for buyers of plastic hatches are the variety of sizes. The minimum hatch size is 100 x 100 mm, then larger sizes are available, up to 400 x 500 mm. If necessary, you can also find the largest hatches, with sides starting from 600 mm.
In addition, hatches for inspection of plumbing equipment can be of different geometric shapes:
This point is important to consider when planning repairs.
Of course, price plays a major role here. The average cost of a plastic hatch is 150-300 rubles.
Standard sizes
To make it easier to determine the dimensions of the inspection hole, we focus on the standard dimensions of plumbing hatches. These designs may differ not only in size, but also in planting depth.
The most convenient sizes for providing access to utility networks are:
- 300x300 mm;
- 150x150 mm;
- 150x200 mm;
- 200x300 mm;
- 300x600 mm.
If you plan to tile the door, take its dimensions into account.