Click to share
more
There are at least several proven ways to change the color of grout . As you can imagine, completely replacing grout by removing the old one and applying a completely new layer is a time-consuming and tedious job that cannot be done when working with a large area of tile. Therefore, it is worth learning about other ways to make the grout perfect. So how can you change the color of your grout and freshen it up?
Simple coloring
Painting the spaces between the tiles is the most affordable and easiest option for updating the seams. What is suitable as a base product:
Painting seams is considered not the most durable option; the effect of the result lasts for a maximum of six months. However, when using special formulations, this effect may be longer. And, even more so, when using paints that contain a sealing additive. In addition, antifungal substances can be added to special formulations to protect seams from mold. Which is another argument in favor of specialized tools.
When choosing water-based paint, you should take into account the fragility of the option, since the seams will quickly darken again. It is recommended to apply the composition to areas that have been previously cleared of dirt and mold and have been well sanded.
Options with markers and whitewashing are also not durable, although they are simple in technique. The maximum period for maintaining the effect after their use is no more than six months. In addition, the use of whitewash is allowed only in rooms with a dry climate.
The third option is paint for tile joints
Painting seams with whitewash, water-based or special paint has the same instructions:
- clean or wash the surface from dirt, plaque and mold;
- allow to dry or wipe dry;
- For even application of layers of paint, the seams should be degreased with acetone or white spirit;
- apply paint in the gaps;
- if the first layer is applied unevenly, you need to apply another layer of paint to even out the tone;
- After complete drying, remove any remaining paint by washing the tiles.
Water-based paint.
Choosing such paint is not difficult; it is sold in any specialized store or supermarket. A variety of shades makes it possible to update boring white joints, make them brighter, and give the tiles uniqueness. There is one important drawback of this method of putting the cladding in order - it is unreliable and most likely the seams will quickly deteriorate again.
Special paint for tile joints.
The coloring composition in such paints is designed to maximally protect the seams from fungi and bacteria, using a protective sealant. For a better visual effect, it is recommended to choose paint of a different shade. This way, the new color will mask old imperfections in the grout and eliminate worries about paint color loss in the future.
Special coloring compounds
It is not recommended to choose a paint color that has already been used. The optimal solution is to choose a new shade that masks the wear of the grout. Moreover, the choice of shades that resemble dirty ones may seem strange at first. But it is he who can become the most successful. And all because in the future you won’t have to worry about the paint losing its color and darkening.
You can purchase a special composition for restoring the color of tile gaps at a construction supermarket. There, the range of such products is presented in quite a large quantity - for every taste and budget. Moreover, the purpose of such compositions is both to restore the color of the joints over the entire area, and to even out the shade in certain areas where the grout has noticeably worn out.
When choosing the color of the composition, you should take into account the fact that light compositions go well with the shape of the tiles, giving them some streamlining. Whereas dark compositions will make the tiles stand out against their background.
Experts recommend immediately buying a 2 in 1 composition, which already contains a sealant additive. This way you won’t have to think about the last step of the repair with applying a protective sealing layer.
Alternatively, the paint used to make the paving stones can be selected. If the choice fell on it, then before starting work it is recommended to mix the composition with tile adhesive. This is how concrete structures are usually painted. And in this case, the stability of the fugue shade is guaranteed.
Instructions for painting seams
Mechanical cleaning
If it is impossible to remove contaminants, or if fungus penetrates into the deep layers of tile joints, it is necessary to completely or partially update it. Mechanical methods are used to remove used grout, as well as restore the coating with special compounds.
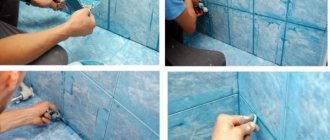
First, the entire surface is washed well with cleaning agents, after which the areas of maximum contamination are cut off with a stitcher or a stationery knife.
When removing the old coating, it must be taken into account that a layer of new grout is applied at least 2 mm thick.
After all areas of contamination and the spread of fungus have been removed, it is also necessary to use a cleaning agent, rinse the surface, and dry it well before starting work.
Replacing the grout layer
Replacing the grout in the joints seems to be the most labor-intensive, but also the most effective and reliable way to update the color of the joint space.
To implement it, the first step is to get rid of the old grout. It is permissible to apply fresh grout over the worn-out layer of grout. Which is much less labor intensive. The main thing is to choose the right composition.
Therefore, you should figure out which grouts are suitable for these purposes. It is advisable to use two types of grouting compounds. Depending on the basis, this could be:
A cement-based fugue is a dry mass diluted with water or liquid latex. Cement grout is always made using Portland cement.
Grouts based on epoxy resins are compounds with synthetic resins and hardeners that are resistant to acids and chlorine. Form strong contact with metal surfaces. For this reason, they are not susceptible to the influence of these substances and are characterized by a high degree of strength.
The cost of epoxy grout is higher. And their purpose involves their use not in residential premises, since the need to protect tile joints against alkalis and acids at home does not arise often.
Epoxy fugue has increased viscosity and is not suitable for thick tiles that are laid with small (narrow) gaps. The width of the joints is considered standardized, but the size of the gaps is determined by the shape and area of the tiles. For square elements 10 by 60 cm, the optimal seam width is 3 mm. In the case of defective tiles, the joint width can be increased to 1 cm.
To remove old grout you will need the following:
Instructions for applying a new fugue to the previous one
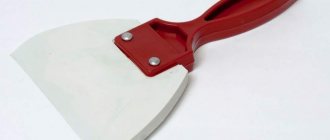
For work it is better to use a rubber spatula. It works well in tile recesses as well as seams.
where are the cheapest apartments on the sea
The above recommendations are suitable in situations where the width of the seams is 3-5 mm. For narrower gaps (2-2.5 mm) proceed differently. First, evaluate to what depth the composition will fill the seams. If more than 3 mm, then grouting continues further. If the composition does not penetrate deeply, then use a spatula to press the composition into each section of the seams. Such a painstaking operation is performed only in areas that are subject to increased loads. In the remaining areas the composition is simply rubbed down.
To update the color of the grout, a colored fugue is well suited. The grout can be chosen to match the overall coating or in a contrasting shade. This way you can not only repaint the seams, but also create an interesting design for the room. To add color to the grout, the use of colors (dyes) is allowed. Typically, paste or liquid tinting agents are chosen, which are sold in a hardware store.
Industrial colored grouts contain a special dry tint, which creates a rich and bright fugue color. It is more appropriate to use industrial colored grout. Experts are against attempting to mix grout and color on their own. Because this is fraught with consequences. For example, damage to the performance properties of the composition cannot be ruled out; in addition, during subsequent mixing, you can miscalculate the desired degree of shade.
When the grout dries, it is covered with a special protective layer. This is necessary to avoid cracking at the seams.
Knowing how to paint the grout between tiles and how to change the grout in the joints will make your choice of resurfacing the grout more informed.
Source
Related discussions
What color can you paint the walls in a 5 sq. m. kitchen? m with red furniture?
Is it possible to use old Soviet furniture in decoration?
Is it possible to paint a small bathroom in a dark color viva color N429?
Is it possible to change the color of chipboard (bathroom cabinet)?
Elena Trufanova
Dennize Denny, I was very interested in your comment. I have a border with a pattern that forms a continuous ornament, I don’t want to “cut” it, tell me, is it permissible according to technology to lay it out without a seam? Thank you.
- Like
- Save
Dennis Denny
Elena, almost any decor can be installed either with or without a seam, unless the ends are rounded. The question is what will look better in a particular case.
It’s just that in this topic the corners and tiles are the same length, the seams of the border could coincide with the seams of the tiles.
- Likes: 1
- Save
The pencil and tile seams do not match on purpose, so the row of tiles looks complete. And pencils in this version cannot be without a seam, since there will be no symmetry, because indeed the tile and the pencil are the same width.
- Like
- Save
Painting tile joints in the bathroom: materials, methods and technology
We will send the material by email
You can paint the seams between the tiles in the bathroom using ordinary lime, water emulsion or a special product. This way you can update the appearance of the room and delay the time for the next renovation.
Cleanliness and neatness of tiles are the main condition for an ideal bathroom. Immediately after the renovation, it’s pleasant to be in the bathroom; you can feel freshness and newness everywhere. But over time, the walls and floor inevitably begin to become dirty, this is especially noticeable at the joints between the tiles. These areas can be difficult to clean and cannot be easily cleaned with detergents. But it is not necessary to make a complete repair to update the seams. There are many ways to return tiles to an attractive and fresh look. To answer the question of how to paint the joints between the tiles in the bathroom, it is important to take into account the conditions in this room.
Cleaning joints - home methods and remedies
Kitchen drawer cleaner
Stains and dirt at the joints between tiles can usually be removed with commonly available products, including baking soda, ammonia, vinegar, baking powder, and others. Most of them give surprisingly good results.
While there are various formulations proven to be effective, any grout cleaner is a good idea to try on a small area before tackling the entire wall. It never hurts to be careful and you can avoid discoloration or even damage to the grout between tiles.
Cleaning joints with baking powder
Baking powder helps with dirty joints in both the bathroom and kitchen. In addition, the space between floor tiles is improved thanks to the cleaning effect of this kitchen helper. The procedure is performed as follows:
- Make a paste with baking powder and a little water. To do this, mix the contents of the package with approximately 200 ml of water to obtain a thick paste.
- The grout cleaner is applied with a toothbrush.
- The baking powder is left on the joints for about an hour.
- The joints are thoroughly cleaned.
- All this is wiped dry with an absorbent cloth or towel.
Cleaning joints with baking soda
Homemade soda also does the trick, and dirty joints become fresh and aesthetically pleasing again. Mix 100 ml of baking soda with 300 ml of water and apply the resulting liquid to the cleaned areas using a toothbrush or microfiber cloth. After about an hour of work, the joints are washed with a damp microfiber cloth and then dried with a cotton cloth.
Nail polish remover and alcohol
These home remedies are often used to clean discolored and dirty joints. Simply moisten a cotton pad or cloth and rub vigorously. Additionally, alcohol and nail polish remover can kill mold. These home remedies are quite useful for cleaning small areas.
Descaling agents, fat solvents
Shampoo is a good grease remover, and dishwasher rinse aid removes limescale stains. Both can be used to clean joints, although on a fairly limited surface area. Therefore, before moving on to an expensive remedy, it would be good to check the substances that are at hand.
Steam cleaner
Tiles and joints can be thoroughly washed with steam, without the use of chemicals. Hot water steam also has the advantage that it not only penetrates deep into the joint and washes away dirt, but also kills bacteria at the same time. Steam cleaners are often equipped with special attachments and brushes to make cleaning easier.
Cleaning joints with vinegar
There is advice to treat dirty tile joints with vinegar: apply the liquid to the joints, rub thoroughly and after a while rinse with water. After this procedure, the joints should look like new. Error! Rinsing joints with vinegar gives a very short-term effect. Over time, vinegar damages the solution, causing it to become porous, which in turn allows dirt to build up.
Vinegar is suitable for cleaning silicone joints. After diluting with water, apply a cloth to the joints and rub in. If the stains are very stubborn, you can temporarily apply a cloth soaked in vinegar to the joint and then rinse with water.
When mold stains are discovered on silicone joints too late, neither vinegar nor other preparations wash them away. In this case, it is recommended to remove the old silicone and apply new grout. It is best to entrust this work to an experienced professional.
Preparatory work
For any type of painting, preliminary preparation is required, since the product will not stick to a dirty surface. The tile joints are cleaned using a regular detergent; you can also use washing powder, dishwashing gel and traditional methods. These substances are applied to the joints between the tiles, then you need to wait a while and thoroughly rub the areas with a brush. After this, the walls and floor are washed with water and wiped dry with a cloth.
To effectively dissolve fatty deposits, you can mix soda and whiteness together. These products are brought into a pasty state and applied to the spaces between the tiles. To better remove contaminants, it is advisable to hold the substance on the surface for about 15 minutes, and then thoroughly clean all areas with a brush. After such cleaning, the seams are washed generously with plain water and the quality of the work performed is checked.
If there are persistent oil stains, the entire process can be repeated several times. At the same time, it is prohibited to use metal and abrasive products so as not to damage the smooth surfaces of the tiles.
If there is not enough time, and the result is needed as quickly as possible, it is recommended to resort to special products from hardware stores. In household chemical departments there are many products that contain strong solvents. Mixtures of acids and other chemical elements ensure effective removal of even old stains. But when using them, you should take safety precautions - you need to wear gloves and a respirator when working with such products. It is also important to ventilate the room well after treatment.
If you have small children and animals in your home, it is better to use more environmentally friendly methods. This is also important for allergy sufferers who are contraindicated from inhaling chemicals. One of the safest methods is steam cleaning. This treatment will allow you to quickly get rid of all contaminants, as well as disinfect the surface and prevent the development of fungi on it. In order for the grout paint to adhere better to the tile joints, they should be thoroughly degreased before applying it. Acetone, white spirit or an all-purpose degreaser work well for this purpose.
Soap and water solution
Soap solution is one of the simplest, and most importantly accessible to everyone, methods of cleaning tile joints. To create a soap solution, you need to use laundry soap, grate it, then add warm water, mix the resulting liquid thoroughly, and apply it to the seams using a sponge. Using a brush, you need to thoroughly clean each seam, and then rinse off any remaining soap.
This method will allow you to clean the seams from surface dirt and accumulated fat. It is completely safe for all surfaces (with the exception of painted seams - if the paint has not been protected with a special solution, laundry soap can partially wash it off).
Note: After cleaning, you can refresh or even change the color of your existing grout using a special grout pen, which can be purchased HERE .
How to paint the spaces between tiles
When choosing a material for restoration, you need to understand the conditions under which it will have to be used. A bathroom is an area of high humidity, where the walls and floor are constantly in contact with water and are subject to regular cleaning. Therefore, the coloring agent must be selected that can withstand significant loads.
Paint for tile joints must have the following properties:
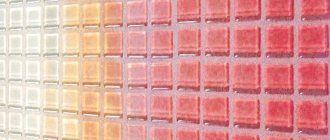
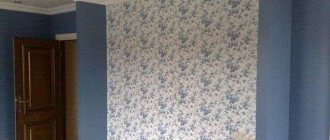
A wide variety of coloring products allows you to choose the right shade for any interior. The most common color remains white and its variations, since such tones are associated with the cleanliness and freshness of the bathroom. But if desired, the seams can be painted in any shade, for example, they can be made dark so that they contrast clearly with the tiles. Colored options are also available for sale; they can be matched to the main color or made into an interesting combination.
blood divination for the sex of a child
Water emulsion for seams
When choosing a paint for grout, craftsmen often opt for a regular water-based emulsion, since this product has many advantages:
Among the disadvantages of this solution is sensitivity to humidity and mechanical damage. Such paint for seams is not able to withstand the ingress of liquid for a long time, so it is not advisable to use it in the bathroom, as well as on the work surface in the kitchen. Floor tiles should also not be treated with this product, as this will make cleaning much more difficult.
Marker Features
If the area to be restored is not too large, and you don’t have paint for tile joints on hand, you can use a simpler method - a grout marker. With this tool it is easy to apply a smooth and neat line, and no additional equipment is needed. Marker coloring is recommended for the following reasons:
Despite the large number of advantages, this option also has disadvantages. They mainly relate to the volume of work performed. There is no point in using a marker over large areas, since the product has a high consumption and can quickly run out. One pencil will be enough for 5-10 meters of processing.
Another disadvantage is the rapid abrasion of the marker tip, which loses its appearance due to the rough surface of the grout. As a result, such a pencil can no longer draw a straight line, and the work turns out sloppy. Companies that produce these products try to include additional attachments in the kit that can be used after finishing the main one.
Special dyes
If you need to quickly update the appearance of your bathroom interior, you can purchase special paint for seams. These products allow you not only to refresh the room, but also to completely change its color. When purchasing a dye, consider the composition of the grout, which can be regular or epoxy. In the latter case, you need to select the product more carefully, since not every product is able to adhere well to such a surface.
The most common types of grout paints are:
How to remove silicone grout
It is generally not recommended to use silicone grout for continuous jointing of cladding, but only locally, at the joints of surfaces. In conditions of dampness and poor ventilation, fungus quickly appears on silicone, and in such cases there is only one way out: replace the grout and re-grout the tile.
The silicone grout material is removed mechanically using a scraper. Silicone is difficult to remove, so for many inexperienced craftsmen, such a task as changing silicone grout can cause difficulties. You can clean old grout without residue using a composition for removing dried silicone. The most affordable option is “Penosil Silicone R”. After applying the solution to the joint, let it sit for a day, after which the silicone will soften and lose its elasticity, and it will be easy to remove it from the joint.
How to Renew Epoxy Grout
It is easy to find a suitable dye for a cement coating, but the situation is completely different with epoxy grouts. In this case, the list of available options is significantly reduced. To remove the epoxy coating, wipe it with Litonit gel. Before application, the product is diluted in water and then carefully applied to the desired areas. You should work especially carefully in the tile area, since the substance is quite aggressive and can damage the surface.
If there are significant defects in the tile joints, it is more advisable to completely remove the grout and apply a new fresh layer. Using a sharp tool, carefully clean the gaps to a depth of about 5 mm, while trying to act carefully and not damage the surface of the tile itself. For the same reason, the use of electrical appliances is highly discouraged.
When the grout is completely removed, you can use a vacuum cleaner and carefully remove dust from all crevices. Then fresh mixture is added in between. To obtain colored joints, you can purchase ready-made grout with a tint or resort to an alternative method. It is the use of powdered pigments that are used in the production of concrete tiles.
Renewing seams without removing grout
Timely renewal of seams makes surfaces aesthetically attractive and neat. The procedure is an important requirement for compliance with sanitary standards. Do not forget the dangers of mold and fungi for the human body.
Renewing seams without removing grout is the simplest of all methods. In this situation we are talking about the following methods:
- Cleaning seams with detergents and chemicals;
- Making the seams neat, masking defects by painting the surface of the seams or with a special marker;
- Applying the next layer.
These update methods guarantee short-term results (no more than six months). When choosing them, it is important not to damage the tile or spoil its appearance, which is important when treating surfaces with highly concentrated acids.
Renewing seams without removing grout is an economical method that is popular in everyday life. Professionals prefer other methods.
Attention! When refinishing seams, avoid soap. Remaining material in the recesses is a favorable environment for the proliferation of harmful microorganisms.
Dye application technology
Grout paint should always be applied to a clean, dry area. Typically a thin brush is used for this, but some manufacturers include their own tools. These can be sponges, brushes or tips. Greater precision during application can be achieved using masking tape. This material is placed on both sides of the treated area so that the dye does not get onto adjacent areas. After painting the gaps, wait some time until the product dries and distributes. When the final result is achieved, the tape is removed.
If a marker was chosen for coloring, no additional equipment will be needed. The product is used to carefully paint the seams vertically and then horizontally.
Cleaning the joint
Cleaning tile joints will be effective if the dirt is not deeply embedded in the grout. Renewing dirty seams is done using commercial detergents or using soda and peroxide. Here's a simple recipe for making grout cleaning solution:
- Pour 4 parts baking soda into a plastic bowl and dilute with 3 parts peroxide. For kitchen surfaces that are prone to grease stains, you can add dishwashing gel.
- Apply the resulting mixture to the yellowed areas, rub lightly and leave to soak for 2-3 hours. After this, thoroughly clean and scrub the seams with a brush, and rinse with water.