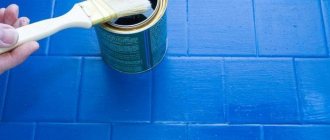
Ceramic tiles are the most common covering for walls and floors in a bathroom, toilet or kitchen. It's all about its strength, durability, ability to resist moisture and elevated temperatures - the tile is not afraid of anything and can serve for decades without losing its appearance. But when an apartment is being renovated, you often want to completely change the color scheme of the interior. And this can be done without even removing the tile and replacing it with a new one. How to paint tiles on the floor?
How to paint tiles on the floor
Paint selection
The main criterion when purchasing paint for tiles is moisture resistance and durability. When using a regular coloring agent, after a while peeling and flaking will appear on the tile. To transform an old coating, it is preferable to choose one of the following types of paint :
- Latex . Has excellent adhesive properties. Rubber paints are suitable for waterproofing. And for decorating dry rooms, products with an acrylic-latex base are suitable. The coating is absolutely safe for health and odorless.
- Epoxy . It has excellent water resistance and adhesion, but you will have to pay a good amount of money. The ink substance does not peel off over time and firmly adheres to the coating.
- Oily . Before application, a mandatory step will be priming.
- Alkyd enamels . Suitable only for rooms where it is always dry and demonstrate good adhesion.
- Stained glass . No preliminary preparation of the canvas is required. It's not cheap, but it's easy to apply to a clean surface. Most often, they are used as decoration.
- Polyurethane. They are wear-resistant, are not afraid of temperature changes, do not cause peeling and can withstand humidity.
Important! Water-based primer is not suitable for use on polyurethane or epoxy products. It must contain organic solvents.
Varnish consumption
If the surface to be treated is porous, then to obtain a durable coating it is necessary to apply two or three layers.
The consumption of the product is 100-200 g/sq.m., but when applying a second layer it increases by another 100 g/sq.m.
Painting tiles: advantages and disadvantages
Before transforming your home, you should carefully weigh all the pros and cons of this procedure.
Benefits of painting tiles:
- Does not require large financial investments.
- Possibility to choose any color. Building materials stores do not always have a wide selection of tiles.
- Extending the “life” of tiles and updating its design.
- Properly selected decor will help make small cracks invisible to the eye.
- Thanks to the use of paint, you can create various designs, interesting combinations of colors and achieve a modern style in the room.
Disadvantages of painting tiles:
- The surface of ceramic tiles should be thoroughly prepared and thoroughly cleaned.
- After some time, the surface of the ceramic tiles may begin to peel off. Such manipulation can hardly be considered durable. The situation can be saved by adding a sealant, then the coating will become stronger, which means the service life will increase.
- If the decision to transform the tiled flooring is caused by the desire to sell the home in the future, then you need to take into account that the new owners may not like the design.
Why paint tiles?
Many people wonder why even take on this labor-intensive job and paint the tiles? It's actually simple. As mentioned above, ceramic surfaces were previously updated using this method, because previously interesting building materials on the market were not as abundant as they are now. And it’s cheaper to simply paint the tiles than to completely dismantle them and glue new ones. It is worth agreeing that much less labor will be required to paint the tiles than to remove the old ceramic coating.
Painting ceramic tiles
The relevance of this method has not disappeared to this day. Sometimes there is neither time nor extra money to completely replace the tiles, and then paint comes to the rescue. Moreover, now there are very high quality and reliable paint coatings, even waterproof, which are perfect for quickly and at minimal cost completely changing the color of the tile. This is especially true for young families who have just bought an apartment. There is not much money in the family budget, but you need to move into a new home now. And the best assistant in updating the interior is paint.
Decorating tips
It doesn’t take much effort to simply paint the tiles, but to do it in an interesting way, with a touch of artistry, is on another level. We offer several ideas:
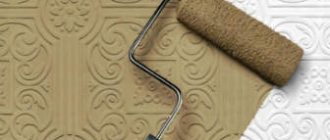
Multi-colored tiles. To achieve this effect, you just need to paint not the entire surface covered with tiles, but only a part. It looks quite unusual. Moreover, this does not mean at all that you apply colors in a checkerboard pattern.
First, you need specially selected shades of paint. It must be designed specifically for tiles. Before starting work, wipe off dust from the canvas and degrease it. Then, paint the tiles with any tool convenient for you (roller, sponge, brush). To get straight lines, don't forget about masking tape.
Drawing on tiles. It all depends on your imagination. You come up with a design, degrease the tile product and paint the picture with acrylic or any paint for tiles.
Stencil and stickers. Specialized stores offer a huge selection of stickers of various sizes, types, shapes and colors. They come with instructions for use and the necessary tools.
The advantage is that such stickers do not deteriorate from the use of detergents and are moisture resistant. Marine sets, various letters, tea sets, images of marine life and much more can transform a room beyond recognition.
To complement the stickers, you can choose plastic stencils. They need to be leaned tightly against the wall and painted with moisture-resistant paint with something like a sponge. The only thing is to choose a stencil that matches the style of the overall design theme.
Decoupage technique. This technique is gaining great popularity. Three-layer napkins are used and decorative elements are created from them. How it's done? Using scissors, cut out the desired decor from the selected napkin. Then, using a brush, cover this part with PVA glue.
Try to avoid wrinkles and unevenness. Next, remove the lower layers and place them in the tiles, closer to the ceiling. Apply PVA glue over the entire surface of the already glued element. Let the product dry and coat it with moisture-resistant acrylic varnish.
Seashells. Using hot glue, you can beautifully decorate the tile surface with shells (plastic or natural). You need to select the desired places, usually around the perimeter of the mirror or next to the seaweed stickers, and stick these parts of the decor.
Another idea:
The complexity of the stencils used depends on your taste and the amount of time you are willing to spend on painting. You can, for example, select a small piece of the wall and make a complex pattern there, and leave a solid color around it.
The step-by-step actions in this case are similar to those described above, only it takes longer to draw the stencils (since the pattern is smaller and consists of several colors).
Please note that the smaller the pattern, the smaller the brush you need to choose. We also recommend that you first apply the design starting from the center of the stencil, and then closer to the edges.
For a more accurate result, we recommend washing the stencil after each use, otherwise you may smear the paint.
TIP: If paint has leaked under the masking tape, you can remove it using a utility knife.
Painting tiles in the bathroom
Tools and materials
For repair you will need:
- sandpaper;
- cleaning and washing solutions;
- brush and rag (sponge);
- primer composition;
- brushes, rollers;
- paint – choose a special one suitable for wet rooms;
- masking tape;
- acrylic varnish (water-based).
Progress
- We are carrying out the preparatory stage . Old tiles are cleaned of mold and various contaminants. The surface is degreased, washed and wiped dry. The procedure is carried out using a brush, rag and abrasive cleaning materials. Fine abrasive sandpaper is needed to sand the surface to achieve strong paint adhesion .
- Adjacent surfaces are covered with masking tape. They should be sealed so as not to get dirty with primer and paint. Interior items, bathtub, floor are covered with old newspapers or fabric or film. The sockets can be removed or sealed with masking tape.
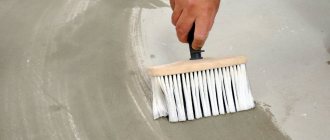
- Cleaned and dry tiles are primed . The composition is distributed with a brush or roller. Try to avoid drips. Next, for the time specified in the instructions, it is left to dry.
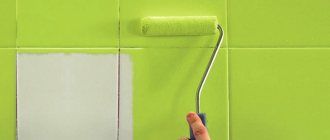
- The surface is prepared, paint is applied in two layers . Start applying each layer only after the previous one has dried. Use a roller on large areas, and a brush on hard-to-reach areas.
- Paint protection . To extend the life of the paint, it should be varnished (1-2 thin layers are sufficient). Coats should only be applied to dry areas.
- We remove the film, masking tape and other protection, and admire the result.
Preparatory work
It is necessary to first remove unnecessary objects from the room; anything that cannot be taken out is covered with a film covering so as not to be painted. Switches and sockets should also be securely closed.
It is necessary to first remove unnecessary objects from the room; anything that cannot be taken out is covered with a film covering so as not to be painted.
Painting tiles in the kitchen
In this case, it is not worth saving on the purchase of high-quality enamel. Cheap paints contain low-quality substances, which are undesirable for the kitchen. Because the backsplash can get hot from the stove, some substances in cheap paint products can produce toxins.
Tools and materials
To paint a ceramic surface, stock up on the following materials:
- epoxy primer;
- tile paint;
- roller;
- brushes of different sizes and bristles;
- protective gloves;
Progress
Be patient and follow the simple steps. By following them, you can easily transform your kitchen apron and create a new decor on it.
- Work begins by cleaning the dirt that has formed on the apron. This can be done using detergent and warm water. You can prepare a soap solution and treat the tiles with it. Or, drop a little product onto a damp cloth and rub it over the dirty surface.
- After removing the soap solution from the tile, it must be degreased with any alcohol-containing substance. As a last resort, vinegar solution.
- Sand the cleaned ceramic surface with sandpaper, preferably fine-grained.
- Apply the primer mixture , paying special attention to the spaces between the seams.
- Leave the tile to dry for a day . Sand the dry surface thoroughly. This will give a good adhesion of the paint to the primer.
- Let's start painting . Apply the paint to the surface using even strokes and leave for 12 hours to dry completely. After which, apply the second layer, then choose a set of brushes as a tool, not a roller.
- Leave the painted ceramic surface for three days to dry thoroughly.
Safety precautions
Before you begin painting work, you must carefully read the attached instructions and study the safety precautions.
It is important to provide yourself with protective equipment such as goggles, gloves and a respirator.
These measures must be observed both at the preparatory stage when grinding the surface, and at the main stage when treating the surface with varnish.
Painting tiles on the floor
To paint tiles on the floor, as well as to perform other painting tasks, you will need to stock up on the necessary tools and materials.
Tools and materials
- fine-grained sandpaper is needed for sanding the tiles;
- epoxy primer mixture;
- paint roller;
- a set of brushes of different bristles;
- rags - for quickly removing paint stains;
- paint container;
- solvent for removing paint from tools;
- wide-diameter masking tape, which will protect the edges of objects adjacent to the surface to be painted;
- degreaser (optional);
- paint - for performing work;
- varnish – to protect the painted surface.
Progress
- Work begins with preparing the room itself and the surface. It is necessary to empty the room of all things and interior items. The surface itself should also be prepared. The tiles should be washed with any detergent. Pay special attention to the tiles in the kitchen; grease stains may remain there. They need to be removed, otherwise the paint will not adhere properly. Cover the baseboards with masking tape and sand the surface thoroughly.
- Rinse the floors with warm water and leave until completely dry. Then, you can cover the tiles with a layer of soil.
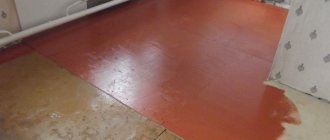
- Paint application stage. It should be distributed in a thin layer over the entire floor. In this case, it is more convenient to use a roller with a long handle. If the surface of the tile is smooth enough, several layers of material will be needed. Each new layer is painted after the previous one has dried. It is recommended to start painting from the corner farthest from the door. The corners of the room should be well treated.
- Let the paint dry thoroughly. It will take about a day for the first layer to be high. Subsequently, the drying time after each layer is reduced to 6-12 hours, depending on what composition is used.
- Upon completion of painting the floor, you should allow approximately 72 hours, or more, for the surface to dry.
What seams need to be treated
As a rule, the manufacturer indicates on the grout label information about whether the grouted joint needs to be further processed. Some modern types allow you to avoid grouting, since they already contain protective (anti-fungal or sealing) additives.
The putty may require protection from moisture (use a water repellent) or other environmental influences. Before purchasing impregnation, you need to clarify which impregnation the manufacturers recommend using.
- The surface of different types of tiles (porcelain tiles, tiles, cotto) may react differently to the application of impregnation for tile joints. Some impregnations may be incompatible with a particular type, so you need to study the manufacturer's recommendations for working on seams.
- Cement-based putty needs increased protection from moisture. Such putties on the seams do not have any protection against moisture.
- Putties based on polymer (epoxy) resin are much better protected from high humidity. These putties should be coated with protective or decorative compounds. They protect against abrasions, stains, and exposure to household chemicals.
- Tile seams of floor tiles, as well as joints near walls, are most often filled with water and are subject to mechanical stress, so they need to be treated first. Use a water repellent.
- For processing joints with light or colored grout, polymer joint varnish is well suited. Without protective impregnation, such grout will inevitably begin to fade and become dirty.
- To protect and enhance the brightness of light-colored or colored ceramic tile joints, use a glossy protective compound. To do this, you can use glossy polymer varnishes.
Many modern protective compounds simultaneously have protective water-repellent properties and can be used to treat ceramic tile joints in any room. Information about the properties and purposes of impregnation can be found in the description on the label.
Experts recommend more often paying attention to an effective water repellent, because seams in more humid rooms are constantly competing with water
Cement-based putties must be treated with sealing compounds. Without additional treatment, destruction will begin over time.
On video: how to effectively protect tile joints.
Painting tiles on the ceiling
A tiled ceiling is a rare occurrence. However, some people use this design in bathrooms, kitchens, medical offices, closets, etc. Ceiling tiles are used not only to embody a creative style, but from a practical point of view.
Tools and materials
- aerosol enamel specially designed for painting ceramic paintings;
- for regular paint – a basin, a set of brushes, a roller;
- safety glasses, mask, and gloves;
- paper tape (so-called masking tape);
- film or newspapers;
- a container of water, detergents and a cloth (sponge);
- degreaser;
- primer;
- fine-grain sandpaper;
- construction ladder or high chair.
Progress
- Preparing ceramic tiles . Wash the surface to be painted with the prepared products using a sponge. Thoroughly clean all seams from mold, mildew and other contaminants.
- To create good adhesion of the paint to the material, take time for light sanding .
- Degreasing stage . After washing the ceiling with warm water and then drying it, it is necessary to degrease the tiles using acetone or another special liquid.
- all items where paint should not end up with paper tape or film .
- Primer . At home, many people use an aerosol primer. This will allow you to use the substance more economically, while protecting it from drips.
- Painting . Using a roller, apply a thin layer of paint over the surface of the ceiling. Try not to leave streaks. You will need to apply 2-3 layers, but remember one rule: you need to apply the next layer no earlier than the previous one has dried. As a rule, the instructions for the paint itself contain recommendations regarding drying time.
- Varnish protection . After the tiles have completely dried, it is recommended to apply a varnish coating. It is preferable to use glossy or matte, as well as acrylic varnish. Not only will it add a touch of depth, but it will also protect the painted tiles from damage.
Preservation of the painted surface
For these purposes, water-based varnish is used, since it does not lose its qualities during long-term use and remains transparent. The point of applying varnish to paint is to create a sufficiently hard layer on the painted surface that protects the base from the effects of negative factors.
Here we will look in detail at how and with what to paint tiles in the bathroom on the walls, in the kitchen and ceramic tiles on the floor. 3 detailed master classes on how to repaint old tiles in a different color, or even apply some kind of pattern using a stencil with your own hands!
Old bathroom - BEFORE painting
AFTER painting
The content of the article:
How to choose the right one
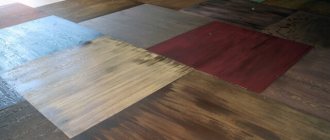
When choosing the design, color shade and texture of a floor covering with inserts, you should pay attention to its aesthetic and practical characteristics. For example, in the hallway the best choice would be a non-rough and non-glossy surface of a dark shade.
Today, there are three main concepts that allow you to choose the right floor design:
The product must be combined with the elements of the room. For example, for beige-colored furniture, it is better to choose a brown coating. Contrast. Here, black tiles combined with white laminate would be an excellent option. Using bright accents
A dynamic image that attracts attention will look great on a neutral and light background.
Today there is a wide range of floor tiles with inserts, thanks to which you can experiment and bring any fantasy to life. To visually expand the space, you can use white tiles. Coziness is created with the help of beige-colored products.
On such a surface, dirt and scratches will be visible in a short time. It is also better not to use white color for the floor. It is best to use light colors here. Even with electric lighting they will look impressive and aesthetically pleasing.
Specifics of care
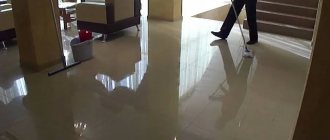
A new floor covering made of polished and semi-polished porcelain stoneware must be taken care of very carefully during the first three to four months of use. Wash the surface of the tiles with an acid solution to preserve the visual appeal of the products, since when dirt accumulates in the micropores on the cut surface, then the floor covering
will become dull and ugly. Before starting treatment, coat the tiles with a moisture-repellent agent, since a polished surface is mainly exposed to moisture than a matte one.
Where there is the most contamination, it is better to finish it with matte ceramic granite. To clean smooth surfaces, do not use products that contain acids and organic fats, as after their use a film or unsightly coating appears on the floor surface. In rooms where a lot of moisture dominates, after treatment with a similar composition the glaze will lose its shine and an environment favorable for mold and bacteria will begin to be created.
Polished floor covering
porcelain stoneware