Savig
9353 0 0
Savig June 14, 2017Specialization: master of interior finishing works. I am well versed in power tools for repair and construction. Formerly a teacher at a radio engineering college.
Before installing the tiles, plasterboard sheets must be carefully prepared
Don't know how to prepare drywall for tiling? The experience I have accumulated allows me to say that any home craftsman can cope with this task. Detailed instructions containing relevant photo illustrations will help me prove this.
Recommendations for choosing materials
There are a number of rules that must be followed when choosing materials:
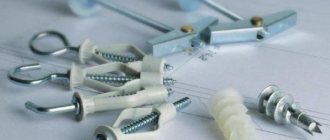
- To level the walls using plasterboard slabs and further laying tiles, you will need a strong frame securely fixed to the wall. Metal profiles are used as the frame. This design does not shrink, is not subject to deformation and swelling under the influence of humidity.
- Drywall must be wall plasterboard and designed for use in conditions of high humidity.
- The tiles should be selected as thin as possible. This is important because thick tiles weigh down the structure, making it less reliable. In addition, it should be taken into account that the tiles will stick to the paper base, which is weakly bonded to the gypsum.
- Another challenge is choosing the right glue. Conventional adhesive compositions are made based on cement. To prepare a working mixture from such adhesives you need water. Such adhesives cannot be used when working with paper material, which is essentially drywall. You will need a synthetic-based adhesive designed to fix the tiles. We can recommend adhesives such as Ceresit, Polimin, Vetonit Optima and other compositions of the same type.
Selection of adhesive
After cleaning the walls, choose the material that will be used to glue the tiles. Typically, in this situation, an adhesive composition intended for installation of HA is recommended. This can be putty or KNAUF product. The composition of the adhesive for tile cladding can be:
- cement;
- in the form of liquid nails;
- elastic.
For the installation of lightweight decorative panels, a conventional cement adhesive is used. However, it does not cope with the influence of moisture. Therefore, it is contraindicated for use in the toilet and bathroom.
Nowadays, elastic adhesives suitable for various jobs (for wallpaper, plastic siding, tiles) are quite in demand. Additives give it additional properties, so you can choose the adhesive for facade work and for gluing wet rooms.
Liquid nails are often chosen for tiling in the bathroom. Their composition is universal and has a high adhesion rate. This glue can be used for finishing surfaces in different rooms.
Moisture-resistant elastic tile adhesive is applied according to the instructions immediately before work. Why is dry powder diluted according to the norm? A drill with a special attachment facilitates uniform kneading. The tiles with glue are applied to the wall according to the marks and level. Then lightly press on it. This is why the glue spreads evenly over the inner surface of the tile.
Padding
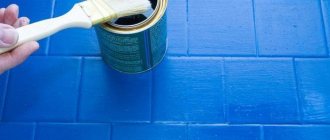
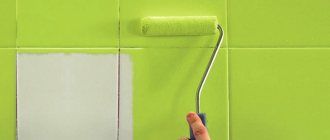
The next step is priming the drywall. Thanks to the primer, the surface will adhere better to the putty. You can do without a primer, but in this case the putty may peel off along with the tile. The primer composition is applied with a wide brush or roller.
Note! On the packaging, the manufacturer provides instructions for using the primer.
A good primer should have the following set of qualities:
- The composition must penetrate deeply into the material.
- Good adhesion, which is the key to the durability of the repair.
- Absence of toxic substances.
- Ability to bind dust.
- Quick drying.
- Thermal stability.
- Ability to withstand the effects of humidity.
- The presence of an antiseptic drug that prevents the development of mold and mildew.
Preparing drywall for tiles: 3 main steps
Before installing the tiles, plasterboard sheets must be carefully prepared.
Don’t know how to prepare plasterboard for tiling? The experience I have accumulated allows me to say that any home craftsman can cope with this task. Detailed instructions containing relevant photo illustrations will help me prove this.
Features of strengthening the structure
The strengthening process includes a number of operations, which will be discussed below.
Puttying seams
The joints must be puttied separately. This imparts integrity and strength to the structure. When installing plasterboard panels, many joints arise - they are the weakest areas of the structure. It is along the joints that cracks most often form after laying the tiles. To prevent this, the seams must be carefully puttied.
According to their purpose, putties are classified as follows:
- Starting compounds (leveling, base), which are designed to hide the largest surface defects.
- Finishing putties used to finalize the coating to perfect condition.
- Universal compositions that can be used to create both base and top coats.
Putties that do not shrink significantly when drying are suitable for filling drywall seams. Polymer and gypsum mixtures are most suitable for this purpose. Unlike polymers, gypsum putties are not suitable for building façades and wet areas. Otherwise, gypsum is an excellent material, in most respects it is not inferior to polymers. But cement should not be used for puttying joints, since this material is prone to shrinkage.
Reinforcement of joints
To achieve a more reliable connection of plasterboard sheets, even before puttying, the joints are laid with a special reinforcing tape. The best option for reinforcement is serpyanka tape made of synthetic material. This tape also has another name - construction bandage.
When installing plasterboard panels, an approximately 5-mm gap is provided between them, into which the reinforcing sickle tape is placed. The thickness of the tape is approximately 5 centimeters. On one side the serpyanka has a sticky surface for gluing. The tape is placed so that it is glued to both panels throughout the entire joint. Next, putty is applied over the tape. Moreover, the tape does not prevent the penetration of the solution throughout the entire seam, since it has a cellular structure.
There is an alternative way to seal the joint with serpyanka, but its implementation will take more time. However, the result is worth it, since the seam will be very durable. In this case, first put not tape, but putty, which is then sanded with sandpaper. After this, the tape is laid and covered with the finishing composition.
Fiberglass mesh
In recent years, fiberglass mesh has become widespread. The use of this material allows you to make the plasterboard structure more rigid. In addition, the fiberglass mesh absorbs the loads that occur due to temperature changes.
The mesh is glued to individual areas near door and window openings. In some cases, not only individual fragments are covered with mesh, but the entire surface of the wall. After drying, the fiberglass becomes one with the drywall, which gives the structure additional strength.
The mesh is made from a special type of fiberglass impregnated with an anti-alkaline compound. The internal structure of the product consists of glass threads intertwined with each other, which ensures high tensile and tear strength. It is also worth noting the environmental safety of fiberglass and its fire safety.
The putty layer gives the surface additional quality characteristics, without which the structure will not be sufficiently reliable. Thus, it is both possible and necessary to putty plasterboard sheets under the tiles.
Selection of ceramic coating
For finishing plasterboard surfaces, the choice of tiles does not come down to any specific type. You can take any variety. However, aesthetic taste and financial capabilities can help in this matter.
From the entire assortment, several varieties are usually preferred.
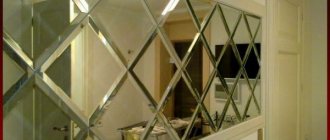
Mosaic or glass tiles look great in bathroom design. Beauty and durability are the main characteristics of such cladding. During its creation, glass is mixed with various additives. Which give the material strength and resistance to temperature influences.
Ceramics can be wall or floor. Therefore, it varies in thickness and weight. For the floor, it is designed to be stronger and heavier, which has a high coefficient of resistance to regular pressure. Collections whose elements have a minimum thickness are suitable for walls. The varied external decor of such tiles, as well as the ability to combine them with stone, wood and even brick, makes them quite popular on the market.
PVC tiles are considered lightweight and quite resistant to the influence of aggressive factors. It can be glued in absolutely any room conditions, which is explained by the water-repellent properties of PVC.
Polystyrene. Both in decor and in their characteristics, such products resemble foam slabs for a suspended ceiling. This kind of ceiling cladding is made of lightweight plastic, allowing even a beginner to work with them. They have good vapor barrier and water repellency properties and are durable. Their service life is long. Volume of the surface is given by different shapes and elements.
How long does it take to dry?
The final hardening time of the adhesive layer varies depending on the following factors:
Which is better: heated floors or radiators?
Warm floorBatteries
- Temperature conditions (at low temperatures, drying may take 3-4 days).
- Humidity.
- Layer sizes.
- Glue composition (high-strength ones harden faster).
- Additives.
- Water absorption of the base.
The surest way to find out exactly how long the glue will dry is to read the information on the packaging. Manufacturers base their calculations on the hardening time at room temperature with an air humidity of 60%; this time is indicated with a margin.
If you want to create a solid base for laying ceramic sheets, putty the walls to level them. However, tiles will adhere well to a putty surface only if the materials are selected correctly and the requirements of the technological process for wall putty are met.
What is reinforcing tape used for?
To more firmly connect adjacent sheets to each other when puttingtying joints, use a special reinforcing tape. Experts recommend choosing reinforced synthetic tape “serpyanka”, or, as it is also called, construction bandage. Serves only for sealing and strengthening joints and various cracks in drywall.
- When installing plasterboard sheets, a gap of 3-5 mm is left between them, which is then filled with putty using reinforcing sickle.
- It is 5 cm wide and has a sticky surface on one side. Before filling the seam, the tape is glued to the surface of both sheets completely over the entire joint. Then, using a medium spatula, the putty is pressed through it. Through the cells of the tape, the putty composition easily fills the entire seam.
Scheme of using reinforcing mesh.
There is another way to seal a seam using a serpyanka, although it takes longer, but the joint is a little stronger.
To do this, first fill the seam with putty, then, when it dries, it needs to be treated with sandpaper in order to remove small sagging, remove dust and then stick the tape on.
After allowing the filled seam to dry a little, you should apply another, now finishing, layer of putty in order to create a common surface for the filled seam and the plasterboard sheets.
How to properly prepare the surface of drywall?
The process of gluing tiles is quite simple.
Even a child probably knows how to lay it on a flat surface: modern television shows repeatedly show the execution of many construction and installation works in great detail. So no special professional skills are required.
But in order for the laid tiles to hold well for a long time, a whole series of other works should be carried out on the plasterboard wall to prepare it for gluing the tile covering.
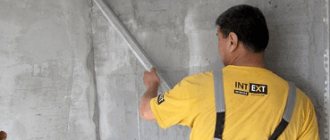
Surface primer
Primer Tools.
In order for the tile adhesive to have high-quality adhesion to the paper surface of the plasterboard covering, it should be treated with a special primer. It is applied with a paint roller or a wide brush in two times. Instructions for use are included in the package. You can lay tiles or ceramics without using them, but in this case the adhesion of the glue and the surface will be much worse.
When choosing a primer for drywall, you should know that its composition must penetrate deeply into the plaster and strengthen its surface. It must have the following properties:
- deep permeability;
- good adhesion;
- ability to bind dust;
- non-toxic;
- quick drying;
- good heat resistance and moisture resistance;
- protection against mold and various fungi.
These properties of the primer can be combined in different versions in one composition.
Why plaster the ceiling before gluing ceiling tiles
If you're looking for a simple solution that can change the entire look of a room, install ceiling tiles. Decorative tiles can subtly brighten up an interior, especially when paired with unique molding. Depending on the type of tile, they can even dampen noise and insulate the ceiling. You will need basic skills with simple household tools. But before gluing such tiles, the ceiling needs to be plastered, let’s figure out why this is necessary.
Why do you need to plaster the ceiling?
Note that not in all cases it is necessary to plaster the ceiling before gluing the ceiling tiles. In fact, if you have perfectly flat ceilings, then you can do without plaster. But even ceilings are a rare occurrence. To lay the tiles, you need to level the ceiling. This requires primer and plaster.
Important! If your ceiling is in good condition, you can apply the tiles directly to the existing ceiling.
Also keep in mind that in any case the ceiling needs to be thoroughly cleaned! If your ceiling is dirty or greasy, use a sponge to scrub one small area at a time using an all-purpose cleaner. It is important to let the ceiling dry completely before applying the tiles. A clean surface will make it easier to install the tiles. You may have trouble attaching them if the ceiling is dirty or has peeling paint.
Also note that if you use a special installation system, then you will not need to plaster the ceilings, because the frame system is a quick, simple and safe way to install surface-mounted ceilings. This concealed system offers easy and quick installation.
What is it?
- You need to attach metal beams to the ceiling beams.
- Fix.
- Arrange the tiles.
If you install ceiling tiles with glue, then you will need to plaster the ceiling. Also be sure to only use the recommended tile adhesive. Follow the adhesive manufacturer's instructions for application and use. Keep in mind that when using this installation method, the drywall or concrete ceiling must be smooth and level.
To install surface mount ceilings, the tiles are laid in an overlapping pattern and secured to the surface using beveled tapered heads. The nails match the metal finish of the panels. This also requires leveling the ceiling with plaster.
Ceiling tiles are an excellent budget option for the ceiling. Gluing tiles is a budget and affordable solution for those who want to quickly and easily repair the ceiling. In addition, you can glue such ceiling tiles yourself.
Installation subtleties
In order for laying tiles on drywall to be successful, you need to follow several rules:
- The walls in the bathroom or kitchen are covered with moisture-resistant sheets. They usually have a green pasting and are marked with the letters GKLV. Others will warp from dampness, and your cladding will simply crumble.
- Before laying tiles on the gypsum board, you need to take care of the strength of the frame: it will bear a very noticeable load. Therefore, the elements of the rack profile should be spaced no further than 40 cm from each other, and the sheathing with sheets should be made of two layers. This way you are insured that the frame will not bend under the load, and the seams between the plates will not separate or become distorted.
- All mixtures and liquids are purchased for dual purposes: they must be oriented towards both tiles and gypsum finishing coating.
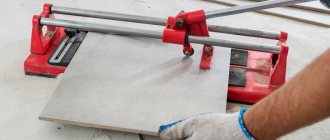
- The tile should be chosen in a standard size. Many materials even indicate that its longest side should not exceed 33 cm. Then the load on the gypsum board will be evenly distributed, and the elements will stick to them more reliably and firmly.
In cases where it is impossible to make double cladding (for example, in small bathrooms, where it hides too large a piece of usable space), in the intervals between the profile elements the wall is covered with a plaster mesh with duplicative fixation with staples. If all these conditions are met, you can safely lay tiles on drywall. It will hold up no worse than on a concrete wall.
Application of fiberglass mesh
Recently, preparation of plasterboard for tiles using fiberglass mesh has often been used, which helps to more rigidly strengthen the entire plasterboard wall for laying tiles. It is glued to separate areas near window and door openings or completely to the entire surface of the wall to reduce the resulting loads that can cause temperature changes.
It is made from special fiberglass impregnated with a compound that is resistant to alkalis. It is made of thin glass threads intertwined with each other. Good resistance to tearing and stretching. It is also environmentally friendly for humans and has high fire resistance.
After drying, it becomes hard and forms one piece with plasterboard sheets, which is very important for tiles or ceramics.
Plasterboard wall cladding
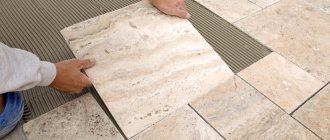
In the future, laying tiles on gypsum boards is carried out according to the same basic principles as on other surfaces. They start it from the most visible corner, if you have to cut the last vertical row by less than half. If the area to be trimmed is larger, installation begins from the middle of the wall so that the trimmed elements are placed symmetrically.
- When it comes to the question of how to properly lay tiles on drywall, the installation solution is important. It is better to limit yourself to a small volume so that you can use it before it starts to dry out right in the container.
- The adhesive composition (it is better to take trusted manufacturers) is applied to a wall with an area of about a square meter.
- Observing right angles, the first tile is applied and pressed.
- Next, 3-4 elements are laid out vertically. They must be checked with a level, as they will serve as a guide for subsequent rows. The evenness of the masonry must be checked regularly, since it is impossible to remove the tile from the drywall when it is stuck without damage; you will have to change the whole sheet or at least a fragment of it.
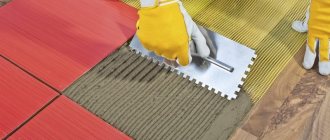
- Next, the first horizontal row is displayed. When fixing the tiles, you also need to fill the gaps between the tiles. To ensure that the seams are the same width, paint crosses are placed at the points of contact of the four elements.
- To evenly distribute the adhesive under the tiles and prevent the formation of voids, lightly tap the material laid in place with a rubber hammer.
- After 3-4 rows of tiles have been laid, a break of half an hour or an hour is taken. During this time, the glue will have time to set strongly enough so that the tile does not sag or move under the weight of the next rows. Afterwards, you can continue laying it on the drywall in the same mode.
- If glue gets on the tile, it must be wiped off immediately with a sponge. Some compounds are very difficult to remove after drying.
When all the tiles are laid on the drywall and the glue has set sufficiently, the crosses are removed. The next day you can start grouting the seams and filling them with silicone to increase the degree of waterproofing. Here is a step-by-step master class. How about you: did you manage to stick the tiles onto this material?