Tiles with a reflective surface are a relatively new type of finishing materials, but they are already in regular demand. Mirror coating is used when lining a kitchen apron, bathroom, instead of a standard mirror in hallways. The material looks harmonious and combines with other types of raw materials. How to glue beveled mirror tiles to a wall is discussed later in the article.
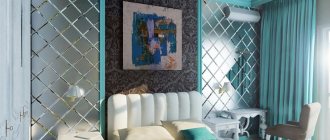
What does the material on the walls look like?
Types of mirror tiles
This type of tile can be made of plastic, metal, glass. Glass tiles vary in color, shape, purpose, and even surfaces, which can be matte, glossy or polished.
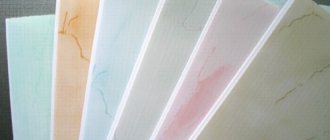
Variety of choices
Today on the market there are all kinds of tiles with a mirror surface. This is a universal material that has a rich range of colors. Thanks to this variety, you can lay out any pattern or even a picture. Manufacturers offer a choice of not only square tiles, but also rectangular ones and those with beveled edges. There is also a wide range of sizes - from the smallest 292x295 mm to the largest 1195x1995 mm. Such a variety of possible options will help to create a unique and sophisticated interior, turning any design idea into reality.
Classification of mirror tiles
Depending on the material used in the production process, decorative elements are of the following types:
- glass - made by melting a mass of glass with mufflers and gaseous crystalline compounds;
- metal - the polishing method is used in production;
- plastic - panels are made of polyvinyl chloride or polystyrene by gluing a reflective film or applying paint with tiny particles of steel.
Decorative tiles made on the basis of PVC or metal are an imitation of mirror cladding, are lightweight, low cost, and flexible, but the reflectivity of the coating is worse than that of glass products.
Glass tiles are classified:
- by purpose: wall, floor, ceiling and universal;
- in shape: square, rectangular, mosaic (individual chips or modules), in the form of stripes, rhombus, triangle, circle and semicircle, hexagon;
- according to color scheme: the front side of the cladding can be bronze, gold, silver, blue, pink, green. In addition, the tile can be plain or with an ornament or pattern applied to it using thermal printing or sandblasting;
- surfaces vary according to the processing method: polished, glossy or matte;
- according to the method of edge processing: with or without bevel.
Installation of mirror cladding is identical to the process of laying ceramic tiles, but there are products that do not require the use of adhesives. This tile has a thickness of 4-6 mm, consists of an outer (reflective) surface and an inner (adhesive) layer, covered with a protective film, which must be removed before work.
Types and types of tiles
The range of mirror tiles is not rich. It can be classified as follows:
- by type of edge processing;
- in shape - rectangular, square, triangular, diamond-shaped, hexagonal, etc.;
- by color - painted gold, bronze, silver, dark gray (graphite), etc.;
- by the presence of a pattern applied by sandblasting or thermal printing.
Sellers accept orders for original shaped tiles. Since mirror tiles are laid on walls, ceilings and floors, two types are available: ordinary ones for walls and ceilings, and reinforced ones for floors.
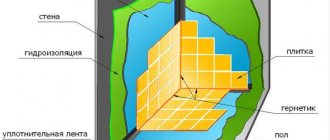
Preparation for installation
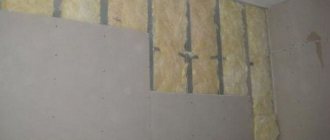
Thoroughly clean the surface of old tiles, wallpaper, and remove any remaining plaster and adhesive. If there are small roughnesses and irregularities, use plaster to eliminate them.
- If in some places the unevenness differs in height, then use plasterboard sheets.
- After fixing them to the wall, the evenness of the surface is checked using a spirit level and a plumb line.
- Next, a mixture of soil is applied, and marking lines are drawn vertically.
Draw a straight line horizontally, taking into account the seams. If you intend to use glass tiles when laying them, then where the first row begins, attach a support rail and start working from this point.
Video review
Sources:
- https://ru-house.net/stroitelstvo/steny/plitka/zerkalnaya-s-facetom.html
- https://repaireasily.ru/tips/polozhit-zerkalnuyu-plitku.html
- https://plitkahelp.com/ukladka/zerkalnye-plitki-na-stenu-svoimi-rukami
- https://strir.ru/vnutren-otdelka/plitka/zerkalnaya-s-fatsetom
- https://kursremonta.ru/otdelka/kak-vybrat-zerkalnuyu-plitku-s-facetom-poshagovaya-instrukciya-montazha
- https://eco-sip.ru/vozvedenie-steny/instrukciya-po-samostoyatelnoi-ukladke-i-montazhu-zerkalnoi-plitki-s-facetom.html
- https://IzPlitki.com/vybor-i-dizajn/roskoshnyj-interer-bez-pomoshhi-dizajnera-zerkalnaya-plitka.html
- https://www.InMyRoom.ru/posts/16665-zerkalnaya-plitka-v-interere-idei-dizajna
- https://promalpworks.ru/steny/kak-kleit-zerkalnuyu-plitku-na-stenu.html
- https://gipsohouse.ru/walls/plitka/16215-kak-kleit-zerkalnuyu-plitku-s-facetom-na-stenu.html
- https://iv-proect.ru/steny/kak-kleit-zerkalnuyu-plitku-na-stenu.html
- https://skelko.com.ua/stati/kak-pravilno-ukladyvat-i-snimat-zerkalnuyu-plitku/
- https://zavod-akma.ru/intstrukcziya-ukladki-zerkalnoi-plitki.html
- https://kakkley.ru/%D0%BA%D0%B0%D0%BA-%D0%BA%D0%BB%D0%B5%D0%B8%D1%82%D1%8C-%D0%B7 %D0%B5%D1%80%D0%BA%D0%B0%D0%BB%D1%8C%D0%BD%D1%83%D1%8E-%D0%BF%D0%BB%D0%B8% D1%82%D0%BA%D1%83-%D0%BD%D0%B0-%D1%81%D1%82%D0%B5%D0%BD%D1%83/
- https://remsovet.com/108-zerkalnaya-plitka-v-interere.html
Preparation of glue
For laying tiles, an adhesive mixture that does not contain additives in the form of acid oxides is suitable.
To fix tile products, a special glue is used, which is used to install glass, or a mixture based on liquid nails, epoxy resins, and silicone sealant.
You can use glue that contains substances that make it resistant to moisture. In addition, this composition is perfectly resistant to shear and has elastic properties.
Moisture-resistant adhesive is used when working on vertical and horizontal surfaces.
Gluing the mosaic
Gluing mosaics is a little more difficult, since you need to apply the product to each of the tiles, which are very small in size. However, there is no need to use more glue than necessary. It will be difficult to remove from small seams.
The canvas needs to be lifted all at once, so you will have to use someone’s help, after which it is pressed against the wall. It is very important that each of the small tiles fits against the wall. Then another sheet is glued, and so on until all of them are glued. When the glue has dried, you can grout the joint.
In order to pass the wire through the tiles, it is better to use the services of a workshop. They will drill a hole there carefully without cracking. When buying tiles, you should take them with a reserve, as they may break or you will have to replace them after some time.
As you can see, there is nothing complicated in installing this material, you just need to use the right glue and do all the work carefully and slowly. In general, the installation itself is no different from gluing tiles.
If the installation itself seems difficult, then you can use the services of professionals.
Step-by-step instructions for laying mirror tiles
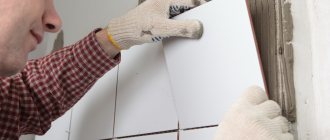
Installation of tiles should begin from the corner of the room, gradually filling the wall in rows from floor to ceiling.
- Apply the adhesive mixture to the outer layer of the wall surface. After three minutes, apply the tile to the base, pressing with your hand.
- Don't forget to use spacer crosses to eliminate gaps between other elements.
- After installation, remove any remaining adhesive with a damp cloth.
Cut items carefully using a special diamond hand tool for cutting glass surfaces. Before proceeding, make a mark on the line drawn on the surface, then press firmly to cut the material.
Wait a day after finishing the work and only then start grouting the joints using a rubber spatula. The completed coating can be washed after six hours.
Summing up
Decorating a living room or hallway with a stylish panel made from pieces of mirror is an amazing and at the same time simple idea. This technique was also used in former times, when decorating the houses of rich and noble people. And although panels made of mirrors require certain investments, today this home decoration option is available to many. Moreover, if you show a little ingenuity and imagination, you can make a panel from pieces of mirrors with your own hands. As practice shows, this is not a difficult but fascinating process.
Source
Features of laying mirror tiles
Do not allow the width of the seams to be more than two millimeters. Mirror tiles are fixed mainly with liquid nails or it can be silicone glue, which does not contain acid.
All this can be replaced with the Betonokontakt primer. It roughens the surface of the facing material, which allows the use of ordinary glue.
- To ensure that the tile adheres well, its reverse side is covered with bitumen and then sprinkled with coarse sand.
- For transparent tiles, it is better to use liquid glass. The first layer of facing material must be laid horizontally.
After a few days, when the surface has dried, the seams are rubbed with neutral silicone, and the glass surface is rubbed with a soft cloth.
Production and technical specifications
The technology for producing mirror surfaces for household use consists of applying an amalgam layer to ground glass. The raw materials for glass production are:
- sand quartz;
- dolomite is a natural mineral of the carbonate class, consisting of oxygen, carbon, magnesium and calcium;
- soda;
- broken glass;
- coal.
The listed components, combined in certain proportions, are melted in continuous furnaces. The finished melt passes through rollers that form a strip of a given thickness. To improve the surface quality, the glass strip is passed through a bath of molten metal and annealed to relieve surface stress. Next, the tape is cut into sheets, which are sent for grinding and polishing. The finished glass is thoroughly cleaned of contaminants and coated with the thinnest layer of silver, aluminum, chromium, nickel, and gold. The color of the mirror depends on the metal used. Application is carried out chemically - by restoring the metal from a salt solution, or physically - by spraying in a vacuum or spraying. The metal is coated with a protective layer of paint. The mirror thus obtained is cut to the required dimensions.
The edges are subjected to additional processing. The bevel is considered the most difficult edge. Its size is 8 – 50 mm and height 3 – 10 mm. It is interesting because, like a prism, it creates a “play” of light. This property of beveled mirror silver tiles makes it a material that allows you to find original design solutions. In addition to bevel, the following types of edges are used:
Euroedge
Polishing
Raw edge
Laying tiles with a decorative bevel along the edge
To do this, we carefully clean the walls, eliminating all roughness, since the base for this type of tile must be smooth.
If the room where it is planned to lay such tiles is constantly humid, then before starting work the walls are treated with products with an antifungal effect.
- As soon as the soil dries, you can begin laying.
- First, we make markings that will help you navigate the size of the tiles.
- If there are regular temperature changes between the tiles, a thermal joint of about two millimeters should be left.
- It will help protect the facing material from damage.
Installation of tiles should begin from the bottom up, strictly following the markings.
Grind the seams after four hours.
Material
Beveled products are individual tiles of certain sizes with special processing of the edges. The side part is not cut straight, but is made with a slope that edges the element along the edge. Creating a slope is chamfering, which is why the product is called beveled.
Facets help make elegant panels, visually expand the wall, and increase the amount of light due to the refraction of rays.
Products with facets are resistant to moisture and temperature changes. The service life of the cladding is significantly increased.
Resistance to different types of detergents does not limit homeowners in their cleaning methods.
Separately, each block is fragile; care is required during delivery and installation. The lack of a well-organized ventilation system leads to the fact that the mirror surface darkens.
An overview of the unboxing material can be seen in the following video:
Pasting the ceiling
If there is a need to visually increase the space, then you can decorate the ceiling with mirror and opaque tiles. However, you need to be careful when choosing tile sizes:
- Large ones will create the impression of non-residential premises.
- Secondly, they increase the risk of splitting, and the dirt that appears on them attracts attention.
A great option would be to combine tiles with panels. The use of small tiles is excellent for decoration. It is better to use dark shades for framing.
The mirror base harmonizes well with wooden surfaces, which creates a feeling of warmth and makes the design special.
Three rules for installing panels
Many people overlook three important points when installing a mirror panel. This leads to not the best results, and often to the need to redo the work. Remember these three rules:
Installation of the mirror panel is carried out exclusively on a flat surface. The maximum difference in height of the wall covering is 2-3 millimeters for diagonal panels, up to 5 millimeters for panels with horizontal and vertical orientation. Otherwise, serious distortion will be visible.
You should not install mirror panels on wooden surfaces. The exception is laminated coatings. The fact is that wood undergoes micro-deformations due to temperature changes. Over time, even a well-glued mirror panel will begin to crumble as the glue loses its strength.
The installation site must be treated with two layers of paint. This procedure is required to ensure reliable protection of the tiles of the future mirror panel from moisture penetration. If this is not done, over time mold and mildew will form under the panel. The second layer is applied after the first has dried.
Once you have memorized these rules and are ready to follow them unquestioningly, you can begin installation.
Design with mirror tiles
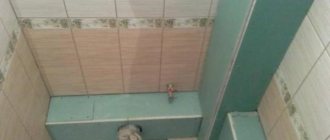
The bathroom can be decorated with tiles, combining mirror and ceramic ones. At the same time, mirror surfaces, as noted earlier, look much more effective with dark shades.
If the bathroom has a window, then the tiles are laid on the opposite side. However, you should not get carried away with completely decorating this room with glass, as it will create the effect of a cold room.
- In order to preserve the beauty of the tiled surface for a long time, it is necessary to regularly ventilate the room and wipe it after each water procedure.
- Such tiles are ideal for masking communications in an apartment.
- The boxes, made from plasterboard sheets, are lined with mirror tiles.
- They create a wonderful backdrop for the boxes and help them become a great part of the decor.
To increase the height of the walls, use this method of installing tiles: lay them starting from the floor and so on to the ceiling.
If the room is poorly lit, then lay out a small area of mirror tiles above the chandelier. The light that hits such a surface will be reflected and spread throughout the room, making it many times brighter.
Useful tips
During installation, you need to work with the tiles very carefully so as not to scratch the surface.
If you need to drill a hole in a tile to bring out a wire for a lamp, etc., it is better to mark the place with a marker and use the services of the nearest glass company (they are in every area).
It’s cheaper and easier than buying an expensive glass drill, and a beginner is unlikely to be able to drill a mirror the first time.
Don't miss: Prices for European-quality renovations
It is advisable to immediately buy several more tiles than the calculations show. Firstly, the fragile material can be damaged during transportation or installation. In addition, it is advisable to have a couple of tiles in case of repairs.
Care Tips
Caring for mirror tiles comes down to keeping the surface clean. To do this, clean the tiles once or twice a month using detergents and a spray bottle included in the package. After spraying the product, let it sit for 30-40 seconds and rub it with a special soft cloth over the entire surface. If necessary, the operation is repeated. If the surface is heavily soiled, products are used to remove grease or limescale, depending on the type of contamination. To clean glass surfaces, in order to avoid damage, do not use scrapers, steel wool, or cleaning powders.