Date: 2012-07-01 17:30:17
Mirror tiles are a type of ceramic tile.
At its core, it is mirror glass, which means you need to work with it accordingly. It is worth noting that laying mirror tiles
with your own hands differs from installing ordinary glazed ceramic tiles.
Especially great difficulties arise with cutting this material. To cut regular tiles, use a grinder with a special disc or a tile cutter. However, tile cutters do not allow you to make special cuts in tiles. In this case, the material may simply break. For complex tile cuts, the most suitable tool is a grinder. However, when using it, the edges of the material are knocked off, as a result, the damaged areas are noticeable. Therefore, it is better to combine the advantages of a grinder and a tile cutter, using both of these tools. When laying mirror tiles
with your own hands, you will certainly need to cut them.
Using a tile cutter, place a flat object under the mirror tile to bring it closer to the knife blade. To perform this operation you will have to get used to it. Until you get the hang of cutting tile, you may need to break a few nail files. Don't be upset - this is a common thing. Mirror tiles are best cut using a glass cutter, and a diamond glass cutter will be the most optimal solution. It will allow you to cut the tiles like regular glass.
Mirror tile laying technology
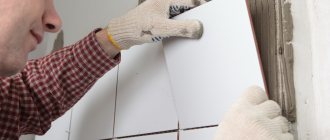
How to lay mirror tiles? Similar to regular tiles. First, achieve a completely flat surface and apply tile adhesive or sealant to it. Experts recommend using 25-kilogram bags of this glue. One such bag is enough for approximately 3 square meters of coverage.
Tile adhesive is a convenient and effective adhesive mixture that is not affected by fungus, water or frost. Apply this glue to the wall in a layer of 0.5-1 centimeter over the entire size of the tile. After this, the excess solution is removed with a notched trowel, forming a wavy layer of glue. This laying method will give additional strength to the coating, since the wavy layer creates an adhesion effect. Even when the tiles are not completely dry, they will be extremely difficult to remove from the wall.
Install plastic crosses between adjacent elements. The size of the crosses should correspond to the spaces between the tiles. On sale you will find crosses for tiles 0.1-1 centimeter. When choosing them, it is important to take into account the design of the entire room, since the thickness of the seams will immediately catch your eye. If it is too thick, then the mirror image will be broken into separate images, and a seam with very little thickness will make alignment between individual tiles difficult if their walls are very uneven.
Installing mirror tiles is similar to laying ceramic
The procedure for installing mirror tiles is the same as for laying ceramic tiles. However, it is important to remember that we are working with glass, which means that shrinking the elements with a rubber hammer should be done more carefully, otherwise you will simply break it. You can grout the seams with regular grout, but when working in the bathroom, both the grout and the glue must be moisture-resistant. You can use one sealant. Its main advantage is that over time it will become rubber and will not allow moisture to pass through to the edges of the coating.
Some people believe that mirror tiles do not withstand humid environments well enough and deteriorate over time. But its manufacturers convincingly assure that mirror tiles are resistant to moisture. And it seems reasonable that a good quality mirror is not afraid of moisture.
If you are afraid that mirror tiles will darken over time, then use a natural sealant rather than tile adhesive for its installation. However, in this case, the laying technology will change slightly: the tiles will be glued to the wall. Any unevenness that may occur can be eliminated by adjusting the layer thickness.
A variety of modern finishing materials allow you to embody the most daring design ideas. One of the most convenient finishing materials, which has recently become increasingly popular as a universal decorative element, is mirror tiles.
Mirror tiles are an excellent material that will eliminate the shortcomings of repairs and visually enlarge the room. Mirror tiles are used for almost any room: in the bathroom, in the hallway, in the bedroom, for suspended ceilings. Mirror tiles have a lot of advantages, thanks to which they stand out among other finishing materials for decoration.
Advantages:
High level of light reflection; . Resistance to external influences: indoor humidity, use of chemicals; . Versatility and a wide range of products for any interior; . Practicality (ease of care)
Mirror tiles are presented in a wide range that can satisfy any consumer taste. Mirror tiles come in a variety of shapes, colors and sizes. The main dimensions of mirror tiles: small size - 292x295 mm, large size - 1195x1995 mm.
If you decide to add some variety to your interior or eliminate existing repair defects, or simply want to visually expand and brighten the room, then your choice is mirror tiles. Mirror tiles are easy to lay on your own, without resorting to the services of professionals. The process of laying mirror tiles
1. First of all, prepare the surface
The surface for laying tiles must be perfectly flat and free of any flaws. If necessary, remove the plaster from the surface down to the concrete or brick. Then level the surface with putty. Finally, prime the surface with a primer and let dry.
2. Mark the surface for laying tiles
It is imperative to apply markings to the finished surface in order to lay the rows of tiles perfectly evenly. When determining the markings, take into account the actual dimensions of the tiles so that there is no bevel. In the case of laying a panel of mirror tiles, first select all the tiles for the future panel and lay it out on the floor. Only after this can you transfer the panel directly to the surface.
3. Start laying tiles
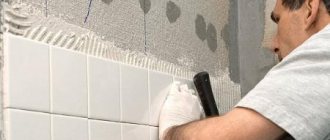
Remember that laying tiles must begin with a horizontal row. The installation scheme is simple. First, take one tile, apply a specially selected adhesive mixture to the inner surface, then apply the tile to the surface and press it with your hands. Be careful not to damage the tiles. As soon as the tiles are glued, place a cross on the border (purchased at a special store, which is used to determine the thickness of the seam between the tiles). Then you continue in the same order. If you plan to lay out a large panel, break the work into several stages.
4. Grout the joints
Only after all the tiles have been laid, let them dry for several days. Only after the glue has completely dried can you start grouting the joints. For this, a special neutral silicone (transparent) is used, which is absolutely invisible on the surface. To do this, prepare a glue gun and silicone. Using a gun, squeeze a small amount of silicone into the seams. Excess silicone must be wiped off immediately with a damp sponge. After the silicone has completely hardened, rub the tiles with a cotton cloth until glossy.
Mirror tiles are a new word in interior decoration. simple, and the result will harmoniously complement any interior. This is a decorative material for finishing work. It is resistant to moisture, detergents and cosmetics, so it can be used in the bathroom. Due to the fact that such a product has a light reflectance coefficient of up to 92%, the presence of decorative elements from this material visually enlarges the space and makes it lighter. It is also used as all kinds of wall panels. We should not forget that this is a rather delicate material, so there are certain rules on how to lay mirror tiles.
Variety of choices
Today on the market there are all kinds of tiles with a mirror surface. This is a universal material that has a rich range of colors. Thanks to this variety, you can lay out any pattern or even a picture. Manufacturers offer a choice of not only square tiles, but also rectangular ones and those with beveled edges. There is also a wide range of sizes - from the smallest 292x295 mm to the largest 1195x1995 mm. Such a variety of possible options will help to create a unique and sophisticated interior, turning any design idea into reality.
Classification of mirror tiles
Depending on the material used in the production process, decorative elements are of the following types:
- glass - made by melting a mass of glass with mufflers and gaseous crystalline compounds;
- metal - the polishing method is used in production;
- plastic - panels are made of polyvinyl chloride or polystyrene by gluing a reflective film or applying paint with tiny particles of steel.
Decorative tiles made on the basis of PVC or metal are an imitation of mirror cladding, are lightweight, low cost, and flexible, but the reflectivity of the coating is worse than that of glass products.
Glass tiles are classified:
- by purpose: wall, floor, ceiling and universal;
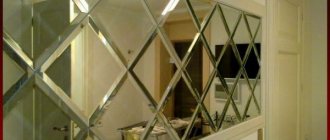
- in shape: square, rectangular, mosaic (individual chips or modules), in the form of stripes, rhombus, triangle, circle and semicircle, hexagon;
- according to color scheme: the front side of the cladding can be bronze, gold, silver, blue, pink, green. In addition, the tile can be plain or with an ornament or pattern applied to it using thermal printing or sandblasting;
- surfaces vary according to the processing method: polished, glossy or matte;
- according to the method of edge processing: with or without bevel.
Installation of mirror cladding is identical to the process of laying ceramic tiles, but there are products that do not require the use of adhesives. This tile has a thickness of 4-6 mm, consists of an outer (reflective) surface and an inner (adhesive) layer, covered with a protective film, which must be removed before work.
Types and types of tiles
The range of mirror tiles is not rich. It can be classified as follows:
- by type of edge processing;
- in shape - rectangular, square, triangular, diamond-shaped, hexagonal, etc.;
- by color - painted gold, bronze, silver, dark gray (graphite), etc.;
- by the presence of a pattern applied by sandblasting or thermal printing.
Sellers accept orders for original shaped tiles. Since mirror tiles are laid on walls, ceilings and floors, two types are available: ordinary ones for walls and ceilings, and reinforced ones for floors.
Glass panel on the wall: the best option for the kitchen
A glass panel can be an excellent solution for decorating a kitchen. And for a small, narrow kitchen, this is just a lifesaver. Most often, this panel is an apron near the kitchen unit, which can come complete with the module design, or can be ordered separately in the form of a panel.
Installation of such a panel is not so simple, so it is most often done by specialists.
A modern panel apron on glass is a coating:
Manufacturers today make panel aprons that are easy to care for and that are not afraid of dirt and grease. And, most importantly, the manufacturing technology will allow virtually any image to be applied to glass.
In what cases will a glass panel be a profitable purchase? For example, if you are not going to change the kitchen set itself, but the apron area is worn out, and you need to do something about it. Such a glass panel will not only replace already unaesthetic fragments of the structure, but will also update the set itself (which means you can postpone the repair for some more time).
Pros and cons of the material
Before you decide to purchase such an unusual finishing material, you should familiarize yourself with its advantages and disadvantages.
Pros:
- versatility of use (you can tile the floor, walls, and ceiling with it);
- visually expands the space even in the smallest room;
- suitable for almost any interior design;
- moisture resistant;
- resistant to damage;
- modern appearance;
- ease of installation;
- you can use any cleaning products when cleaning;
- a wide range of textures, colors, shapes.
Minuses:
- Stains may remain on the surface after cleansing;
- over time, dark spots may appear on the tiles that cannot be removed;
- the material cannot be called budget;
- low impact resistance.
Main uses of paintings
Use as a regular mirror
Very often in modern interiors, instead of ordinary mirrors, a mirror panel is mounted on the wall. All rooms without exception are suitable for this decoration.
Unique combinations help rooms radiate a unique look.
The combination of mirror surfaces will serve not only as a decorative element, but will also emphasize the unified style of the entire space.
Applications for design solutions
If the room is not large and you want to visually enlarge it a little, then with the help of paintings you can achieve very visible results.
They are often installed in bathrooms, small living rooms or small kitchens. Sometimes they hide some wall defects.
Using mirror tiles
This modern, sophisticated finishing material is used to decorate various rooms.
Bathroom finishing
Reflective surfaces look great in the bathroom. For small rooms, designers often use just such tiles. The ability of mirrors to expand space allows you to make a tiny bathroom visually much more spacious and brighter. Designers advise choosing different types of tiles of the same size so that a mirror insert can be made in the right place.
Mirrors are not afraid of moisture, are resistant to scratches and mechanical damage, and their surface is easy to care for. The aesthetic appearance is beyond praise.
Kitchen finishing
A kitchen with mirror inserts on the walls or ceiling will always look stylish and expensive. The play of light, the glare reflected in the mirrors, creates a solemn, upbeat mood. The undoubted effect is the expansion of space and a visual increase in the height of the ceilings. A kitchen with a similar finish can be made in the Empire, Baroque, or exquisite classic styles.
Important : “don’t overdo it” with the use of mirrors, so as not to achieve the opposite effect. Rooms overloaded with light-reflecting surfaces look tacky, the space seems distorted. It is not recommended to glue beveled mirror tiles on opposite walls.
Living room decoration
If you decide to create an expensive, luxurious interior in a palace style, decorative elements such as mirror inserts on the walls or ceiling are perfect for this purpose. Some designers prefer to apply painting, engraving, and patterns to the surface of the tile. The surface takes on a refined appearance.
In the living room, a mirrored ceiling framed with gilded baguettes . You can create a panel on the wall in which mirrors will be combined with glass and interior lighting. Entrust such delicate work to a talented designer. A flight of fancy is good, it is important to keep it in moderation and create a stylish, luxurious composition.
Ideal combination : candles and mirrors. Sconces with crystal pendants placed next to an exquisite composition will add charm and charm to any living room. Only natural wood, leather and rich fabrics can be used in the living room, decorated with mirrors of various shapes and sizes.
Public premises
This material is successfully used for decorating restaurants, cafes, shopping centers, recreation areas, hotel lobbies and office centers.
Ceiling lining
Mirror tiles on the ceiling give the illusion of increasing space, filling it with air. Often the ceiling in the hallway is decorated with mirror tiles. For the best effect, combine opaque and mirror tiles.
It is recommended to select more ceiling material, the higher the ceiling. But you should not use only large tiles: you get the feeling of an uninhabited, cold room. It is optimal to combine mirror slabs and panels imitating natural stone or wood.
Large slab sizes make the seams noticeable, increasing the likelihood of splitting. The image on large tiles is often distorted and dirt is noticeable. And large mirror planes do not always fit into the design of the room.
It is ideal to decorate the ceiling with small tiles and panels. According to the configuration, the mirror ceiling can be square, circular, or diamond-shaped.
It is advisable to use dark colors for framing. The design becomes non-standard and warm. The mirror base of the ceiling is in harmony with cork, wood decor and in the bedroom.
A cornice made of mirror materials will highlight the ceiling perimeter. The room will visually expand, and the transitions of horizontal surfaces will become invisible.
Installation features
Mirror tiles can be laid on almost any surface; they look especially attractive on walls and ceilings. An untrained person may have difficulties with installation, since such tiles have a smooth surface, unlike tiles.
Don't miss: Apartment renovation in Moscow
Before installing the tiles, you should prepare the base. It should be as smooth as possible; without this it will be almost impossible to achieve a uniform surface. If you do not get rid of roughness, this will lead to deformation of the mirror image. Think in advance about the order in which you will lay out the tiles. Dimensions may vary, so take this into account before you begin installation.
If it is possible not to trim the edges of the plates, it is better to use it. The appearance of the product noticeably deteriorates if specially treated edges are cut off. If you cannot do without adjusting the facing material to size, use a glass cutter. Use it carefully to avoid chipping and cracking.
If the base and material are prepared, installation work can begin. The first row of tiles is laid horizontally. The evenness of each laid row is checked with a building level. Small joints (up to 4 mm) are left between the plates, this will preserve the integrity of the pattern.
There is no need to rush when laying the mirror elements, otherwise there is a risk of damaging them and leaving unsightly scratches. Press the tiles to the base carefully, using a soft cloth. Then you need to wait a few seconds for the adhesive to set.
Mirror products are fixed in several ways. It is attached to the suspended ceiling using screws. For walls and floors - silicone-based glue, liquid nails, a mixture of bitumen and sand (if the back side is opaque). It is important that the composition does not contain acids, because they can cause stains to form on the surface.
When the installation process is completed, the tiled surface is left to dry completely. This may take from 1 to 3 days. After this, the seams are treated with silicone grout to prevent moisture from penetrating between the mirror tiles. The final stage is polishing with a soft cloth.
Preparing the base
Due to the fact that the thickness of mirror tiles, unlike ceramic tiles, is at least half as large, the base for installation should be prepared especially carefully:
- remove all dust, debris, remnants of wallpaper, glue, plaster, etc. In some cases, you will have to clear the wall down to concrete or brick, depending on what the building is made of;
- level the base. This is a must. Otherwise, everything will be reflected in the appearance and quality of the laid tiles. The amount of work expected depends on the degree of unevenness. If the defects are not very significant, then it is enough to plaster the surface. If it is not possible to level the base in this way, you can attach drywall;
- thoroughly . This is done in order to achieve maximum adhesion of the tile to the base.
Ultimately, the result should be a well-primed, smooth surface without significant flaws.
Instructions for self-laying and installation of beveled mirror tiles
In order for your mirror tiles to last as long as possible, it is very important, as in any other repair issue, to approach installation and installation thoroughly.
Surface preparation
The surface for gluing tiles must be flat, without wallpaper or other materials. If the surface is uneven, the tile will not stick well, and a large mirror will distort. The surface must be primed and painted with oil paint (any color). Pay special attention to the fact that it is oil based and not any other type. Only oil paint is neutral for mirror coating (amalgam). Using any other paint will cause the mirror surface to deteriorate very quickly and begin to darken.
If all recommendations on the surface have been followed, then you can begin installing the product.
Selection of adhesive mixture
Before gluing mirror tiles, you should carefully select the adhesive mixture.
Cement-based glue is absolutely not suitable for such material. You also need to be careful when choosing a sealant, because cement and vinegar destroy the mirror amalgam and spoil the appearance of the surface of the product.
The best option is a special tile adhesive that is used for mirrors. It is also good to lay tiles using neutral sealant or liquid nails.
Stirring the glue
For successful installation of tiles, specialized adhesive is required. While simple tiles can be laid even on concrete mortar, mirrored models cannot be installed this way.
Glue for mirrors is suitable, but liquid nails and neutral sealant can be used. When choosing the latter, you need to pay attention to the cement and vinegar in the composition - they destroy the reflective part of the products.
If you purchase ready-made liquid glue, it is enough to thoroughly mix the solution after opening. When working with dry mixtures, use a separate medium-sized container, add only clean water at room temperature, and for maximum homogeneous mixing, use an electric drill with a mixer attachment.
Marking
Any installation of piece objects on the wall begins with markings. Use a pencil, a level and a long ruler to make the markings. Mark the place where the first tile will be glued. It is recommended to start from the top left corner, as with decorative wallpaper.
How to cut mirror tiles?
Why is the issue of cutting mirror tiles raised as a separate item? It is worth noting that the installation of mirror tiles differs from the installation of ceramic tiles. Particular difficulties arise with cutting this material. In fact, the tile is mirror glass, and accordingly, you need to work with it properly. To cut glazed tiles, craftsmen usually use a grinder or tile cutter. It is best to work with mirror tiles using a diamond glass cutter and oil. He is able to make a precise and neat cut without chipping.
Also remember! It is recommended to wear gloves and goggles when working with tiles.
Some nuances when cutting mirror tiles:
- Weather the mirror tiles before cutting to ensure they are clean - even small particles of dust or dirt can prevent you from making an even cut.
- Before cutting, you first need to take preliminary measurements on the wall, then transfer them to the tiles.
- The cut line is drawn on the face of the tile using a felt-tipped pencil.
- You need to make a scratch in one precise movement. To begin with, you can practice on a piece of an old mirror or glass.
- You need to bring the cutting line to the corner and over it.
- The pressure must be strong and the movement precise.
Installation of the first tile
Apply 2-sided tape to the back side of the mirror tile in small strips, and then apply glue-sealant for mirrors in spots. (see diagram)
After this, you can stick the mirror/tile onto a previously prepared surface. Please note that mirror glue (sealant) must only be used on a neutral base. Otherwise, the amalgam will also quickly become unusable.
What is 2-sided tape used for?
It is needed for the initial fixation of the product on the wall. The sealant dries within 1-2 days. Naturally, over this long period of time, the product may “slip” under its own weight, and the tape will prevent this from happening. In addition, the tape is 1-2 mm thick, which will give the mirror a small indentation from the wall. At the same time, the amalgam will be ventilated and will last you much longer.
Installation of the following rows
Pay special attention to the fact that the optimal gap between the tiles should be 1 mm. This will create a ventilated space between the inside of the tile and the wall, which will preserve and extend the life of the mirror amalgam coating.
Grouting joints
When laying regular ceramic tiles, grout is usually used. In the case of a mirror image, it is not used. But, if you combine mirror tiles with ceramic ones, for example, in a bathroom or kitchen, then it is recommended to use the same color for grout as for ceramics.
Preparatory work
To obtain a high-quality final result, the base on which the mirror tiles are installed must be brought to optimal condition. Preparatory work must be carried out in the following sequence:
- Initially, you need to remove old wallpaper, tiles, glue, plaster, whitewash, oil paint or other finishing material present on them from the walls.
- Next, it is necessary to inspect the surfaces for defects and ensure their evenness using a building level and plumb line. If there are contaminated areas, you must also remove mold and mildew from the walls by treating them with products intended for this purpose. If there is no need for such measures, then after removing the dust, minor defects can be eliminated with plaster. If there are large differences in height, you can level the walls with plasterboard.
- At the next stage, to maximize the level of adhesion, it is necessary to open the treated areas of the surface with a primer in several layers. When carrying out preparatory measures in the bathroom, the mixture used must have antiseptic properties that will protect surfaces from the occurrence of fungus and mold.
If, at the end of all stages, the walls are smooth and there are no bumps or protrusions on them, and the evenness is within normal limits and there are only a maximum of minor curvatures in large areas and the primer has been properly opened, then you can begin to carry out the main work.
Useful tips
During installation, you need to work with the tiles very carefully so as not to scratch the surface.
If you need to drill a hole in a tile to bring out a wire for a lamp, etc., it is better to mark the place with a marker and use the services of the nearest glass company (they are in every area).
It’s cheaper and easier than buying an expensive glass drill, and a beginner is unlikely to be able to drill a mirror the first time.
Don't Miss: How to Install a Vent
It is advisable to immediately buy several more tiles than the calculations show. Firstly, the fragile material can be damaged during transportation or installation. In addition, it is advisable to have a couple of tiles in case of repairs.
Care Tips
Caring for mirror tiles comes down to keeping the surface clean. To do this, clean the tiles once or twice a month using detergents and a spray bottle included in the package. After spraying the product, let it sit for 30-40 seconds and rub it with a special soft cloth over the entire surface. If necessary, the operation is repeated. If the surface is heavily soiled, products are used to remove grease or limescale, depending on the type of contamination. To clean glass surfaces, in order to avoid damage, do not use scrapers, steel wool, or cleaning powders.
Interior decoration
Mirror tiles can be used in almost any interior. It is convenient to apply to a wide variety of materials: plastic, metal, ceramics, etc. But when using this decorative element you need to know a sense of proportion. A large number of mirrors and stained glass windows in a room negatively affect a person’s psychological state.
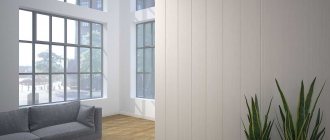
You can use mirror tiles only on two adjacent surfaces, for example, on the ceiling and one of the walls, but in this case it is better to take materials with different textures or patterns. It is not worth covering the ceiling completely with mirrors, because... It may feel like the room is upside down. It is more expedient to decorate only part of the ceiling with this material.
To ensure that the light reflected on the surface of the mirrors does not tire the eyes of the beholder, it is better to use lamps with a soft matte glow or LEDs. You can use mirror tiles in any room of an apartment or private house.
Hallway interior
Reflective surfaces allow you to visually enlarge a small hallway and harmoniously decorate a large hall. If the apartment has a narrow, long corridor, then there is no need to decorate both walls with mirrors at once; you should limit yourself to only one plane.
In small hallways, you can line part of the wall with this material and hang lampshades above them. This will make the corridor visually more spacious and comfortable.
In the halls, mosaic tiles look great, effectively decorating one of the walls. Mirrors also look good in a hallway niche. A wardrobe is usually placed in it, but if there is no need to install it, this niche can be decorated with mirror tiles with ornaments or bright designs.
The tiles often depict:
- hieroglyphs;
- silhouettes of people, animals and birds;
- flowers;
- eastern ligature.
Living room design
Mirror tiles in the living room are often used to zone the room. Often it is used to highlight a fireplace or a sofa. In private homes, columns and niches are decorated with this material. The fireplace framed by a mirror mosaic looks very impressive. You can also make a stripe on the wall from this tile, placing flowers or floor lamps next to it. Thanks to this technique, it will seem that there is a lot of color and light in the living room.
This material is also used to decorate furniture. They can be used to lay out wall shelves or shelving facades. Moreover, mirror tiles will be appropriate in palace, urban, and oriental interiors.
A mosaic of mirrors is suitable for a kitsch-style interior, creating unusual multi-colored tints. You can decorate one of the living room walls with classic tiles, and then place a stylish sofa next to it. Its straight lines will look good against a mirror background.
Kitchen decoration
Mirror tiles in a post-Soviet kitchen look unexpected, although acceptable. This decorative item is not only beautiful, but also functional. It is ideal for classic small kitchens in typical homes. Mirror tiles can be used to decorate the kitchen apron. This tile can be decorated with interesting designs, ornaments or holography.
For kitchen sets in a classic style, aged mirror tiles are suitable. On such a surface, stains, drops of water and fat are almost invisible. This decorative material can be used to decorate the wall above the kitchen unit if there are no top drawers, or the wall next to which the dining group is located. This technique will help give a narrow and long kitchen a square shape. And, of course, you can decorate the facade of the kitchen unit with mirror tiles.
Bedroom design options
Mirror tiles in the bedroom make the room unusual and piquant. From this material you can make a completely monolithic wall or a mirror ceiling. But such an installation should not be placed directly opposite the window; the tiles will look much more impressive to the left or right of it.
If a wall decorated with mirror tiles reflects sources of artificial light, this can make the room brighter and more comfortable. But this finishing method is only suitable for large rooms. In small bedrooms, it would be more appropriate to decorate only part of the wall with mirror tiles, for example, the head of the bed.
The doors of wardrobes, bedside tables or chests of drawers for linen are often decorated with tiles, and beds are also decorated with mirror tiles, but this will not be appropriate in all interior styles.
In the children's room
The presence of a mirror wall in a children's room causes controversy among designers and psychologists. Of course, such tiles will look impressive and stylish, turning the nursery into a fairy-tale corner, but from a psychological point of view, this piece of furniture is inappropriate in rooms for small children.
A wall made of mirror mosaic can disrupt a child’s sense of reality, so this interior element is suitable only in rooms for teenagers. In other cases, you can hang a panel of mirror tiles on the wall or decorate the clock in the room with tiles. But such decor is not recommended to be placed in front of the child’s eyes: above the desk, opposite the bed or in the sports area next to the wall bars. Mirror tiles are best placed in places where sunlight and light from lamps, floor lamps or ceiling chandeliers fall.
Bathroom
Mirror tiles are appropriate in any bathroom. One of the walls of the bathroom can be made completely mirrored: from regular or mosaic tiles.
This finishing method looks beautiful and is one of the most practical. A wall of mirrors opposite a window or bathtub looks especially impressive. This makes the bathroom light, bright and airy.
Mirror tiles do not deteriorate from moisture and are practically resistant to its effects. You can use it to lay out the ceiling or part of it, giving the interior a romantic style. When decorating a bathroom, some people combine ceramic and mirror tiles, and spectacular shiny inserts appear in ordinary white tiled walls.
This material can be used to decorate the facade of bathroom furniture. But there is no need to make the bathroom completely mirrored, decorating the ceiling, walls, and furniture with these tiles. This can make the bathroom cold and uncomfortable, even if warm colors are used in the interior.
Two simple ways to make a composition
You can build a panel from separate ordinary mirrors. It doesn’t matter what is used for production, the main thing is that the end result is a single product. A painting can be made from one element or from several. Such a mirror panel in the interior will always find its purpose.
Nowadays, markets sell ready-made kits for creating masterpieces. They have different price qualities, as well as sizes, shapes and shades.
The most spacious decorative effects from mirrors in rooms can be used as an additional window.
Examples in the interior
Video review
Sources:
- https://ru-house.net/stroitelstvo/steny/plitka/zerkalnaya-s-facetom.html
- https://repaireasily.ru/tips/polozhit-zerkalnuyu-plitku.html
- https://plitkahelp.com/ukladka/zerkalnye-plitki-na-stenu-svoimi-rukami
- https://strir.ru/vnutren-otdelka/plitka/zerkalnaya-s-fatsetom
- https://kursremonta.ru/otdelka/kak-vybrat-zerkalnuyu-plitku-s-facetom-poshagovaya-instrukciya-montazha
- https://eco-sip.ru/vozvedenie-steny/instrukciya-po-samostoyatelnoi-ukladke-i-montazhu-zerkalnoi-plitki-s-facetom.html
- https://IzPlitki.com/vybor-i-dizajn/roskoshnyj-interer-bez-pomoshhi-dizajnera-zerkalnaya-plitka.html
- https://www.InMyRoom.ru/posts/16665-zerkalnaya-plitka-v-interere-idei-dizajna
- https://promalpworks.ru/steny/kak-kleit-zerkalnuyu-plitku-na-stenu.html
- https://gipsohouse.ru/walls/plitka/16215-kak-kleit-zerkalnuyu-plitku-s-facetom-na-stenu.html
- https://iv-proect.ru/steny/kak-kleit-zerkalnuyu-plitku-na-stenu.html
- https://skelko.com.ua/stati/kak-pravilno-ukladyvat-i-snimat-zerkalnuyu-plitku/
- https://zavod-akma.ru/intstrukcziya-ukladki-zerkalnoi-plitki.html
- https://kakkley.ru/%D0%BA%D0%B0%D0%BA-%D0%BA%D0%BB%D0%B5%D0%B8%D1%82%D1%8C-%D0%B7 %D0%B5%D1%80%D0%BA%D0%B0%D0%BB%D1%8C%D0%BD%D1%83%D1%8E-%D0%BF%D0%BB%D0%B8% D1%82%D0%BA%D1%83-%D0%BD%D0%B0-%D1%81%D1%82%D0%B5%D0%BD%D1%83/
- https://remsovet.com/108-zerkalnaya-plitka-v-interere.html