Waterproofing walls is a mandatory procedure when constructing a building. Unprotected surfaces will be exposed to moisture - precipitation, condensation - and deteriorate, and mold may appear on them. When carrying out work, it is necessary to strictly adhere to the technology; this is the only way to ensure protection of brick, wooden or concrete surfaces from water, extending the service life of the house.
Application of liquid waterproofing
Sources of moisture
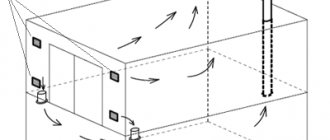
Condensation forms on the internal surfaces of the walls in the room. This occurs due to increased air humidity. In bathrooms, kitchens, basements, non-residential buildings (garage, shed, workshop), especially if they do not have a heating system, air humidity is constantly increased, so protecting the walls from the inside is mandatory.
Another reason for the appearance of condensation is insufficient quality insulation of the house.
External surfaces come into contact with precipitation and groundwater.
Ditch, seal, waterproof
Our user with the nickname ALEXUS_81 has constant water in the basement because “a goblin brigade of monolithic workers poured screed onto the floor without any waterproofing or reinforcement.” Because the floor is unprotected, he doesn't see the point in digging out the basement and applying waterproofing to uneven surfaces. All the water has already been pumped out by the pump, but where it comes from is not visible, so the plan to combat basement flooding is as follows:
- To groove and seal all joints between concrete walls and floors;
- Treat all basement walls and floors with penetrating insulation so that there is no more “capillary action.”
ALEXUS_81FORUMHOUSE Member
If all the cracks are caulked and the capillary movement of water is stopped, then there should be no water flow into the basement. Although one unsealed hole may be enough for flooding.
This is what the underground garage of our user with the nickname Magma looked like before the basement was waterproofed:
Water penetrated into the basement through the capillaries of the concrete and through the junction of the floor and the wall. We had to make grooves to dump water into a drainage well with a pump. Water began to flow quite actively from the opened seams, the pump worked in continuous mode. To stop the water, we first had to make hydraulic seals, and then seal the grooves with joint compound. At the last stage, the concrete surface was treated with a penetrating compound.
This is the result that we managed to obtain.
Why is waterproofing needed?
The absence of a waterproof coating will significantly reduce the service life of the building; the material (concrete, brick, wood) will deteriorate, cracks, mold, and moss will appear on it. To prevent this from happening, you need to waterproof the walls outside and inside.
In addition, protecting internal surfaces will help:
- prevent the appearance of damp smell;
- maintain an optimal indoor microclimate;
- protect pipes and other metal structures from corrosion;
- delay the need for cosmetic and major repairs.
Content
- Which waterproofing to choose, roll or coating
- How to choose the right waterproofing
- After which layer of floor pie should waterproofing be applied?
- Is it possible to save on tape?
- Do I need to use two-component formulations?
- Is waterproofing necessary in the bathroom of a private house?
5nizza Member FORUMHOUSE
Explain to the dark one: why is it necessary to waterproof a bathroom in a house made of gas silicate blocks and bricks, if the bathroom is on the first floor of the house with a ground floor?
Bathrooms are traditionally considered the most “complex” rooms in a country house, and not only in a wooden one. Many homeowners waterproof them simply by default - there is still always a risk of leaks. Another category of homeowners is inclined to believe that in a one-story house without a basement, “you don’t have to do any waterproofing - there’s nothing to flood,” and you can get by with epoxy grouting of the joints - it doesn’t allow water to pass through. But it's not right. In a house with a floor on the ground, GI still needs to be done to prevent gradual wetting of the structures from the side of the room.
Mastergidro FORUMHOUSE Member
Waterproofing of the bathroom is done in accordance with all SNIPs. It’s better to do it right away than to dismantle the floor later if there are leaks.
SanSanych-Moscow Member of FORUMHOUSE
Let's assume there is no basement. There will be a leak. The water will sit for a day, some will go into the stove and will come out of it for a long time. Dampness, mold... Do you need it? Take the coating waterproofing and cover everything with it.
Wind4625FORUMHOUSE Member
In the bathroom and in the bathhouse, waterproofing is always necessary. There are a million risks in these premises: spilled water, cracks, damaged washing machines... Waterproofing is a minuscule part of the overall construction costs. Stick a roll of waterproofing on top of the screed, some with a self-adhesive layer.
Types of waterproofing materials
According to their purpose, materials are divided into 4 types:
- sealing;
- anti-corrosion;
- hydro- and heat-insulating;
- antifiltration.
In appearance, waterproofing can be liquid or roll.
An example of using rolled waterproofing
Bitumen mastic
Bitumen is an elastic mass that is a product of oil refining. Creates a dense waterproof film on the surface and is not subject to cracking. Fills the smallest cracks, penetrates into the pores of the base. Used in combination with roll material or independently. Designed to protect the wall from the outside and treat the foundation.
Bitumen mastic is easy to apply; even a person with no experience can cope with the task. The work takes a little time. The material is sold in the form of bars, which must be heated to 150 degrees to melt before use.
The disadvantages include the duration of hardening. If low-quality compounds are used, the resulting coating may crack over time.
Polymer mastic
Polymer mastics are acrylic-based plastic adhesive compositions used for waterproofing walls from the inside or outside. In addition to protection from moisture, it improves the thermal insulation properties of the treated surface.
Advantages of polymer mastic:
- forms a dense, even coating that does not require finishing;
- fireproof;
- protects against moisture, fungus, moss;
- has a safe composition that allows its use in bathrooms and other rooms;
- Available in a wide range of colors;
- resistant to sub-zero temperatures;
- dries quickly;
- elastic, when the base dries or deforms, it retains its integrity.
Colored polymer mastic
Deep penetration compositions
Dry mixtures containing quartz sand, cement and polyurethane resins are diluted with water immediately before use. After drying, they form an airtight film that reliably protects the surface.
The application technology is extremely simple; the work can be performed by a non-specialist. Penetrating compounds are used primarily inside the home.
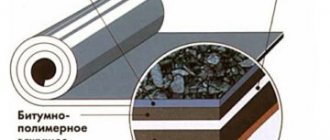
Roofing felt and roofing felt
Both materials are used to waterproof the outside of the wall and protect the foundation from moisture.
Ruberoid is a rolled material consisting of a base (cardboard, fiberglass) and impregnation (most often bitumen). Roofing felt is a cardboard sheet impregnated with a tar composition. The first is superior to the second in its properties; only it costs less.
Membrane (film)
It is a roll material made of synthetic rubber or PVC. Used indoors and outdoors. A significant drawback is instability to mechanical stress. Waterproofing film for walls can easily be damaged during installation.
Covering the foundation wall with a membrane
Injection waterproofing
This type includes:
- epoxy compounds;
- acrylate gels;
- polyurethane compounds.
Holes are drilled in the wall in increments of 50 cm into which liquid is injected under high pressure. The method is quite expensive and requires special equipment, so its use is justified only in very complex cases when it is impossible to use other materials.
Disperbit. What it is? How to choose?
When waterproofing a house, it is recommended to use only the best and highest quality materials so that the protective layer is as resistant to all external factors as possible. For this reason, many private home developers have turned their attention to a product called Disperbit. Let's look at it in more detail.
Disperbit is a so-called dispersion waterproofing based on bitumen-rubber mass. It consists of bitumen which is suitably modified using synthetic rubber. It has proven itself to be an excellent material for the preparation of durable waterproofing coatings.
Why do you need disperbite? First of all, to protect such elements of the house as the roof, foundation, walls, bathrooms and more.
What are the advantages of disperbite? The first thing worth noting is that it can be applied to walls immediately, without heating. This creates a highly flexible coating that is resistant to water and variable temperatures, and is non-invasive to materials such as polystyrene. However, this waterproofing material cannot be applied at low temperatures (below +10 degrees), or in rainy weather.
How to apply waterproofing material?
Before applying the waterproofing coating, you must thoroughly clean the surface. Any possible defects in the structure of the treated walls, floors and other surfaces must be eliminated (cracks and pits repaired, and the surface leveled).
Disperbit is applied in several layers - the first is used to prime the material, so the product should be diluted with water (1:1 ratio), then subsequent main layers are applied (without dilution). Each of them should be about 1 mm thick.
Wait until the previous one has dried before applying another coat. After this time, the product changes color from brown to black. If the coating is applied to the roof, it must be sprayed upon completion of the work.
We also note that Disperbit dries well on its own. However, in the case of working with roofing coverings, we must also cover the last layer with roofing paper, which will further strengthen the waterproofing.
Let's look at some more answers to the most common questions here:
- How long does it take for waterproofing coating to dry? Drying time for one millimeter layer of agent usually lasts about 5-6 hours;
- What is the product consumption? If we decide to apply 1 mm coating once, the consumption will be about 1 kg per square meter. However, it should be taken into account that effective protection will be obtained with two coatings, that is, using approximately 2 kg per square meter;
- What is the price of dispersant? A package containing 20 kg of product costs about 800-1000 rubles;
- Is disperbite harmful? No. It is completely non-toxic and non-flammable, so it does not pose a threat to our health;
- Does Disperbit dissolve foam? Due to its structure and composition, it in no way destroys polystyrene foam, so it can also be used for such coatings;
- Can Disperbit be used indoors? Yes, confirmation of this fact is the corresponding certificate that the product has;
- Which is better - Disperbit or Abizol? Analyzing both indicators, it should be emphasized that disperbite, first of all, is more friendly for the developer. It does not emit an unpleasant odor and is in no way dangerous. It should also be emphasized that abizol is a more material-intensive product.
That's all. We hope that we have answered your question: “What is the best material for foundation waterproofing?” For more detailed information on the selection of waterproofing materials, please contact specialized companies.
Did you find this article helpful? Please share it on social networks: Don't forget to bookmark the Nedvio website. We talk about construction, renovation, and country real estate in an interesting, useful and understandable way.
Location of insulation cover
Waterproofing a wall can be done in 2 ways: horizontal and vertical.
Vertical
This method is used both during the construction process and during renovation work. Use roll or liquid waterproofing material or both at the same time.
Horizontal
The rolled material is laid on the base where the wall is being built. Roofing material or film will prevent the absorption of moisture from the cellar, basement or soil.
Horizontal waterproofing
Installation of horizontal waterproofing is possible only at the construction stage.
What types of drainage exist?
In low-rise construction, ring, wall and layer types of drainage are used.
Reservoir drainage is installed at the base of the building directly onto the aquifer. Moreover, it is hydraulically connected to a tubular drain located on the outside of the foundation at some distance from the plane of the building wall.
The reservoir drainage system protects the structure both from flooding by groundwater and from wetting by capillary moisture. It is widely used in the construction of underground structures erected on low-permeability soils, as well as in the presence of a powerful aquifer under the foundation.
Ring drainage (most often tubular drains) is located along the contour of the building. Its action is based on lowering the groundwater level inside the protected circuit, which provides protection against flooding. The depth of this depression depends on the depth of the pipes or the filter part of the wells relative to the groundwater level, as well as on the size of the protected circuit. Ring drains are located at some distance from the structure, thanks to which they can be installed after its construction. In this regard, ring drainage compares favorably with reservoir drainage, which can only be installed simultaneously with the construction of the structure.
Wall drainage consists of drainage wall structures (pourable, glued, installed) and tubular drains laid on the outside of the structure and serving as a pipeline that simultaneously collects and discharges drainage water.
Wall drainage is used, as a rule, in almost all cases, both independently and in conjunction with other types of drainage. Currently, special geocomposite drainage systems are used for wall drainage, consisting of a profiled plastic membrane (PVP) and geotextile glued to it. Geotextiles allow water to pass through, trapping soil particles, and the plastic membrane freely drains water to the drainage pipes.
To create reliable and durable hydro- and thermal insulation of buried structures, all the necessary materials and carefully designed certified building systems are available on the market today. The correct choice of system and materials guarantees the homeowner the desired result.
Internal protection
Waterproofing of internal walls is carried out using polymer mastics or fixing the membrane.
Procedure for applying mastic:
- The prepared and cleaned surface is leveled with cement plaster.
- Apply primer.
- After drying, the surfaces are covered with a layer of waterproofing. In total, several layers will be required.
Polymer films are used for walls in an apartment or private house. Membrane installation:
- The sheathing is attached to the insulated surface.
- Insulation is placed in the cells between the racks.
- Using slats, the film is attached to the frame. Place it vertically, the stripes overlap.
- The cladding is carried out with finishing material.
If necessary, you can attach 2 layers of film - directly to the wall, before installing the sheathing, then to the frame itself.
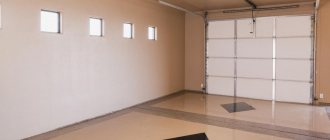
Video description
An unusual protection option is a 3D self-leveling floor in the video:
The material is distributed over a primed concrete base in two ways - hot or cold, in several stages. Then the surface is dried with hot air (gas burner, IR radiation). For additional reliability, the layer is reinforced with fiberglass or metal mesh. The thickness of the finished film is from 5 to 15 cm.
Impregnating (penetrating) waterproofing
For protection, solutions of concrete, concrete-polymer or cement composition with chemically active additives (polymers, salts of alkali and alkaline earth metals) are used. This composition is able to penetrate deep into the concrete surface (some 50-60 cm), making it waterproof. You can immediately lay ceramic tiles on top of the waterproofing.
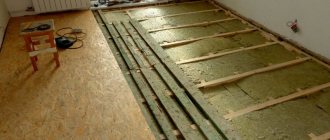
Waterproofing of a wooden floor, logs (beams for flooring) Source bg.decoratex.biz
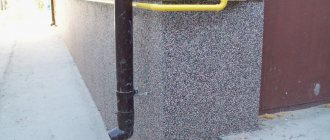
Features of waterproofing foundations and basement walls
The main feature of the foundation waterproofing process is that the surfaces requiring treatment are buried in the soil, and they will need to be cleared by digging a trench around the perimeter of the building.
Before starting work, you need to inspect the foundation and eliminate all defects.
Waterproofing of basement walls from the inside is carried out using bitumen mastic, roofing felt, and membrane.
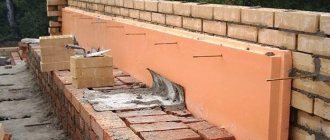
Waterproofing a basement wall
Why not do without waterproofing?
For the foundation of a house, any moisture becomes a source of problems, because its elimination is a labor-intensive process that requires additional considerable expenses. Therefore, it is wiser to take care of protecting the foundation during the construction phase.
Foundation waterproofing cannot be neglected because:
When laying a building, the concrete solution leaks into the soil, which significantly weakens the structure in the future.- The foundation of the house is in constant contact with a humid environment, this includes:
- groundwater;
- melt moisture;
- precipitation (snow, rain);
- flooding as a result of seasonal river flooding.
- Unprotected concrete absorbs moisture through capillaries, which crystallizes and expands the foundation, forming cracks.
- It’s not pleasant when there is water in the basement, and the basement cannot be fully used.
- A damp basement in a home becomes a source of mold spreading up the walls.
- The building is being built for more than one decade.
Waterproofing of external walls
To protect external surfaces, you can use bitumen, roofing felt, or a combination of both.
Coating technology
Procedure:
- Cleaned surfaces are primed with a special composition (you can use bitumen diluted with gasoline). Apply the liquid with a brush. Wait until it dries. Apply a second layer.
- Cover with bitumen mastic preheated to a liquid state. If the composition is too thick and difficult to spread, add a small amount of solvent or gasoline to obtain the desired consistency. Particular attention is paid to the joints of the material from which the foundation is made.
- After applying the first layer, wait until it hardens. Cover with another one.
In order for waterproofing to perform its intended function, its total thickness must be at least 3 mm.
Pasting principle
Waterproofing the external walls of a house with rolled material is carried out as follows:
- The cleared surfaces are primed in 2 layers.
- Heat a strip of roofing felt or roofing felt using a hair dryer or burner. The impregnation needs to soften.
- Apply the material to the bottom edge of the surface horizontally (parallel to the ground).
- Press with force and carefully iron so that the roofing felt sticks tightly to the outer wall and there is no air left inside.
- The next strip is fixed vertically, with its lower end touching a horizontally fixed section of roofing material. The remaining strips are fixed in the same way, making an overlap of about 20 cm.
- The joints must be additionally sealed. Bitumen mastic is suitable for this.
Combined method
Waterproofing an external wall with roofing felt
For high-quality and reliable waterproofing of the walls of a house, you can use a liquid composition and rolled material.
In this case, first the surface is coated with bitumen mastic, and roofing material is laid on it.
The simplicity of the technology and the absence of the need to use special equipment make it possible to carry out work on protecting walls from moisture with your own hands, and the tangible benefits - a significant increase in the service life of the building - justify the investment of time and money.
Common mistakes, valuable recommendations
Defects made when arranging foundation waterproofing lead to a reduction in the service life of materials and destruction of the foundation of the house.
These errors include:
- Saving on drainage pad. If this is not done, the lower part of the base of the building will constantly come into contact with moisture. It is recommended to fill it with sand and gravel after compacting the soil. Its task is to remove moisture from under the house.
- Unevenly poured foundation due to poor-quality formwork and violation of concrete pouring technology. It is recommended to level the walls and the horizontal part of the foundation and knock down the protrusions. Rolled strips cannot be attached perfectly to uneven surfaces.
- Violation of the integrity of 1 vertical waterproofing barrier. Gaps, cracks, non-overlapping waterproofing materials that are laid on a drainage pad along the bottom of a trench or pit before pouring the foundation. It is necessary to glue the joints and lay the sheets with an overlap of at least 15 cm.
Inadequate choice of building materials for vertical waterproofing. When choosing, you should take into account climatic conditions and the location of the building. It is recommended to consult specialists who will select the best option.- At the corners and joints of the base and the walls being built, the waterproofing is done poorly. In these areas, the materials must be firmly fixed; any loose materials must be removed and replaced with new ones.
- No primer was used. To ensure a good fit of materials, all surfaces must be treated with a primer, otherwise all waterproofing work will go down the drain:
- the applied compounds will peel off;
- you will have to dig out the foundation around the perimeter;
- remove all old material;
- perform the entire range of waterproofing works, already following the technology.
- The use of roll materials inside the building, neglecting external waterproofing. Under the influence of moisture from the outside, rolled materials on the internal walls of the foundation swell and peel off. For interior work, it is recommended to use polymer-cement compounds.
- Incorrect timing for waterproofing. It is better to carry out work in dry weather.
- The waterproof barrier is level with the ground. The upper part of the protective layer should be located at least 200-300 mm above the ground level.
- Lack of storm sewer, drainage system and blind area.
Everything you need to know about foundation waterproofing can be found in this section.