Plastering the plinth and foundation of a building is designed to perform several tasks at once. Such work makes it possible to obtain high-quality protection of the foundation from an aggressive external environment, extend the service life of the structure and can become a real decoration of the exterior of the home.
Plastering the plinth
Finishing the basement of the house
Requirements for basement plaster for exterior finishing
The finishing of the base with plaster is carried out in compliance with the following requirements for durable operation:
- Plaster is selected in accordance with the climatic conditions of the region.
- A moisture-resistant material that can withstand exposure to precipitation is required.
- The coating must be durable, resistant to mechanical damage and vibration.
- Choose a frost-resistant material that can withstand a large number of defrosting and freezing cycles.
- Plaster for the plinth must withstand ultraviolet radiation.
- Choose a material with antiseptic characteristics that is resistant to mold.
- The plaster layer must have low thermal conductivity in order to further insulate the building.
- An aesthetic coating is necessary, because... used for facade finishing.
- The cost of the material should be affordable, because plastering the foundation and basement requires large volumes of mixtures.
- Choose a coating that is resistant to chemical detergents.
- The material must have good vapor permeability and high hydrophobicity.
- Fire safety of the finishing coating and durability are required.
Suitable types of plasters for exterior work - which one is better to choose
Before plastering the base, choose a suitable material:
- Ready-made solutions or dry compositions for dilution with water can be used. The advantage of materials in powder form is that they are more affordable and cost-effective.
- Materials for external use or plaster mixtures for universal use are purchased.
- For the finishing stage, decorative and facade plaster is used for the base of the house.
- Surface leveling is carried out with cement compounds filled with sand.
- For buildings located in a seismically unfavorable region, the foundation is not plastered with cement mortar, because... cracks may form.
- To finish the base, specialized plaster mixtures (waterproofing, sanitizing, insulating) can be used.
- The work does not use gypsum plasters, which do not have high strength, water resistance and quickly crack.
According to technical characteristics, plinth plasters are divided into the following subtypes:
- structural (with the addition of stone chips and other particles);
- textured (used for decorative finishing, creating designs);
- glazing (to reproduce original decorative effects);
- leveling;
- standard smooth, etc.
Based on the type of binding components, materials are divided into the following subtypes:
- cement-sand;
- clay-sand;
- limestone;
- lime-cement;
- cement-clay-sand;
- silicone;
- acrylic;
- silicate;
- polysilicate, etc.
By invoice
The plinth is plastered using the following texture mixtures:
- bark beetle;
- mosaic;
- pebble;
- lamb;
- Venetian;
- sgraffito;
- wet silk;
- Marseilles wax;
- craquelure;
- sea breeze, etc.
Universal version of plaster -
"bark beetle"
. The coating is durable, aesthetic, and can be combined with different materials. The plaster is applied vertically, crosswise, horizontally, etc. The relief is formed after applying the mixture in several layers with a special grater. The “bark beetle” finish is combined with stone-look walls and concrete bases.
Pebble mixture
for finishing the base, universal for exterior decoration of buildings. Using the material, you can create your own design, reproduce bas-reliefs, and the sgraffito effect. The composition contains stone chips with fractions of 1-3 mm. The texture is formed with a grater. The coating can be applied with a roller, brush, or palette knife. Using spatulas, original patterns are created.
Mosaic decorative plaster
for the plinth is used to create an original design. The coating is applied in an even layer. The composition contains coarse stone chips. It is allowed to fill the mixture with different rocks. Translucency and easy application are ensured by the presence of silicate or silicone components in the composition.
At the final stage, the surface will not need to be treated with dyes, clear varnishes or other protective agents.
Lamb plaster
is created using the technology of throwing the mixture and does not require careful leveling or grouting. To create this relief, cement-sand and lime-cement mixtures are used.
Classic smooth foundation finish
Plastering the foundation plinth can be done with classic leveling mixtures. After drying, the surfaces remain smooth. These materials are often used to create a base or second layer of facade plaster for subsequent tinting of surfaces.
The work is carried out using the following types of plasters:
- Cement-sand
. Standard material for leveling facades. The solution is prepared from sand and cement in a 3:1 ratio with the inclusion of plasticizers and modifying components to increase plasticity. If necessary, coloring pigments are included in the composition to enhance the decorativeness of the finish.
- Clay-sand
. The material is environmentally friendly, safe to use; when decorating the base, waterproof additives that increase strength are added to the mixture.
- Limestone
. Contains slaked lime, sand, cement. To finish the base surface, additives that increase durability will be required.
- Cement-clay-sand
. Optimal for leveling the base and using it as a starting layer. The proportions of the components provide increased strength, resistance to mechanical stress and precipitation.
- Polysilicate mixture
. It is highly elastic, resistant to ultraviolet radiation, easy to apply to the base, and safe to use. However, to increase the antiseptic characteristics, special additives are included in the mixture. Plaster is consumed at the rate of 2-4 kg per 1 m².
- Silicone plaster
. Can be used to apply a second leveling layer. The material is resistant to mechanical damage and has good vapor permeability characteristics. The coating is water resistant and can be easily cleaned with detergents. Plaster is available in a wide range of shades. The solution consumption is carried out at the rate of 1.7-2.4 kg per 1 m².
Facade decorative
The finishing of the base with decorative plaster is carried out at the finishing stage. The work is carried out using mixtures that allow the original textured, structural, and relief surfaces to be reproduced. The compositions are presented in a wide range of colors and have a high cost.
The following materials can be used in decorative finishing:
- Acrylic plaster
. It is distinguished by strength, elasticity, a wide range of shades, and waterproof characteristics. The presence of acrylic resins prevents cracking, washing out and fading of coloring pigments. Material consumption is carried out at the rate of 1.5-4 kg per 1 m².
- Silicone
. The material is characterized by high elasticity, vapor permeability and water-repellent characteristics. Decorative finishing is durable, but expensive.
- Silicate mixture
. It is created on the basis of potassium liquid glass, it is durable and resistant to mechanical damage. The coating has water-repellent characteristics and is available in a wide palette of shades. The plaster is resistant to mold and mildew. Consumption is carried out at the rate of 2-4 kg per 1 m².
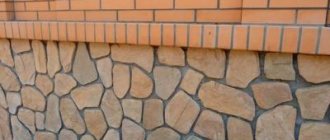
How to plaster a base under a stone
Plastering under a stone surface is in demand when finishing building facades. The mixture includes cement, plasticizers, quartz sand, stone chips, and binders. The coating is highly durable and durable.
The mixture should have a dense consistency for easy application to the base. The type of masonry chosen determines the thickness of the plaster layer.
Creating an imitation of stone is possible by cutting through a plastered surface or using stencils. To imitate a stone base, you will need natural stone chips or coloring pigments.
Selection rules
The main plastering is carried out using cement mortar, on top of which decorative layers are often applied.
Plastering of the plinth should be carried out according to the requirements
Therefore, such a vapor-permeable material must have a high adhesion coefficient and good strength, and also meet the following basic requirements, including:
- the presence of sufficient biochemical stability;
- high fire safety indicators;
- increased hydrophobic qualities;
- resistance to low temperatures and ultraviolet radiation;
- durability and environmental safety;
- ease of use and ease of independent work.
Basement finished with plaster
A correctly selected and high-quality base plaster mixture allows you to not only imitate the texture of almost any finishing material, but will also serve as additional protection to the main layer.
Decorative plaster of the base
Advantages and disadvantages of cladding the outside of the basement of private houses
Before plastering the base of the house, it is necessary to evaluate the advantages and disadvantages of the finishing material.
The list of advantages:
- protection of the building’s foundation from moisture and temperature changes;
- additional strengthening of the basement;
- increasing the strength and durability of the building;
- improving the thermal insulation characteristics of the building;
- creation of original decorative finishing of the house;
- the work can be done independently;
- the plaster coating is repairable;
- it is possible to repaint plastered surfaces;
- a wide selection of structural, textured plasters;
- the coating has good vapor permeability and maintains the microclimate in the house.
The list of shortcomings:
- the coating does not withstand heavy mechanical loads;
- service life of finishing below stone cladding;
- If the solution is applied poorly, cracks and chips will form.
Important points
The advantages of applying plaster to mesh are that when using this method, durability is significantly increased, the plaster does not crack or peel. The technique of plastering on a mesh is not very complicated. It is worth remembering that when applying the mesh to the surface and applying the first layer to it, you need to smooth it out and make sure that it is evenly stretched along all edges. The next layer is applied with a wide spatula and, as it were, rubbed into the surface of the base. This is done so that the plaster seeps through the mesh and securely adheres to the bottom layer. After applying the solution and then drying it, you can begin to “grout” the surface and after that paint the almost finished base.
Independent production of plaster mixture for finishing the basement of a private house
Before plastering the foundation, it is necessary to prepare the solution. Quarry or river sand is used as a filler, and Portland cement is the binding component. A mixture of cement, sand and water is prepared in a ratio of 1:3:4. Proportions may vary when kneading depending on the characteristics of the components.
Stages of work:
- the sand is sifted through a sieve and poured into a container;
- add cement and mix;
- dissolve a plasticizer (liquid soap or PVA glue) and color in water;
- Gradually pour water into the mixture and mix.
Where to buy and how to choose the right façade mesh
To choose the right facade mesh, you need to understand its varieties. There are three groups:
- General construction. Suitable for most general plastering jobs.
- Reinforced. Used for plinths, foundations, special structures.
- Architectural. Necessary for the design of various architectural elements - corners, curbs, slopes, etc.
Next, you need to choose, paying attention to such an important parameter as density. The weight of the mesh, its strength and the load it can withstand depends on it. So, depending on the density we choose:
- interior and painting work - up to 90 g/m2;
- work on facade thermal insulation - up to 220 g/m2;
- thick leveling layers, plinths, foundations - more than 220 g/m2.
Recently, home decoration is rarely done without thermal insulation. For this reason, we will give an approximate algorithm for choosing a facade mesh for polystyrene foam plaster:
- The optimal cell size is 5x5 mm; this fabric will create the most even and durable surface.
- We take the density in the range of 140 – 160 grams per square meter.
- We check the quality of the weaving and the material itself - we crumple the mesh in our hand as much as possible. A good mesh will not tear and will return to its original shape.
- Be sure to check the alkali resistance of the material. Otherwise, the mesh will be quickly corroded by cement.
- Since we are talking about facade insulation, the price of the mesh should be no more than 5% of the cost of all materials.
If the plaster layer is no more than 5 mm, fiberglass mesh will suit you. As a rule, this type is used on insulated facades that do not require leveling. For thicker layers, if you want to create a truly durable layer, buy galvanized metal or polypropylene mesh.
It is better to buy building materials from trusted sellers. If you are interested in large volumes or wholesale supplies, then the best option would be to contact the manufacturer and negotiate with him directly. GOODHIM welcomes this type of cooperation and offers a variety of options that will satisfy customers in a variety of situations.
It is better for a retail buyer to find an official representative, dealer or distributor of the manufacturer in his region if there is no company store. Also, do not forget about the possibility of online shopping using an online order with subsequent delivery by mail with payment upon receipt of the goods.
A good option is to visit a construction supermarket or a retail chain with a name. Such organizations value their image and try not to sell dubious goods, agree to replace defects and care about the rights of their customers. After all, a large company is easy to find and hold accountable if problems arise.
Undoubtedly, the worst decision would be to buy a product on the market, especially a spontaneous one, from a neighbor in the country house or garage, from an acquaintance of an acquaintance, or from handymen who were paid in materials. Unfortunately, in our country there are still people who are ready for such methods of shopping.
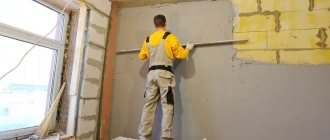
Preparing the surface of the base of the house with your own hands
Before plastering the base, the surface needs to be prepared. The work differs for masonry made of brick, aerated concrete blocks, concrete, and rubble foundations.
Preparing a brick plinth for plaster
You can plaster brick surfaces after cleaning the old material to prevent the new decorative layer from cracking.
The work is carried out in stages:
- Damaged bricks are cleaned or replaced, and old mortar is removed from the cracks with a wire brush.
- Surfaces are dust free.
- The brickwork is moistened with water, new bricks are inserted into the cement mortar.
- Deep seams are filled with cement-sand mortar.
- Clean the new masonry with a wire brush.
- The seams are deepened by 1 cm to increase the adhesion of the base.
- Before plastering, the brickwork is wetted, because Without preparation, the new coating will fall off.
Preparation of rubble and rubble concrete base
Before plastering a concrete or rubble foundation, it is necessary to inspect the wall. Damaged blocks are removed, the old solution is cleaned. The surfaces are dust-free, and new blocks are inserted into the openings using mortar. The cracks are filled with the mixture.
Preparation of concrete and reinforced concrete foundations
A reinforced concrete or concrete base needs to be inspected. Chips, cracks, damaged seams are repaired. If necessary, the foundation is strengthened. Surfaces are cleaned of dust. The cracks are filled with a solution based on cement and sand. Strengthening is done with reinforcing mesh. To level the surfaces, use the Betonkontakt primer.
Coating methods
When choosing the appropriate application method (manual or mechanical), you need to take into account the amount of work to be done. If the area is small, then you can choose the most primitive and accessible tools; if the volume is large, then you will need a mechanized application technique.
Brush and board
This method is the most ancient, it was used by several previous generations. For manipulation, you will need a high-stiffness brush and a small board. The brush should be dipped into the prepared mixture, then turned over with the bristles up, and kept next to the wall. You need to move the board along the bristles of the brush in the direction from the wall towards you, bending the bristles. Under this influence, the hairs will straighten due to their elasticity, and the mixture on them will shoot out onto the wall. The plaster is spread over the surface in a thin layer, but does not serve to obtain a heat and sound insulation effect.
Net
This method is not as popular as the previous one, but is still sometimes used. A fine-mesh mesh is fixed to the wall, maintaining a certain distance. Using a construction trowel, the mixture is poured onto it. Flying through the mesh cells, the solution forms interesting patterns on the wall. At the end, the mesh is removed, since it is an auxiliary material.
With a broom
To implement, you need two tools: a broom and a stick. The stick should be held perpendicular to the wall. A broom is dipped into the plaster, and it makes sharp blows to the stick. When these two tools collide at high speed, the plaster from the broom will simply fly off, creating “fur coat” patterns on the surface to be decorated.
But this method is the longest and most labor-intensive. One portion of the mixture is enough to cover a small area. You will have to perform a large number of similar movements. Therefore, when decorating large areas, it is better to abandon this method. A broom made from thin twigs of any tree is ideal for the job; sorghum should be avoided.
Roller
The roller is a more modern and advanced tool. After the roller, a thicker layer of “fur coat” plaster remains on the walls with a minimum amount of time. The procedure is similar to simply painting vertical surfaces with a roller. To make it more convenient to work, you need to choose a flat rectangular container, dilute the mixture in it or pour it already prepared. It will be much more convenient to dip the roller into this. Then, using simple rolling movements, you need to evenly distribute the solution on the surface. You can work with a roller in another way. Using any tool, immediately apply a significant amount of mortar to the future facade, and then begin rolling out.
Manual sprinkler
This method reads semi-professionally. There is a special tool, plaster is poured into it. The person independently untwists the handle, which causes the shaft to rotate, which will push out the solution, spraying it on the wall. It will be distributed in a shooting motion thanks to a large number of metal tendrils.
Gun with compressor
This method is already considered professional; the mixture flies out of the apparatus under the influence of air pressure. The compressor creates it. With a convenient tool, you can decorate large areas of walls efficiently and evenly. The result looks perfect, has texture, roughness, and lasts much longer than plaster applied with a broom or roller. But the equipment has a significant cost.
Technology for plastering the basement of a private house
Do-it-yourself plastering of the base is carried out in stages:
- preparation of the base;
- padding;
- fixation of reinforced mesh;
- installation of beacons;
- spray with solution;
- plastering;
- grout;
- decorative finishing;
- coloring.
Preparatory work for plaster
Before plastering the foundation of the house, preparatory work is carried out:
- old finishing materials are cleaned off;
- cracks and chips are repaired with cement-based mortar and reinforcing mesh;
- the base is cleaned of dust and grease stains;
- mold is cleaned off, surfaces are treated with antiseptic compounds;
- metal elements are removed or isolated with oil dye;
- notches are applied to the concrete base.
Application of primer
The base is dried and primed. You need 2 layers of primer suitable for the base material. For porous surfaces (brick, cinder blocks), deep penetration primer mixtures are used. The composition is applied with a roller or brush. Each layer of primer is dried. The plastered base can be primed with façade mixture before applying paint.
Fastening the mesh to reinforce plaster
The plinth plaster on the mesh is characterized by increased strength. The list of recommendations on how to properly plaster with a layer thickness of 20 mm or more indicates the need to fix the mesh. Reinforced construction is required when using insulation for facades. The work uses galvanized reinforced mesh or stainless steel mesh. The canvas is secured to the base with dowels or nails. The meshes are overlapped.
Installation of beacons
After fixing the grid, beacons are installed. To do this, the level of curvature of the walls is changed using a cord. Planks are installed along the protruding point and lines for placing beacons are marked. Dowels are driven into the wall and the cord is pulled. A solution is applied along the cord line in which the beacon strips are fixed.
Splash
The plastering of the basement begins with spraying. The solution is poured onto the surface to fill small cracks and depressions. The work is carried out with a trowel. The mass is slightly leveled and dried.
Plastering
The work is carried out in stages:
- The plaster mixture is applied to the surface with a spatula or trowel in successive rows.
- The mass should protrude above the beacon strips.
- The applied solution is leveled using the rule.
- Then the gradual application and leveling of the coating over the entire area of the base continues.
- When plastering in 2 layers, it is necessary to remove the beacons after the starting composition has dried.
- The spaces from the planks are sealed with mortar and leveled with a wide spatula.
- At the next stage, decorative plaster is applied and the texture is formed.
- When plastering corner areas, reinforcing corners are installed and the solution is applied.
Grout
Before painting the top plaster coating, it is necessary to rub and sand the surfaces. Grouting is done with a trowel after the mortar has set. Surfaces are smoothed, leveled, and protrusions are removed. The treated base area is moistened with water using a sponge or brush. Then the grater makes rotational movements without strong pressure. The remaining solution is removed into a container.
Creation methods
The process of plastering according to the chosen texture with your own hands can be done in two ways:
- Stamping. Stencils of several contours are made, which are applied to freshly applied plaster and tapped. The resulting print is embroidered. Rollers are also used for shallow relief. The decorative pattern is rolled in even rows.
- Cutting. Recesses in the solution are made with a sharp tool (a fragment of a sheet of metal or tin, cut to resemble a characteristic groove). The lines are expanded by inserting a metal ruler, tapping until the required clearance and angle are obtained. Complex transitions in the cladding can be formed from a notch made with a spatula using a rubber-gloved hand. The hardened solution is amenable to the action of a circular saw, but the shape is already limited. A wide seam requires two cuts with the middle removed.
The plausibility of large details of the image on the finishing of the foundation of the house is achieved using a combined method. A characteristic pattern of the material is applied to the block formed by cutting using a metal impact stamp with protruding parts measuring 15x15 cm.
The surface is leveled by wet grouting the plaster, for example, with a tarpaulin mitt. The roughness of natural stone is created with soft metal brushes.
Features of textured decorative finishing for the foundation
Decorative plastering of the base adds completeness to the building. The work uses textured, pebble, structural mixtures, etc.
Large-grain pebble plasters are effective in finishing the foundation. The coating contains binding plasticizers, is applied in an even layer and forms an aesthetic texture due to the filler. The surfaces do not need to be varnished or painted.
Textured mixtures are used when finishing the base using the imprint method using stamps, figured rollers or matrices. Using structural plaster mixtures, it is possible to reproduce the “bark beetle”, “lamb”, “fur coat” technologies, etc. Stone decoration is created manually or using imprint forms.
The design of the base with 3D plaster looks original. It is possible to reproduce the effect of stonework. The plaster mixture is applied to the walls without smoothing. Then, using a construction knife or palette knife, grooves are formed to create an imitation of masonry. After the mortar has set, the edges of the seams are smoothed with a brush or left uneven to create an antique design solution.
After the decorative layer has dried, a primer is applied and dried for 24 hours. Then coloring is done with natural shades (2-3 colors).
Adding black pigment to the tint mixture will reduce the brightness and create a natural stone texture. The surfaces are coated with dye using a brush or roller. After the layer has dried, the seams are tinted with dark shades.
Consumables and tools
To plaster the foundation plinth you will need not only a solution, but also other materials and tools:
Plastering ladle.- Sander.
- Hatchet.
- Primer.
- Plaster mesh.
- Medium hard brush.
- Grater or trowel.
- Spatulas.
- Boards 0.2-0.3 m wide.
- Hammer.
- Shovel
- Hammer.
- Beacons.
- Rule.
- Dowels.
It is recommended to choose high-quality material. Without some tools, it is quite difficult to get the job done.
If you plan to finish the base in color, you should purchase pigments, granite or marble chips in advance.
How to paint the exterior plinth of a house over plaster
At the finishing stage, the base is painted. The paint chosen is durable, has waterproof characteristics, and is resistant to mechanical damage. It must be façade or universally applicable.
Dyes based on silicone, acrylic or a combination are optimal. These materials are characterized by durability, elasticity during application, resistance to ultraviolet rays, and vapor permeability. The shade of the base should be combined with the overall color scheme of the building. More durable dark shades.
Follow-up events
To give relief to the stone, you can use special stencils
The type of finish chosen has a decisive influence on subsequent actions. If you plan to paint the base, lay it with tiles or plaster it with a decorative composition, then you will need to create an optimal drying regime for the plaster. This is expressed in the use of a waterproof coating to protect against all climatic influences while the plaster layer dries: this usually takes up to three weeks. If you decide to create a certain relief on a fresh mortar, then to do this you need to acquire in advance a stencil or any thin tool that allows you to apply imitations of stone or brickwork.
as well as Mosaic plaster, its features, types. Finishing the base.
Tips and tricks for plastering the foundation of a house
When finishing the basement floor, experts recommend taking into account the following nuances:
- When plastering a facade, it is important to follow the stages of work to prevent cracking of the materials.
- In the absence of a blind area for the base, more water gets onto the façade, so plastering is done with waterproofing materials.
- Work is carried out in a respirator, gloves and in compliance with safety regulations.
- Facades are not dried using heaters and fans.
Manufacturers of facade mesh
The production of facade mesh is widespread and this allows us, consumers, to choose and find what is needed. Previously, facade mesh, the manufacturers of which were either located abroad or simply could not cope with the volume of demand, was a novelty. It was used only in the construction of luxury houses, or during the renovation of expensive apartments.
This was due to the high cost and unavailability in nearby stores, so the builders used the usual chain-link on the facades, and inside the premises they used the most ordinary shingles made of wood. Often, with a small layer thickness, the use of mesh was simply ignored.
This, as you might guess, led to rapid cracking, shedding of paint and plaster itself and all that finishing “splendor” that surrounded us in our usual reality. The current situation is radically different.
In addition to the fact that global construction giants have long entered the Russian market and filled our stores with every conceivable product, many domestic companies have appeared that produce no less interesting and useful products. Let's give an example.
Plastering using non-ventilated wet facade technology
The wet façade is a multi-layer insulating structure consisting of several layers held together with mortars.
When plastering this structure, it is important to follow the sequence of steps:
- the primer is applied and dried;
- then apply the adhesive;
- fix the thermal insulation boards;
- attach an additional layer of insulation;
- install reinforced mesh;
- apply a layer of plaster;
- surfaces are dried and painted.
The plaster mixture increases the protective characteristics of the building, improves thermal insulation, and improves the aesthetics of the house.
Installation of facade mesh
Installation of facade mesh is not particularly difficult and does not require special skills. In this case, the method itself will depend on the type of mesh and the type of base. Let's start with how to attach the metal mesh:
- The roll is rolled out from top to bottom and secured to the building with metal dowels with a wide head, steel hooks, galvanized fastening wedges and other available methods.
- The wall is first cleaned, primed and, if necessary, repaired.
- The strip is fastened on top, then nailed to the wall. The dowel pitch depends on the cell and is approximately 30 cm.
- The mesh should lag behind the wall by 5 - 10 mm; for this, special linings are used.
- It is advisable to ensure good tension; the wire should vibrate like a string between the fastening points.
- The joining of the strips is done with an overlap of at least 10 cm; the mesh should form a monolithic fabric over the entire surface of the wall.
- Corners and other architectural elements should be decorated with appropriate details, which are either included in the kit or purchased separately.
The dowels can be driven in with a special gun or holes can be drilled for them using a hammer drill. The use of ordinary nails, cut reinforcement, steel wire and other types of fasteners that are not coated with zinc, polymer paint or other waterproofing is fraught with rapid wear of the structure due to electrochemical corrosion. In addition, such fasteners will release rust and can create unsightly red stains on the walls.
Installation of polymer and fiberglass mesh is simple compared to metal. They do not need to be nailed with dowels. Typically, the following approaches are used:
- nail the mesh onto a wooden or foam base with a construction stapler, and then rub it in with glue using a spatula;
- a rough layer of plaster is applied to the brick or concrete, then a mesh is pressed into it and a thin leveling layer is applied on top with a spatula;
- the mesh is secured with self-tapping screws with wide washers or special mushroom-shaped plastic dowels;
- glue is applied to the base in a layer of up to 1 cm, into which the mesh is embedded to a depth of 5 mm, leveling with a spatula - the surest way.
It is best for the reinforcing mesh to be located inside the plaster layer, approximately in the middle. That is, it should not come into contact with the wall, while a layer of substance should cover it from the external environment. Only in this case will the structure fully perform its function and last long enough.