One of the common techniques for decorating furniture is decoupage with wallpaper and other paper materials. Most often it is performed to give old furniture an original look. This will also hide damage acquired over the years, renew and extend the life of your favorite item. This decor will allow you to transform the furniture so that it fits perfectly into the interior of your apartment or house.
Decoupage is very diverse. With its help, you can revive individual parts or entire furniture by gluing individual scraps of wallpaper. Using decoupage, you can create an original thing with your own hands that will decorate your home and meet the requirements of modern decor.
Method of execution
If decorating using the decoupage wallpaper technique with your own hands is done for the first time, then you should not immediately start with complex irregularities. It is better to learn decorating on flat areas, such as cabinet doors, refrigerators or countertops. Use partial placement of patterns. For beginners, the patchwork decoupage technique is best suited. Before starting work, you need to carefully think through and complete the sketch, highlighting the main elements on it. This will make the job much easier. You should also prepare all the materials that are needed: specialized glue and colorless acrylic varnish.
When performing decoupage, we follow certain rules:
- we clean the desired area from various contaminants, wipe it and wait until it is completely dry;
- We seal various damage and cracks with vapor filler. If there are major damages, then use putty;
- We begin grinding the surface. To do this, attach fine abrasive sandpaper to a special grater. Bring to a smooth state;
- we align the wallpaper to the intended dimensions or lay out a sketch of a pattern from scraps;
- Apply glue to the wallpaper and leave for five minutes to absorb;
- After the time has passed, we glue the wallpaper sheet gradually, level it with a roller, starting from the center, to the edges. Everything should be done carefully, since paper soaked in glue is very easy to spoil;
- After the glue has completely dried, the edges of the wallpaper are very carefully and thoroughly sanded and coated with acrylic varnish.
Features of decorating with wallpaper
If you already have some skills in creating decor with wallpaper, then you can use more sophisticated techniques.
- Special aging, which is manifested by the presence of cracks. To do this, dark paint is applied to the furniture. The color matches the color of the cracks. One option is gold or silver dye. After the base layer has completely dried, it is necessary to cover it with craquelure varnish. When the varnish is partially dry, very quickly apply the paint of the main shade;
- abraded effect. To achieve this, you need to rub certain areas with wax and apply paint on top of it. After it has dried, we treat the waxed areas with sandpaper;
- patination effect. This technique involves darkening certain areas of the furniture. Most often, the patina is black or metallic. Mainly applied to corners;
- toning effect. Achieved by adding shiny additives or a small amount of colored paint to the varnish;
- using the potal technique. Application of metallized paints: gold, silver, bronze, etc. You can also perform the potal technique using crumbs or thin metallized sheets.
Preparatory work
First of all, you need to completely empty the closet of all things. Often, one or more wooden shelves are installed at the top of the wardrobe. In this case, if possible, it is recommended to temporarily remove these shelves, as well as the hanger bar. Then you need to wash the walls inside the cabinet.
Now it’s time to tackle the paper or wallpaper. Lay out several sheets to determine whether you need to match the pattern or whether your color allows you to glue the wallpaper without matching patterns. If you are wallpapering, you will need to cut the pieces to fit your cabinet, using a pattern as a guide if necessary. It is for this reason that it is useful to have more paper than you need.
Check and stripe. The best men's trousers for 2022 (photo)
Andrei Makarevich about his nationality and about the trait common to all Jews
Returned home: Russian artists whose careers did not work out abroad
Decoration materials
Since furniture decoration with wallpaper has become more popular, manufacturers are keeping up with the times. Therefore, along with paper wallpaper, adhesive wallpaper for furniture has appeared on sale. They differ in that an adhesive layer is applied on the reverse side, protected by a thin film. Typically, adhesive wallpaper is a vinyl sheet with a printed pattern. Advantages of their use:
- quite low cost;
- very easy and simple to fix;
- Damaged wallpaper can be replaced quickly and without complications;
- Wallpaper is unpretentious in care and cleaning;
- a rich variety of colors and textures.
To carry out the procedure for decorating furniture with adhesive wallpaper, you need to prepare the following tools:
- wallpaper knife or scissors;
- dry cloth napkin;
- roller for leveling wallpaper;
- cleaning solvent;
- putty, which is used to level a wooden surface;
- sandpaper with medium abrasive.
Self-adhesive wallpaper
For high-quality furniture decor with self-adhesive wallpaper, we will provide a step-by-step algorithm:
- Preparation. We inspect the furniture and carry out the surface leveling process. We fill cracks and other irregularities. After the putty has dried, sand it using sandpaper. Then we perform degreasing. For this, acetone or solvent is used. Apply acetone to cotton wool or a napkin and wipe thoroughly;
- dry gluing. This process is carried out in several steps. First of all, we take the appropriate measurements and cut the wallpaper sheets and roll them into rolls. Immediately before gluing, remove the edge of the canvas (5–10 cm) from the protective film. We apply the side with glue to the surface and begin to level it with a roller. Next, gradually removing the protective film and, working with a roller, glue the canvas.
If it turns out that after finishing the work, air bubbles have formed, you need to carefully pierce them with a needle and remove the air;
- wet pasting. This is used when it is necessary to cover large areas. In such cases, the protective film is removed completely, after laying the front side of the canvas on the floor. Then we moisten the adhesive layer with a soapy liquid using a spray bottle and apply the canvas to the furniture. Due to moisture, the canvas can move along the surface. You can use such furniture after 10–12 hours.
How to glue correctly
First of all, you should ensure that you have the necessary tools.
For convenient work you will need:
A utility knife; in extreme cases, you can use scissors
Pencil
Centimeter or tape measure
A scrap of clean cloth
Sandpaper
Spray bottle or damp cloth
Alcohol or other degreaser
Preparation for gluing
First of all, the film must be purchased with a reserve.
Before proceeding with the actual pasting you need to:
- Measure the area of the surface to be pasted.
- Mark the approximate layout on the back film.
- Wipe the surface from dust and wash with detergent.
If the surface is varnished, you can prime it for better adhesion.
Surface pasting
Step-by-step instructions for covering a surface with film:
- Spray the surface with a spray bottle or wipe with a damp cloth. Thanks to this action, the film will slide more easily over the surface and can be adjusted.
- Carefully align the film and cut it to size, trying to make as even cuts as possible. To do this, you can use a stationery knife with a sharp blade.
Rounded corners can be easily covered by simply using a hairdryer. By slightly warming the film with hot air, it will be easier to stretch it onto a curved surface. It will stretch and smooth out easily.
If any extra edges suddenly appear, you just need to trim them using a utility blade or scissors.
Pasting difficult places
In some cases problems may arise.
For example, when pasting:
- Table legs . Carefully wrap the sheet of film around the table leg. Next, note where the edges of the film meet. You need to draw a mark on the back of the film with a pencil so you know where to cut. Now you can cut a piece of film as wide as needed to cover the table leg without overlaps or gaps at the seams.
- Drawer . You will need to remove the handles from the front of the drawer. Next, you need to wrap the film around the covering area, and mark on the mesh the places where there will be holes for attaching the handle.
- Large flat surface . Some surfaces are longer than the length of a roll of film. In this case, you need to cover the surface with strips cut to length.
Decoration examples
Reviving furniture with your own hands and turning it from junk into a modern work of art that will harmoniously fit into the interior is the dream of any housewife. Let's present a master class in furniture decor. It will provide the basics of decoupage with aging elements for beginners.
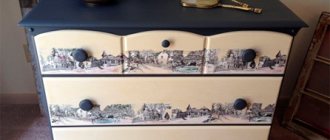
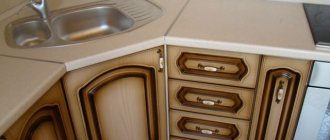
- Decoupage of an old chest of drawers. This master class presents the technology of reviving a chest of drawers that has been in the house for a long time and is already obsolete. First, apply white paint to the prepared and cleaned surface of the chest of drawers using a roller. While it dries, cut out flower appliqués from the remaining wallpaper. Then we use sandpaper to go over the surface of the chest of drawers. Then we glue the appliqués using PVA glue. After drying, cover the areas with applications with PVA glue. This chest of drawers is suitable for a vintage style interior;
- Master class for beginners - decoupage of a chair in Provence style. Begin work by removing varnish or paint using sandpaper. Then it is treated with coarse sandpaper, gradually reducing the abrasiveness, until a perfectly smooth surface is achieved. Then we cover the chair with white acrylic paint. After complete drying, coat with paint of a darker shade. We select applications for decoupage in Provence style. Those places where they will subsequently be cleaned with sandpaper are treated with wax. We paste the appliqués in pre-designated places. Apply curls with paint of the appropriate color, adhering to the chosen style. We go through the places where the wax was applied with sandpaper, and cover everything with a finishing layer of varnish.
Let's sum it up
This simple method can bring any furniture back to life. The decoupage process itself is simple, and the result will make the furniture original and expensive. And the remains of wallpaper can be used rationally. And to make the furniture a work of art, it is additionally processed with interesting effects, such as craquelure, patination, abraded effect, gold leaf and tinting.
Recommended Posts
Wall shelves for TV and equipment
DIY curtains with eyelets
Design project for a small dressing room
How to design a niche in the wall
Sliding mirror doors for dressing room
White wallpaper with a black pattern in the interior
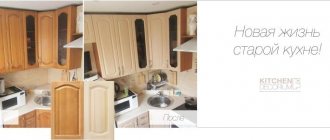
Simple decoupage from wallpaper: decorating old furniture
A master class on decoupage techniques can easily be found on sites with similar topics. The decoration of wooden cabinets, tables, stools, chairs and even the floor is described in detail and filmed.
What you need to turn an old piece of furniture into a work of art:
- Sandpaper with a rough abrasive surface;
- A piece of wallpaper;
- Old furniture;
- PVA glue;
- Alcohol;
- Primer;
- Water;
- Paint for wood.
To get into the decorative scheme using the decoupage technique, below is an algorithm using the example of decorating the top shelf of an old chest of drawers.
The decoupage process is as follows:
- First you need to sand the surface that you intend to decorate with sandpaper, removing the entire top layer. Particular attention should be paid to furniture with a varnished surface. The varnish must be removed completely without leaving any gloss. Otherwise, the wallpaper may not stick to the surface.
- Then, using alcohol and a napkin, degrease the entire working surface of the shelf;
- The next step is to apply a coat of primer and paint;
- Next, you need to prepare a piece of wallpaper: place the wallpaper in water for better attachment to the work surface. Place the soaked wallpaper on a paper napkin.
- Apply glue to the surface of the chest of drawers and to a piece of wallpaper without removing it from the napkin.
- Next, carefully place the wallpaper with glue on the surface of the shelf and only after that, remove the napkin, being careful not to tear the piece of wallpaper;
- Remove excess glue with the same napkin or dry cloth;
- The final stage is the application of paint or furniture varnish, which is not necessary, but furniture varnish will give the chest of drawers and the picture on it a finished look.
DIY decoupage: vinyl wallpaper as a three-dimensional pattern
Vinyl wallpaper with three-dimensional ornaments and patterns will help to add an unusual decor to furniture. The remaining piece of wallpaper should not be thrown away, because it will help when decorating old furniture and interior items. The result will help turn ordinary cabinet doors into an element of style.
In addition to the basic items for decoupage, you will need spray paint with a metallic effect, such as gold, copper or silver.
Having prepared the cabinet doors, you need to place a piece of wallpaper on them, pre-coated with glue. At the same time, there is no need to soak it in water, as is the case with a chest of drawers and paper wallpaper. It is enough to thoroughly coat the desired side with glue, as with normal gluing during repairs, and leave a piece of wallpaper with the glue for 15-20 minutes so that the wallpaper absorbs more glue. To prevent the glue from drying out during this time, simply fold the wallpaper in half.
The next step is applying wallpaper to the cabinet doors. The technique is the same as when gluing wallpaper on a wall. Carefully remove all bubbles without damaging the pattern and straighten the wallpaper on the surface. Before spraying paint, it is better to wait some time for the glue to dry to prevent the material from getting too wet. After applying the paint, it will be enough to wait until the paint dries. There is no need to apply furniture varnish. After all, metallic paint will give the desired gloss and shine to the updated doors.
Decor of the facade, side walls and doors
You can wallpaper almost any surface of a closet, cabinet or chest of drawers. Most often, cabinet doors and drawer fronts are covered as the most important element of furniture, which is the center of attention. But you can do the opposite - wallpaper everything except drawers and doors.
Color and stylistic solutions may also vary. You can use the same wallpaper on all surfaces to be pasted, you can alternate different ones, or decorate using the patchwork technique, that is, paste them over with multi-colored squares. It is absolutely not necessary that the wallpaper on the furniture matches the wallpaper on the wall. Feel free to experiment with contrast, for example, for a room with pastel wallpaper, make a closet with bright colorful doors.
Decorative decoupage with wallpaper: master class
A decorative and beautiful look can be given not only to the closet. By choosing several patterns from one piece of wallpaper, you can decorate kitchen wooden stools. The technique is the same for all furniture.
You will need:
- Several cut-out wallpaper fragments;
- 4 wooden kitchen stools;
- PVA glue;
- Sandpaper;
- Water;
- Furniture glue;
- Alcohol;
- Paper towels;
- Textile;
- Primer and paint;
Sand the stools, removing excess paint and surface unevenness. Apply a coat of primer and paint. Soak the cut out wallpaper fragments in water. Apply glue to stools and wallpaper. Place the wallpaper fragments in the desired place on the stool, remove excess glue and reapply the glue in a thin layer for stronger adhesion. After the glue has dried, you can apply varnish or use a large-pore sponge to spread a little paint around the design.
You can complete the kitchen ensemble by decorating the doors of kitchen cabinets, window sills or countertops using the same technique and style.
Children's wallpaper: decor in decoupage of a toy box
When a baby arrives in the house, the apartment gradually becomes overgrown with many toys. And these are not only cute soft bear cubs and bunnies. These are construction kits, small parts, cars and a lot of little things that often fall under your feet, causing a lot of trouble. Nowadays there are many different plastic containers for storing small toys.
But making such a container with your own hands, and even together with your baby, is a useful and educational activity. Having a wooden box, adapting it as a place to store toys is not a difficult task. And decorating it, attracting a child, is a fascinating procedure.
What you will need:
- Wooden box with removable lid;
- PVA glue;
- Children's wallpaper;
- Water;
- Furniture glue;
- Sandpaper;
The process is similar to any decoration using decoupage technique. Prepare the box for gluing pictures: sand 4 sides of the box and the lid. Cut out pictures from the wallpaper - these can be heroes of fairy tales or cartoons that the baby likes. Or just bright flowers. Wet the cut out fragments with water and place them on a paper napkin to absorb the moisture. Apply PVA glue to the box, lid and wallpaper. Place the pictures in the right places, remove excess glue with a napkin or cloth. Then apply a thin layer of glue again. The box is ready. For gloss, you can varnish the box, although this procedure is not at all necessary.
Beautiful decoupage of furniture with wallpaper (video)
The decoupage technique is a simple task at first glance. Give the interior an updated look and turn the room or kitchen into a room in the same style, perhaps with the help of simple tools and a few pieces of wallpaper. The creative process will give you many pleasantly spent hours without extra costs. There are no restrictions in the decoupage technique. You can decorate using old newspapers, paper napkins or any paper material suitable for working using the decoupage technique. It is enough to spend a little time and the result will exceed all expectations.
Decoupage furniture with wallpaper
If there is wallpaper left after the renovation, you can use it to decorate furniture with your own hands. The decoupage technique involves gluing paper or other fragments with a pattern onto furniture and then covering it with varnish.
Decor for the back wall of shelving
A great way to decorate with wallpaper is to cover the back wall of open cabinets and shelving. Manufacturers of modern furniture almost never pay due attention to decorating interior surfaces. Agree, against such a background any souvenirs or dishes will seem festive and bright, and the furniture itself will sparkle with new colors. In this case, it is better to play with contrast and use wallpaper that differs from those with which the walls are covered. It is advisable to use wallpaper with patterns and patterns, especially for furniture with a light facade. By the way, you can take wallpaper that covers the walls in other rooms; this technique will help connect different rooms.
If the rack is divided into square or rectangular sections, then each can be covered with different wallpaper, again creating an analogue of patchwork.
Types of decoupage
Decoupage can be done in different ways. Depending on this, different effects and different styles are obtained.
- Classic - the surface of the furniture (entire or individual areas) is covered with paper, fabric, napkins, wallpaper. The top of the composition is varnished.
- Reverse - used on transparent glass. In this case, the fragment with the pattern is smeared with glue on the front side and glued to the glass.
- Artistic - decoupage acts as part of the composition; the design is glued to a surface that has already been painted or otherwise decorated.
- Decopatch - completely covering furniture with various trimmings and scraps of colored paper.
- Volumetric - in this case, a relief decor is created. Particularly suitable for the Baroque style; volumetric repetition of the wallpaper pattern on furniture is also interesting.
Technique
The technique of gluing fragments of wallpaper onto furniture is practically no different from decoupage with other materials. One of the few differences is that you need to use special glue. Regular PVA is not suitable for wallpaper, as it is made of thick paper.
For beginners, it will be easy to decorate, for example, a table or a cabinet door, if you completely cover it with wallpaper. Watch the video master class, which shows how you can update your closet with your own hands.
Surface preparation
In order for the surface to be smooth and the design and varnish to adhere well, you need to prepare it. For this you will need
- filler
- putty,
- sandpaper: medium and fine,
- primer.
Surface preparation procedure.
- Before decoupaging wallpaper, you need to clean and wipe the surface.
- Next, fill the cracks. For small ones, filler is used, for large ones, putty is used.
- After drying, level the surface of the furniture with medium-grain sandpaper, and then bring it smooth with fine sandpaper.
- Remove dust and cover the surface with primer or paint if you need to change its color. Acrylic paint will do.
If the surface is varnished, then it is better to remove the varnish, otherwise the acrylic paint may not adhere well, pay attention to how this is done in the master class in the video above. You can remove the varnish with sandpaper. If you do not want to remove the varnish, thoroughly degrease the surface and use special glue and paint. Glass surfaces are also degreased by wiping with alcohol.
Wallpapering
The simplest option is to paste wallpaper onto the entire surface, for example, a table. To do this, first try on the wallpaper, then cut off the required part, leaving 5-7 cm in reserve on all sides. Then glue is applied to the paper and the piece of furniture itself and left to soak for 5 minutes. Then the wallpaper is applied to the work surface with one side and smoothed with a roller from the middle to the edges. After drying, remove excess and sand the edges with sandpaper. Finally, the product is coated with acrylic varnish.
If cut out fragments are used, they are glued in exactly the same way, and then brushed with glue along the edge.
Varnish coating
After the glue has completely dried, the product is coated with varnish, usually in two layers. The second layer is applied when the first one is completely dry. This can be either regular acrylic varnish or wood varnish. For items that will be exposed to moisture, it is advisable to use yacht varnish.
Preparation
Before you start decorating furniture, you need to prepare the surface of the product. Depending on the type of jewelry, preparation differs. Most often, this stage requires:
- putty for leveling surfaces;
- primer for filling gaps and cracks;
- various dyes to update the color of furniture;
- finishing varnish. It is used to protect decorative furniture elements from external influences and extend their service life;
- special pastes to make the surface polished.
Also for preparation you need sandpaper and decorative brushes. In addition, plastic PVC plugs for furniture will help hide surface imperfections. A round plug can hide a small dent, and it will also decorate the product. Their main task is to protect the fasteners of interior items. Once the surface is ready, you can start decorating the furniture.
Self-adhesive wallpaper for furniture
Adhesive, or self-adhesive, wallpaper for furniture allows you to quickly update your interior with your own hands. They are produced in the form of a film that is easy to glue and have two layers: a top, decorative one made of PVC, polyester or polypropylene, and a bottom, paper coated with glue.
Adhesive wallpaper is used for decoration in the same way as regular wallpaper, only without the use of glue. But there are several nuances:
- they are suitable only for smooth surfaces - any unevenness and flaws will only be emphasized,
- The film on furniture doors may peel off.
There are adhesive wallpapers in a variety of colors, imitation wood and metal. There is calendered film - low plasticity, and cast film - soft and flexible. For decorating actively used surfaces, it is better to choose special wear-resistant options.
How to stick self-adhesive film? The surface is prepared in the same way as for decoupage with ordinary wallpaper. Measure and cut out the required sheets of wallpaper with allowances of 2-3 cm on all sides, remove the protective film. Apply the film to the surface, pulling slightly. To cover sharp corners, the film is heated with a hairdryer - this makes it more flexible.
There is also a wet gluing method. Remove the protective layer from the film, place it face down and moisten it with soapy water. It will allow you to easily move the decorative material along the surface. Then the wallpaper is glued into place, pressed, and smoothed. The glue dries in 10-20 hours.
Add-ons
To get interesting effects, for example, to artificially age furniture, after decoupage you can use one of the following techniques:
- Craquelure is the effect of cracked paint. It uses a special varnish, which is applied alternately with layers of acrylic paint. Due to different drying times, the coating cracks, which creates an antique effect.
- Patina also helps to “age” furniture. This is the darkening of certain areas, usually edges or metal parts.
- Scuffs - artificial abrasions can be created by applying wax to part of the surface, paint on top, and then sanding.
- Potal - decoration with gold, silver or other metallic paint. Use it carefully - too much gilding will look tacky.
- Tinting is adding a tint by adding a small amount of paint or glitter to the varnish.
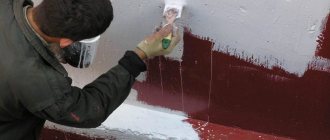
Antique restoration
This method is more labor-intensive than the one described above. To decorate an old antique cabinet, only natural wooden materials are suitable. There is no need to completely disassemble the cabinet. But you will have to move it outside.
Attention. The aging process of wood is accompanied by a large amount of waste wood shavings and dust.
Rust must be removed from metal parts. Large wood defects are covered with putty
Interior design, repair and decoration with your own hands.
Decoupage furniture with wallpaper
The art of decoupage was known back in the Middle Ages. Thus, back in the early 15th century, pieces of furniture and various household items were decorated with cut-out pictures.
The art of decoupage reached a particular flowering in Venice, where many furniture manufacturers actively used this technique to decorate furniture sets.
Today, decoupage has become an extremely popular type of needlework, because many craftsmen have paid attention to the simple technique of gluing pictures, which helps to give a completely different look and often gives new life to outdated pieces of furniture.
Old furniture can be given a second life by covering it with leftover wallpaper.
This way you can tidy up old or worn-out furniture. Therefore, each of us is able to decoupage furniture with our own hands - fortunately, the technique is not particularly difficult.
The art of decoupage can give furniture a completely new look
So, you can glue wallpaper from leftovers to various furniture surfaces. The main thing is to be guided by your own taste preferences in choosing materials, and also to do the work carefully and accurately.
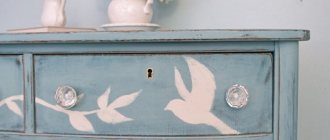
The headboard of the bed is decorated with wallpaper
Materials for decoupage
Many types of materials are suitable for decorating furniture using the decoupage technique, including the following:
- Wallpaper
- Textile
- Napkins
- Lucky
- Paints
- Chipboard
For beginning craftsmen, it would be best to try their hand at the technique of decoupaging furniture with wallpaper. This is quite easy to do, and is also affordable, because pieces of old wallpaper left over from renovations can be found in almost every home.
Decoupage furniture with small pieces of wallpaper
Preparing for work
Before gluing pieces of wallpaper onto furniture, it is recommended to thoroughly clean the selected surface from dirt, stains, as well as scratches and cracks.
It is best to pre-treat the wood with sandpaper to achieve maximum adhesion of the wallpaper to the surface.
Stains that are difficult to remove can be painted over with acrylic paint of the desired tone, and deep scratches can be carefully repaired using wood putty.
Before starting work, the surface of the furniture needs to be prepared
Types of decoupage wallpaper
There are several types of decoupage with which you can successfully decorate pieces of furniture:
- The patchwork decoupage technique involves gluing separate pieces of several types of wallpaper with different patterns. In many ways, this type of decoupage is similar to the patchwork technique.
Patchwork furniture decoupage technique
- Solid decoupage involves applying large pieces of wallpaper to pieces of furniture. This will allow you to decorate cabinet doors or other surfaces in a single color scheme and style.
Finishing furniture with large pieces of wallpaper
It will be great if the wallpaper for decoupage is chosen to match the tone of the wall decoration. This will help create a touch of harmony in the interior design. A tastefully decorated wardrobe or bedside table using decoupage technique will add an elegant twist to the design of the room.
Wallpaper for finishing the cabinet is matched to the tone of the wall decoration
- Interior decoupage involves wallpapering the inside surfaces of cabinets, cupboards, bedside tables, racks and shelves. This decoupage method helps transform the appearance of open furniture beyond recognition, making it more original and bringing an atmosphere of comfort.
Decoupage wallpaper on the inner surface
The only drawback of this type of decoupage is that the work must be done extremely carefully and accurately, but the result will definitely please you.
The inner surface of the cabinet is covered with wallpaper
- Decoupage of large surfaces is also one type of furniture decor. You can decorate the doors of an old cabinet with solid wallpaper, giving it a completely new look. In addition, this type of decor will help add a characteristic touch to a stylish interior.
Decoupage of a wardrobe - compartment with wide sheets of wallpaper
We produce pasting
Collecting the necessary materials
Before you start work, you need to take care of the tools and material. Here's what we'll need:
- sandpaper (sandpaper), an appropriate attachment for a drill or grinder, to prepare the surface for pasting;
- in some cases a hair dryer, but not necessarily;
- measuring instruments - ruler, tape measure, corner;
- tools for markings and markings - pencil, pen, marker;
- cutting tool - knife, scissors;
- primer and wood putty for preparatory work;
- tools for applying compounds - roller, brush, spatula;
- rags for smoothing and removing glue;
- PVA glue.
Using a grinder to sand surfaces
As you can see, the list is quite impressive. If you don't have some materials, buy them. By the way, if the fittings of your furniture are worn out, then you can change them too. For example, a handle, a new handle for a cabinet will not cost much, but will add color to your newly made wallpapered furniture.
Preparatory work
Before wallpapering furniture, you need to take care of the surface on which you will apply the material. We need to make it suitable for such work, so we will perform the following manipulations:
Typical domestic kitchen cabinet after decoration
- To make it easier to work with a cabinet or bedside table, you need to disassemble it and remove all the fittings from it.
- The next step is to sand the decorative surface and remove the entire layer of varnish from it. This can be done using sandpaper, which is very labor-intensive; it will be easier to put the appropriate attachment on a drill, grinder or screwdriver and go over the varnish.
You can also remove the varnish using a hair dryer. To do this, the surface is heated and the applied composition is scraped off with a spatula. But even in this case, you can’t do without sanding.
- If your furniture is made of solid wood and has not been treated with anything, then it is recommended to go over it with sandpaper to create some roughness.
- In the next step, we remove all dust from the skin using a damp cloth. Give the furniture some time to dry.
- After examining the dried surface for defects, we decide whether it needs to be puttied. If the cracks and grooves are not so large, and the wallpaper for pasting is embossed, you don’t have to do this. If the defects are deep, you will have to level the surface with putty, maybe even in several layers.
- As you probably already guessed, after the putty has dried, the putty areas must be treated and leveled with the general surface. This is also done with sandpaper.
- Now the surface of the cabinet is almost ready, all that remains is to prime it for better adhesion to the wallpaper.
Carrying out the preparatory work will ensure 80% of success, even if you cannot hang the wallpaper beautifully the first time, you will already have a basis for further experiments.
Pasting
Pasting furniture also takes place in several stages:
Furniture wallpapering work
- First of all, it’s worth making blanks from leftover wallpaper. To do this, the item is carefully measured and the dimensions are transferred to the wallpaper. Some patterns are cut out in accordance with the size of the closet or bedside table.
- Next, the prepared surfaces are coated with glue. You can use wallpaper glue, but it is better to use construction PVA, it will glue the materials together better. You need to carefully apply the cut pieces to the surface of the cabinet, trying to immediately level the canvas. This is not so difficult to do, since the patterns are small in size.
- It is recommended to stock up on a large number of dry rags or rags to smooth the sheets and remove any remaining glue from them. A special pressure roller will help to press the pieces more tightly.
- After wallpapering a cabinet or other furniture, you need to give the glue some time to dry, and only then screw on the fittings. Usually a few hours are enough, but in the case of large items, it may take a day.
As with standard wallpapering, try not to create drafts in the room; there is some chance that the sheets will not stick well.