Manufacturing Features
Firstly, you need to remember about product levels, of which there are 3:
- The background is the basis of the entire product
- The intermediate layer holds the background and top together.
- The top layer is the one that is visible best.
It is imperative to fix the finished product with varnish, otherwise all efforts may be in vain. The creation may fade, be damaged by water, or fall apart.
In addition, in the photo, voluminous decoupage coated with varnish looks much better.
Mixtures
To make drawings using this technique, you can choose ready-made compositions or dry mixtures that need to be diluted with water to the desired consistency. It is more convenient to work with ready-made materials, but for beginners it is better to use dry mixtures. If for any reason the work has to be postponed indefinitely, the dry mixture will not deteriorate and will not lose its properties. As needed, you can prepare the required amount and use it immediately.
For certain types of work it is better to choose suitable materials. Each of them has its own special properties that allow you to realize your intended sketch. They are distinguished by good performance properties and environmental friendliness.
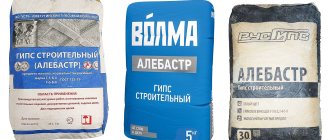
Gypsum
Contains natural ingredients. It is vapor permeable and absorbs moisture – therefore it is used only for interior work.
A protective paint layer is needed on top. Great for creating bas-reliefs and applying stenciled designs.
Putty
Quick-drying, durable material with virtually no shrinkage. It is easy to apply and convenient to create three-dimensional drawings. Afterwards, a protective coating is required.
Acrylic putty
This material differs more favorably from other types of putty in its ease of use and performance properties. Therefore, it is widespread and preferred by builders. There is also a downside - it dries faster, which makes it difficult for beginners, especially when creating complex relief compositions, where some details may need to be adjusted during the creation process.
Liquid glass
This material, used for waterproofing work, has also found application for decorative purposes. Liquid glass is included in the base of silicate putty, the surface of which is very durable, water-repellent, and resistant to fungus and mold. An excellent option in rooms with high humidity - bathrooms, kitchens, saunas, swimming pools, etc.
Materials for work
First you need to collect a set of items necessary to start creativity:
- Napkins with a pattern: no need to come up with a plot, calculate proportions, or think about the color scheme.
- Printed drawing, photograph. A huge number of options for every taste will allow you to create something unique and at the same time close and dear.
- Beads, buttons. To add volume, you can take voluminous objects, an incredible fact! Original and accessible, just what you need.
- Appliques and bows, ribbons provide wide scope for imagination. An opportunity to give a “second life” to items that have become boring or become unnecessary.
- Thick paper with even more vibrant compositions.
- Glue. Probably the most important ingredient for a successful craft - you can’t do without it. PVA, pencil, “glue-moment” - any one you like will do.
- Everything you can use to color: pencils, paints, brushes for them, markers. Brightness is the motto of volumetric decoupage!
- Water-based varnish for fixing or even icing (not the kind that goes on buns).
- Cutting objects: sharp knife and scissors.
- Tweezers to improve the accuracy of manipulations, your fingers will get dirty much less.
- A special surface for cutting details of a future image. This could be, for example, a rug.
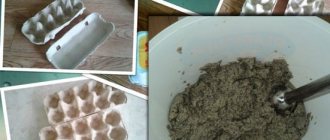
How to make gypsum mortar
Before preparing the solution, you should consider the volume of the future product and the capacity of the container for dilution. If the initial solution for the sculpture is insufficient, it will have to be made again. Therefore, an excess of gypsum mortar is better than a lack of it. Having chosen a container for preparation, pour gypsum powder into it, and then add water. The mixture is thoroughly stirred and, if necessary, either water or gypsum is added to it.
When pouring the gypsum mixture into molds, you should not waste time, since the gypsum hardens quickly and it is impossible to remove it from the container after setting.
Please note that frequent inhalation of gypsum powder in significant quantities can be harmful to health.
First steps
Despite the apparent complexity, volumetric decoupage is also suitable for beginners on their creative path. You can easily start by decoupaging the postcard.
You will need to take:
- Sheet of cardboard;
- Several identical images;
- Glue or double-sided tape;
- Scissors;
Step by step:
- Step 1 – fold the cardboard in half.
- Step 2 – cut out identical elements, glue them together and glue them to the cardboard.
- Step 3 – add other decorative elements of your choice (beads, ribbons, etc.), color if desired.
- Secure the product with varnish.
- The postcard is ready!
General information
First of all, it must be said that this work is not for the lazy, and can take more than one day. However, the result of the work will be a unique decor, the price of which consists only of the cost of the putty.
You shouldn’t tackle a complex picture right away. To “get your hands on”, just make a small panel of putty with your own hands with the simplest pattern. In this case, you don’t have to do any grinding, which means you don’t have to breathe in dust.
A spatula will not be needed in all cases, since, for example, you can make flower petals with your own hands. Ideally, of course, it is better to wear gloves on your hands, however, in this case you can feel the texture much worse. Therefore, you should also be prepared for dry skin and a long washing process.
A more complex version of the painting made with putty
But you can leave a variety of shapes on the wall with your fingers. For example, you can create a very interesting outline that will pretend to be an abstraction or a Roman fresco.
We will also further consider the option of making paintings using a syringe. In this case, you won't need a spatula at all.
Preparing the base
Complicating the work
Finding video master classes on volumetric decoupage is not so difficult; besides, suitable offline master classes are held in almost every city. Therefore, if someone prefers to master decoupage under the guidance of a guru or in a fun company, then there will be no problems!
After getting acquainted with the basics, it’s time to move on to the next stage - working with items that can be proudly shown to guests and put up for sale.
For example, volumetric decoupage of plates is an excellent choice for continuing to get acquainted with the technique.
In this case you will need:
- Transparent glass plate;
- Detergent and alcohol (alcohol wipes);
- Rice paper;
- Scissors;
- Acrylic paint;
- An image that will later be three-dimensional;
- Glue;
- A simple pencil.
How can you create a masterpiece out of all this? The recipe won't take long to arrive!
- Wash the plate with detergent, dry it and wipe the edges with alcohol to degrease.
- Cut out the design and glue it to the bottom of the back of the plate, face up.
- After the glue has dried, you need to paint the picture with white acrylic paint, it will be much brighter and more interesting.
- Creating a border on a plate. On the back of the dish you need to apply acrylic paint of the desired color and create a pattern. You must first make sure that the edges are sufficiently degreased and have not been stained during previous manipulations!
- Attach it to rice paper, trace the outline with a pencil and cut out the plate along the outline. Glue to the back of the product.
- Paint with paint of the desired color after complete drying, making sure it is securely fixed.
- Once the paint has dried, you can add additional designs to the back of the plate.
- Secure the product with varnish.
- The creation is ready!
LiveInternetLiveInternet
1. The model is impregnated with a hot saturated solution of borax, allowing it to dry, it is impregnated a second time, and, after drying again, it is impregnated twice with a hot solution of barium chloride, drying after each impregnation. The treated model is covered with a hot aqueous solution of soap, and washed to remove salts
2. Gypsum is dissolved in water containing 4-8 parts by weight of glue and 0.4-0.5 parts of zinc sulfate per 100 parts of gypsum
3. When mixing gypsum, add 2 parts gelatin and one part alum to 100 parts water.
4. Add 50% silicic acid to the gypsum. Then dried and soaked in a solution of barium chloride.
5. Sodium methyl siliconate is added to the gypsum in an amount of up to half a percent of the weight of the air gypsum.
6. The model is sealed with lime milk, or soaked in heated drying oil, and 5-10% rosin is introduced into it. The model is coated with drying oil twice, then dried and coated with a thin layer of oil varnish (once or twice)
7. Method used in America: 6 parts of gypsum are mixed with 1 part of slaked lime and this mixture is then manipulated as with ordinary gypsum. Objects made from such a mixture, after drying well, are impregnated with a solution of zinc sulfate
8. Solid gypsum mass according to Keating . Gypsum is given greater hardness and strength if it is placed in a borax solution. To do this, dissolve 5 borax in 45 water, put pieces of gypsum into this solution so that they are completely covered with it and leave it until they are completely saturated with the solution, after which they are subjected to strong heating for 6 hours and after cooling turn into powder. An even better strength is obtained if you dissolve 4 cream of tartar and 4 borax in 72 water by heating. For dissolution proceed as stated above.
9. Solid gypsum mass according to Winclair Gypsum (alabaster) is dried by subjecting it to the ordinary heat of a Russian oven, which is required for baking bread, while for a piece that is not thicker than 30 cm, 3 hours is enough, after which it is cooled and soaked in water for 30 seconds, expose it to air for a few more seconds and soak again for 2 seconds in water. In conclusion, they expose it to the air for several days, which makes the gypsum as hard as marble. 10. Lime gypsum . To give gypsum hardness using lime, carefully slake the fatty lime so that it disintegrates into a fine powder, and mix the extracted powder in an amount of 10% of the weight of the gypsum with this latter. To obtain a close mixture, the powders are best mixed in a rotating barrel, since uneven distribution of the mass would cause unevenness in the cast mass. Limestone gypsum must be carefully protected from access to air so that the lime cannot attract carbon monoxide. After several months, objects cast from limestone gypsum, by attracting carbon dioxide anhydride from the air, become harder than things cast from ordinary gypsum.
11. Alum gypsum. To make alum gypsum, alabaster is finely ground and closely mixed in a rotating barrel with 1/12 of its weight in alum, crushed into the finest powder. The mixture is then lightly fried in shallow pans, resulting in a slightly yellow mass that is easily reduced back to powder. When grinding alum gypsum with water, a paste is obtained that hardens only after 40-60 minutes. A weakly burned mass hardens faster than a more strongly burned mass. A good alum-gypsum mass can also be prepared from ordinary burnt gypsum, if instead of plain water you add to it water in which equal parts of alum and ammonia are dissolved
12. Potassium sulfate gypsum can only be prepared from gypsum free of lime carbonate. To free it from it, when mixing the gypsum mass with potassium sulfate, use not pure water, but acidified with sulfuric acid. Fine powder of potassium sulfate and gypsum flour are mixed, as with lime gypsum, in a rotating barrel. Objects cast from potassium sulfate gypsum are slightly translucent and have a special gloss.
13. Zinc sulfate gypsum is obtained as follows: in the water used for grinding gypsum, zinc sulfate (zinc sulfate) is dissolved and the gypsum is treated with this solution.
14. The brown-gypsum mass is obtained as follows: first prepare a cold saturated solution of borax, dissolving as much borax in boiling water as can be dissolved. Then they leave this solution to stand for 48 hours and drain the solution from the crystallized borax. Place burnt pieces of gypsum in this solution, leave them in it all day and, after drying, burn them again. At the same time, they are heated to extreme heat in order to expel all the crystallization water from the borax. After this, grind pieces of gypsum and grind them with water, in which 10 sodium or potassium carbonate is dissolved per 100 water, and then cast into molds. The brown gypsum mass hardens very slowly, but after a while it becomes so hard that it can be ground and polished like natural limestone.
15. Solid gypsum mass according to Yulia . 6 gypsum is mixed well with 1 finely sifted freshly slaked lime and this mixture is processed like ordinary gypsum. After the mass has dried well, the finished object is impregnated with a solution of iron or zinc sulfate, the base of which is precipitated with lime and gives an insoluble precipitate. The lime contained between the pores of the gypsum decomposes the vitriol, forming two insoluble bodies, namely calcium sulphide salt and metal oxides, which completely fill the pores of the object. When using zinc sulfate, the mass remains white. With iron sulfate, it first acquires a greenish color, and upon drying it acquires the characteristic color of iron oxide. With iron the hardest mass is obtained; its resistance is 20 times greater than that of ordinary gypsum. To achieve maximum hardness and strength, you need to mix the lime-gypsum mixture with the required amount of water as quickly as possible. Before hardening with vitriol, the mass must be well dried so that the solution can easily saturate it. The solution should be saturated, and the object should be immersed in it for no longer than two hours. The plaster made in this way can no longer be scratched with a fingernail. If the immersion in the solution lasted too long, then the plaster becomes crumbly, but if after the first immersion it is dry, then touching it with water does not cause any harm to it. If you add too much lime, it happens that the surface becomes so compacted that it does not absorb either water or oil. The surface, however, is made so hard that it can be polished with glass sandpaper, like marble, but the disadvantage is that the hard layer is no more than 2 mm thick, which is why the mass does not have sufficient compression resistance. The proportions of lime and gypsum can vary widely, but Yule achieved the best results with a ratio of 1 to 6. Gypsum objects hardened with iron sulfate have a rusty-brown color, but if you soak them in boiled linseed oil, which has become brown from heating, they turn red. tree. If you coat them with copal varnish, they take on a very beautiful appearance.
16. Solid gypsum mass according to Heinemann. Objects prepared using this method from raw gypsum stone are first heated to 100-120 °C to remove part of its water of crystallization. Then the objects are placed in a concentrated solution of calcium chloride and, after saturation, in a hot concentrated solution of magnesium sulfate. This releases calcium sulfide salt inside the gypsum, which replaces the crystallization water removed during the first heating, and objects become denser, with greater resistance, while the resulting magnesium chloride is released by immersing objects in water. This treatment is followed by secondary heating, saturation in a solution of calcium chloride and precipitation with magnesium sulfate. This processing can be repeated several times. With this reheating, the temperature can be increased so much that it can eventually reach 400°C. After the objects are impregnated in the above way, they are treated alternately with glue and tannin solution, each time from 1 to 4 days, depending on the size of the objects, and then dried in a dryer with gradually decreasing heat. Instead of wood glue, you can use substances that, with dehydrated calcium sulfur salt, produce insoluble compounds in water, such as blood serum, liquid gluten, drying oils, etc. In the same way, you can combine glue with calcium sulfur salt with an alum solution. To make colored marble, a solution of calcium chloride is mixed with metal chlorides that, upon subsequent treatment with metal salts, give colored, insoluble precipitates instead of expelled water of crystallization. If, for example, a solution of calcium chloride was combined with ferric chloride, then by treatment with potassium chromate, a brown insoluble precipitate of iron chromate is obtained with the formation and release of potassium chromide. Further processing is otherwise similar to that described above
17. Solid gypsum mass according to Denstedt. A hot saturated barium solution has not yet been recommended for hardening gypsum castings, however, subject to certain precautions, a barium solution can be used and gives very satisfactory results. When using this solution, the main concern is to prevent the release of barium crystals during application of the solution. This is achieved by heating the objects to 60-80°C before soaking. This simultaneously ensures that the applied solution is pressed to a considerable depth by external air pressure. When cooled, barium crystals are then released inside the mass and do not protrude to the surface when dried, but remain inside and form insoluble compounds. Another difficulty is that you cannot use ordinary brushes or sponges to apply the solution, as they are instantly corroded by the caustic liquid. Therefore, brushes with glass threads are used. They are prepared by gluing threads into glass tubes with glue consisting of liquid glass and oyster shells. A number of thin brushes are connected in one wide glass tube and glued together with the same glue. To achieve greater hardness, either free silicic acid or metal salts are added to the gypsum, which form a reaction with barium such that, along with the insoluble barium salt, insoluble metal oxides or oxide hydrates are released. When using free silicic acid, it is mixed into the gypsum in a dusty state before molding. You can increase its amount to 50% without reducing the ability of the gypsum to harden. Cast and dried objects are heated to 60 - 70 °C and soaked in a hot barium solution. Instead of free silicic acid, you can also use glaze sand used in porcelain production, obtained from turning burnt quartz into powder. Under the influence of atmospheric carbon dioxide, barium combines with carbon dioxide hydrate into a solid mass, just as lime combines with sand. The metal salts mentioned above are mainly metal sulfates (zinc, cadmium, magnesium, copper, iron, aluminum, chromium, cobalt, nickel). Gypsum is dissolved with these salts, or cast objects are impregnated with solutions of these salts. After they are carefully dried and then heated to 60-70C, they are treated with a hot barium solution. Some of the above salts also cause coloring of objects. A completely uniform color can be achieved if lime is used instead of barium hydrate. In this case, the process is reversed. Burnt lime (up to 5%) is added to the gypsum before dissolution, or better yet, the gypsum is dissolved with milk of lime and the cast objects are soaked after drying with solutions of the above salts.
18. Solid gypsum mass according to Keating. Gypsum is given greater hardness and strength if it is placed in a borax solution. To do this, dissolve 5 borax in 45 water, put pieces of gypsum into this solution so that they are completely covered with it and leave it until they are completely saturated with the solution, after which they are subjected to strong heating for 6 hours and after cooling turn into powder. An even better strength is obtained if you dissolve 4 cream of tartar and 4 borax in 72 water by heating. When dissolving, proceed as stated above.
19. Solid gypsum mass according to Binkler. Gypsum (alabaster) is dried by subjecting it to the ordinary heat of a Russian oven, which is required for baking bread, while for a piece that is not thicker than 30 cm, 3 hours are enough, after which it is cooled, soaked in water for 30 seconds, and exposed for another a few seconds in the air and again wet for 2 seconds in water. Finally, it is exposed to air for several days, which makes the gypsum as hard as marble. Adding slag or hydraulic additives in large quantities to any gypsum makes the gypsum absolutely waterproof and frost-resistant. But in this case, a completely different material is obtained, which does not have the properties inherent in gypsum. If you want to achieve super-high strength from a model, for example, in order to correct the model with a cutter, then you will need to sift it through a fine sieve into dust.
Taken from here https://forum.guns.ru/forum/97/923436.html
Putty goes to work
It’s wonderful that the modern world provides so many opportunities for creativity. Volumetric decoupage with putty is proof of this: it doesn’t stick to walls alone, as they say!
Any drawing will become more expressive if you use this technique, it’s been tested.
- First you need to fix the first copy of the design to the surface.
- Next you need to apply a layer of putty. It is much easier to work with geometric shapes; floral patterns will require you to work on your painting skills.
- Paste a second copy of the design on top of the putty.
- Secure the product with varnish.
- Ready!
Bottles and vases can also be decorated. To do this, it is necessary to implement the following action plan:
- Wash with regular detergent, degrease the vase or bottle with alcohol, and dry.
- Apply several layers of white paint to the entire surface of the product, preferably 3.
- Apply a layer of putty.
- Wait until completely dry, apply a coat of paint of the chosen color.
- Cut out the design and glue it to the product, wait until it dries.
- If desired, paint with a different paint for greater volume.
- Strengthen the success with 2 layers of varnish.
- Success achieved!
For decoupage, acrylic primer and texture paste can be used.
Fabrics can also be used in this technique.
- First you need to create a background (white acrylic paint or a layer of primer), let it dry completely, apply the design with a brush, and let it dry too.
- Next: cover with 2 layers of varnish to fix it, cut a hole in the fabric for the existing pattern.
- Fix the fabric on any product and cover it with varnish.
Wonderful creativity! All the best!
What crafts can be made from plaster
In medicine and forensic science, the property of gypsum to quickly harden, maintaining the desired shape, is used. In addition, it is attractive due to its availability and low cost. The same properties of gypsum, in contrast to heavy cement, are very useful for making crafts for your home and garden yourself. This material makes beautiful vessels that can serve not only aesthetic functions, but also bring practical benefits, just like ordinary vases. Various leaves and other decorative ornaments are made from gypsum. However, the most widespread are plaster products in the form of mermaids, gnomes, dragons, mushrooms and other sculptures. Fashionable ideas for plaster crafts in the country came to our country from Europe, where they have been known for a long time.
Of course, it is possible to purchase such products in a store, but this will require significant financial costs. Homemade sculptures for a suburban area can be made on your own without significant financial investments and time. Gypsum is sold in every pharmacy, and its price is insignificant. To obtain the desired result, you only need to purchase molds for casting products.
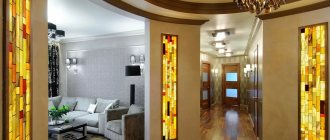
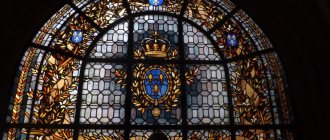
Photo of volumetric decoupage
Necessary tool
When you have decided on the material, you need to select the tool for the job. Let's look at the basic minimum set of a bas-relief master.
Spatula and trowel. This is the main tool for applying plaster mortar to large volumes and leveling the surface. A narrow spatula is convenient for mixing the material in small buckets and applying it to a trowel.
Where to buy: any hardware store.
Venetian trowel and dovetail spatula.
A palette knife is the main assistant in forming the contours and details of three-dimensional paintings. Using a palette knife, apply small portions of the plastic solution to the wall, trim the edges, trim off the excess. Initially, this tool was used in painting for mixing and applying oil paints, but it also came in handy in bas-relief when they began to be made from plaster rather than carved from solid stone.
Where to buy: shops for artists, in convenience stores in the hobby department, online stores (Aliexpress, for example)
Small spatulas - palette knives for decorative modeling and artistic wall decoration.
Stacks for cutting. They are used to remove excess completely or partially hardened mortar, to make a recess with neat edges and other various recesses. Such stacks are also used in pottery, when modeling from plasticine.
Double-sided stacks for modeling.
Additional tool. You may also find a wood chisel useful. Their working edge can be straight, beveled, or semicircular. Choose according to the situation what and where you need to trim. Using a chisel you can easily remove plaster and form relief surfaces.
I always have sandpaper on hand. For rough sanding I use sandpaper with grit P 80-100; To achieve perfect smoothness, I use abrasive size P 180 or 240.
Preparing walls and other surfaces
The type of coating determines how demanding Decorative putty plaster is in terms of the level of preparation of the walls. Imitation Venetian finishing has a thickness of no more than 2 mm, so its requirements are the highest. Venetian wall:
- impeccably leveled (remnants of the previous coating must be removed, cracks and potholes must be repaired, greasy, moldy and other dirty stains, dust, etc. must be removed);
- primed with a composition corresponding to the base material;
- smoothed with sandpaper and cleaned of dust;
- dried.
For finishes with a pronounced relief texture, such as bark beetle or Versailles, the requirements are not so strict. Minor flaws are acceptable, which will be hidden under the volumetric coating.
The material from which the walls are made also dictates its conditions for preparation. For example, gas silicate blocks have a lot of open pores, which, without appropriate preparation, will instantly draw out all the moisture from the putty composition, and a high-quality coating will not work. The pores must be “sealed” by applying three layers of primer from a spray bottle, forming the most dense film possible.
Decorative plaster, master class
High-quality decorative plaster is the key to the success of the future interior. But high-quality plaster does not mean it was made by professionals; success can be achieved by doing it yourself. A conscientious approach is important here, don’t quit halfway, don’t be too lazy to redo it, if any part doesn’t work out, don’t rush. And then, guided by our master class, you will definitely be able to make good decorative plaster with your own hands using ordinary putty.
Decorative plaster with putty
Be sure to stock up on high-quality materials and tools, and you can start applying plaster.