Home » Building a house » Headings » Walls
Alexander Korovaev 08/02/2019
8113 Views
Every homeowner sooner or later faces renovations. And, as you know, it starts from the walls. The better they are prepared, the better the final result will be.
All further work depends on how competently all the internal surfaces of the house are plastered - the entire appearance of the room directly depends on this important stage of construction.
How to place beacons under plaster is the topic of this article. At first glance, there is nothing complicated here, but this is not entirely true - you cannot do without knowledge and practical skills developed by entire generations of professional plasterers.
Why is it necessary to display beacons?
The beacons form a flat plane, which in the future will be the plane of the plaster. These elements create a kind of reference level. The lighthouses themselves are made of steel or wooden slats. In most cases, galvanized steel slats are used.
The beacons are attached to the wall with a certain pitch (800 - 1300 mm), the distance should not exceed the length of the rule, otherwise the whole point of alignment with the beacons is lost. A solution is thrown between the slats, then it is usually supported on two adjacent beacons and pulled from the floor to the ceiling. The rule cuts off excess plaster, resulting in a smooth surface.
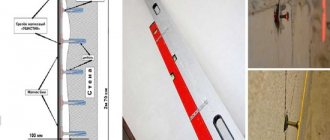
Checking the verticality of the walls
The first step is to understand what and how we will align. To do this, first check the verticality of the walls. Let's take a rule with a bubble level or a regular rule, and put a bubble level against it. We attach the rule to the wall in different places and set it in a vertical position. We look at the gaps between the wall and the rule. The main thing here is to understand the general picture of the wall, deviations from the vertical, what and how will need to be done.
Checking the verticality of the walls using the rule
Having checked the wall for verticality, you can draw a conclusion about it, what you will have to face and how to install beacons with your own hands.
Factors influencing the correct installation of beacons
- installing beacons is the most crucial moment, so it is important at this stage to avoid mistakes that will spoil the entire result
- the slats should not have defects or bends that would disrupt the level
- walls with small differences do not always need to use beacons; sometimes it is enough to perform local alignment of dents and depressions
- it is also necessary to take into account the thickness of the beacon; if the difference on the wall is less than the thickness of the beacon (10 mm), then plastering along the guides does not make sense, since the required solution consumption will be exceeded
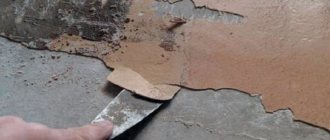
- The evenness of the installation of beacons can be affected by the preparation of the base. If there are traces of old mortar on the base, they will not allow you to install the slats evenly
Removing old mortar is one of the mandatory procedures before installing beacons.
Adjusting the apartment layout along the axes
If you want to achieve the ideal quality of plaster with the ideal geometry of the apartment, we recommend making adjustments to the layout of the apartment along the axes. We will talk about a comprehensive check of the design and correct placement of partitions. We recommend that you complete these works before performing the markup discussed above. In other words, make corrective markings for installing beacons throughout the entire living space.
First, a situational survey is done to determine the incorrect placement of the walls. The starting point in adjusting the walls and corners will be the outer wall; subsequently, you need to set the correct position of all internal partitions - perpendicular to the outer wall and parallel to each other. This is done using a control cord, along which the beacons will subsequently be mounted under the plaster.
What to make beacons for plaster from
For lighthouses, straight steel or wooden slats are usually used.
- wooden elements are rarely used, since when exposed to moisture from the solution, the wood can swell and deform
- Steel beacons are usually made of galvanized steel and have a T-shaped profile. There are also slats without galvanized coating. They rust faster, but it is important to understand that it is not recommended to leave any beacons inside the plaster
- gypsum beacons are rubbed from the plaster mixture, no auxiliary means are used - nothing needs to be removed from the wall
Sometimes you can come across the statement that galvanized beacons are better because they do not need to be removed from the plaster. In fact, this is a misconception. If you leave the beacon in the wall, you can accidentally hit it when drilling holes. Also, during the installation process, the galvanized layer may be damaged, these places will corrode and rust will appear on the surface of the plaster. Read more about mistakes when plastering work in the advice “Common mistakes when plastering walls.”
Useful tips
Professional plasterers share useful tips to help when installing guides before plastering work. The most relevant recommendations were the following:
- The primer must be allowed to saturate the surface well. This is done so that the beacons on the mortar stick better and the plaster does not fall off in the future.
- Although many people call for abandoning the installation of beacons, this should not be done. Firstly, they greatly facilitate the work of leveling walls when you need to cover a large area. Secondly, plastering work will be completed faster. Thirdly, the surface will be perfectly flat provided that the beacons are positioned correctly.
- Do not leave profiles or guides made of other materials in the wall after finishing work. Over time, they can make themselves known by stains appearing on wallpaper or decorative plaster. With plastic profiles everything is somewhat different. If they are made from toxic, cheap plastic, then over time they can release harmful substances into the air that adversely affect the health of people and animals.
- To save material, choose profiles of the smallest height, if the curvature of the walls allows it. For example, when processing surfaces in a new building made of blocks, it is permissible to do without beacons at all, while in an old brick house, where the walls are laid out crookedly and unevenly, beacons 10 mm or more in height will be needed.
To learn how to quickly and efficiently install beacons for plastering walls, see the following video.
Materials and tools
Before selecting a tool, you need to determine how to install the beacons. We list everything that may be required, but the number of materials and tools may vary depending on the installation method.
- slats for beacons will be required in any case (exception: rubbing of plaster beacons). If the room has a high ceiling, then you can make composite beacons from several parts. The easiest way to cut beacons is with metal scissors; if cutting is required, it is advisable to have this tool
- To install beacons you will need all the tools for plastering work: a trowel or spatula, usually clean containers for mixing the solution, you will also need a drill mixer
- if the self-tapping method of installation is used, then dowels and screws will be required. A screwdriver is not required, since we will tighten the screws with a screwdriver
- Measuring instruments play an important role when installing beacons. We need not only modern laser levels, but also such ancient and reliable measuring devices as a plumb line and angle. These are useful to have on hand to check your laser level readings.
A laser level will greatly facilitate your work, but its readings often need to be compared with other devices.
- a bubble level is a mandatory tool when installing beacons; it is advisable to have several: a long one (1.5 - 2 m) and a short one
There are ways to install beacons without using a laser level; in this case, only plumb lines and twine are used. This method is quite complicated for beginners, so even if you don’t have a laser level, it’s better to purchase one.
Preparatory work for the installation of beacons
Before the actual installation of the beacons, it is necessary to carry out preparatory work.
Preparing the wall
Preparing the wall begins with cleaning the base: you need to remove dust, grease stains, mold, and whitewash. If there are traces of fungus on the wall, then these places need to be treated with fungicides. If the base is old plaster, then it needs to be tapped to reveal voids. When the surface makes a dull sound, in professional parlance “bangs”, it means you need to remove the old base, since in the future such an unreliable finish may move away from the wall.
If there are protruding pieces of old mortar on the wall, they need to be removed using a spatula. These pieces will interfere with the normal installation of beacons.
Surface primer
The surface is primed before installing the beacons. This is important, because otherwise the wall under the lighthouses will not be able to be processed.
The soil is selected depending on the type of base and the composition of the plaster that is planned to be applied.
- For porous surfaces such as aerated concrete, moisture absorption should be limited. For this purpose, stabilizing compounds are used that form a film on the surface.
- fragile substrates that do not have a strong structure should be treated with deep penetration primers. These compounds impregnate the surface and strengthen the material.
- for gypsum plasters, concrete bases must be treated with concrete contact. This quartz sand-based primer helps improve substrate adhesion. It forms a rough layer on the surface, which allows the gypsum plaster to grip and not slide off the wall
It should be understood that concrete contact from most manufacturers (with the exception of Ceresit CT19) is not intended for use with cement-sand mixtures. The principle of hardening of cement plaster is based on its growth into the base structure, so a layer of concrete contact will only complicate this process. Also, the adhesion of this type of primer is lower than that of cement plaster, so the finishing can simply tear the primer away from the wall when it shrinks.
Beacon markings
With any installation method, it is important to establish a reference point - this will be the most protruding part of the wall. In this place the layer of plaster will be minimal and all other points of the wall must be adjusted to this position.
There are several ways to determine the most prominent point, by marking with twine or using a bubble level.
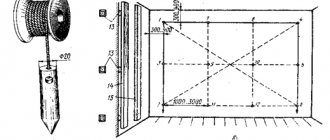
In the first case, you need to find the upper corner points; they are marked at a distance of 10 cm from the wall and ceiling. Then holes are drilled at these points and screws are tightened. You should not screw the hardware all the way, it should be 3-5 cm away from the base to form a plaster plane. A plumb line is attached to the self-tapping screw, which shows the vertical. We set aside a similar distance of 10 - 20 cm from the floor, and also place a self-tapping screw at this point. We twist it according to the plumb line.
This operation must be carried out on both sides of the wall. The screws are connected to each other using twine. It turns out a rectangle with diagonal lines, this is the flat plane of the wall.
We find the locations of the first beacons; to do this, we make 10 cm indentations from the vertical sides of the rectangle. We divide the horizontal distances between the outer beacons into segments of 80 - 130 cm. The beacons will be located in these places. If there is a door or window opening on the wall, then you need to make an indent of 10 - 15 cm from it and mark another beacon.
To determine the most protruding point of the wall, take a square and measure the distance to the threads that mark the plaster plane. Measurements can be taken on paper or directly on the wall. The place with the smallest distance to the plaster plane is the most protruding. The first lighthouse is usually attached to this location.
If we have a laser level, the device does all this work for us; it creates a vertical or horizontal plane invisible to the eye, which is projected onto objects in the form of lines.
The second method is based on the use of a laser and bubble level. We apply a long bubble level (2 m) in different directions to the plane of the wall. This is how we find the most protruding area. Then we find a protruding point relative to the vertical. The vertical in this place can be marked with a level, or with a plumb line, as in the previous case.
After marking the outer beacons, you need to mark the intermediate ones; the distance between them should not exceed the length of the rule. At this stage, you already need to determine the installation method, since further work will be different.
Before starting work, you need to decide which method of installing beacons will be used, because this will at some points affect the progress of work.
Applying plaster mixture
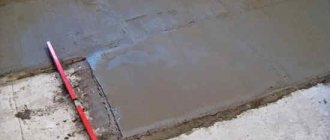
The next stage of work is applying the plaster mixture to the wall. First of all, the thickness of the plaster layer is determined. If it is more than 10 - 15 mm, then the whole process must be divided into two stages. During the first approach, you need to throw the solution on the wall and level it so that the upper surface does not reach the plane of the beacons by about 5 - 10 mm. After the first layer of mortar has dried, the final finishing can begin. The solution is applied to the walls in slightly larger quantities than necessary and leveled using a rule that rests on the planes of the beacons. The instrument is moved from bottom to top, making swaying movements from side to side. Under no circumstances should the rule be torn away from the guides during this movement. Ideally, the surface will be smooth after the first pass.
During the first approach, you need to throw the solution on the wall and level it so that the upper surface does not reach the plane of the beacons by about 5 - 10 mm
Removing the corners between the ceiling/floor and the wall is done only after the entire main surface has set, but it should still remain damp. A special trowel is used to mark the corners. The beacons are removed after the wall has completely dried. The furrows remaining after them are sealed with plaster mortar using a level sliding along the already finished sections of the wall. If you plan to stick ceramic tiles to the wall in the future, then the profile can be left in the wall.
Installation of beacons on mortar cakes
This method does not involve the use of auxiliary fasteners and screws, and the person performing the work requires certain experience and skills. Small mortar cakes are applied to the places where the lighthouse is attached. A lighthouse is glued to them on top.
We set the laser level aside at a distance that is the sum of the height of the beacon (6 - 10 mm) and the width of the rule. You need to place the rule on the beacon and press the rod into the solution until the edge of the rule aligns with the laser level mark. To check adjacent beacons horizontally, a rule is also laid between them. If an unevenness is detected, you can press on the more protruding side.
What will you need?
This method does not require additional auxiliary means, only a solution is needed. In this case, it will be very useful to have a laser level.
Advantages of the method
- no need for a large number of auxiliary tools
- does not require much time for marking
Disadvantages of the method
- Without experience, you may not calculate the effort and press the beacons too hard into the solution. In this case, they will need to be peeled off and placed in the solution in areas of subsidence.
Installation of beacons on screws and gypsum plaster
The installation method using self-tapping screws involves installing hardware that will serve as a support for the lighthouse. They will play the role of a “zero point”, below which the lighthouse cannot be sunk. This method involves the preliminary installation of self-tapping screws. The most protruding point on the wall will be the place where the first hardware is attached; we drill a hole in it and hammer in a dowel. Use a screwdriver to tighten the self-tapping screw until the end. First, you need to stick a piece of masking tape on the screwdriver. When the self-tapping screw is tightened, we make a mark on the tape on the plaster level, which is marked with ropes or a laser level mark.
Having this mark, we tighten the screws under the other beacons, aligning the mark on the screwdriver with the laser line or rope. The further steps are no different from the first method; we apply a solution to the screws, into which we press the beacon.
What will you need?
In this method, in addition to all the tools, you need self-tapping screws, dowels and a drill for drilling holes.
Advantages of the method
- there is no way to drown the beacon in the solution, since it is supported by self-tapping screws
- all work “by eye” is kept to a minimum
Disadvantages of the method
- work takes longer due to the need to install self-tapping screws
Pull the “laces”
Using a hammer drill, we drill 6 holes with a drill (an impact drill for a hammer drill is called a drill) with a diameter of 6 mm along the edges of the profiles (to the right of the right and to the left of the left). The holes should be at the same distance from each other vertically as much as possible, that is, the lace lines should run as horizontally as possible.
To do this, measure along the edges of the beacons (between the corner and the beacon) an equal distance of 15-20 cm from the floor and ceiling along both edges and also find the vertical center of the wall and put marks. We drill holes for the dowels with self-tapping screws, insert the dowels, but do not screw in the screws.
We drill holes for screws on the right and left of the installed beacons
Having drilled the holes, we tie the end of the “lace” to the self-tapping screw near the cap. We tie it well so that it doesn’t come undone. We screw the self-tapping screw with the cord into the hole into which the dowel was previously inserted. The self-tapping screw with the cord must be recessed deeper than the lighthouse! If it is more convenient (if the depth from the beacon is shallow), then first screw in the self-tapping screw, then tie it with a string, then tighten the self-tapping screw.
We unwind the second end of the “lace” to the other edge. We screw the self-tapping screw into the second hole, not all the way. We tie the lace onto the self-tapping screw and screw the self-tapping screw deeper than the beacon. Thus, the lace lies tightly on the beacons, screwed with self-tapping screws. The tension should be strong enough so that it is like a string and does not sag. We expose two other “laces”.
The laces lie tight on the beacons
Installation using a platform for a lighthouse
This method involves the use of various fasteners for beacons; they are installed on self-tapping screws and provide a more reliable fixation than in the first two methods. In this case, after installing the screws, we immediately attach the beacons to them using fasteners. The solution here acts as an additional retainer so that the rail does not dangle.
The solution must be applied locally near the fastening points so that the beacon is fixed and does not sag. In this case, there is no need to make a continuous layer of mortar on both sides of the lighthouse; such separation of plaster layers on different sides will lead to uneven hardening.
What will you need?
The kit is similar to the previous installation method: self-tapping screws, dowels, and a drill for drilling holes. Mounts for beacons will also be needed.
- cremmer - the mount is fixed to the installed screw. When the beacon is installed, the edges of the cremmer are bent and secure it. If the screw is tightly twisted, then it is difficult to install this element, and the curved edges do not provide reliable fixation - the beacon can still dangle
- “eared” - installed simultaneously with self-tapping screws. In this case, fixation is also carried out by bending the edges of the fastener
- The platform for the beacon with a clip provides the most reliable fixation. At the same time, it adds additional thickness to the plaster layer, since the platform itself protrudes from the wall. An increase in the plaster layer leads to an increase in the cost of work, so recesses can be made in the wall for platforms with clips
Advantages of the method
- maximum fixation of beacons, less chance of making a mistake.
Disadvantages of the method
- the speed of work is reduced: additional time is required to install fasteners and to deepen them into the wall
- additional costs for fasteners
Rubbed plaster beacons
This method does not involve the use of plaster or steel beacons; instead, gypsum plaster is used. The installation method is quite complicated for beginners. For insurance, self-tapping screws are sometimes pre-installed. At the same time, you need to understand that the screws are then difficult to remove from the wall, and leaving them in the plaster can have negative consequences: the appearance of traces of rust, getting into the fasteners when drilling the wall.
To remove self-tapping screws from a rubbed beacon, their heads must be visible on the surface of the beacon.
In most cases, rubbed beacons are made without screws. To do this, plaster is applied to a narrow plane of the rule and glued to the place where the lighthouse is attached. Press the rule to the laser level mark. The protruding mortar is cut off from the edges with a spatula. To separate the rule from the wall, use a thread that is pulled between the solution and the plane of the tool.
What will you need?
A set of tools, as in the first installation method. The difference is the presence or absence of self-tapping screws.
Advantages of the method
- beacons do not need to be removed from the wall
- most efficient in terms of time costs
Disadvantages of the method
- requires extensive experience working with plasters; without specific skills, work will take a lot of time
- if self-tapping screws are not used, the beacon can be flattened too much
- the method is only suitable for working with gypsum plaster, and combinations of gypsum and cement plaster are in some cases unacceptable