The use of beacons is required to perfectly level the plaster mortar on the wall and create even corners. Such guides help to significantly save expensive mixtures. Beacons for plaster are made in factories from different materials, as well as by craftsmen directly at the place of repair. To get the best result in plastering walls, it is important to delve into all the nuances that are associated with the use of beacons.
Purpose
When a house is being renovated, finishing the walls takes up most of the time. To remove cracks and level the walls, you must first plaster them. If there are problem surfaces, special beacons are installed that act as a guide where it is necessary to create a perfectly flat plane. Beacons for plaster vary in size.
The guide is installed on the wall in the place of the depression so that the master can make the surface even. It should be secured with several self-tapping screws, otherwise the construction beacon will not hold tightly. Afterwards, dowel-nails with threads are inserted, which serve as the main guide for applying the plaster in an even layer. Beacons are attached to the mixture, which must first be spread over the walls and ceiling every 30 centimeters maximum.
The variety of problems with walls and ceilings forces craftsmen to take different approaches to their repair, choosing the best option for work. Also, beacons for leveling walls differ from each other.
If you choose the right type of guides, you can achieve excellent results without spending a lot of effort and materials.
Do-it-yourself wall surface preparation
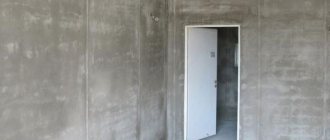
Before correctly positioning beacons for plastering walls, it is necessary to prepare the surfaces. You will need to clean the walls of old finishing materials (wallpaper, plaster, dyes). Then stains and mold are removed from the surfaces and treated with antiseptic compounds. Metal fasteners are removed from the wall or treated with water-based paint. Cracks and chips are filled with primer and leveled. Smooth concrete surfaces are covered with notches to increase adhesion to the plaster mixture.
When preparing a base with brickwork, the seams are opened to a depth of about 10 mm, dust is removed from the surfaces, a primer is applied, the primer layer is dried and, if necessary, reinforced.
Types and sizes
Many home craftsmen who are starting to plaster walls for the first time do not know what kind of beacons there are in terms of type and parameters, and which ones are best to buy. Their main difference lies in the materials from which they are made.
Metal
They are the most popular among builders because they are convenient and quick to work with. The profile length can be easily adjusted using ordinary scissors. You can purchase a metal plaster beacon at any hardware store.
Guides are available in sizes 3, 6 and 10 mm. The appropriate option is selected depending on the unevenness of the wall or ceiling. The greater the curvature of the surface, the wider the profile used.
A metal beacon for plaster has the following advantages:
- low cost;
- easy installation;
- quick setting of the solution, which allows you not to stop work.
Metal guides are characterized not only on the positive side. For example, it is quite common to find finished products with curved geometry due to irregularities in the production process, during transportation or storage. In order not to run into defects, it is recommended to carefully check each guide before purchasing and transport them correctly to their destination.
Another common flaw with metal beacons is the possible formation of rust spots on the surface. They appear after the destruction and oxidation of zinc located on the surface of the guides. After applying the plaster, it is better to remove them immediately.
Aluminum beacons have a fairly flexible structure. To provide them with additional rigidity, you need to first fill the surface with a solution, and then install the guides.
Plastic
This type of beacon is very similar to metal, but heavy-duty plastic is used for their manufacture. The result is parts with less weight and greater strength. It's much easier to work with them.
Plastic beacons are resistant to deformation, their original geometry is well preserved even in conditions of improper transportation. After using the profile, spots and stripes do not appear on surfaces.
Such plaster beacons cannot be installed in places with negative temperatures, as they can crack from frost. It is not recommended to impact them with heavy weight and strong impacts, because the impact resistance of plastic guides is very low.
Improper fastening of the beacon profiles entails their sagging during the process of leveling the plaster, which will ultimately provide unevenness to the coating.
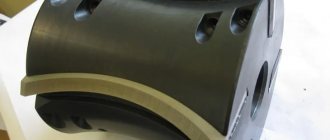
Reusable steel
These guides are expensive because they can be used more than once. Basically, they are used by builders who use beacons constantly.
Reusable steel profiles have increased strength, so there is no need to thoroughly fix them. Galvanized beacons will not bend or lose their original appearance, and the result of plastering the walls will be positive in any case.
Despite the fact that these beacons are convenient to use, they have their drawbacks. Not every person can afford to purchase a reusable steel profile for minor repairs; the high price forces them to choose a different type of beacon.
It is better to remove the steel product before the solution has completely hardened. Otherwise, despite the strength of the profiles, they can be broken.
Homemade
When special guides are not at hand, various devices are used instead. Some use metal pipes or corners. Wooden slats also work very well, but are used less frequently due to their tendency to warp.
Craftsmen often select profiles for drywall as homemade beacons, but then more solution is wasted than in other options.
In construction stores you can easily pick up ready-made beacons for plaster for any repair. However, homemade products are still often used. The process of making them is completely simple, and the costs are minimal.
Strings
Installing string beacons is considered the simplest and cheapest option for using guides for the rule. For placement you will need screws, thread or wire, as well as a drill. First, holes are made for the dowels, then the screws are screwed in, and the thread is tensioned. It is at the level with it that the solution is subsequently applied.
The layer of solution is laid slightly thicker than the surface itself. Next, after the plaster has slightly hardened, the top ball is cut off using a thread. The surface is leveled according to the obtained reference point.
Using string beacons does not come without some drawbacks. If the screws are attached incorrectly, the threads will be tied unevenly, which will then certainly affect the curvature of the walls or ceiling.
The advantages of this method include the low cost of string guides, because wire and thread cost pennies, and almost every home craftsman has self-tapping screws.
By brand
Using this type of plaster beacon is great for one-time repairs. The costs are minimal and installation is very simple.
First, vertical lines are drawn, in which holes are drilled every 40-50 centimeters. After which the screws are screwed in at the same level. Then a slightly larger amount of solution is applied, and the rule is pressed against the screws to remove excess. As soon as the plaster is thoroughly dry, the surface is leveled using a spatula.
Lighthouses by brand have some disadvantages. If the screws are set unevenly, the plane will end up with noticeable deformation. In addition, the work should be carried out very carefully, otherwise the pronounced curvature of the wall and ceiling surface will subsequently be evident.
You can plaster the walls yourself. An important condition is to obtain all the necessary materials and equipment, as well as follow the technology. Beacons should always be removed, regardless of the materials from which they are made. This measure will provide excellent results for a long time.
What types of lighthouses are there?
In the recent past, specialists used wooden beacons, which were ordinary slats of a certain length and width. Some craftsmen still prefer this type of beacon, although most often the wood begins to rot over time, deteriorating the strength of the wall. Another way to take a non-standard approach to the problem of leveling walls is to use beacons made of mortar intended for further plastering. Both of these cases are rather isolated, and in most cases experienced specialists prefer to use beacons made of:
- steel (galvanized or non-galvanized);
- plastics.
Plastic or metal beacons, which would be more correctly called beacon guide profiles, have their advantages and disadvantages. For example:
- plastic profiles are less expensive, but also less durable. There is no guarantee that during the work they will not bend and you will not have to redo the entire work again;
- metal profiles are more expensive, but are characterized by increased strength and reliability. If non-galvanized slats are used, they can be removed after completion of work. Such products have a T or L profile, length 2.5 and 3 m, width 6 and 10 mm.
How to choose
The choice of beacons should be approached responsibly. If we take into account what the profiles were made of, then the plastic variety is used in cases where it is planned that the beacons must be removed after plastering or their operation will be carried out in very comfortable temperatures with no sudden changes.
Steel beacons are quite reliable, because they cannot be affected at all by temperature, humidity, chemicals and fungi. When using these guides, it is not at all necessary to remove them, both from the inside and outside of the building.
If craftsmen choose beacons by size (3 - 30 mm), then they need to buy profiles that correspond to the curvature of the walls. The thickness of the plaster layer is applied in such a way that the top one is sanded well, without reaching the guides. The length of the product ranges from 2 to 6 meters. Small ones are used for ordinary repair work in residential areas, and large ones are purchased for plastering warehouses and production workshops.
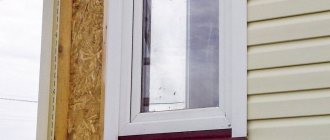
Lighthouses also differ in their shape. The T-shaped plaster beacon profile is placed in the corners of the rooms, the V-shaped one is placed on the entire wall and ceiling surface. A corner beacon is indispensable in the process of arranging a window, when there are few fastenings and materials that are strong enough are required. Metal guides are more promising in such situations; they better protect corners from damage, cracks and other types of negative impacts.
The use of homemade beacons is advisable if special profiles from the manufacturer are not available or there is not enough finance to purchase them. The simplest option in such cases is to pull the strings onto self-tapping screws. Instead, it is possible to install a wire, and then use it to remove the surface layer of the solution to ensure perfect evenness.
Rules for plastering lighthouses
When leveling the bases along the beacons, the following technical requirements are observed:
- The plaster coating should not be stronger than the base material to prevent cracking.
- Before leveling, surfaces are carefully prepared (cleaned of old finishing materials, primed, etc.). Oil stains are cleaned, surfaces are treated with degreasing agents.
- The planks are set with step-by-step alignment and checking the symmetry of the elements.
- The solution is applied during plastering in a uniform layer without indentations.
- The strip between the beacon guides is plastered in small sections to evenly distribute the solution.
- As a rule, press the guides with little force to prevent damage to the installed beacons.
- After the solution hardens, the beacon profiles are removed from the wall.
- The remaining irregularities on the wall are covered with a dense plaster solution.
To level the base, the outer guides are first installed, along which the remaining fasteners are placed. Properly performed marking work before installing plaster beacons ensures easy and accurate leveling of the base, correction of height differences, and reduction in the cost of finishing materials.
Marking for beacons
Before starting the process of installing beacons, it is necessary to first mark the surface. Today, different methods are used with their positive and negative sides.
Simple method
This method involves installing guides on plaster, which will then be used to finish the walls. Marking is carried out according to the following instructions:
- The distance from the corner is 30 centimeters, the floor and ceiling are 15 cm.
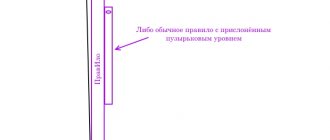
- A vertical line is drawn, the evenness of which is measured by a level.
- The operation is repeated on all walls in the room.
- The distance between the stripes is measured, it must be divided by 1.5 meters. The result obtained means the number of beacons that should be placed on a certain wall.
- The profiles are cut so that their length is reduced by 30 cm.
- At the very beginning and end of the lines, holes are drilled into which dowels are installed.
- The entire wall is drawn with lines at a distance of 1.5 meters from each other.
- Self-tapping screws are placed in the holes, and two threads are stretched between them.
- In places where the threads and drawn lines intersect, holes are also drilled into which dowels and screws are inserted.
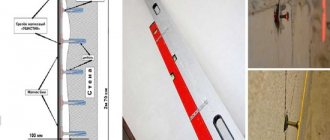
- The level of the screws is leveled according to their heads: the number of wall obstructions, the thickness of the beacon and the additional margin (about 0.5 cm) are summed up. The result obtained means the length of the protrusion of the fastener from the walls.
As soon as the screws are installed, the threads are tensioned diagonally. The beacons are attached under the resulting plane. The products only need to slightly touch the threads. Then the ropes are removed and the walls are covered with mortar.
Using a laser level
Not every home craftsman has such a device. However, its use simplifies the process of placing beacons under plaster, which is carried out according to the following scheme:
- The laser level is used to locate the blockage of the wall. The device is installed against the wall opposite, then the cross-level is turned on. This procedure will help you find out the required thickness of the plaster layer without carrying out preparatory work.
- Using the device, vertical stripes with indentations are drawn on the wall, which were indicated in the simple method above.
- The level is placed 40 cm from the corner, a vertical line is included.
- The location where the laser beam reaches the wall at the minimum distance, for example 36 cm, is determined.
- A long strip (0.5 m) is taken and a point at a length of 37 cm is marked on it. This result was obtained by adding the distance from the laser strip to the wall, the thickness of the beacon and the required margin.
After the calculations have been carried out, glue is applied to the drawn lines. Then the beacons are pressed with a wooden strip until the mark coincides with the laser strip.
Installing beacons in different ways
Before placing beacons on the wall, you need to choose a method:
- on plaster solution or tile adhesive;
- without solution;
- from cement or gypsum composition, etc.
The plaster beacon must be securely fixed and leveled on the wall. The work uses clips, corner elements, staples, etc.
Installation on the wall using plaster mortar or tile adhesive
Placing beacons for applying a plaster coating on an adhesive base or mortar is an affordable and easy-to-use technology. Next to the fastenings, the plaster mixture is laid out with a spatula. Round or rectangular beacons are formed from the mass.
The upper part of the elements is aligned to a single level. Beacons are placed on the hardened bases and fixed with plaster mortar or glue. The profiles are fixed using plasterboard profiles. We set the distance between the beacons taking into account the standards for the placement of fixing elements (up to 1.2 m between the beacons).
Installing beacons on a wall without mortar
A quick way to place beacons without mortar on the wall is used to decorate small spaces.
To fix profiles to self-tapping screws, several types of fasteners are used:
- clips;
- "eared ears";
- creamers;
- homemade staples;
- smarts, etc.
The advantage of these types of fastenings is the ease of installation and the absence of the need to prepare an adhesive base or solution. The elements do not move and ensure reliable alignment of the base. After installing the fasteners, begin plastering the surface.
When and how best to install mortar beacons on walls
Beacons for leveling bases can be made independently from a solution (based on cement powder or gypsum). After plastering, the beacons do not need to be removed from the wall panel. To work you will need a trowel, a set of spatulas of different shapes, sizes and a rule.
The work is carried out in stages:
- the axes of the beacons are preliminarily marked on the wall, the size of the indents is calculated taking into account the dimensions of the room;
- a laser device detects surface irregularities;
- an elastic plaster solution is prepared;
- the rule is installed on the edge and fixed;
- a trowel is applied on top of the rule;
- the bar is pressed onto the base onto the solution;
- use a trowel to adjust the angle of contact of the beacon strip with the wall;
- remove the remaining solution with a spatula;
- the rule is removed;
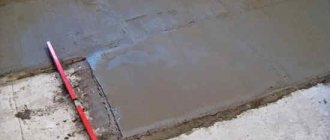
- the applied solution is dried for 24 hours, then a block with sandpaper is applied along the top of the beacons for grinding.
This method creates mortar paths with a width of up to 2 cm. After a day, the beacons are ready for plastering.
The technology is optimal for small unevenness and height differences. Execution requires specialist skill to accurately place elements.
Installation of beacon profiles
After the preparatory work is completed, the craftsmen install the guides.
Installation with mortar or glue
The first thing to do is prepare the solution according to the instructions on the box. When planning to plaster surfaces using cement or lime mixtures, which tend to dry for a long time, gypsum or alabaster is added to them in small quantities, which helps the solution set faster.
The prepared mass is applied in small volumes at a distance of 15-20 cm from each other in accordance with pre-drawn lines. Next, the trimmed beacon profiles are applied to the solution and pressed to the surface.
If the craftsman used simple markings, the guide is installed flush with the screws. If there is a laser device, the position of the beacon is checked in accordance with the previously applied marks. Excess solution is removed, after which the following products are installed.
Mounting on fasteners
To accommodate beacon profiles, fastenings made of plastic have been invented. Their installation begins with removing the retainer from the product, which is placed on self-tapping screws screwed into lines every 30 cm. After this, the beacons are attached, and the retainer is returned back to the beacon profile.
The main advantage of this method is the speed and ease of installation. However, the plaster layer thickens by 0.5 cm, and therefore the final cost of repair work increases significantly.
Using “eared ears” made of metal
More recently, painters and plasterers used one trick. They cut out legs with holes for fastenings, with the help of which plasterboard panels are installed. Beacons were placed on these metal parts. Today, such products are made from metal in large factories and are available in all hardware stores.
The installation process of the guides is not complicated. Beacons are applied to the walls, then attached to the surface with metal ears. They already have self-tapping screws that are screwed in to the required depth, which ensures the installation of a level for applying plaster. Installing beacons with special ears is easy, but removing them afterwards is much more difficult.
Materials and tools for finishing
To install the guides and apply the plaster mixture, different tools may be required depending on the specific type of product and the technology used. Typically, an exhaustive list of devices and consumables looks like this:
- building level (any) and plumb line;
- strong thread or fishing line;
- self-tapping screws;
- dowels;
- screwdriver;
- capacity;
Tools for plastering an apartment
- drill with mixer attachment;
- grater or grater;
- rule;
- spatulas;
- Master OK.
You should also purchase the beacons themselves, which are selected in accordance with the expected thickness of the coating. As for the length, it is better for beginners to take standard 3-meter products. If mechanized plastering is intended, an apparatus for applying the mixture (plaster ladle or gun) is also prepared.
Alternative materials
Not everyone can carry out repair work well. Here it is necessary to use tools and auxiliary equipment correctly. This facilitates high-quality plastering on all surfaces on the internal and external sides of the objects being repaired.
Before the advent of modern lighthouses, wooden slats were used almost everywhere as guides. They were installed on gypsum and cement mortars, then leveled using a plumb line. However, wood is considered an inconvenient and unreliable material, because it swells over time. Strong wetting causes the surface to swell, causing the walls to become severely curved.
Another option for installing beacons was the use of shavings. These remains from cutting wood were glued together into a common mass with special substances. The result was chipboard, MDF, wood concrete. The structure of these materials (the fibers have different directions) allows the products not to deteriorate or warp from exposure to moisture, which facilitates high-quality repairs for a long time. It is only necessary to soak the products in advance with antipyrine, an antioxidant. Such glued strips of sawdust are still used as beacon guides today.
Plaster beacons are very valuable and useful products, with the help of which craftsmen achieve perfectly smooth surfaces and high-quality coatings. The main thing is to act in accordance with the above recommendations, and also remove beacons from the walls in a timely manner. After all, even expensive galvanized profiles have the unpleasant property of causing the appearance of rust spots and stripes, which will require the application of a new layer of plaster. Do not neglect effective means for marking, for example, a laser level. This device will help you quickly complete the preparatory work and begin installing beacons and further plastering.
Useful video
Below we have selected several videos with master classes on installing beacons and plastering walls.
Quick installation using a laser level.
The next video shows the technology for plastering walls using beacons with your own hands. Leveling is carried out with gypsum mortar on brick without mesh reinforcement.
We hope that the article was useful to you. Ask questions and share your experience in the comments.
Previous
Tool Angle for plaster: types and installation rules
Next
Tools Construction floats: types and features
Types of device
The conditions under which the surface is leveled may differ, which is why beacons are made in different design options. Thus, according to their functional purpose, mortar and reinforcing devices can be distinguished. The first ones are intended specifically for orienting the strip of the working mixture. In the future, they are not dismantled, but are included in the structure of the coating. In turn, reinforcing beacons for plaster serve not so much to guide the laying lines, but to strengthen the corner protrusions. For example, when you need to create a small projection outside in the wall for decorative or structural purposes. If you leave the structure of the mixture without strengthening, it will simply collapse. However, the presence of a rigid beacon at the base of the ledge will preserve it for a long time.
A fundamentally important feature of the classification of lighthouses is the material of manufacture. Profile strips can be made of wood, plastic (polyvinyl chloride) and metal. Wooden products are good because they are inexpensive and are a suitable consumable for large volumes of work. A metal beacon will be beneficial where it is planned to apply thick layers of mortar - the load-bearing structure of the strip will allow it to cope with heavy loads. As for plastic elements, due to their elastic structure they are recommended to be used when applying thin, delicate coatings. In the small-format version, they are organically integrated into the cladding design and do not cause problems when finishing the surface.
Preparation of plaster mortar
Usually the dry mixture is supplied in bags with a standard volume of 25-30 kg. As the manufacturers themselves note, 27 kg will require 15 liters of water. Stirring is performed with the already mentioned mixer at low speed until a homogeneous mass is obtained. During the preparation of the solution, you can adjust the consistency by adding a little more water or dry mixture. The operation is repeated 2-3 times with short pauses of 5 minutes. To ensure that the surface of the beacon under the plaster optimally interacts with the solution (adhesive bonding ability), special binding components can be added. This quality, by the way, will be influenced by the material used to make the slats. Wood is not the most practical material for a beacon, but it adheres better than metal and plastic to finishing solutions of various types.