There is no house without windows and doors, so the framing of these openings on the facade is important not only for visual perception. If the space between the facade and the window (slope) is open, then water, dirt, fallen leaves will get inside - the facade will have holes, but you don’t want that. Let's look at what and how to install on slopes when installing vinyl siding.
Window strip - design features, dimensions, conditions of use, purpose
The window profile is intended to be an additional element of siding lamellas. As a rule, the product is included in the standard package of this type of finishing materials from all well-known manufacturers. Therefore, a consumer who uses products from official manufacturers will never face the problem of finding suitable components.
Design features and dimensions
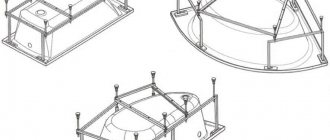
The plank, manufactured according to the European standard, consists of the following main parts:
- Wide edge - located on the inside for direct overlay on the slope. The surface structure can be smooth or grooved and have different widths. Combines with finishing strip.
- Narrow edge - separated from the above part by bending. Performs the function of a platband and is located on the outside. The width is 2-3 times smaller than the inner area.
- Fastening area or J-component. It has a U-shaped structure and oblong fastening holes along the edge for strong fixation and joining with siding slats.
Construction of a near-window strip Source mkif12.ru
The dimensions of the parts of the near-window strip depend on the location of installation of the profile and combination with the siding, as well as on the brand that manufactures it, and vary within the following limits:
- The length of the profile is 305 cm, the width of the internal part is 14.4 cm, the external part is 8 cm.
- The length of the plank is 305 and 381 cm, the width of the inner area is 24 cm, the outer area is 8 cm.
- Product length – 305 cm, width inside – 22.8 cm, outside – 7.5 cm.
Moreover, if the slope area reaches 16 cm or more, the product is considered wide and is used for finishing slopes up to 20 cm, if less than 16 cm - small.
Conditions of use and purpose
The type of slope strip in question can be used under the following conditions:
- Installation is possible with a slope depth of 20 cm (plus or minus 1.5 cm).
- When the window is located at the level of the facade, only the platband is installed.
- When the opening is located to a depth of more than 20 cm, the surface of the slope is sheathed with siding or soffit.
- The installation of the plank elements is carried out before the installation of the lamellas begins, which allows for more precise finishing.
An example of installation work on finishing a facade with siding with a window profile Source rubankom.com
The main purpose of the window trim is to protect the structure, as well as the connection points with the wall, from precipitation. Additionally, the plank performs a decorative function, and with an artistic selection of multi-colored elements, it allows you to decorate the facade of the house in an original way in accordance with the design ideas.
See also: Catalog of companies that specialize in finishing materials and related work
How to choose a window strip
The first thing to do is determine the width of your slope. This is the distance from the window profile to the sheathing.
They often measure the distance from the window to the edge of the wall, but this is incorrect, because... a sheathing will definitely be attached, which will increase the width of the slope.
after installing the sheathing, the width of the slope can change significantly
For example, the width of your slope is 15 cm.
Is a near-window strip with a slope width of 16 cm suitable for you?
not suitable - because the working size of the slope part of this profile is 14 cm.
Having purchased such a profile, during installation you will realize that its width is not enough for fastening.
the working width of the window strip should be greater than the width of your slope. the difference between the actual width and the working width of the near-window strip If the widths of the slopes are different, you need to take into account the maximum value
Next, if you have several options that fit the size, choose a color.
Installation requirements
In order for the near-window strip to fulfill its tasks and serve no less than the siding itself, all installation work must meet the following series of requirements:
- When attaching both metal and vinyl elements, you should leave a small gap. This is necessary to compensate for the expansion of the material under the influence of temperature changes between seasons. So, the self-tapping screw should never be tightened to the limit - even if there is a press washer.
- The hardware should be screwed into the center of the hole and perpendicular to the base.
- It is recommended to use galvanized self-tapping screws as the main elements for fastening.
- Installation of the strip should be carried out at the stage of installation of the frame structure.
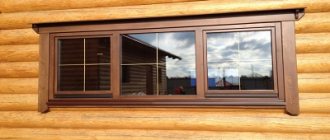
The window strip was installed before the panels were installed Source prom.st
- To form a high-quality frame and a tight fit of the connecting sides (to avoid the penetration of dampness), corner trimming and edge trimming should be performed, respectively.
- It is recommended to carry out installation work at positive ambient temperatures. Otherwise, during operation there is a high probability of defects due to expansion of the material during a thaw.
Advice! To avoid problems of components not matching the main material during installation, and to avoid defects and damage during operation, it is necessary to purchase accessories from the manufacturer that produces the main product.
Which window slopes are better - let’s look into the details
So, the installation of windows with your own hands is completed, and you are thinking, which window slopes are better? After all, you need to know both the pros and cons? Let's ask the experts!
To understand this issue, you need to find out what advantages and disadvantages each type of finish has.
Plaster slopes
The “oldest” type of window opening has a number of advantages:
- Acceptable price. If you order work from craftsmen, now only the work is assessed, without taking into account the materials. In addition, you can easily install this type of slope yourself;
- Resistance to mechanical stress. Unlike plastic and plasterboard analogues, plastered slopes are not so fragile, and this is a very decisive factor for owners who decide which slopes are best for a window;
- Seamless installation. When installing a plastered slope, there are no seams or edgings, there is no need to worry about joining the sheets, and the process of puttying the window brings the surface to an almost perfectly flat layer.
- Easy to install. Even a beginner, in principle, can independently plaster a slope; this requires a minimum of tools, materials, and labor costs;
- Versatility of use. This type of slope can be used in any room, at any temperature.
However, like every type of finish, these window slopes also have disadvantages:
- Installation duration. The installation principle is to apply the mixture layer by layer. In addition, the next layer can be laid only when the previous one has dried, and this automatically extends the production time to 5 days, which is not very convenient;
- Formation of condensation. This type of slopes for windows is “cold”, since it does not contain materials with heat-insulating properties, which leads to moisture condensation and the subsequent formation of mold;
- Cracks. The plaster slopes do not adhere closely to the plastic windows, which ultimately leads to peeling.
Plasterboard slopes
When deciding which window slopes are better, many choose the plasterboard option. Let's look at what exactly attracts them so much:
- Simple device technology. Without a doubt, any beginner can make such slopes for windows; it will only be enough to purchase the material;
- Installation speed. With skill, installation of one slope takes no more than 2 hours;
- Low cost. Materials for work are quite accessible to all consumers, and this is often the most decisive argument when deciding which slopes for windows are better.
- Exposure to moisture. In the presence of excess moisture, this slope, unfortunately, can collapse, and the same moisture can cause the formation of mold, which simply cannot be removed from the plasterboard sheet; the damaged sheet will need to be replaced;
- Major renovation. If for other types a partial replacement is possible, then here, as already written above, a complete rework of the slope will have to be carried out.
- Indoor use only. While plastered window slopes can also be installed outdoors, plasterboard ones are intended exclusively for “working” indoors.
Plastic slopes
This option for slopes is the “youngest”, and now more than half of consumers are in favor of this finish when deciding which slope is best for a window.
So, the undeniable advantages:
- Smooth surface. Of course, no one will argue about the smoothness and evenness of the surface of the plastic being produced today;
- Quick installation. The simplest type of installation that you can imagine, if you are not yet a master of your craft, and you are choosing which slope for the window is best. We advise you to opt for plastic options;
- Clean work. There will not be as much dirt and debris as when working with plastered window slopes and drywall;
- No finishing work. There is no need for painting or puttying of the seams - it’s installed and that’s it, the work is finished;
- Color selection. Manufacturers today can please consumers with a wide variety of product colors;
- Additional thermal insulation. This material provides additional thermal insulation to the slopes, which is also a very tangible advantage when deciding which slopes are better for windows;
- Possibility of replacement. If in the case of gypsum craton it is necessary to completely repair the slope, then a partial replacement can be completely sufficient.
Disadvantages of plastic slopes for windows:
- Damage. These slopes do not “tolerate” mechanical damage;
- Price. Despite the affordable price for this type of finishing, it is still worth choosing more expensively, since cheaper analogues may change color when exposed to sunlight, and your boiling white slopes may become dirty yellow after six months, and hidden ones may also become visible stiffening rib;
- Inconsistency between the colors of the panels themselves and the fittings. Often there is no available color of fittings that would match the shade of the panels themselves, especially if you have chosen some exotic option;
- Inconsistency with the interior. Often, this option for window decoration does not suit the designer’s idea, especially if the interior is designed in a classic style;
- Number of additional extras. Only all purchased planks, profiles and corners will guarantee your room an ideal look.
So, here is a fairly detailed analysis of the most common finishing options, read, think, and then you will find your own answer as to which window slopes are better.
Installation nuances - calculation, preparation, installation, processing
Before installing the window strip, you need to install the sheathing along the entire profile of the house for siding, take measurements and other preparatory procedures according to the following algorithm:
- Replacing old frames with new ones (if necessary).
- Renewing the surface of the slope - cleaning, covering cracks and cracks.
- Treatment of the external part with an anti-fungus and mold remover.
- Installation of sheathing on the house facade.
Scheme of preparation, trimming and installation of window trim Source vseprosiding.ru
Preparatory and calculation work
Finishing activities include the following stages of preparing the opening:
- The window is cleaned of everything unnecessary, the slopes are checked, cracks and crevices are covered. Treatment is carried out with protective compounds against mold and mildew. If you plan to replace old frames, then this is done in advance.
- The general sheathing of the house is being erected.
- After framing the window with frame elements from the outside, the location of the ebb is determined. For these purposes, a special additional part is used. It is placed at a distance from the facade, ensuring uniform drainage. But it can not be used, then a near-window strip installed at a slope is used as a drainage system. For it, a beam is pre-set, cut at the desired angle.
- The outer part of the opening is also framed with a wooden strip; it will serve as the basis for installing the finishing profile. For these purposes, it is better to use parts made from hardwood with minimal thermal expansion. Such fragments must be treated with antiseptic compounds.
The frame for window cladding can be either metal or wood.
After preparation is completed, the material for the cladding is calculated. The internal and external perimeter of the opening and the width of the slopes are measured. To do this, it is advisable to use at least 3 points on one side, which will avoid distortions due to changes. All parameters are transferred to the window diagram. According to the dimensions, the optimal type of profile is selected and purchased or the existing one is adjusted.
Opening finishing options
The technology for installing window strips near window and door openings when decorating a house with siding, as well as the set of materials used, depend on the depth of the slope and have the following variations:
- The depth of the slope is 20 cm. Installation is carried out according to the above standard instructions.
- The depth of the slope is more than 20 cm. The cladding is carried out using siding panels adjusted to the size of the slope. In this case, the finishing profile is mounted inside, and the corner profile is mounted on the outside.
- Opening without slope. The framing is done using a J-profile.
On a note! The use of window strips for siding is possible only if the opening dimensions correspond to standard parameters. In other cases, alternative methods and materials are used. Therefore, when planning a house, it is necessary to think in advance about what and how the facade will be finished.
What is a J-bevel
J-chamfer is a profile whose shape resembles a window strip, mainly used for lining cornices with soffits.
differences between a J-chamfer and a window strip
- front part - width is smaller - 4.5 cm
- slope part - has stripes
- Available only in white or brown
comparison of window strip and J-chamfer J-chamfer can be used to frame openings, but few people do this, because the width of the front part is small - visually an opening with a narrow platband looks less impressive
Briefly about the main thing
A window strip is an additional element for framing window or door openings when finishing the siding of the facade of a house. It consists of three main parts - the wide and narrow sides and the J-component. The dimensions of the product are strictly specified by production standards, so it is used for openings with a depth of about 20 cm. Its main purpose is to protect window joints from precipitation and decor.
Installation of the profile must be carried out strictly in accordance with the requirements:
- When fixing the material, a technological gap must be left taking into account interseasonal temperature changes.
- Screwing in the hardware strictly in the center of the mounting hole and at a right angle.
- The best fastening element is a galvanized self-tapping screw.
- Framing should be done during the installation phase of the frame under the facade.
- The installation technology must necessarily include trimming and trimming procedures.
- Installation is recommended to be done at positive air temperatures.
The installation of a window strip when finishing a house with siding is preceded by preparation, calculation and processing procedures. Depending on the depth of the slope, a window or doorway can be framed not only with a specialized profile, but also with a J-profile or lamellas adjusted to size.
Ratings 0
Useful tips
With the general installation scheme for any type of siding, there is a difference between installing aluminum and plastic slats. This also applies to additional elements, since they are made from the same materials.
- When attaching siding, the nature of the material and weather conditions are taken into account. The screws do not fit tightly to the surface of the profile or lamella. The gap size varies from 1 to 6 mm. When installed in hot weather, the slats acquire the largest possible volume. Therefore, the gap is left minimal. In the cold, siding has its smallest dimensions, which inevitably increase with warming. Accordingly, the gap is made maximum.
- The fastener is always placed in the center of the oval hole . Plastic siding changes not only in volume, but also in length. In this case, the element can move along the fastening and not deform.
- Installation is easier to carry out in the warm season , since it is easier to make a small gap than a large one. However, you should not sheathe the facade during rain or when it is of increased importance.
- need to take galvanized fasteners , as they are resistant to corrosion and do not rust.
When decorating a facade in winter, the material is first left in a warm room for 12 hours so that the lamellas do not lose flexibility in the cold.
Should be considered
Using siding strips is not always advisable. The thing is that building codes differ in all countries. The main requirement of Western countries is that the window opening must be recessed into the wall by less than 13 centimeters. But in Russia this is not always justified. However, the combination of other finishing elements with the strip comes to the rescue. It is worth noting the fact that the finishing strip significantly increases the cost of cladding.
The window strip should not be used for cladding plastic windows. In fact, according to standards, plastic windows should be built into the wall 1/3 from the outside. This is necessary to reduce the effect of condensation. It turns out that the slopes in this case will be larger than the width of the plank.
If you are going to cladding a window in an old building, then the appearance of unevenness is inevitable.
In order for the effect to be good, silicone sealant should be used. The product is hermetically sealed, and when compressed and expanded, the panels will not crack, as they are elastic.
Before installation, you need to calculate the required amount of material
When installing not only the upper and side, but also the lower near-window strips, it makes no sense to install a drip sill. The plank will ensure reliable removal of moisture and condensation.