In order for passage into the house to be convenient and also to fulfill all its functions, many conditions must be met. And in some cases, the level of livability of a home is determined by a small detail - the threshold for the front door. This element is multifunctional and is needed not only for decoration. There are many practical purposes hidden in the step in front of the door.
Work phases
A cement screed on a prepared concrete foundation forms a threshold in the bathroom. How to do this will be described below.
- Wooden pages are designed in such a way that the cement mortar does not expand and does not form the shape of the future threshold. The slabs should be wrapped in foil so that the ties do not stick.
- The syringe is poured into the mold and the top is aligned with the rule.
- The threshold level is adjustable in the bathroom.
- The layer must be completely dry, this may take several days. At this time, the cement screed should be regularly moistened with water. This is necessary to prevent cracks in the screed.
- When the concrete is completely dry, the plates are removed. The pores must then be cleaned out so that the surface is as plain as possible.
- Now we need to coat the threshold on all coated surfaces.
Work on the threshold has been completed.
Then finish the threshold in the bathroom with ceramic granite. Also read: “How to get to the threshold at the front door and what material.”
This is done as follows:
- The adhesive is applied to the tiles using a spatula. The glue is applied to the surface and pressed for a few seconds.
- Using special plastic crosses, the seams between the plates are leveled. Use a level to smooth the surface.
- After laying the seams, they are washed with a special composition of the same tone as the tiles. To do this, use a rubber spatula and remove excess mixture with a foam sponge.
The resulting bathroom floor tiles must be tested for durability, this is done with a simple touch - the sound must be the same everywhere. If you can't avoid voids, the tiles will quickly tear apart in these areas.
Ilya Kotkin
Do you need a threshold in the bathroom? Actually, we need a but! when we had problems with ventilation, we were advised to either remove the threshold or not close the door to the bathroom. Probably the best option is when the door has special “through holes in the lower half of the door...
If suddenly a pipe bursts in the bathroom, then without a threshold, water will immediately flow into the apartment. Therefore, it is better that there is. We have never installed thresholds in apartments, what nonsense to talk about noise insulation with three children. Learn to better enjoy children's squeals.
I know nerves and all that, so I say learn it. You need to learn patience. It’s about...
Zinaida Shmakova
Sharp threshold in the bathroom due to the tiles on the floor, the door is butt.
What can be done? It would be better to cut the tiles by 5 cm and lay a semicircular threshold (if I presented the problem correctly), “round it off” with a grinder if that doesn’t work, as john222 said, or cut the door leaf and install a threshold.
In bathrooms, it is necessary to leave a small gap under the door; to ensure air flow, exhaust ventilation without influx is ineffective), thresholds for joining different types, https://www.vikont-spb.ru/catalogue
Sergey Dubasov
Which door to install in a bathroom is veneered? Which one do you have? Any door can be used, but preferably without a threshold (so that there is a gap of 1.5 cm between the floor and the door) and the bathroom needs to be ventilated. Where do you get moisture in the bathroom?
the bathroom must have supply and exhaust ventilation, and the veneer can be protected with wax polish for 5-7 years. We have solid wood. Even the cheapest door will do. Hollow MDF film. By the way, such doors react even better to changes in temperature and humidity. But the array (solid veneer) will change sizes.
Vyacheslav Kulikov
At the dacha we found a door bought a long time ago, the door of which does not reach the frame to the frame) What is there 10 cm for? Because this is not an entrance door, but for a room or for a bath, nowadays they don’t make thresholds in apartments so that a cat can get through. Ventilation is probably a door for there should be a gap for ventilation at the bottom.
But 10cm is a lot. in the toilet the door should have a gap, but it doesn’t reach downstairs, most likely for the threshold. or a door without a frame at all
Sergey Kiryanov
I want to install doors with a threshold in the bathroom, but I don’t know what to do first, screed the floor or install the doors? Fill the floor! Is it worth flooding the bathroom floor?
Is he crooked? First, of course, it starts with the floor. Well, I would advise making the doors without a threshold. I installed a board in the opening so that the solution would not spread into the corridor. Then the door and then the floor tiles.
Polina Kozina
It seems to me that the layout of the apartment is not entirely successful. Well, yes, the layout is unsuccessful, a lot of partitions, a narrow tunnel instead of a corridor and there is zero sense.
They wrote to you correctly. Separate part of the corridor as a hallway, separate the bedroom from part of the room, and leave the rest as a single living room with kitchen.
Design features of latches
Door latches, which you can install yourself, are a kind of locking device, the operating principle of which is similar to the operation of built-in door locks.
The main difference between a latch and a full-fledged lock is that in the first case, a special key is not required to open the door. To do this, just turn the handle of the locking mechanism. This solution is ideal for interior door designs. Such latches are installed on entrance doors as an additional locking device and to increase security.
By design, the following types of products are distinguished:
- Latches;
- Deadbolts;
- Butterfly valves.
According to the method of mounting the latches, there are:
- Invoices;
- Mortise.
The most popular among consumers are rotary latch models that cut directly into the door leaf. They are equipped with an automatic shutter mechanism and have a more attractive appearance. Installation of such devices can be performed on doors made of any material.
There are other options for latches, for example, rotary latching handles, which allow you to close interior doors and securely fix them.
Do-it-yourself porch to the house - bold ideas, beautiful projects (photos, drawings)
A porch for a private home is an essential element of any modern home. Since the aesthetic and functional design of the entrance becomes a “business card” and a reflection of the preferences of household members, the construction of this structure requires a competent approach, in particular to the selection of suitable materials. The design of the porch of the house should create a feeling of integrity of the overall ensemble and enhance the attractiveness of the main building. In the article we’ll talk about how to make a porch for a house with your own hands and what nuances you should pay attention to in order to avoid serious mistakes.
Installation process
In cases where unevenness is visible on your work surface, or it is located at a low level, you need to perform a screed. A special wooden formwork must first be organized, which can prevent the solution from leaking beyond the expected threshold.
In order to prevent the building substance from sticking to the wooden formwork, it can be covered with cellophane or plastic film. Only after this the prepared space can be filled with mortar. Based on the sides you have built, the mixture needs to be thoroughly leveled. In order to determine the evenness and horizontality of the surface being created, use a building level.
Complete hardening of the screed will occur a few days after completion of the work. During this time, the screed must be moistened with running water. This will eliminate the possibility of cracks forming. After the substance has completely set, you need to remove the formwork. Now the lining of the threshold with porcelain stoneware begins, but before that the resulting surface must be covered with a primer composition.
Threshold installation
The back side of the tile must be coated with an adhesive before laying. For this tutorial you will need a notched trowel. This technique will allow you to evenly distribute the solution over the tiles, thereby saving some adhesive. Now the porcelain stoneware is applied to the cement base and pressed for a few seconds. Porcelain stoneware tiles are leveled using the same building level. After laying and tiling, grouting of the joints must be carried out. In this case, a special composition must be used. It is applied to the joints of the tiles using a rubber spatula so as not to damage the front side of the porcelain stoneware. When the substance dries, its remains are removed from the tile with a simple sponge.
Wait until the solution is completely dry, and then check the quality of your work. All you have to do to do this is knock on the tile. If there is no sound indicating the presence of voids, you don’t have to worry at all - all your work has been done properly. And this, in turn, means that the threshold you create will last a long, long time.
Tips for finishing a porch
Porch design ideas can be seen in the photo. There are a lot of design options for the entrance group.
Finishing materials for cladding the porch
The porch to a wooden house is most often made from the same material. It is impregnated or painted with special compounds to protect against pests and adverse conditions.
A concrete porch can be lined with ceramic tiles or decorative stone (brick).
The metal porch is decorated with forged elements.
Execution materials
When choosing raw materials, it is necessary to take into account the conditions in which the door threshold will be used.
The tasks that will be assigned to this element of the front door are also taken into account. There are enough materials for execution, but each of them will behave differently in the same circumstances
Metal
Perhaps this is the most reliable and durable material. Conventional steel is used extremely rarely and, as a rule, for industrial facilities. In residential premises, various alloys are mostly used. This is brass or stainless steel. But aluminum is very popular. It is easy to care for and very resistant to abrasion. The only downside is its slippery surface. Therefore, it is decorated with corrugated elements. They can be made of rubber, wood or plastic.
Advantages of metal thresholds:
- Used for any premises with high traffic;
- Not afraid of high humidity;
- Simple in design;
- Preservation of all characteristics with a sufficiently long service life;
- Finished products have a large selection of sizes;
- Easy to install;
- Not afraid of corrosion and mechanical stress;
- Low cost.
For interior passages, low thresholds are made (up to 2 cm). Some of them can even be installed with tile adhesive. A balcony or front door requires taller structures that are fixed with self-tapping screws. This is not difficult and anyone can do this work on their own.
Tree
Wooden thresholds are very popular in residential areas. For the front door, only hard wood should be used. You don’t even have to buy the planks, but make them yourself from oak or aspen. But store-bought products are not expensive and have a very wide range, differing in color and texture.
Advantages of wooden thresholds:
- Environmental friendliness;
- High insulation characteristics;
- Easy to install;
- Compatibility with laminate and linoleum;
- Sufficient strength;
- Low price.
But the material is sensitive to high humidity and is not recommended for installation outdoors or for bathrooms. True, if it is pre-treated with protective compounds and painted, then it copes with all tasks no worse than others.
But the wooden threshold has proven itself best in interior transitions. There is no need for serious processing and you can only use clear varnish. It will best highlight the beautiful texture of wood and the element will act as a good decor.
Concrete
One of the most durable options, but also the most expensive. As a rule, they are installed at entrance or balcony passages. Optimal for the private sector, where you can often see a tile threshold. A concrete base is poured at the front door and then lined with decorative material.
Features of concrete structure:
- Suitable for high traffic openings;
- Great durability (up to 50 years);
- Excellent waterproofing properties.
Concrete thresholds for the front door are extremely rarely left without decoration. They are usually covered with ceramic tiles. You can find laminate and wood finishes. But a simply painted concrete surface looks decent.
Most often, the threshold is made before the doors are installed. And for its production, a plasticizer must be added to the cement-sand mixture. This reduces the formation of cracks on the surface and extends service life.
But if chips do occur, then in most cases their covering will be only temporary. A serious crack indicates a violation of manufacturing technology and a complete rework of the threshold will be required.
Concrete is rarely used in interior passages. It can be seen, perhaps, only in the bathroom. In other premises it is not only unprofitable, but also of little aesthetic value. Under some circumstances, the threshold is made of brick. This can be seen especially often if it is multi-level, in the form of a staircase.
You can recall some examples of making plastic thresholds. But this material is fragile and is afraid of sunlight. You can find it when it comes complete with a metal-plastic door.
Why is it needed?
In many cases, a threshold at the door is needed to complete the design of the entrance space. Decorative strips are used only for interior passages. Street doors simply require the installation of this element to protect the room from dust and dirt.
But there are also rooms inside the house for which it is recommended to install a threshold at the entrance. This is a bathroom, due to the high humidity in it. In the kitchen it is required to avoid the spread of odors from it throughout the apartment. On the balcony door it is needed to protect the room from street dust.
Functions that the threshold performs:
- Decorative design;
- Protection from dust and dirt;
- Odor control;
- Noise suppression;
- Thermal insulation.
But in most cases, the element is necessary to level out floor differences between rooms. The threshold at the front door is needed as a transition from a lower street surface level to a higher one in the apartment. It also helps protect the premises from intruders. The design may have a groove into which the bolt of an additional lock embedded in the door fits.
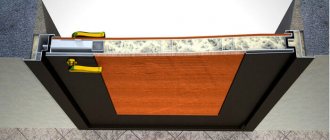
Guillotine threshold - what is it?
Such a threshold is a mechanism that, when the door is open, falls down and does not interfere with normal movement. With its help, you no longer need to constantly raise your feet when entering the apartment. This is very convenient, because remember how many times have you accidentally tripped, forgetting to lift or lifting your leg to a lower height?
Guillotine threshold
The guillotine has several advantages that make it very popular and in demand in the world of thresholds:
- The seal has a very good stroke, allowing you to hide significant gaps
- Acceptable cost
- Easy installation and replacement
- This threshold has a long service life - 200-250 thousand openings
- Excellent thermal insulation and sound insulation performance
Decorative decoration of the entrance to the apartment can be varied and is carried out strictly according to your taste preferences. Some people use tiles, some like painting, and others, deciding to save money, use conventional linoleum decoration. In any case, the finishing must be of high quality and fit into the overall interior of the room. The functionality of the threshold and its appearance can not only protect the interior from the cold, but also somehow complement the appearance of the room.
Decor
Finally, decorative finishing is performed. The appearance of the threshold adds aesthetics to the opening and increases the service life of the product itself.
The coating depends on the material used to make the threshold. Wooden products are coated with varnish or special means to protect wood. Sometimes they paint.
Using ceramic or laminate tiles, you can decorate a concrete threshold.
Decorating with linoleum will save on finishing, but this option is not the most reliable in terms of service life.
Source
Level difference
Brass and aluminum floor thresholds for different purposes are made from 3 types of profiles:
- flat (the upper side may have a convex shape);
- corner (transitional step, difference in the thickness of adjacent floorings);
- T-shaped (for installation at the joints of materials of different structures, for example, tiles/laminate/parquet).
Where the difference in levels forms a clearly defined step, an angular profile is installed to maintain the integrity of the edge and protect the legs.
The structure for multi-level transitions can be prefabricated or solid (with a given angle of inclination and width of the closing surface).
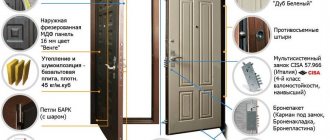
Materials for the threshold at the front door
Metal threshold for the entrance door to an apartment
Many types of raw materials used in the construction of walls are used to install the threshold. Often they choose a material that harmonizes with the door.
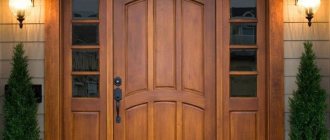
Tree
This is one of the most common materials, aesthetically attractive and suitable for wooden panels. Installation, replacement or repair of such a structure is much easier than metal or cement. It also has good noise and heat insulation properties. Oak is best suited - its wood is durable. It is possible to use other rocks, the main thing is that the material is hard. Before installation, raw materials must be treated with compounds that prevent fire and rotting.
Metal
Wooden thresholds are installed in private homes
Such a threshold will be characterized by maximum wear resistance. Another plus is the possibility of installation in industrial premises, including where the air contains a lot of moisture. The product is not afraid of corrosion. It is recommended to choose a steel or brass profile - these materials are very durable. The threshold is installed quite simply; self-tapping screws are suitable as fastening elements.
Brick
This is a fairly durable material and is also easy to obtain. A brick threshold is well suited for buildings whose walls are also made of it.
Plastic
Due to their low price, such products are quite popular, but they do not differ in durability and resistance to sunlight. However, it is acceptable to use them for the interior door of a room, especially if it is also made of plastic.
Cement
Threshold made of cement and ceramic tiles
The cement threshold is durable and lasts up to half a century, while the cost of funds will be quite small. Another plus is good waterproofing.
Typically, such designs are made for the external entrance door, as well as for the balcony.
For finishing, you can use decorative panels that are resistant to moisture. If the door to the opening is already installed, it will be more difficult to make such an element.
What are GOSTs based on?
The main requirements for entrance doors set by the consumer and SNiP are, as a rule, reliability, thermal insulation, sound insulation and noise absorption. All these characteristics influence the choice of material for their manufacture. The size is influenced not only by the desire to move freely with bags, but also by fire safety.
So, for example, a sash 650 millimeters wide will already be inconvenient for passing through it along with any objects. If the doors are wide - from 1000 mm, then their weight increases accordingly, which means they will take up more space when open.
Their throughput capacity is calculated based on the actual width of the passage. This means that you need to take into account its reduction due to the box and the protrusion of the canvas when opening.
As for SNiP and GOST regarding the height of the threshold for the entrance door, the documents contain a figure from 20 to 45 mm. This indicator is required by fire safety standards and other acts, for example, ensuring free movement of persons with disabilities.
[my_custom_ad_shortcode1]
Profile Features
Thresholds are made in a wide variety of colors and sizes Thresholds are made in a wide variety of colors and sizes. Various materials can be used in the base. But the fastening of different models can be either hidden or open. Each method has its pros and cons. An open mount is easier to install, and the threshold design is more reliable and simple. Closed fasteners are more difficult to install, but they have a completely different appearance.
The price of this product is based on the cost of the material. Aluminum and brass interior thresholds will be more expensive than plastic ones. The cost of wooden samples for parquet depends on the type of wood. But, no matter what threshold you install, it needs care, otherwise the expensive part will very quickly become unusable.
Where are the most expensive new buildings in the Moscow region?
Installing a wooden threshold for a door
The wooden threshold may be an element of the door frame, in which case it can be restored or replaced.
Installation of a wooden vestibule is quick, so replacing or repairing it is not difficult. If small irregularities have formed on it, then it is enough to sand it, coat it with varnish or paint to match the color of the front door.
Materials and tools:
wood boards; scrap; hacksaw; saw; vacuum cleaner; nails; drill; dye; varnish
Before replacement, you need to dismantle the old threshold. If the threshold does not protrude above the floor, then it can be removed using a lever. Take a crowbar and hammer one end under the threshold, and then press the other end.
Before removal, remove the threshold that rises above the floor from nails and knock it out with a hammer. If it is impossible to knock it out entirely at once, cut it into several pieces with a hacksaw and then remove it.
Before installing a wooden threshold, make sure that the front door fits snugly against it.
Collect dry debris with a vacuum cleaner. It is recommended to wipe the surface itself with a cloth. You can make the threshold yourself or buy a ready-made one. If it is larger in size than necessary, then part can be sawed off. You can secure the wooden structure with ordinary nails.
To prevent cracks from forming when hammered, drill holes of the required diameter. Before proceeding with installation, check how the front door closes. If it fits well to the ledge and opens and closes freely, then you can begin installation. To finish the job, paint or varnish.
You can cover the threshold with the coating that is in the hallway. If there are tiles in the corridor, then the threshold can also be covered with tiles. This finish looks beautiful and the renovation will look complete.
Any cracks that form during such work must be plastered. Once the solution has hardened, apply silicone putty. This will block the path to cracks from vibration.
Wood is not a durable material. Therefore, for this design it is better to choose durable wood. If you make the threshold yourself, then use oak, ash, beech, or larch. From the selected block of wood, use a chisel to form a threshold no more than 30 mm high.
When buying a finished wooden product, do not skimp on quality by purchasing a cheap option. It can be made from soft rocks. And this will lead to rapid wear and damage under load.
In order for wooden thresholds to last longer, you need to carefully treat them so that moisture does not penetrate into the cracks when washing the floors.
Metal thresholds are usually installed from stainless steel, aluminum or brass. If a metal door is installed, it will be immediately equipped with the same threshold, which simplifies the task.
How to lay a floor with tiles
On old tiles
On floors made of chipboard or similar materials
Before laying tiles on a wood floor, vacuum or wash it with an alkaline detergent. If necessary, treat the surface with a primer. If the floor is uneven, level it with a leveling mixture.
Installation: use special glue or glue with an additive and a special plastic joint compound or mixture with an additive.
2 Installation materials
| Primer | Additive | Self-leveling leveling mixture |
| Apply with a roller or brush before leveling or facing. Used on poorly absorbent porous or wooden surfaces, it creates a layer between the base and the glue. Allows you to strengthen the adhesion of the tile to the base. | It is added to glue to enhance its adhesiveness and plasticity. Allows you to compensate for unevenness of the base. | Apply using a leveler to achieve a smooth surface of the base. |
| Grout for seams | Tile adhesive |
| Apply with a soft rubber spatula to fill the spaces between tiles (joints). | A dry mixture that is mixed with water and applied with a spatula. |
It is necessary to lay the tiles in such a way that each new row of tiles ends at the front door to the room or at the main entrance.
2. Before laying the tiles, lay the tiles, without gluing, along the drawn axes to the walls of the room.
Don't forget to take into account the width of the seams. This adhesive-free trial of tiles, called a "test run," will allow you to select the optimal tile placement and avoid unnecessary cutting. In order to understand how to lay tiles correctly, start by gluing the tiles near the wall opposite the entrance.
| The first row will consist of whole tiles; you will place the cut tiles later. |
5 Applying glue and gluing
Laying tiles yourself using the gluing method is the easiest way to lay tiles. All steps described below (1 to 6) must be repeated for each surface area measuring 70 x 70 cm.
2. Place the tiles on the adhesive. To lay tiles measuring 20 x 20 cm or more, apply two layers of adhesive: on the floor and on the tile. To glue the tiles, just apply a thin layer of glue to it using a trowel.
4. How to lay tiles evenly?
Check the flatness of the surface of the laid tiles. Level any protruding tiles using a rubber mallet or wooden block. The wooden block should be placed on several tiles at the same time.
5. Don't forget to remove the plastic crosses before the glue hardens.
2. Place the tiles on the adhesive. To lay tiles measuring 20 x 20 cm or more, apply two layers of adhesive: on the floor and on the tile. To glue the tiles, just apply a thin layer of glue to it using a trowel.
3. For rounded cutting: Apply adhesive tape to the surface of the tile to be cut, which will avoid nicking the enamel, and drill holes along the perimeter of the intended rounding using a carbide drill bit (tungsten carbide)
Then, using wire cutters or tile tongs, carefully break off the desired portion.
Processing: Use a file to smooth out uneven edges.
At this stage of the work, the plastic crosses must be removed from the seams.
Using a soft rubber trowel set at an angle, apply the grout mixture to an area of approximately 1m2 of tile and spread it so that it completely fills the grout lines. After a few minutes, wipe the tiled surface with a damp sponge.
After tiling and grouting are completed, mask the seam around the perimeter of the room (expansion joint) by gluing the baseboards along the wall.
9 Additional tips
- Use tiles from different packages at the same time to ensure a more uniform color.
- If you want to understand how to lay tiles on an outdoor floor, cladding with marble or other non-standard materials, consult with our consultants, they will provide you with the necessary information.
- Wipe the tiles with water and cleaning agents that do not scratch the surface and do not contain grease. And then rinse with clean water.
Types and device
Thresholds are of the following types:
- Entrance – installed at the entrance to the house (apartment, building);
- Interior – mounted in the opening in the bathroom or shower room. Many people do not understand why a threshold is needed inside the apartment at the entrance to the bathroom. It's very simple: if a water breakthrough occurs in a given room, it will become a boundary that will not allow flow into the rest of the apartment. Some install this limiter in order to isolate the entire apartment from excess moisture coming from the bathroom. In addition, no one forbids installing a threshold in the hallway or near the doorway in the kitchen;
- On the balcony - this is a necessary element, as it retains heat in the apartment and prevents dust from getting inside. In this case, the threshold from the outside should be, first of all, functional, and from the inside – beautiful and matching in design with the overall design of the room.
Among the types of this design, there are models with an interesting and unusual name - guillotines. They are attached to the end of the door. When the door closes, they move down and completely tear off the gap between the floor and the door.
Some doors are already sold complete with a threshold. Which is very convenient, since you don’t need to waste time searching for the required copy. If such an element is not available at the door in finished form, it can be purchased separately and installed independently.
The range of construction stores is quite diverse. Finding the right product is not difficult. On sale you can see thresholds made from inexpensive materials as well as quite expensive ones. Thresholds are made from the following materials:
Wood is an inexpensive option. There are both interior and entrance wooden thresholds. Its quality depends on the type of wood. Oak, pine, and hornbeam are considered the strongest and most wear-resistant. A special feature of wooden models is the need for careful care and annual painting. Plus - wood is easier to install.
Advantages
Most modern households accept it as an object that performs a specific function.
Here are some opinions on the usefulness of this component:
Helps reduce noise. This is true. However, it is also necessary to take into account the noise absorption of the door leaf itself. It is higher on a solid wooden door than on a hollow one.
Door without threshold, photo
- When cooking, the kitchen door prevents oil smoke from entering other rooms. Here we recommend purchasing a good hood over the stove or a fan with natural circulation.
- Protects from draft and dust. You can't argue with that!
From all of the above, it is clear that installing interior doors without a threshold in the kitchen is quite acceptable. If alternative solutions to problems with sound insulation and air penetration through the gap under the door do not suit you, then use thresholds. It can be retractable, floating and so on.
Types of floor thresholds
They can be divided into types according to the material of manufacture, design and installation method.
What are floor thresholds made from?
Metal thresholds for laminate flooring are most common; they are made of aluminum. They are quite practical and easy to install. But their main disadvantage is that they are taken out of the context of floor paintings. Let's say it is necessary to close the joint between the tile and the laminate, as a result, using a metal threshold we will create a conspicuous edging - a metal strip. Although aluminum thresholds laminated to look like wood are on sale today, it is often difficult to find them to match the chosen floors.
Metal thresholds for laminate flooring photo
In this sense, thresholds made by laminate manufacturers are more profitable. Such companies produce them for each decor of the laminate they produce. Therefore, when purchasing laminate, be sure to buy the original threshold for it. As a result, after installation, the threshold merges with the laminate and does not stand out against its background. The material for their production is the same as for the production of laminate - HDF board and lamination. The lights are installed in a hidden way.
Thresholds for laminate flooring photo
A separate point is flexible thresholds for laminate; they are used to connect curved joints (zigzags, semicircles, etc.) - these are rubberized thresholds and cork expansion joints. The latter have an advantage over the others, since they do not come to the surface - they remain flush with the laminate sheet. This is an ideal option for those who do not want to use a T-shaped threshold.
Flexible threshold for laminate photo
What is the design?
The type of threshold design determines its purpose; there are several types of laminate construction:
- multi-level,
- single-level,
- universal.
The first allow you to join floors located on different planes - for example, thinner laminate and thicker parquet boards.
To use the second type of thresholds, it is necessary that the floors being joined lie in the same plane.
Universal thresholds have such a design that they can be transformed into multi-level, single-level, and can also be used in cases where it is impossible to install a plinth - it is used as a finishing edge for the laminate fabric. These types include the Imncizo threshold from the Belgian company Unilin, which produces Quick-Step laminate.
Thresholds for laminate flooring photo
Methods for attaching floor sills
There are two types of fixation - thresholds for laminate with hidden fastening and open. The former are, of course, more preferable, since after installation the fastening elements are not visible. They come in HDF(MDF) and metal. The HDF design has two profiles - working and decorative. The working bottom one is fixed directly to the base, and the second decorative one is simply inserted into it. Metal thresholds with hidden installation have a slightly different design; they do not have a lower profile - we will look at them in more detail using an example of installation in the section below. But the type of thresholds with open fastening, after installation, will look less aesthetically pleasing, since it is mounted through the end-to-end method - with self-tapping screws through the decorative layer.
Thresholds for laminate flooring photo
Technology for installing an interior threshold
There are many ways to install interior thresholds. However, they all start with measuring the joint in the flooring that needs to be covered. After measuring its length, the resulting value should be noted on the purchased threshold, and the excess material should be cut off with a hacksaw or grinder. Otherwise, the complexity of installing the threshold depends on the type of its design.
Installation of thresholds with an open fastening system
Installation of thresholds of this design is very simple. In this case, profiles are used that have ready-made holes for fastening, drilled with the same pitch. To install such a product in a doorway, you need to attach it to the floor and mark the attachment points on it. After this, according to the resulting markings, you should make holes of the required diameter, install plastic dowels in them and secure the threshold with screws.
The fastener must fit tightly into the holes of the threshold, otherwise over time it will weaken and fall out. If there is a wide gap between the coatings, you need to select the appropriate threshold for it. In order not to spoil its appearance, it is recommended to buy screws with decorative caps for fastening.
If the joint of floor coverings has different levels from 3 to 20 mm, you can use a wide threshold, which is fixed at an angle, or a transition profile to disguise it.
Installation of thresholds with a closed fastening system
It is often chosen for aesthetic reasons. In this case, strips with floating internal holes intended for fastener heads, or special thresholds consisting of two parts - a rail and a T-shaped profile, can be used.
To attach the plank, you first need to make holes in the floor according to the previously made markings and insert plastic dowels into them. After this, the screws must be carefully inserted into the slot on the plank and turned over so that all fasteners fit into the installed dowels. Then the threshold should be fixed by slightly pressing it to the floor and tapping it with a hammer through a layer of paper to avoid damaging its surface.
To secure the T-shaped threshold, you should also drill the required number of holes in the floor and insert dowels into them. After this, the threshold strip must be fixed to the surface using screws, and an external decorative profile must be installed on top by snapping or gluing.
Special attention is always paid to installing a threshold in a bathroom. Currently, special products are on sale that prevent water from penetrating into adjacent rooms in the event of flooding. An excellent option for a bathroom would be to install a guillotine threshold, the description of which is above.
An excellent option for the bathroom would be to install a guillotine threshold, the description of which is above.
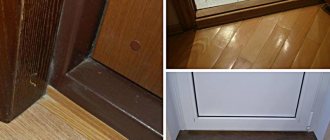
If a wooden threshold is being installed in a toilet or bathroom, the work must be done so that there is a gap of 5-8 mm between it and the bottom of the door leaf. It is necessary for the normal operation of natural or forced ventilation, if one exists in the room.
Currently, according to many people, interior floor thresholds present a lot of inconvenience. However, those who use them are well aware that the functionality of these products is so obvious that they have a right to their existence. It is difficult to determine which of them is right. But with or without a threshold, interior doors - let it be practical and beautiful!
Working with an opening
The vacated opening must be prepared for installation of the box. Surfaces located inside should be leveled if necessary. To install the door correctly, you need to take all measurements accurately. To do this, you need to estimate them using a certain formula: take the width of the door, add double the thickness of the timber to it, taking into account a gap of 2-3 cm. The height of the opening is calculated using the same method.
If the box exceeds the required dimensions, it should be reduced. There is no need to be afraid of this, since this work is much easier to do than by enlarging the opening, especially if the wall is made of concrete.
Reducing the opening
But when reducing the thickness of the side of the box, you shouldn’t get too carried away, since you can remove a maximum of 15 mm from the beam.
It is better to reduce the value from the piece of timber that will contain the lock strike plate. This is due to the fact that this part bears a small load during operation. When installing the box, it is necessary to maintain a gap of 10 to 20 mm in order to subsequently fill it with a special sealant.
Measuring systems
In the old days, builders used the English system of weights and measures. In accordance with it, two doorway standards were distinguished - a height of 6 feet and 6 inches, which equated to 198.1 cm, and a height of 6 feet and 8 inches (203.2 cm). The standard width also had two values - 2 feet 3 inches (68 cm) and 2 feet 9 inches (84 cm).
But, with the advent and widespread use of the decimal measurement system, which was much easier to use, the previous values were abandoned. Moreover, over time, the numerical indicators themselves have changed, which are reflected in GOST and SNiP.
[my_custom_ad_shortcode5]