Types of handles used on interior doors
Thanks to the many varieties of handles for installation in doors between rooms offered by manufacturers, you can choose the best option suitable for each house or apartment. When choosing the type of handle, the type of doors between rooms, the material they are made of, personal preferences, and financial capabilities play a role.
However, when making a choice, you should also take into account the design features of the mechanism and the method of their installation on the interior door leaf. Differences in the installation of different types of door handles can sometimes be quite significant, and the installation method depends on the specific locking mechanism.
Overhead handle
Differences in installation method
So, door handles, which are used for installation in doors between rooms, are divided into two main types:
- overheads that do not require much effort during installation. The simplicity of the design means that it is quite possible to handle their installation even on your own. After all, their installation consists of fixing them on the surface of the interior door;
- mortise Here things are more complicated. Because a preliminary process of drilling a hole will be required. It will be needed to install the lock and handle and will be located in the canvas.
Mortise handle
Both of these types of handles are convenient to use. However, their installation is fundamentally different. There is a classification for mortise handles. It looks like this:
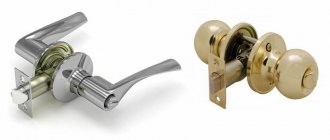
- knobs, otherwise called rotary knobs. This type has the most convenient shape of different sizes. The scheme of their operation is as follows: the door opens not by pressing on the door leaf, but by turning the holder. There may be a lock inside the structure itself that will block the tongue inside the lock;
- Latch handles, also called push handles. They are the most common today. As the name implies, they are activated by pressing on the handle lever.
For wardrobes and doors with a similar operating pattern, convenient and practical open-type handles are used. They allow you to open sliding doors as efficiently as possible without damaging the wallpaper and walls.
Knob handle
When choosing door fittings and handles, in particular, you should pay attention to the material from which they are made. Handles should match the overall design of the room and the door leaf.
Latch handle
conclusions
Replacing the hardware on the door locking mechanism is a simple job that can be done by any home craftsman who has little experience in repairing any equipment. If you need to install overhead handles on the door leaf, this procedure will also not raise unnecessary questions, since the device only requires fixing the finished part to the door leaf with self-tapping screws.
Rice. 8. Defects during installation
However, when installing a new mortise handle with the need to make holes with a large diameter along the pin, it is better for the apartment owner to turn to professionals for help. In the absence of proper work experience and a good router, the result may not live up to expectations, and the operation of the entire set of doors will be significantly difficult.
What to pay attention to
When installing, you should correctly calculate the installation height of the handle. The degree of ease of use of interior doors largely depends on this. There are no clear regulations regarding such a height anywhere. The generally accepted indicator is 1 m from the level of the floor covering.
This figure is based on adults and children. In many ways, this indicator may depend on the height of the people living in the house or apartment. It is also necessary to pay attention to the height at which the handles are installed in other doors: they should all be installed the same. Thus, the interior of the room will acquire harmony and completeness.
Choosing the right accessory
Of all the types of handles presented, it is important to choose one that matches the door.
Before choosing a lock, you need to decide which version of the accessory you need - right or left. This point should definitely be clarified with the seller.
- swivel mechanism;
- push;
- stationary.
Pay attention to the shut-off valves. There are devices that slam shut equally on both sides, but there are also those that have a latch on one side and a lock on the other. The latter mechanisms are very inconvenient if there are small children in the house. They can slam the door from the inside, making it difficult to open. There were precedents when an interior door had to be dismantled because of such a trifle.
Types of door handles
Products differ in the material of manufacture, design, and working mechanism. The fittings are selected to match the style of the room, taking into account ease of use. By type of fastening there are:
- Invoices. The fittings are simply screwed with self-tapping screws to the surface of the canvas.
- Mortise. They often come complete with a lock or latch. Installation of fittings involves cutting a groove and drilling a through hole in the body of the door leaf.
All mortise models are divided into two types:
- Knobs. The fittings are equipped with a rotating mechanism that moves the latch. Usually the handle itself is made of a spherical or disk shape.
- Push models. The mechanism operates on a similar principle, only the handle must be pressed to activate it. Fittings complete with a lock are in demand for interior and entrance doors.
Push models, in turn, are divided into two types:
- Mechanism with handle and latch assembly . Such models are inexpensive, but not durable. They quickly become loose and fail.
- The handle, latch, screw and the mechanism itself (with a tongue or magnetic) are selected separately depending on preferences. Such products are of higher quality and more reliable than the first option.
Common materials for the production of fittings are metal alloys or aluminum. Overhead models can be made of wood. For expensive paintings, handles are made of stone and glass. The cheapest option is plastic. Metal elements are chrome plated or plated with nickel.
Products differ according to the type of lock . The simplest locking element is a latch. The lock can be locked with a key on one or both sides. In the first option, a latch replaces the key on the inside of the room.
Door handle-latch device
So, you are thinking about how to install and disassemble a door handle latch. Knowledge of the device and circuit will help you easily remove the old handle and replace it with a new one. We will look at the most popular knob type models - with push and turn handles . They are similar in design, differing only in the shape of the handle and the method of opening the latch. The push button is convenient because it is easy to operate - just pull the handle down and the latch will open. However, some users find this model quite inconvenient: it happens that they hit it or get caught by clothes. The rotary handle is more ergonomic in this regard, and it looks much more aesthetically pleasing. But it also has its drawback - it is not always possible to turn the latch the first time to open the door. For example, it is not easy to do this with slippery hands, and children cannot handle such a handle at all. When purchasing, consider these nuances and make the right choice.
The product consists of two interconnected handles (3) and a latch mechanism (1), which is inserted into the door leaf. A strike plate (6) is installed in the door slope. The fastening screws (8) are hidden by a decorative flange (5), in which there is a technical hole (4) for pressing the handle and removing it. To do this, use a special key (7). And several keys (9) are included in the delivery set for models with a keyhole.
If you decide to install a door handle with your own hands, remember the main thing: the mechanism will work properly only if you take into account all the nuances during installation. To make it easier to cope with this task, we offer step-by-step instructions.
Installation process
Let's say you installed a new interior door. Now you need to cut the handle into it. Its functioning depends on the quality of the operating mechanisms and correct installation. Before talking about the installation process, we suggest you familiarize yourself with its components.
Knob-type door handle-latch diagram
1 – internal rotary handle; 2 – technological hole; 3 – spring clamp; 4 – lock button; 5 – handle shank; 6 – decorative flange; 7 – mounting plate; 8 – locking mechanism cylinder; 9 – decorative flange; 10 – external rotary handle; 11 – latch mechanism; 12 – plate for fastening at the end of the door; 13 – striker for the door frame.
Making holes in the door leaf
First you need to make a through cylindrical hole. To do this, use a tape measure to measure a distance of 1 - 1.2 m from the floor. Make a mark with a pencil. From the end of the door, measure a distance equal to the length of the latch mechanism. You can measure the mechanism using a ruler or look at its parameters in the manufacturer's instructions (all the drawings should be there). The resulting intersection point will be the center of the hole. First, use a drill to make a hole with a diameter of 5–6 mm. Then install a bit on the drill, the diameter of which is equal to the diameter of the hole for the internal mechanism of the handle - as a rule, it is indicated in the instructions.
Helpful advice! To make a neat through hole in the door leaf using a crown, first make a shallow cut on one side of the door - 5 or 10 mm. After this, a through hole is made on the other side of the door, centering the crown along the hole from the drill. Thus, when the crown comes out from the back side, the decorative coating will not peel off along the edges.
At the end of the door, according to the markings, you need to prepare a hole for the latch. To do this, a drill with a feather drill is used to make a hole. If it is too small, you can widen it with a chisel. Using the same hand tool, a small recess is made under the groove of the plate, which will be screwed from the end.
Installing the Latch Handle
First, you need to insert the latch mechanism through the hole in the end and screw the plate with self-tapping screws.
Then the part of the handle with the cylinder is inserted into the groove of the latch mechanism. On the reverse side, a mounting plate is put on the cylinder protruding from the door leaf and screwed with self-tapping screws. Then a decorative flange is put on. It is important that the small groove on the edge of the flange is at the bottom - for aesthetics. And the technological hole must coincide with the internal spring clamp. Otherwise, if you need to dismantle the handle, it will be difficult to disassemble it. Having aligned all the parts of the latch handle in accordance with the diagram, install the handle by pressing - the internal pin will fix it.
Installation of the strike plate
Close the door and mark on the end of the door frame the place where the latch tongue rests. Using a feather drill, make a hole for it. A chisel will help you choose the required depth. Attach the mounting strip and screw it with self-tapping screws.
Ready! On average, installing a latch handle yourself takes 20–30 minutes. The main thing is to take your time, study the manufacturer’s instructions and the dimensions indicated there. Then everything will work out perfectly the first time!
It is worth mentioning separately about the installation of the so-called handle on the socket. Its internal mechanism is impressive in size. A nest is made for it at the end of the door - first drilled, then expanded with a chisel to the required size. The mechanism is placed inside the door leaf for fitting. Make recesses for the lining on the end part. Next, the location of the hole and handle square is marked on the surface of the door leaf - holes are drilled. The latch mechanism is inserted inside and secured with self-tapping screws. After this, handles are attached to both sides of the door. The strike plate is attached according to the same principle as when installing a knob-type latch handle.
Marking
The procedure begins with marking the door leaf.
- Use a pencil to mark the location for drilling. Diagrams are usually included with the product.
- If there are no explanations, you can apply the dimensions yourself. To do this, mark with a pencil a distance of 60 mm from the door edge, the height of the location is from 90 to 1100 mm.
- We mark the central point for drilling on the side edge of the door leaf. Dimensions are drawn along the center line.
Height and distance from the edge of the door
The internal element (latch) is uniform, so it is installed the same for different handles with a latching mechanism. The height from the bottom of the door and the distance from the edge are standard.
For latch handles, there are two options for inserting into the canvas: 60 or 70 millimeters from the edge. The rotary latching mechanism can “move” to the right or left by about 1 cm, and this also needs to be taken into account.
- If the handle has a spherical shape, and the distance from the edge of the door to the decorative element of the door (for example, glazing) exceeds 140 mm, it is better to fix the mechanism 70 mm from the edge. If you install the handle at a distance of 60 mm, when closing the interior door from the inside, you can hit your hand on the door frame.
- When installing a pressure product, the indentation must definitely be 60 mm.
The standard handle installation height (distance from the floor to the center of the latch) is 900–1100 mm. If the door is usually used by one person, the optimal height will be located at the level of his waist.
Installation of the product on an interior door is carried out on the right or left side. For round handle models, you only need to reverse the latch design. The tongue should point towards the closing of the interior door. If the device is asymmetrical, the elements simply need to be swapped, focusing on the opening side.
How to disassemble and remove the handle?
Above we described how to install a latch handle in a new door leaf. But it happens that you need to replace the existing handle, and to do this you need to remove it. It's simple, because you know its structure. The procedure will be as follows.
- Loosen the decorative flange. It has a small groove on the edge - pry the flange behind it with a knife and carefully pull it out. You will see that there are fastening elements hidden under it, which cannot yet be reached with a screwdriver, since the handle is in the way.
- The handle is secured with a spring-loaded locking pin. How to find it? At push handles it protrudes on a decorative flange. Press it in with a key (if it is included in the kit) or a screwdriver. If the handle is rotary, the pin is hidden inside the housing. To access it, there is a technological hole on the flange into which you need to insert a key or an awl. While pressing the pin, pull out the handle at the same time - you're done!
- Now you can unscrew the fastener. Remove the handle and decorative flange. This way, you will separate the inside of the handle from the outside and can remove them from the door.
- To replace the latch mechanism, unscrew the screws that secure it to the end of the door, remove the bar and remove the mechanism from the door leaf.
Attention! Sometimes, due to improper installation of the latch handle, it is not possible to feel the pin. The fact is that the technological hole does not coincide with it. To fix this, you need to turn the flange until it aligns with the pin.
As you can see, disassembling the latch handle with your own hands is not difficult. This means you can quickly deal with this and move on to installing a new handle. The main thing is that it is reliable, and you do not have to replace it after a few months due to low-quality components. We offer you to buy reliable latch handles in our online store. Here you will find branded products that will last trouble-free for many years. The kit contains everything necessary for installation and instructions with a drawing for making holes in the door leaf. By the way, you can also purchase a tool for installing the latch handle yourself from us.
Installation of handles for compartment doors
Before you put the handle on the interior compartment door, you need to prepare an electric drill, a Phillips screwdriver and a chisel. Handles for this type of door opening are made in the form of a plastic insert in the shape of an elongated oval and a decorative lining-latch in the plastic part.
The size of the plastic insert is marked on the canvas with a simple pencil. Using a feather drill and a chisel, a recess along the height and length of the liner is knocked out in the solid part of the canvas. A tab is inserted into the prepared groove and secured at the top and bottom with hardware. The decorative part of the product is simply snapped inside the plastic component.
A similar procedure is carried out with the second part of the handle on the reverse side of the canvas.
Materials for work
Materials for work:
- – roulette;
- – electric drills;
- – screwdriver;
- – self-tapping screws;
- – chisels;
- – square;
- – hammer;
- – a set of wood drills;
- – pencil;
- – conductor.
The conductor allows you to simplify the process of marking on the door leaf and spend a minimum of time on it. It needs to be attached to the end of the door so that at the end of the work its holes coincide with the lining of the tongue of the screwed handle.
Installing a door handle with a magnetic lock
Handles for indoor doors with a magnetic lock can have different handle shapes, and the locking mechanism itself is shaped like a regular mortise lock and is mounted in the same way as it. To ensure that the sash closes smoothly, you will need to install the handle striker as accurately as possible. On the door in the closed position, the markings of the upper and lower edges of the lock are carefully transferred to the door. A counter strip is placed on the marking and the position of the groove for the magnet is marked, which is then drilled using a feather drill of the required diameter. Afterwards, a magnet is placed in the prepared recess, secured on top by a counter plate with self-tapping screws to the frame. On an interior door, the bar on the frame of a magnetic lock is never placed flush, since over time, in this position, the magnet weakens and ceases to tightly hold the door.
Installation of stationary door handles
Stationary handles are divided into two main categories based on the type of fastening: overhead and mortise. The first ones are screwed in a matter of seconds in the right place on the canvas onto hardware of suitable size. Before installing a recessed stationary door handle, holes are drilled through the interior door leaf into which a threaded rod is screwed. Handles are screwed onto the edges of the studs.
Having both basic locksmith skills and the necessary tools allows you to install a door handle on an interior door without much difficulty. The main condition is to accurately mark and not get into possible voids in the door.
Required Tools
To install a handle on an interior door with your own hands, you will need the simplest carpentry tools:
- electric drill;
- crown attachment with a diameter of 50 mm;
- feather drill with a diameter of 20–25 mm;
- pencil;
- screwdriver;
- hammer;
- chisel.
To facilitate installation, a template for installing door handles, sold with the product, will help. If it is not in the package, you can print it from the Internet. The template is a 1:1 scale diagram of the mechanism body. It is applied to the canvas to mark the groove and hole. If you intend to install a large number of handles, a jig is cut out of wood for drilling.
Useful tips
- It is first necessary to carry out careful calculations and then carry out any actions.
- When creating a through hole, you should be extremely careful and do not drill the door on only one side.
This can cause chips on the back side of the door leaf. As soon as the drill begins to appear, passing through, you need to continue working on the other side. After completing the installation, it is necessary to double-check the tightening force of the bolts or screws used so that poorly fixed parts do not soon damage the handle.
Hole preparation
At this stage we do the following:
- Using a chisel, we hollow out a 3 mm recess under the face plate of the latch, corresponding to its width. It is better to mark the center in advance with an awl so that you do not have to apply the markings again.
- Using a half-centimeter crown, we drill a through hole. It is better to do this on both sides of the door leaf so as not to damage the door coating at the exit of the crown.
- Now let's move on to the side edge. Take a wood drill (about 24 mm in diameter). They need to make a hole in the marked center for the latch. You shouldn’t go too deep, otherwise you can make a hole in the canvas all the way to the panel.
Handle and lock care
The best prevention is timely care of the handle and lock. This means periodic checks of functionality in case of downtime and regular lubrication of the lock. If the fittings become loose, it is necessary to tighten the handle so that the mechanism does not break in the future.
To ensure long service life of the lock, it must be lubricated annually. It is best to use machine grease or silicone grease for this purpose.
Sources:
- https://DomZastroika.ru/dveri/mezhkomnatnye/ustanovka-dvernoj-ruchki.html
- https://vitdoors.ru/dveri/ustanovka-dvernyh-ruchek-raznyh-vidov-poshagovaya-instrukciya-2.html
- https://www.vseinstrumenti.ru/krepezh/skobyanye_izdeliya/dvernaya_furnitura/ruchki/articles/kak_ustanovit_i_razobrat_zaschelku/
- https://o-dveryah.ru/zamki/ustanovka-na-mezhkomnatnye-svoimi-rukami/
- https://ProDverivdome.ru/ustanovka-dvernoj-ruchki-poshagovye-instruktsii-dlya-razlichnyh-konstruktsij/
- 1

