Warmth and comfort in the house are the main tasks facing every owner of his own living space. Particular attention is paid to the front door, as it is in direct contact with the street. And in the cold season, heat can leave the room through the doorway. To avoid unpleasant consequences, you should insulate the front door. You can do this work yourself. But before you insulate a wooden door in a private house, you should prepare everything necessary for this.
How is heat lost?
Pay your attention first of all to the main line of defense - the entrance doors. If there are gaps between the door frame, then no amount of batteries will protect you from cooling outside.
A draft makes its way into the house between the jambs and sagging doors, which are formed for a number of reasons.
There are 3 main types of thermal insulation failure:
- Gaps between the boards of the door leaf. The space can be created by the expiration of material or padding, which creates cold bridges through which the cold enters directly into the house. To avoid this problem, remove these boards when adding filler and cover empty cells with it.
- The gap between the box and the canvas. It appears due to frequent use, poor quality material or installation.
It is highly not recommended to buy a wooden entrance door made of pine and spruce, because this material tends to dry out quickly. But doors made of dark exotic woods will serve you for decades.
Also, be careful during installation, because a few carelessnesses and you will have to re-cut and align the openings.
- Gaps between the opening and the wall. A common problem in older homes and damp areas. Over time, the material dries out and thermal insulation failure occurs. The problem is solved by using polyurethane foam, but only with precise and dense placement of the platbands. If you install them loosely, the foam collapses and loses its protective properties.
When you are completely sure that the source of the cold has been eliminated, then start insulating the wooden door!
Eliminating Gaps
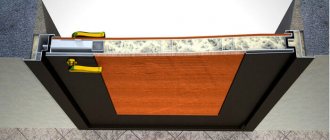
Heat loss occurs not only through a metal leaf or door frame. During the installation of the structure, a so-called technological gap is created - a gap between the wall and the box, usually its dimensions are about 2 cm. For insulation work, it is best to use polyurethane foam. Simply covering the cracks with cement is not a solution, since such a mixture is not a heat-insulating material. It does not protect the room from the cold, but shrinks over time.
Thermal insulation of the technological gap must be carried out in the following sequence:
- From the side of the room, remove the casing in the place where the box comes into contact with the wall. Secure the polyethylene film.
- Remove the casing from outside the apartment. Moisten the space in the crack with water. You can use a spray bottle. This is necessary so that the polyurethane foam hardens much faster.
- Apply the first thin layer of foam. Its path should be uniform, without breaks or omissions.
- After about 20 minutes, when the first layer of foam expands, apply a second ball of it. It is necessary to ensure that the substance does not bleed beyond the perimeter of the door frame.
- When the foam has completely hardened, remove the polyethylene film that served as protection from inside the apartment.
- At the end of the work, install the platbands in place.
If the foam appears a little outside the box, it’s not a big deal. It must be carefully cut with a construction knife.
Choosing insulation
When choosing a material, pay attention to fibrous and porous structures. This filler is perfect for the front door of the house. Choose the number of layers individually depending on the resistance of the door frame and the wall as a whole.
The more you insulate the doors with your own hands, the better the thermal insulation will be. But keep in mind that the structure will become many times heavier!
It's time to start choosing insulation for the door:
- Styrofoam. One slab contains many small polyethylene pimples connected to each other. An effective thermal insulator, but life-threatening. It ignites in the first seconds and at warm temperatures evaporates toxic substances.
- Mineral wool. It consists of various rocks and processing. Unlike polystyrene foam, mineral wool is safe at high temperatures and does not contain toxic substances. This material is also protected from physical damage from rodents and cold temperatures, but has one significant drawback - it swells from moisture. To prevent yourself from replacing the filler, first protect it with lathing.
- Polyurethane foam. A practical product that can be applied to any surface using a spray can. Does not require any additional fastenings for fixation. A heat-resistant material that is difficult to ignite, but when burned decomposes into carbon dioxide and carbon monoxide.
- Foamed polyethylene. And finally, we recommend purchasing this moisture-resistant insulation when it comes to a sauna or bathhouse. Sold in rolls 10-15 mm thick, which is enough to eliminate drafts in the cracks and retain heat in the room. But polyethylene alone will not be enough, which is why it is used as an additional layer of insulation.
To make the insulation of a door at your dacha affordable, a small layer of structure is enough.
But still, if you are preparing for the winter in an active rhythm of life, with noisy neighbors, then be sure to install only large and warm doors, which in turn will protect you from unnecessary extraneous sounds from outside. And, of course, everything should look decent!
Wooden blocks
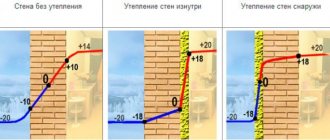
Wood is a material that retains heat well indoors, therefore, as a rule, the need for insulation is directly related to defects in the operation of the structure. The reasons for the passage of cold can be very diverse: the wood has dried out, the sash is sagging on the hinges, etc.
Therefore, first of all, it is recommended to adjust the position of the sash relative to the opening (rearrange the awnings or remove the sagging part of the canvas). As the tightness of the canvas to the box increases, a thermal curtain will appear.
In addition, you can reduce the heat transfer coefficient of wooden structures by putting such doors in a warm “casing”. Of course, the choice of insulation method depends on the design features of the door: if the leaf is hollow inside, the door can be insulated in the same way as metal structures.
This means that you first need to remove the sash from the doorway and remove the fittings. Then felt or mineral wool is placed inside the canvas, this insulation is fixed and the top is upholstered, for example, with MDF or dermantine. To perform such an operation you will need a standard set of tools.
More often, of course, there are solid wood door systems. Insulating an entrance door of this type is a little more difficult than a hollow structure. But still, a home master can cope with this task.
The thermal curtain is created as follows:
- The sash is removed from the opening.
- Unscrew the fittings.
- Lay the canvas on a flat horizontal surface.
- A groove is made along the perimeter of the sash (it is intended for the scallop of the layout).
- Insulating material (foam rubber or felt) is glued to the surface.
- The upholstery is attached on top of the insulation using decorative nails (the sash can be covered with dermantine, genuine leather, etc.).
- Excess upholstery is cut off.
- If desired, a brass string is pulled under the decorative nails (this is done to give the structure a special appearance).
The result will be commensurate with the diligence that the home craftsman showed when insulating the door system and upholstering it with dermantine or other decorative material. And besides, whether a proper thermal curtain will be created is influenced by the quality of the material and tools used (in this case, a standard kit is the best solution).
Tools and materials
When you have finally decided which filler to use to insulate the doors, it’s time to prepare all the necessary tools:
- hammer;
- decorative nails;
- measuring instruments (tape measure, ruler, pencil);
- wood saw;
- sharpened knife for cutting;
- stapler and staples;
- pliers or nail puller;
- sealing tapes.
The list is impressive, but all items are necessary. And for this case there is an English proverb - “Necessity is the mother of invention.”
It is best to choose a leather substitute for upholstery. This material has many advantages: moisture-resistant, tension-resistant and easy to clean. Plus, it's available in many hardware stores and chain stores, so your search won't take long!
Advice from professionals
The following recommendations from experienced craftsmen will help you avoid common mistakes when insulating a wooden front door:
- It is more effective to use heat-insulating material on both sides.
- You should choose consumable components from trusted manufacturers.
- The selected material must have high performance characteristics.
- The outer cladding must be resistant to precipitation.
- Each stage must be treated with full responsibility.
In the video on how to insulate a door with leatherette with your own hands, you can get acquainted with some of the features of the work:
We insulate the door frame
And now the most important stage begins - insulating the front door. The first step is to eliminate all the cracks through which air gets in from the outside. They can be different - from noticeable to the smallest gaps between parts.
Your task is to place a seal around the entire perimeter of the box to block the cold bridges. It should be secured with the edges of the ribbon from the frame to the very edge of the door. Then the holes need to be filled with insulation. How to choose insulation for the front door was already discussed in the article.
Foam rubber or tow will work as a material, which needs to be pushed as deep as possible, creating a large layer. If the space is more than 5 mm wide, then polyurethane foam will be most effective.
Using a special nozzle, you can easily treat hard-to-reach places. But do not fill more than 50% of the free space with it, as the foam will grow over time and fill the void.
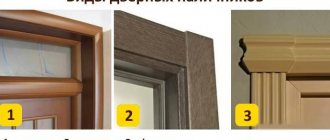
Seal options
In the process of insulating an outdoor door block, the cracks around the perimeter of the door leaf and frame are carefully sealed. Various models of seals are used that can effectively prevent heat loss from the room:
- silicone seal. The silicone base strip has an elastic structure; the material is not afraid of dampness and promotes high-quality thermal insulation. When worn, it becomes sticky and easily deformed;
- foam rubber The material has an adhesive side and is easily fixed to the base. The potential of the foam rubber sealing strip is not very impressive and assumes service for only one season;
- rubber seal. The rubber band can last for several years as a reliable barrier against heat loss. The rubber seal is highly resistant to mechanical loads and is not afraid of temperature and humidity. There are various product models on the market, including flat, embossed, tubular stripes;
- thermoplastic. This seal is considered one of the best solutions in terms of wear resistance, but it is difficult to install;
- polyurethane strip. In terms of performance properties, polyurethane tape is similar to a rubber seal; an adhesive base is provided for fixation.
When sealing cracks in the entrance structure, you should correctly calculate the parameters of the gaps and select the optimal sealing option in order to eliminate difficulties when opening/closing the door leaf.
The rubber seal is highly resistant to mechanical loads and is not afraid of temperature and humidity.
We insulate the door leaf
Now we are ready to begin the most interesting question: how to insulate a wooden door with your own hands? This means, get ready, you will have to knock down the entire door. To make it easier to remember the action plan, read the preparation instructions below:
- Remove all the fabric from the loops. You should eliminate all unevenness and deflections of the box to make sure there are no sources of cold. It is best to replace all old mechanical parts with new ones before installation.
- Cutting out components. If you already know the dimensions of the “wood guard,” then cut out the exact parameters for the insulation. Attach them to the panel using a stapler or glue, depending on the composition of the padding.
- Cover the wooden canvas with leatherette and start fixing it from the middle. If desired, leave the upholstery with an allowance of 1-2 cm for hems and decorations. And here, as fasteners, your decorative nails with a round hat will come in handy, which will add style to our “creation.” You can create a wide variety of patterns and designs with fishing line - just let your imagination run wild!
- Carefully iron the finished fabric to remove wrinkles and irregularities. If the weight of the door has increased noticeably since the start of work, then install an additional hinge between the two main ones. Security will never be unnecessary.
Video on how to insulate a wooden door
Clearance seal and door interior trim
When your canvas is ready for installation, begin twisting strips of leatherette and insulation to join the door.
To get such a detail, you need to wrap the filler in a tube made of leatherette. The shape will resemble shawarma or sushi! With their help, the entrance will be tightly closed, leaving no space for through jambs.
Rolls can be secured using standard methods - nails or paper clips.
You should end up with a box with leatherette lining on all sides, which will insulate the heat escaping from the house and will tightly secure the ajar door when closed.
Preparatory work
To insulate the door leaf, you should go step by step, stage by stage. This approach allows you to achieve good results and eliminate errors. And first there is preparatory work to be done.
To ensure that nothing interferes with the work, you need to remove the door leaf. This is done using a mounting tool or a nail puller . It is enough to pry the canvas from below and it will rise from its hinges. If the rotary axis is slightly rusty, then it must be lubricated with machine oil. After this, with small forward movements you can move the hinge and remove the door leaf.
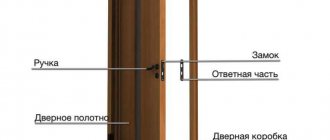
When the door is outside the frame, all existing elements must be removed from it. The hinges, handles, peephole and lock are carefully unscrewed and put aside. If the door is not made only of wood, then it is necessary to remove the sheet of inner lining to gain access to the interior of the door leaf.
Features of insulation of a metal split door
But how do you imagine insulating a metal door in a private house? Leaving it untouched would be a big mistake from a thermal insulation point of view.
For people who lived in the country, the theme of the vestibule is well known. This front part is designed to prevent air from the street from entering directly into the home. But most people don’t know about insulating a metal entrance door. And there is nothing complicated about it.
You will need to do the same technique with the seals for the box. Choose rubber gaskets and install them along the entire contour of the box.
This material is certainly the best, for its price, availability and durability - it justifies all its shortcomings. But do not forget to remove and degrease the previous seal, if there was one previously. Only then start preparing the front door in a private house for winter.
Video on how to insulate a metal door
Things to consider
From the point of view of effective thermal insulation, the quality and price of the purchased door are not the main success factor. If there are violations associated with cold bridges, no amount of fabric replacement will help. Just as in the case of a wooden door, you need to completely solve the problem of blowing cold in the area between the frame and the leaf.
Please note that much of the success depends on good heat treatment of the through gaps. Pay attention to which side of the canvas you are installing the mineral wool on. If you place the filler outside, then all the condensation will evaporate outside, and not into the room. This way you will protect yourself from excessive humidity and dampness.
Common Mistakes
Let's briefly talk about what not to do and how to avoid being a victim of failure:
- Foam insulation. When choosing a material for sealing the joint between the door and the frame, abandon the idea of foam rubber parts. The reason lies in the fact that this filler quickly breaks down and loses its properties. And if the “guard” is used frequently, the insulation will need to be replaced after a couple of months of winter.
- Foaming the box. Polyurethane foam, like nothing else, is suitable for insulating hard-to-reach places, including door frames. But do not overdo it when applying liquid to the surface!
If this is your first time touching a can, remember that the foam significantly increases in volume after sealing.
In this case, the insulation will end up in all possible places: from wallpaper to the insides of mechanical locks. Otherwise, you will have to deal not only with insulation, but also with parallel repairs.
That's all! Now, you can independently check in practice how to insulate a door with your own hands, and create comfort in your home and family budget.