Hi all!
In this article we’ll talk a little about finishing the window unit after installing a double-glazed window. Namely, about finishing slopes with plastic sandwich panels. This is a fairly budget-friendly, versatile and attractive finishing method that even a housewife can do.
Windows must fully perform their functions. A comfortable microclimate in the house is created after high-quality sound and heat insulation of window structures.
To achieve this goal, slopes are installed on the windows. How to make slopes on plastic windows? It’s very simple - you can do this work yourself, or you can hire professionals to help.
What are slopes?
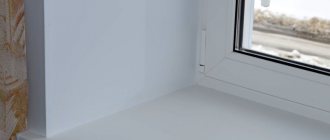
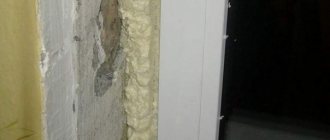
Slopes are the inner walls of the window opening niche. Finishing with various materials or plastering internal and external slopes is an integral part of window installation. The opinion that by foaming the window you have solved the problem of thermal insulation of the house is erroneous.
Foam that is not protected by slopes quickly picks up moisture and then breaks down. Slopes not only provide the room with the necessary insulation, but also give the window a finished look.
The design of the entire house or apartment depends on the aesthetic appearance of the window opening. The slopes also protect the installation seams, which prevents the windows from fogging up.
What requirements must the slope material meet?
Regardless of the technology for protective and decorative finishing of a window opening, finished slopes must meet certain requirements. The design must withstand various mechanical impacts without loss of operational and aesthetic characteristics. It is necessary that the slopes are moisture resistant. This especially applies to outdoor structures. The material must be characterized by wear resistance, immunity to ultraviolet rays and high humidity, and temperature changes.
Note! To waterproof the frame, a PVC window ebb is attached to its outer side.
Slopes must be moisture-resistant, wear-resistant, and have low thermal conductivity.
The protective structure of the window should not deform over time. It must be distinguished by a long period of operation without loss of original properties. Due to the fact that the slope panel closes the installation gap, this is the main source of heat loss. It is necessary that the material has low thermal conductivity, which will provide a good level of heat and sound insulation in the room.
The chosen finish for the slopes should be aesthetically appealing. High-quality cladding is characterized by a neat appearance. It is necessary that the finish is in harmony with the window profile and fits into the interior design of the room. Maco window fittings have proven themselves to be the best in this regard.
Types of slope finishing for plastic windows
The list of main services of companies that install metal-plastic windows includes measuring, installation and adjustment of plastic windows. Next, the customer independently decides what slopes there will be.
There are several types:
- plastering;
- plasterboard;
- plastic;
- metal;
- from foam plastic;
- wooden.
Let's take a closer look at the most common of them.
Plaster slopes
The construction of these slopes takes place in several stages.
To increase adhesion, the surface is first treated with a primer. Then several layers of plaster are applied, each of which must be allowed to dry.
Plaster is the cheapest, but ineffective way to finish slopes, since the lack of heat-insulating properties of this finish leads to hypothermia and further fogging of the windows.
The plaster is applied using a mesh, and the gap between the window and the plaster must be sealed with silicone.
Plasterboard slopes
When installed correctly, plasterboard slopes will delight you with quality, aesthetic appearance and durability. Proper insulation with mineral wool or foam will create high thermal insulation properties of slopes.
After installation, the drywall is primed and puttied. The paint is applied last after the previous layers have dried. Remember, drywall is very sensitive to moisture. Therefore, they are not recommended to finish the external slopes of PVC windows, but they can install such slopes on the balcony if it is glazed and insulated.
Instructions on how to do it and where to start
All you need to do is know the theory and follow the instructions for everything to work out as it should! Prepare panels, tape measure, liquid plastic, knife, self-tapping screws, screwdriver, drill, profile type F and P. Let's get to work, clean the surface of old plaster and dusty surface. Profile P is the starting one; it is attached horizontally and vertically. Profile F is a platband; its shape is the same as the starting one, but it has a wide stripe in the design, which is used to cover the installation seams. The main thing is to trim correctly, without gaps or gaps.
First, the side blocks are cut and mounted in the groove, then the top. Factory components are used for joining and external decorative finishing. After the top profile is installed, the outermost starting profile is attached.
Sealing will not hurt; it will serve as a reliable additional fastening. Use polyurethane-based sealant for these purposes. All blocks for installation are cut exclusively at right angles, otherwise cracks will form in the corners, which will allow air to enter the room, which means that there will be a draft in the room.
If necessary, use thermal insulation materials, they are placed inside the structure; these can be mineral wool or polystyrene foam.
Plastic slopes
Finishing window slopes with plastic is the most versatile option.
Ease of installation, reliable design, high noise and heat insulation qualities combined with an attractive appearance are the main advantages of not only internal but also external plastic slopes. Sheet plastic slopes are often replaced with sandwich panels. Installing slopes made of this material is an excellent option for cladding the sides of window openings.
The three-layer panel consists of two external decorative layers of plastic and internal insulation. Extruded polystyrene foam is used as the internal thermal insulation layer.
The big advantage of this material is the huge selection of color shades. It will not be difficult to choose a panel to match any window color. The structure of sandwich panels is very similar to the surface of plastic windows, so additional decoration with plastic slopes is not required.
To install slopes from sandwich panels with your own hands, it is enough to have the desire, or better yet, a little experience in carrying out this work and following the technological instructions. Purchasing sandwich panels almost ready-made will greatly speed up and simplify their installation.
Foamed PVC panels are also used to finish window slopes. Thanks to its porous structure, this material creates additional thermal insulation of the room, does not deform due to temperature changes and does not delaminate due to prolonged heating. Let's take a closer look at the independent installation of PVC slopes on plastic windows.
Material properties
Plastic slopes made of sandwich panels
The structure of standard panels looks like a sheet, the outer side of which is solid-sheet PVC, the inner side is sheet polystyrene, and there is insulation in the middle. That is why this finishing option was called the American word - sandwich panel. They differ only in the material of the facing side, and the installation remains the same for any type.
Important! People call sandwich slopes – warm slopes. This is due to the insulation that is present in the panel
Once you have already imagined what they are, I will tell you about their advantages:
- Despite their popularity, they remain accessible to everyone due to their reasonable price.
- This is not just a building element, it is also an independent device that has its own set of components.
- The interior is filled with mineral wool or foamed polystyrene - this indicates the non-flammability of the structure.
- Excellent thermal insulation performance, as well as additional sound insulation, is achieved with their help.
- This finishing method is durable and strong.
- If you do the installation yourself, you must strictly follow the installation technology. In this case, resistance to moisture and mold will be at a high level.
Sandwich panels for finishing slopes
For those who have decided to change the windows in their house or apartment and install the slopes with their own hands, I will give you advice: you need to wait at least 24 hours after installing the windows and only then finish the slopes with sandwich panels. The advantage of installing a sandwich over plastering is that installation by hand does not require painting skills and is a clean method.
It is important not only to correctly install the slopes, but also how to cut the panels. It is better to cut plastic elements with a circular saw on plastic or aluminum. At the same time, a fine tooth pitch can cope with the task perfectly. In addition, the material must be cut at a temperature of +5 degrees Celsius - if the temperature regime is not observed, then due to a decrease in impact strength, chips may appear on the cut line. If the slopes are finished with PVC sandwich panels, then you can cut them with many tools. But the most optimal one is a hacksaw for metal; it can also be used for wood. You need to cut face up and with a slight angular inclination. At your own peril and risk, you can cut with a grinder, but if you apply a little too much pressure, the panel may break.
Do-it-yourself installation of PVC slopes
Like all construction work, the installation of plastic slopes begins with preliminary preparation, during which the materials and tools necessary for this work are purchased.
What materials and tools are needed:
- Plastic for slopes with a thickness of at least 8 mm.
- U-shaped starting strip made of plastic.
- F-shaped plastic profile.
- Insulation material: mineral wool, polyurethane foam.
- Wooden slats.
- Drill for self-tapping screws.
- Building level.
- Roulette.
- Putty knife.
- Cement mortar.
- Long screws - 95 mm, self-tapping screws - 4.5 mm.
- Painting knife.
- Silicone sealant.
- Metal scissors.
- Construction stapler.
Next, the working surface is prepared: the remains of wallpaper or old plaster are removed from the old slopes, and the surface is treated with an antifungal agent.
If, during the installation of a metal-plastic window, cracks appear on the street side, they need to be sealed with cement mortar. This procedure is necessary to protect the polyurethane foam from harmful sun rays and seal the external assembly seams.
Source: balkonsami.ru
Features of the material
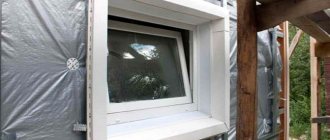
Unlike wooden window structures, modern plastic frames have ventilation equipment. It is for this purpose that the upper part of the sash is tilted, resulting in a narrow opening through which air masses flow. Because of this, air turbulences with sharp temperature changes are formed. To increase the service life of the window system, you need to responsibly approach the finishing of window slopes.
Drywall is often used for these purposes, but in winter this material can freeze. In addition, it needs to be carefully looked after. If the building is made of reinforced concrete blocks or bricks, a sandwich should be used for maximum thermal insulation of the slope panels. Main advantages of the material:
- does not require special care, any contamination can be removed with a soap solution;
- low weight of structures;
- resistance to sunlight;
- resistance to fungus;
- the material does not require additional decoration, the outer surface resembles window plastic;
- high rates of thermal and sound insulation; construction foam can be used to improve thermal insulation and adhesion of the panel to the slope;
- good vapor permeability, the panels do not get wet or deform under the influence of moisture;
- resistance to mechanical damage;
- stylish design;
- acceptable price;
- The material is environmentally friendly and does not emit substances harmful to humans during operation.
Despite a number of obvious advantages, sandwich, like any other building material, has a number of disadvantages. Some of them:
- improper installation of panels can cause gaps and cracks;
- under the influence of high temperatures, structures turn yellow and become deformed;
- Products cannot be installed if there is a small distance between the hinge and the wall (otherwise the panels will “walk” around the entire perimeter).
Preparing for work
To install plastic slopes from sandwich panels you will need:
- sandwich panel;
- “P” profile (starting);
- “F” profile (slope cover);
- liquid plastic (optional);
- roulette;
- sharp knife;
- self-tapping screws 2.5x7mm;
- screwdriver, drill or screwdriver.
Using a tape measure, you need to measure the length and width of the slopes. Taking this data into account, three strips are cut out of the sandwich panel: the top (parallel to the window sill) and two side strips.
One caveat: if you plan to finish just one slope in a panel house, then in order to reduce costs, strips of the required sizes can be purchased from the seller company without buying a whole sheet of sandwich panels.
Using a sharp knife, carefully cut off the excess layer of polyurethane foam around the perimeter of the plastic window block. It should be borne in mind that the work is carried out after the foam has completely dried, that is, at least a day must pass from the moment the window is replaced.
Advantages and disadvantages
Positive technical characteristics of the material:
- Thanks to the surface structure of sandwich panels, which is similar in appearance to the structure of plastic windows and window sills, the material does not require additional decoration or processing.
- If we compare the panels with drywall, the latter clearly loses, as it is susceptible to cracking and getting wet as a result of the influence of condensation. Sandwich panels are reliably protected from this effect, thanks to the plastic coating.
- The panels provide better thermal insulation. Although the product itself does not allow cold to pass through, most often the structure is additionally insulated, but this is done more in order to immobilize the panel and obtain a reinforced bond of the material with the window block using polyurethane foam.
- Cleaning the surface of the panels is not difficult. Any stains can be easily removed from the plastic coating using a cloth soaked in soapy water.
- The panels are easy to install. which does not require any special skills.
- Long service life - according to the indicators specified by the manufacturer, it is 15-20 years.
The presence of shortcomings in sandwich panels is mainly due to the quality of the material itself:
- Poor quality panels, as a result of the influence of high temperatures, usually formed due to direct sunlight, can become deformed and acquire a yellow tint.
- In addition, poor quality also affects the durability of products, which, if manufactured unscrupulously, leaves much to be desired.
When purchasing, it would be a good idea to pay attention to the manufacturer and make sure that the seller has certification of the product
Fastener "P" profile
A starting profile is cut according to the dimensions of the slopes, resembling the letter P in cross-section. It is attached using self-tapping screws exactly along the edge of the window profile.
The distance between the screws is approximately 10-15 cm. In this case, first of all, the profile should be installed at the top, while the side elements are brought close to the top, leaving no gaps.
A nuance: it is possible to install slopes using a sandwich panel without using a starting profile. In this case, strips of sandwich panels are placed closely behind the window profile 1 cm deep, with step-by-step foaming of the niche to fix the slope. This process is more labor-intensive than using a “P” profile, but the result is more aesthetically pleasing.
Installation of strips of sandwich panels
The top panel is inserted into the starting profile already secured with screws.
After this, 4 more parts of the starting profile are cut off, the length of which is determined by the width of the slopes. The segments are inserted into the side starting profile at the top and bottom on both sides, secured with self-tapping screws to the top of the sandwich panel and to the window sill, respectively.
Nuance : most craftsmen specializing in these types of finishing work exclude this stage. In this case, the sandwich panel strips simply adjoin the top strip and the window sill.
The gap at the joints is closed with a special agent - liquid plastic, which, when hardened, acquires the same characteristics as ordinary plastic. There are also negligent workers who use conventional sealant, and after a short time the slopes lose their appearance: the joints treated with sealant darken and become dirty.
Any of these two methods reduces work time and material consumption, and has its supporters and opponents. Therefore, the choice of option is a matter of taste.
Next, a sandwich panel strip is installed into a kind of structure made from the starting profile, fixed on three sides (along the window opening, at the top on the sandwich panel and at the bottom on the window sill).
The process of working with the panel on the other side is completed in a similar way. As a result, the plastic slope is almost ready, and all that remains is to give the appearance to the outer sections.
How to cut the right size
When starting renovation work, every builder is faced with the main task - correct measuring measures. After all, the integrity of the structure and its attractive appearance will depend on the quality of the selected dimensions and finished cut sheets. Therefore, SIP plates should be prepared as follows:
- First you need to prepare the surface for installing slopes, level the walls, cut off excess installation materials after installing the window or doors;
- Then the stage of measurements and transfer of data to layers of construction products is carried out.
- Measuring work must be carried out in stages, first at the top, from corner to corner and depth, then using devices for cutting SIP panels (a jigsaw is quite suitable), cut off the required size of the plate.
- Using a building level, you need to attach the finished sandwich panel to the future slope and see whether the product fits tightly to the wall, at the right angle or not.
- If everything is done correctly, the same manipulations are performed with the side walls and the bottom (if necessary) of the opening.
- When transferring slope width data to a multi-layer building sheet, 10 mm must be added to this indicator. This is necessary for high-quality pairing of the product with the window frame.
Important to remember! In order for the slope structure to have a beautiful, holistic appearance, sandwich panel plates should be cut to strictly measured widths so that the plates do not protrude beyond the edges of the walls. In this case, after finishing, the wall will smoothly transition into the constructed slope
Also, when carrying out measuring activities, the possible unevenness of the walls should be taken into account, so measurements should be taken from the top, middle and bottom of the wall (or, respectively, in several sections of the upper and lower strips of the window and door opening).
The last stage of installing slopes made of sandwich panels
To give the plastic slope a finished look, use the “F” profile, or, as it is also called, the slope cover.
The profile is cut into strips of the required length, based on the following calculations: slope length + profile width for the side parts and slope length + 2 profile widths for the upper slope.
It is advisable to leave a length greater than required, since in the end the excess will still be cut off, but a shortage of even one centimeter will require a complete redo.
Next, snap the slope cover onto the cut edges of the sandwich panels. In the corners at this stage the outer strips overlap.
Using a ruler and pencil, mark a cutting line along which the excess edging is trimmed. The result is neat right angles.
Nuance : for many slope installers, this stage is the final one. However, it is preferable to fill the niches between the sandwich panels and the wall with foam. To do this, the “F” profile prepared for installation is temporarily dismantled.
The voids are filled with foam, the next day the excess is carefully cut off, and the slope covers (“F” profile) are returned to their places. This creates additional heat and sound insulation in the apartment.
Source: rems-info.ru
Technology for quick plastering of doorways
Doorways are an important part of the interior, and their appearance says a lot about the quality of the finish. The slopes must be smooth and neat, just like the walls themselves. In this article we will tell you how to plaster the slopes of entrance and interior doorways with your own hands.
Plaster performs the following tasks:
- the base plane of the slope is formed, preparations are made for finishing
- fills the gap between the wall and the door block
- additional sound and heat insulation is provided
If it is not planned to install a door block in the doorway, the slope provides an organic transition between the planes of the walls of adjacent rooms.
What comes first: installing doors or plastering?
First, the door block is installed, then the slope is formed. There is an explanation for this.
After installing the door, a technological gap inevitably forms, which the craftsmen fill with polyurethane foam. This gap is made in order to be able to adjust, achieving a vertical arrangement of the box posts.
Materials and tools
To carry out the work you will need a set of tools and materials:
- water containers;
- plaster, water and mixer for mixing;
- masking tape will help protect the surface of the door frame;
- plastering rule;
- metal profile for installing beacons;
- spatulas for working with plaster;
- level (bubble or laser) to control the verticality of the beacons;
- a tape measure, a pencil and a square will help with marking;
- a screwdriver (possibly a hammer drill) to secure the profile;
- deep penetration primer, brush and tray for applying the primer.
Selection of plaster mixture
For plastering work, two main types of mixtures are used:
Cement-sand .
In rooms with high humidity, unheated rooms, on slopes of entrance doors, external slopes and surfaces intended for finishing with ceramic tiles, cement-based solutions are used. Such materials do not suffer from significant changes in humidity and temperature and are highly durable. You can prepare a simple mixture yourself from sand and cement grade M400 in a ratio of 4:1. They are used for economic reasons when it is necessary to process large, rough surface defects.
It is more practical to use ready-made mixtures with a balanced composition, plasticizers and improved adhesion.
In areas where additional thermal insulation is needed, warm plaster filled with perlite or vermiculite is used. Plaster .
To form internal interior slopes, which are prepared for the application of paint, wallpaper or decorative plaster, gypsum starting mixtures are used. Gypsum-based solutions are more flexible and easier to process. Gypsum is much lighter and has lower thermal conductivity.
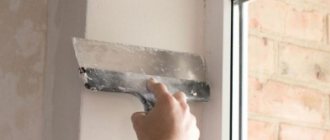
How to plaster with your own hands
The installation of door slopes begins after the plastering of the walls is completed. This makes it easier to install the beacon profile and maintain the “geometry” of the planes.
The work can be roughly divided into several stages:
- preparation of the base;
- marking;
- profile installation;
- applying a plaster layer;
- dismantling the profile and final finishing of the plane.
Let's take a closer look at how to plaster slopes after installing doors:
- The base is considered prepared when old coatings and crumbling areas are removed, the surface is free of greasy stains, and dust is removed.
- When plastering bricks, a reinforcing mesh is often attached.
- Next, a layer of deep penetration primer is applied. Be sure to let the primer dry.
- Marking the future slope is necessary for uniform distribution of the plaster layer. On the door frame, measure the width that will not be covered with plaster (do this on both sides and at the top). A corner is placed at this mark and a line for the future slope of plaster is drawn on the floor. The beacon profile is installed vertically using these marks.
Sandwich panel slopes
Window slopes made of sandwich panels are a three-layer panel in which the two outer layers are decorative plastic, and the inner layer is insulation (expanded polystyrene).
The material used as insulation can be of two types - free foam or extruded polystyrene foam.
The plastic used for cladding sandwich panels has a wide range of colors, so choosing a panel to match the color of your window will not be difficult. Plastic sandwich panels are considered the best choice for cladding window slopes.
With this finish, a wooden window will look attractive, will not freeze even in severe frost, and condensation will not accumulate on the window. Today there are several ways to finish window slopes, and these are considered the most popular: plaster slopes; plasterboard finishing; slopes made of sandwich panels.
And as mentioned above, it is the latter method that is most popular. What is this popularity based on? And the answer lies on the surface - slopes made of sandwich panels have many advantages.
Installation features and types of building structures
Ready-made material can be purchased in the store. Sandwich panels are available in several types: wall, roofing and phased assembly models. Wall panels are most often used in construction. Their light weight does not put pressure on the foundation of the building. When using panels in roof roofing, specially designed roofing panels are used.
The filler between the sheets is based on a mineral slab. Sandwich panels of phased assembly are a structure designed to be mounted on a building frame. Such structures are neither durable nor have a low chance of fire.
One of the important components of the panel is durable polyurethane adhesive. It comes in two types: one-component and two-component. One-component adhesive hardens upon contact with air, while two-component adhesive hardens due to a chemical reaction between its two components. It is more durable than one-component adhesive. The life of quick-drying glue can be extended by lowering the room temperature.
The following can be used as an insulation layer for sandwich panels:
- mineral wool;
- polyurethane foam;
- expanded polystyrene;
- polypropylene;
- polyisocyanurate;
- fiberglass.
The following can be used as frame sheet material:
- aluminum and zinc alloy;
- Cink Steel;
- drywall;
- hard plastic;
- polyester;
- polydifluorionad;
- pural;
- oriented strand board;
- tree;
- fibreboard.
The panels are often used in the renovation of city apartments. They can serve as the inner walls of a window opening for new plastic windows. Such panels are extremely useful for thermal insulation and sound insulation of the apartment, and also do not allow air to blow through.
Advantages of window slopes made of sandwich panels
- Thermal insulation - due to the presence of insulation, sandwich panels have good thermal insulation properties;
- No special additional tools are required for their installation;
- Do not rot;
- They tolerate temperature changes well;
- Durability;
- They have soundproofing properties;
- Moisture resistant;
- With not much weight, excellent strength;
- Easy to care for - just wipe regularly with a damp cloth.
Just like any other finishing material, sandwich panels for slopes also have disadvantages.
Positive characteristics
This finishing has advantages, especially if GOST standards were followed during production. These include:
- simple installation,
- easy care,
- durability,
- moisture resistance,
- little weight,
- resistance to temperature changes,
- resistance to biological influences,
- low thermal conductivity.
To perform installation, you must have certain tools:
- metal cutting scissors,
- mechanical stapler,
- sharp stationery knife with spare parts,
- spirit level,
- paint spatula,
- electric drill,
- polyurethane foam.
When new double-glazed windows are installed, they wait about a day for the mounting foam to harden. Then remove the excess with a knife, flush with the frame. Before installation begins, the site must be well prepared. Clean from construction debris, various contaminants, dust, and apply a special antiseptic substance.
For high-quality installation, you should have plastic profiles: U-shaped and F-shaped. Take measurements of the height and width of the slopes. Use these measurements to cut the panels. Finishing with sandwich panels will add beauty to the appearance and provide thermal insulation. Well-made slopes will protect installation seams that prevent windows from fogging up.
Stages of installation of slopes made of sandwich panels
At the first stage, the window slopes are cleaned of dirt and all voids are sealed.
Then measurements of the slope and cutting of the panels are made, after which they proceed to installation. First, the slope is fixed on top of the window, the starting “U” or “J” shaped profile is attached using self-tapping screws.
The panel is then inserted into the profile with a slight slope. The gap between the jumper and the sandwich panel is filled with polyurethane foam. Using liquid nails, the front part of the slope is attached to the opening. The side window slopes are also installed.
After installing slopes made of sandwich panels, your windows will take on a finished look, and your home will delight you with warmth and comfort.
Further actions
All excess gaps must be filled and leveled.
Excess acrylic must be removed with a damp cloth or sponge. This must be done carefully until the surface is completely clean. Manipulation is carried out in small areas. The acrylic should not be allowed to harden, otherwise there will be problems with its removal. It is more convenient to seal cracks immediately. The horizontal slope panel is processed first. After this there are joints, then they move downwards. First close the gaps on one side, then on the opposite. Lastly, the joints with the window sill are processed. It takes 12 to 24 hours to dry, depending on the characteristics of the sealant. If the gaps are large, the acrylic may be pulled into the seam. All these areas must be worked out again using the same method. After the second layer has dried, if there are unevenness and roughness, you can smooth out these defects with fine-grained sandpaper, folding it in half. It is recommended to carefully level the materials while they are gray, otherwise the plastic may suffer mechanical damage.
The slopes can be considered installed. They should be puttied when the final polymerization of the foam occurs. Their surface should be flat relative to the plane of the walls. After this, the protective blue film is removed.
Panels are considered the most unreliable material for installing plastic slopes. Even wall ones are easily pressed through, and their front layer is imperfect. It is enough to shine light on them, and the jumpers will be immediately visible. This is not observed in plastic window sills and sandwich panels.
Cost of sandwich panels for window slopes
The price of such panels is quite affordable, so almost everyone can afford window slopes made from sandwich panels.
One panel measuring 1500 x 3000 x 10 mm will cost an average of 800 - 900 rubles. If you order the installation of slopes from a company, then installing a slope made of sandwich panels will cost around 500 rubles per square meter.
Today there is a lot of talk about the dangers of some building materials, and one of them is polystyrene. And many try to explain their reluctance to use finishing materials made of plastic by the fact that it emits substances harmful to health, while drinking water from plastic glasses that was boiled in a plastic kettle, and eating food packaged in plastic.
Of course, all this is harmful, but we have been living surrounded by plastic for a long time and therefore it is up to you to decide whether to install slopes for windows made of sandwich panels or not.
Source: proevrookna.ru
Stages of installation work
The measures to replace the double-glazed windows are completed and then work begins on the design of the adjacent walls. This procedure will take a short amount of time if you install slopes from sandwich panels. To do this you should purchase:
- First of all, you should choose a design and a certain type of multilayer products; level, measuring tape;
- A special knife for cutting SIP plates, a drill or screwdriver, self-tapping screws;
- Assembly adhesive or liquid plastic;
- profiles type P and F.
Having prepared all of the above, the fastening of the plates begins. The most common and fastest installation method is as follows:
- The perimeter of the opening is prepared. Using a sharp construction knife, you need to cut off the remaining fastening materials and level the surface for better fastening of the panels. The walls are cleaned of construction debris and dust.
- An important part of any construction process is counting and measuring all areas for further preparation of sandwich panels. Use a sharp knife to cut the required size plates.
- Next, the U-profile is fastened using a drill, screwdriver and self-tapping screws. This is done first at the top of the structure, then on the sides and at the very end - at the bottom of the window opening.
- The next stage is the actual installation. This must be done according to the same principle as fastening the U-profile, using an adhesive solution and self-tapping screws.
- The finished structure is covered with a slab cover, which is an F-profile. This ensures that the design will look uniform and aesthetically pleasing.
For many installers, fastening plates is an ordinary action that is not carried out in a relatively short period of time. But having decided to carry out the installation process without resorting to the help of builders, you should take a responsible approach to the process of studying the nuances of technology so that the result justifies the invested effort and expectations.
Sandwich slope - can be done on any windows, wooden or plastic. The optimal block width for these purposes will be 1 centimeter. Among the positive properties of the material:
- Affordable price;
- Reliability;
- Durability and long service life;
- Soundproofing qualities;
- Easy installation.
There are large color palettes, which allows you to choose panels according to the decor of the room. They are matte, with a glossy sheen, natural wood, marble, stone. For any interior, you can choose a successful solution for decorating window openings.
External slopes made of sandwich panels have many advantages:
- High thermal insulation characteristics;
- Possibility of installation in the shortest possible time;
- Little weight.
Remove the old plaster, prime the surface, and use dowels to mark the lines along which the structure will be installed. Directly for the installation procedure you will need liquid nails or polyurethane foam. After drying, the excess is cut off with a knife, and decorative attachments are put on the ends and edges.
Sandwich panels are considered one of the most popular materials in modern construction and renovation. They have excellent characteristics, are easy to install and have thermal insulation properties, and are also relatively lightweight, so they do not require special reinforcement of the foundation.
The design itself really resembles a sandwich, as it consists of several layers:
- The external material used is raw material that is resistant to mechanical and other types of damage. As a rule, this is galvanized steel or aluminum, as well as fiberboard and OSB.
- For the inner layer, a dense, durable, thick layer of insulation is most often used. You can choose basalt fiber, polystyrene foam, glass wool and other materials that differ in thermal insulation properties.
- Most often, in order for sandwich panels to be maximally protected from temperature changes, exposure to ultraviolet radiation and other negative factors, the outer layer of the structure is impregnated with special agents. And only after this the SIP panels are ready for use.
Due to the fact that the production uses raw materials that can be bought at any hardware store, it is possible to install sandwich panels yourself.
The popularity of sandwich panels is growing, because with their help you can not only insulate buildings, but also carry out their construction. For this reason, some home owners decide to start making this design themselves.
If you decide to insulate your home, you can construct sandwich panels from OSB and glass wool layers. Do-it-yourself installation will, of course, take a lot of time, but the result will exceed expectations. You will receive high-quality thermal insulation material.