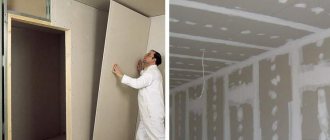
When the walls are covered with plasterboard, many people start thinking about finishing. Such issues need to be resolved in advance, although this is not critical. The resulting smooth surface can later be prepared for painting, wallpapering, applying liquid wallpaper, laying tiles and applying decorative plaster, etc. We will look at how to putty drywall under wallpaper. This process is so simple and accessible that even a beginner can handle it.
The most difficult thing is to prepare gypsum board for decorative plaster and painting, but for further wallpapering it can be easily puttied with your own hands.
Why do you need putty?
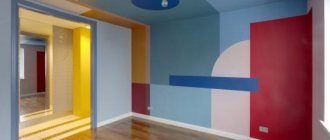
The appearance of the wall after covering the drywall with wallpaper.
It is clear that the joints of the sheets will be protected with a special reinforcing tape and puttied. It is clear that the screw heads are also hidden under a layer of putty. However, not everyone knows whether it is necessary to putty drywall before wallpapering. We are talking about completely covering the sheet with a special solution. Is this really necessary?
- The covering under the wallpaper should be white. If the wallpaper is made in light colors, it will begin to show through and the color of the cardboard will begin to show through. In this case, already processed joints and screw heads will not be visible.
- When removing wallpaper in the future, it will be much easier to do this if you apply it to the putty wall. Otherwise, by peeling off the wallpaper, you can remove it along with part of the plasterboard sheets. If this happens, then in the future such sheets will not be suitable for new finishing and will have to be replaced.
Consequences of the absence of a layer of putty on drywall sheets
There are only two arguments, but they are very significant. It is also worth noting that shrinkage is possible in a new building. So the wallpaper can start to turn into an accordion. Only properly used drywall (installed with gaps) can save you from this. Experts say that putting drywall under the wallpaper also helps, but this is only a theory that has not been tested in practice.
Do I need to putty drywall before wallpapering?
When planning to finish surfaces with any material, you must keep in mind: sooner or later the coating will have to be changed. If you do not putty the gypsum board before applying the finishing layer, it will be removed during repairs along with the paper layer of the sheets.
At the same time, any proven method of action for removing, for example, old wallpaper - steaming, soaking, scraping, rolling with a “wallpaper tiger” - leaves its traces on the unprotected paper surface of the gypsum panel.
If you putty the entire surface in advance, and not just the joints and fastening points, there will be no problem, you can change the decor several times. In extreme cases, if a small area of the putty surface is damaged, it can be re-treated before the next cosmetic repair.
Another compelling argument in favor of putty is that self-tapping screws can rust, so if there is no sealing, rust will sooner or later “decorate” the elegantly finished surface.
Finally, very thin wallpaper and thin layers of light paint will not necessarily “overpower” the native green or pink color of the gypsum board cardboard covering.
Choosing the right putty
There are a lot of different products on the market that can suit the intended purpose. Construction supermarkets offer a wide selection, and it’s easy to get lost in all this variety.
Since no one will glue wallpaper in rooms with high humidity, you can use the most common gypsum putty. As for the kitchen, cement-based putty is sometimes used in this room, but this is not important.
You should give preference to a dry mixture, which can always be diluted with water in the desired amount.
The consumption of material and the procedure for its use are always indicated on the packaging. Therefore, there should be no questions about the quantity required for the job.
There is a starting and finishing putty, which are used at different stages of work. Do I need to putty the drywall under the wallpaper with both putties? It's not obligatory. The starting solution is applied in a large layer and is used to seal cracks and level the surface. In the case of using drywall, this is not necessary, except for sealing joints. Therefore, you can use finishing putty, which is applied in a thin layer and has less consumption.
In the classic version, a starting putty is used first, and then a finishing putty. But such a scheme will be more expensive.
Separately, I would like to dwell on polymer putties. They are sold ready to use and are easy to work with. They take longer to set, which means a beginner will have enough time to correct his mistakes. However, the unused solution can be safely thrown into the trash, since its shelf life after opening does not exceed half a month.
Everyone must decide for themselves about the brand. The most commonly used products are Knauf, Fugenfüller and Uniflot. However, you can take a lesser-known product if we are talking about simple dry gypsum putty.
How to choose putty for walls under wallpaper and what to look for?
First of all, it should be taken into account that to level the walls for further wallpapering, a special type of putty is used. It lays flat on the surface, dries quickly and practically does not require grouting after drying.
When choosing, pay attention to the following characteristics:
- Composition type . If the walls are uneven and have many defects, you will have to first apply the starting mixture, and after it has completely dried, the finishing mixture. If the walls are relatively smooth, only the finishing composition will be sufficient.
- Packing . Inexpensive putties are produced in powder form and packaged in bags. Such products are prepared immediately before use, diluted in a small amount of water. But it is much more convenient to use ready-made putty in buckets. It is completely ready for use, easy to apply and does not splash.
- Surface type . There are different types of putty for concrete, brick, wooden walls or plasterboard structures. This criterion must be taken into account when choosing, because it determines how well the material will adhere to the surface.
- Compound . Putties can be cement, gypsum or polymer. The latter include acrylic, latex and polymer cement. Cement compositions form a durable coating and are inexpensive, but have low elasticity and are difficult to apply. Gypsum putties allow you to create a perfectly flat surface, dry quickly, but have low resistance to moisture and temperature changes. The remaining compositions are excellent for creating a topcoat and are usually available in a form ready for application.
Required Tools
The right tools make the job much easier. We will not consider a set of tools for working with drywall or wallpapering. At this stage, we are only interested in those devices that are used to putty drywall under wallpaper.
- Set of spatulas. They will be used at almost every stage of work.
- A construction mixer or a regular drill with a “mixer” attachment will be needed at the stage of mixing the putty. By and large, this work can be done with just a spatula. The process will be labor-intensive, but cheap.
- A roller or brush is needed to pre-prime drywall.
- Containers for priming and stirring the solution.
- Serpyanka for sealing joints between sheets.
- A construction knife may be needed to chamfer the plasterboard.
- A grater with sandpaper to remove defects.
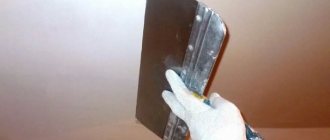
This is what the minimum set of spatulas required for work looks like.
Separately, I would like to dwell on spatulas. You need at least two of them: with a blade width of 5-5-10 cm and 20-40 cm. A narrow spatula is used to scoop up the solution and transfer it to a wide spatula. The last step is to apply the putty directly to the wall. Also, a narrow spatula is used in places where you need to carefully add a little solution.
The spatula must be flexible and made of stainless steel. Then it will be convenient for them to work, and rust will not appear on the wall after some time.
Preparing the surface
We already understand whether it is necessary to putty the drywall under the wallpaper before gluing it. If the wallpaper changes in the future, then putty is definitely needed. But even drywall needs preliminary preparation. It’s clear that nothing needs to be aligned, but there are certain nuances that you should pay attention to.
Self-tapping screws must be screwed in to this depth
Most often, problems arise due to self-tapping screws. If the screw head sticks out above the surface, the spatula will constantly cling to it. Therefore, it is necessary to immediately go over the entire wall with a spatula to detect such defects. The screws need to be tightened with a curved screwdriver in order to sufficiently recess the cap into the gypsum board.
If somewhere the cardboard shell has peeled off from the gypsum core, then it needs to be cut off in this place. In the future, the defective area will be puttyed simultaneously with the joints.
The joints of the sheets must also be prepared. The joining edges must be processed with a plane or a construction knife. It is necessary to chamfer the edges at an angle of 450. The resulting edge will be well puttied. The factory chamfer (the rounded edge of the sheet) does not need to be touched.
Before you putty the drywall under the wallpaper with your own hands, the wall will need to be cleaned of any remaining dust and dirt that could have appeared in the previous stages of working with drywall. After this, you can start priming the surface.
Is it necessary to do this?
Often, inexperienced developers wonder why they should putty on an already smooth wall surface. Especially if you are going to glue wallpaper, which will stick perfectly to the cardboard, covering up minor defects.
It turns out that there are a number of reasons for applying putty to drywall:
- Having glued the canvases to cardboard, during repeated repairs it will be difficult to remove them without causing damage to the structure of the gypsum board. Sometimes a situation arises that when replacing wallpaper, you also have to change the plasterboard material, which significantly increases costs;
- Another reason for such a finish lies in the difference in color shades of the sheets and the markings applied to their surfaces. All this will clearly appear through thin, light wallpaper. You should also take into account the connecting areas, which will definitely have to be puttied, the heads of the screws that fix the finishing material to the wall surface;
- if the walls were covered with plasterboard without the involvement of craftsmen, defective areas will remain on the wall, which are hidden only by putty solution.
Pre-priming and puttying
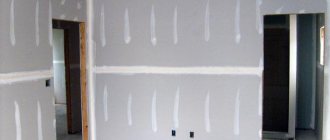
The appearance of the wall after puttying the joints and screw heads.
First, you need to putty the screw heads and joints, and only then you can work with the entire surface. Screw heads and drywall joints are primed to improve the adhesive properties of the material. This procedure will also make the entire wall more uniform in color. Only after the primer layer has completely dried can you begin to apply the putty.
Using a small spatula, putty is applied to the joint of the sheets using transverse movements. After the hollow is completely filled, a reinforcing tape (paper or sickle tape) is applied over it. Fiberglass serpyanka would be the best option. It will be extremely difficult for a beginner to work with paper tape, because it tends to be difficult to smooth out.
Using a wide spatula, the sickle is pressed to the surface with longitudinal movements. If everything is done correctly, the excess putty will come to the surface and will eventually end up on a wide spatula, from where it is periodically removed using a smaller spatula.
Sealing seams using serpyanka
The remaining putty from this procedure is used for self-tapping screws. The material is evenly rubbed over the surface in as thin a layer as possible. As a result, the caps and joints of the sheets will be covered with a layer of mortar, and the surface will become completely flat, without holes or hollows. Now the plasterboard walls can be completely puttied under the wallpaper.
Trimmed seams
Before sealing horizontal GVL connections, you need to perform the following steps:
- unstitch the seams - cut the edge at an angle of 45 degrees on each side of the joint;
- apply a brush to the primer and walk along the seam to remove dust and increase adhesion;
- as soon as the soil dries, fill the joints with putty; it is more convenient to work with a small spatula;
- level the surface of the seam and glue the serpyanka;
- Using a large spatula, apply a small layer of putty to the mesh.
At this point, the work of sealing the seams and masking the screw heads can be considered completed.
The procedure for puttingtying a wall
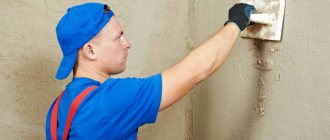
In order for the putty to be more securely attached to the drywall sheets, they must be treated with a water-based primer. It is enough to use a roller to go over the entire wall twice, waiting until the first layer of primer dries. When the second layer has dried, you can mix the putty for work.
It is most convenient to apply the primer using a roller with an extended handle.
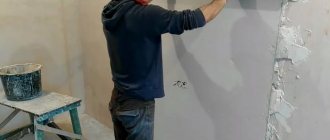
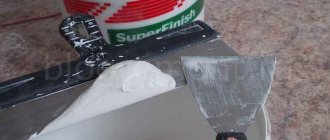
Using a small spatula, apply the solution in an even layer onto the large one. After this, the solution is spread over the wall with wave-like horizontal movements. You need to rub it into drywall in a thin layer.
You need to work with a small amount of material so that it does not bulge when spread on the drywall. The solution is applied over the entire wall in an even layer, after which it is allowed to dry.
It is recommended to start work from the least visible corner of the room. The further the work progresses, the more thorough it will become, and all the flaws will remain where they are least visible.
Plasterboard putty under wallpaper should be applied in two layers. Moreover, there is no need to prime, because a kind of fur coat has formed on the first layer, which will improve the adhesion of the second layer. A new layer is applied in the same way as the first one was applied. After this, the surface should dry (usually wait until the next day).
The dried surface has many roughnesses, sagging and bumps (the less experience, the more such defects). But all this can be easily eliminated with grinding. You can use a regular grater with sandpaper placed on it. The entire wall is sanded and becomes smooth, just right for wallpapering.
A special grater for attaching sandpaper to it
Now you know how to putty drywall under wallpaper correctly. However, there are certain difficulties with working in corners, so we will dwell on these points in more detail.
Processing external corners
Particularly difficult during such repairs are the corners. These are the same joints of drywall sheets, but at right angles. It is necessary not only to seal such joints, but also to leave the corners straight.
External corners must be reinforced with plastic or metal corners. To do this, putty is applied to the entire area of the corner part, which is then pressed with a corner. You can press down with a rule for uniform pressure. The reinforcing corner is pressed to the limit, after which it will no longer come off.
These corners have perforations to allow excess solution to escape.
The squeezed out putty is spread along the wall from the corner. Since the reinforcing corner adds thickness, it is necessary to smear it in such a way as to make a smooth transition. As a result, there should be no noticeable differences between the wall and the reinforcing corner.
Cheap galvanized corners tend to wear out the coating. Any careless movement of the spatula can damage the zinc layer. As a result, moisture will begin to get on the metal, which means you won’t have to wait long for rust. Over time, a rust stain will appear through the putty in this area.
If you want to take a metal corner (thinner than a plastic one), then it is better to give preference to aluminum products.
Putting drywall under wallpaper with your own hands means that not everything will work out the first time. Therefore, you need to be patient, especially with outside corners. They are always in sight, so you need to do everything efficiently.
Sometimes reinforcing corners are laid on the outer joint and screwed with self-tapping screws. Such a corner will adhere firmly to the surface and will not fall off. After this, you can apply putty on it without fear that it will move somewhere or fall off.
Preparation of new gypsum board sheets
It all starts with cleaning the surface. Need a damp cloth. All walls are wiped with it so that no dust or lint remains on the surface. Next, the wall is treated with a deep penetration primer. This will help prevent the wall from rotting under the wallpaper, which leads to the formation of fungus and mold.
The primer is applied to the entire surface without gaps, moving from bottom to top. The wall is treated with a roller, and hard-to-reach places with a paint brush. The packaging says how long it will take for the mixture to dry. Usually 10 to 20 hours is enough, it all depends on the product.
Advice! Marks from self-tapping screws can ruin the appearance. The caps should not stick out from the drywall, but there is no need to recess them too much. It is enough to deepen them by 0.5 mm.
Finishing internal corners
Many people rely on a special spatula shaped like a corner. It is convenient for them to putty corners, spreading the putty with vertical movements. However, such a tool also has disadvantages. It will be difficult for a beginner to handle it. Also, if the sheets of drywall do not form a right angle, then such a tool is useless, because it is designed for ideal walls.
Classic version of working with an internal corner
Puttying drywall under wallpaper on the inner corners is done using a serpyanka. The tape is glued to both walls along the joint. Moreover, you need exactly two tapes on two walls, not overlapping. You can’t bend the serpyanka in half to stick it on two walls at once. If you do this, then over time the wallpaper in the corners will begin to peel off. It is advisable to take a tape with an adhesive base so that you can stick it evenly.
A layer of putty is applied on top of the serpyanka, which is spread vertically, and then horizontal movements from the corner are made only with pressing movements of the spatula. The correct thing to do would be to complete one wall first, and then move on to the second wall.
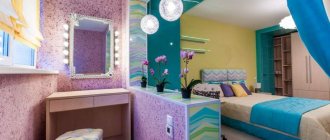
After wallpapering, the slight curvature of the inner corner will not be noticeable.
Which company should you choose?
To ensure that the treated walls are perfectly smooth and the wallpaper is easy to glue, you should give preference to compositions from trusted manufacturers.
In 2022, users and professional builders named the following putty manufacturers as the best:
- KNAUF;
- PUFAS;
- Weber;
- Unis;
- Volma;
- TEXT;
- DANOGIPS;
- Ceresit;
- Tikkurila.