Painting drywall without putty is possible after cleaning the surfaces, double priming, and leveling the joints. Preparatory work will ensure even application of paint and durability of the finish. However, if there are uneven surfaces, chips, or cracks, it is recommended to putty the drywall with special compounds for painting and use a primer.
Why putty drywall?
At first glance, such a smooth material does not require additional leveling before painting. However, the functions of putty are not limited to just leveling. Putty:
- increases the strength of the surface material,
- increases the adhesive properties of the base (paint adheres better),
- reduces the absorbency of the surface,
- evens out the color of the applied coating.
Drywall at its core is gypsum boards covered with thick cardboard. Despite its density, cardboard is still paper, and therefore absorbs moisture very well.
The paints produced by modern industry are mostly water-based, which means they will certainly be absorbed into the material. Because of this, paint consumption increases significantly.
Another characteristic of drywall is its tendency to dry unevenly. As a result, the painted surface becomes spotted.
If painting the walls is meant to be done in a warehouse or utility room, the end result may not be of great importance. But in living rooms it is better to do everything according to the rules.
You don’t have to putty the entire area of the plasterboard boards before painting, but the joints and fastening points must be puttied. However, in this case, the secondary primer should be applied not in one layer, but in two.
Painting gypsum board walls
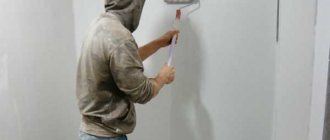
After a solution has been found to the problem of whether it is possible to paint drywall without putty, paint is applied to the prepared and dried base. The painting process is familiar to everyone, but in the case of drywall, some features should be taken into account:
- The paint is applied in several layers, since a single-color surface cannot be achieved at one time. Putty seams and screw heads will stand out in any case. Most often, 2-3 layers are enough, but sometimes additional application of the coloring composition is required
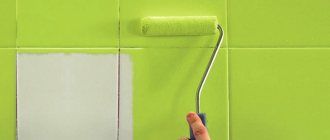
- It is best to paint gypsum board walls with a roller; the paint goes on more evenly, without streaks or smudges.
- To ensure uniform application, the paint is rolled out in a tray with a roller.
- Each subsequent layer is applied only after the previous layer has completely dried. Neglecting this rule will cause divorces.
- When applying paint, the direction of each layer should be changed, that is, the second painting should be done in a direction perpendicular to the first, and so on. This will avoid uneven staining and color variations.
- It is better to paint in corners and hard-to-reach places with a small brush. Moreover, it is recommended to start painting in these places
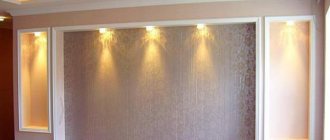
The work is carried out until the color is perfectly even.
The question of whether it is possible to paint drywall without putty does not have a clear answer, but regardless of the decision made, the work can be done efficiently only if the painting technology is followed, including careful preparation of the base. Only in this case can you obtain a perfectly painted surface without color variations, streaks or other imperfections.
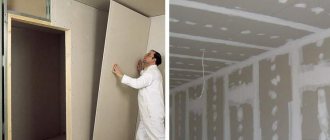
Where to begin
The first step is to clean the surfaces from dust using a vacuum cleaner. Next, you need to check whether the heads of the screws that secure the plasterboard boards are “recessed” enough into the walls.
This is easy to do with a regular spatula. Just run the blade along the fastening points - the tool should pass without snagging or bouncing. The protruding screws are tightened with a screwdriver or screwdriver.
Now all surfaces need to be primed. For this purpose, use deep-penetrating compounds and a brush (a wide brush used for whitewashing) or a long-haired roller. Usually this work is not difficult. The most important thing is not to miss a single centimeter of the surface being treated.
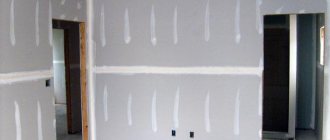
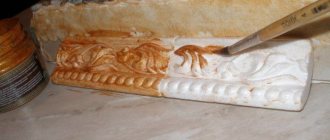
Proper sealing of joints of gypsum board sheets is the key to high-quality painting
Joints of gypsum board sheets are a problem that many people encounter when painting. Nothing seems to be a sign of trouble, but literally after half a year, or even less, cracks will form on the already painted wall. These cracks form at the joints of sheets.
Let's find out why this happens and how to avoid it. The fact is that many craftsmen seal the joints of gypsum board sheets with a “serpyanka” mesh, which does not sufficiently reinforce the seam and the seams crack. To seal gypsum board seams, it is better to use paper tape, or even better, combine both serpyanka and tape, and also putty the entire drywall in two layers! But this is already a bit expensive, so we are considering an option without putty.
Tape for joints of drywall sheets
You can also stick sickle tape onto the joints under the wallpaper; you still can’t see under the wallpaper that cracks have appeared, and this won’t cause the wallpaper to tear, but you need to use tape when painting drywall.
It is better to seal the joints with a special putty, especially for gypsum board joints, it is stronger and more reliable. Self-tapping screws screwed into the gypsum board must be recessed into the sheet and these places must also be puttied.
The joints are glued with paper tape and puttied, the holes from the screws are also
Seam treatment and re-priming
The next step is to reinforce the joints with sickle tape and putty them. A tape with a width of 5 to 10 cm is applied to the seams so that the heads of the screws are also covered. You need to apply a putty solution on top and “stretch” it over the surface with a wide spatula.
After drying (this process lasts approximately 12 hours), the seams are rubbed with sandpaper or an abrasive mesh. To leave no doubt about the excellent result, shine a flashlight on the wall at a slight angle. The slightest unevenness will reveal itself as a shadow.
Next, a secondary primer is applied in one layer. If painting without putty is meant, then an additional layer of primer is applied. If you want to do everything at a professional level, move on to the next stage.
Ceiling
The plastered ceiling base must be puttied before painting; everything has already been said about plasterboard and fiberglass. As for unplastered concrete slabs, in some cases it is enough to remove the old paint and repair individual sinkholes, potholes and other defects. Therefore, if you are 100 percent sure of the smoothness and evenness of such a ceiling, you can do without a continuous passage.
For concrete ceiling paint, the same rules apply as for drywall. If the covering power is weak, you will have to carry out additional painting so that the gray color does not show through the coating, or still carry out previous puttying.
If you find an error, please select a piece of text and press Ctrl+Enter.
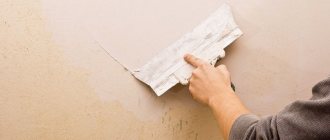
Puttying plasterboard surfaces
All that is needed for the most important step is a putty solution and a tool with which it is applied to the primed surfaces. For beginners, it is better to purchase a ready-made solution and “stretch” it using a spatula 25-35 cm wide.
For those who have already more or less got their hands on such work, you can prepare the solution yourself from powder putty. As skill increases, it becomes more convenient to putty walls with a metal float (width 25-35 cm).
It is very important before starting work to check that the putty is homogeneous, that is, that it does not contain solid particles that leave grooves on the surfaces. If you use powder putty, do not make a solution at once from the entire available amount. The mixture begins to thicken after 40-50 minutes, so you need to prepare it in small portions.
The procedure is as follows:
- A small amount of the finished solution is scooped up with a narrow spatula and transferred to a wide one - the one that is prepared for work. The putty is evenly distributed over the entire width of the tool blade.
- The process of puttying the ceiling begins from the junction with the wall, the wall - from the upper corner (any). The spatula is positioned at an angle of 20-30 degrees to the surface. The solution is applied in a layer of 1-2 mm with sweeping movements, it is very important not to change the pressure force.
- The corners are processed last.
The final stage of preparation for painting
When the putty surfaces are completely dry, they should be sanded. For this, a special grater is used. Smoothness is checked with a flashlight.
If you find a depression in some area, fill it with putty solution and sand it after drying.
Next, professionals recommend applying another primer before painting. And finally, the drywall finish is completely ready for painting.
Safety precautions
Before starting painting work, you must take precautions: make sure that the building materials are not toxic, wear protective clothing, glasses for repair work, check the working condition of the tool, and the ventilation outlets in the room.
You should be extremely careful with paint materials containing toxic substances. If used incorrectly or carelessly, they can cause harm to health.
It is prohibited to use liquids such as toluene, leaded gasoline, benzene as a cleanser for the skin of hands, clothing, tools, or for staining.
You should be extremely careful with paint materials containing toxic substances.
Drywall paint
Plasterboard sheets used as finishing in the living room, bedroom or hallway can be painted with any water-based or water-dispersion paints. For the kitchen and bathroom, you can use oil paint, or enamel, or acrylic paint. Water-emulsion and water-dispersion are also suitable, but not any - it is necessary that its characteristics indicate increased resistance to water condensate.
Water-based paint has gained popularity in the finishing materials market because it does not smell and has a snow-white color that can easily be changed into any other color using color. Another advantage of water-based emulsion is the ease of giving it texture using either a long-haired roller or a special rubber one.
Acrylic paint also allows the use of additives that transform the appearance of the painted surface. But texture is not its property.
Main features and requirements for the surface painting process
No one will argue that painting work has been one of the most popular in the design of premises and facades for many years (see also the article “Gypsum putty - characteristics, features and consumption”).
This is due to a number of advantages:
- Simplicity of the process . Any person can paint a ceiling or walls; this does not require complex tools or deep knowledge in the construction industry. The main thing that is required when carrying out work is accuracy.
- Low price of material. There are many product options on the market that will allow you to find the optimal solution for any wallet. At the same time, the coloring quality will be high both for premium-level paints and for economy-class samples.
- The widest choice of colors , which gives almost limitless possibilities when decorating the interior. This became especially evident after the advent of tinting machines, which are capable of making paint of any shade according to a special sample. You simply select the desired option, and the equipment will prepare the composition before your eyes in a matter of minutes.
The choice is made according to the tinting fan, where each color is divided into many halftones of different intensities, and you can definitely choose the right shade
- But not everything depends on the quality of the paint, the right tools and the accuracy of the work. The most important factor is the quality of the foundation, and we will discuss all the nuances regarding this point below.
Paint consumption and necessary tools
Average paint consumption is 1 kg per 5 square meters of surface. However, this figure may vary depending on the type of paint and how it is applied.
The walls and ceiling are painted with a brush or roller with a drum 150-200 mm long:
- short pile (4 mm) is used for glossy paint,
- medium pile (4-8 mm) – for matte paint,
- There is no need to use a long-haired foam roller, because... it leaves streaks on drywall;
- flat brush 60-80 mm wide:
The brush is used to paint the perimeters of walls and ceilings, as well as the boundaries of protrusions if the finish is multi-level.
Important! Before using a roller with the ability to replace the coat, keep in mind that it cannot be changed until you have painted the entire area of one wall or ceiling.
Otherwise, differences in texture will be clearly visible. If the design of the roller does not provide for replacing the coat, then another roller cannot be used until the painting process of one area is completed.
Recommendations for using water-based emulsion
Water-based dyes contain various components, including PVA glue, chalk, and silicone. The base they consist of is water. It contains microscopic polymers. They determine the type of coloring agent.
To work with this type of paint, it is recommended to purchase a spray gun. It will help distribute the dye evenly on any surface.
To save money, you can produce the desired shade yourself. You will need a white base. It is mixed with pigment, selecting the appropriate tone. It is important to record the numerical proportions of the components for re-preparing the mixture and coloring.
The spray gun will help to evenly distribute the dye on any surface.
Personal protective equipment, equipment
This section includes: goggles, gloves, helmet, knee pads, unloading, mounting belt, mounting boots.
The list of tools indicated in the table is not definitive or exhaustive. It may vary. Puttying drywall for painting can be done with a minimal set of tools, but experts recommend using just such a set - with it the work goes quickly. Safety is also very important.
Puttying walls can be done with a minimum set of tools