Experts call drywall a real lifesaver. With its help you can make slopes, build an arch, erect a partition, and quickly level the surface. And with the advent of waterproof plasterboard sheets, it became possible to carry out many works using it in rooms with high humidity - in bathrooms, kitchens, even baths. However, gypsum board requires subsequent finishing. And in the described premises, tiles are most often used for these purposes. In this connection, many craftsmen have a completely logical question: “Is it possible to glue tiles to drywall?”
Let's not keep the intrigue, but will immediately give a positive answer. Drywall under the tiles is ideal as a base. True, in order for the end result to be of high quality, and for the tiled coating itself to please the owner for many years, certain conditions must be met. Therefore, we propose to consider in detail how to glue tiles onto drywall: step by step, with a description of all the nuances of installing the gypsum board itself and laying the tiles. And let's start with the issue of preparing the surface to be finished.
Can drywall be installed on tiles?
Typically, gypsum plasterboards are used in cases where leveling using the traditional method - by plastering - seems to be quite labor-intensive and financially expensive. In simple words, when the walls are so crooked that the construction mixtures for their preparation can be calculated not in bags, but literally almost in dump trucks. As a rule, such surfaces are found in old houses. And if we talk specifically about bathrooms, then at the time of renovation they are most often already lined with old tiles. And then the home master is forced to think about whether it is possible to install drywall on tiles - the old cladding? To answer this question, we need to make a small digression.
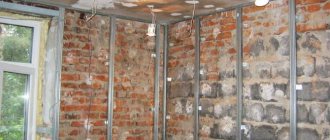
When arranging a plasterboard surface, two methods are used: installing sheets on a frame and directly gluing them to the wall. First, let's talk about what concerns the first option. If the old cladding is in more or less acceptable condition, then after appropriate preparation, which we will discuss below, plasterboard can be installed on the tiles using the frame method. If you decide to attach the gypsum board directly to the wall, the answer will be clearly negative. The old coating must be removed. Even if it seems at first glance that it is quite durable. The fact is that after the end of the procedure a very serious load will fall on him. And how it will behave subsequently is unknown. So, rule number one: you cannot glue drywall to tiles! Next - about the preparation procedure itself.
Preparing the surface
Let's take the most common option first: there is a tile on the wall. There are two ways here. Either remove everything or leave the old cladding. It is worth saying that the procedure for getting rid of tiles is very dirty and labor-intensive. And not every master wants to get involved with her. Therefore, since we agreed that if there is a tiled covering, gypsum boards can only be installed using a frame method, the tiles can be left. But at the same time, conduct a thorough audit of its condition and remove all elements that do not adhere well to the wall. It is advisable to cover the resulting voids with plaster mortar. If most of the old facing surface is in poor condition, the tiles must be removed. And all of it. Rule number two: all tiles from the wall are removed if more than 40% of the coating is damaged.
More on the next steps. If you plan to glue drywall to the wall, the surface will have to be plastered. And not just like that, but to level it out as much as possible. If frame technology is chosen, it is enough to treat the walls with an antiseptic primer after removing the tiles. In the same cases, if the surface was not tiles, but paint or just plaster, you can get by with a little blood. You just need to clean the walls and walk over them with soil that contains antimicrobial additives.
The next step is to purchase materials. There are also some nuances here.
About the frame
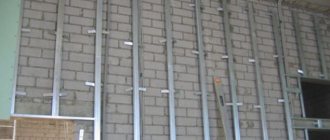
Literally in a nutshell. Some home craftsmen, in an effort to save money, choose ordinary wooden blocks as a frame. If in ordinary rooms such an approach, although undesirable, is possible, then in those rooms where it is planned to subsequently tile the walls, the fourth rule should be strictly observed: the frame must be constructed only from a metal profile!
Calculation of the laying order
The dimensions of the room directly affect the choice of where to start laying the tiles. The “reference point” is determined after preliminary calculation of the number of tiles along a horizontal line, adjusted for the gaps between them. The result is very rarely an integer. The place where work begins depends on the amount of balance:
- If it is less than half of one tile, then start from the center of the wall. This way the tile will lie symmetrically with the trimmed elements at the edges.
- If the remainder is more than half of the fragment, then the installation is carried out so that the trimmings are less visible: they start from the most noticeable area.
USEFUL INFORMATION: Profile cutter for drywall: advantages, how to work
Tile selection
As for design, color and other external components, the choice here is made at the discretion of the owner. The only thing worth paying attention to is that it is still recommended to purchase only high-quality material. Saving is strongly discouraged. But regarding the type of tile, you should follow the fifth rule: under no circumstances purchase its heavier versions, such as porcelain stoneware. Still, the plasterboard base is not a stationary wall, so the load on it should be minimal. You will also have to apply glue under the tiles, which will only make the structure heavier.
Glue
You can lay tiles on drywall in two ways: with liquid nails or with tile adhesive. The first option is simply ideal. Fast, clean, minimal load on the structure. But very expensive. So most often masters opt for the second method. If you are one of them, follow the sixth rule: no self-prepared solutions from cement and sand! Buy only special and high-quality tile adhesive. Moreover, it is not that expensive. The domestic “Lux”, for example, is good and easy to use, has an affordable price and holds the tiles well.
Once all the materials have been purchased, you can move on to the next step - constructing the frame and installing drywall.
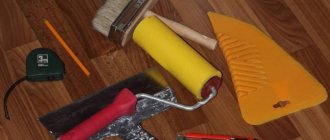
Required materials and tools
For preliminary preparation of gypsum boards and laying tiles you will need:
- Putty and reinforcing tape for sealing seams.
- Primer produced by the well-known and reliable Betonokontakt.
- Tile. It is necessary to purchase tiles with some reserve, taking into account losses during pruning and possible damage.
- Roller or brush for applying primer.
- A pair of spatulas: simple and serrated. They will come in handy when puttingtying and spreading tile adhesive.
- A drill equipped with a mixer attachment for stirring putty and adhesive.
- Fine sandpaper for sanding the leveled surface.
- Tile cutter and plastic crosses.
USEFUL INFORMATION: Do-it-yourself lining of toilet pipes with plasterboard
Tile adhesive is selected especially carefully. To stick it to drywall, use:
- Cement-based mortars, sold primarily as a dry mixture. Provide reliable adhesion of the tiles to the cardboard surface of the gypsum board.
- Adhesive composition with the addition of polyurethane. It is found in the form of a dry mixture or a ready-to-use solution in buckets. It has high elasticity, is more reliable than a cement mixture, but is also more expensive.
- Silicone sealant. It holds tiles perfectly on the wall, withstands changes in temperature and humidity, and has an impressive service life.
Note: transparent sanitary sealant can be used to replace grout. If the width of the seams is small, the wall will not be visible through them.
- Reliable fixation of the tiles is ensured by the “liquid nails” composition, but it is rarely used when carrying out large-scale work due to its high cost.
Before purchasing glue, you should make sure that it is suitable for use on plasterboard. This information must be indicated by the manufacturer on the packaging.
Creating a base for the tiles
Sheathing a wall with plasterboard will not be difficult. If you decide to glue it to the wall, then there is a special glue for this, onto which the gypsum board is attached. For reliability, some craftsmen also additionally secure it with self-tapping screws. As for creating a frame from a metal profile, here you need to follow the seventh rule of those that need to be followed when laying tiles on drywall. Metal guides must be placed at a distance of at least 40 cm from each other so that the base is as strong as possible. All work must be carried out under the control of the construction level. As for the drywall itself, it is attached to the guides with self-tapping screws. Upon completion of installation, the finished surface is treated with a primer. After it has dried, you can proceed directly to the installation process.
Seam processing
If the tiles are laid in a room with high humidity, standard joint grout will not be enough. Water will penetrate through it, which over time will lead to damage and warping of even moisture-resistant drywall. Therefore, a special varnish or sealant for bathtubs is applied on top of it.
USEFUL INFORMATION: How to make plasterboard shelves with your own hands (video)
The whole process is shown in detail in the following video. If, after reading the article and watching the video, it turns out that certain points are not described in sufficient detail, ask questions in the comments. An experienced master finisher will answer you.
How to glue tiles to drywall
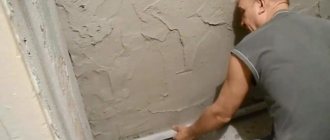
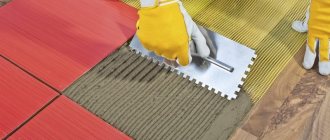
Work should begin from the most visible corner and from the bottom. At the level of the second row, using a building level, markings are made and, under the drawn line, pieces of the remaining profile are attached with self-tapping screws as a support to the plasterboard. This is necessary to fix the first row of ceramics. The glue is applied not to the tiles, but to the plasterboard surface. This is rule number eight. Why is that? Because this way it will be distributed more evenly on the wall, the ceramics will lie flat. Ninth rule: the layer of glue should be as thin as possible, since the more you apply it, the more significant the load the plasterboard base will bear. This is highly undesirable. The glue is diluted in small portions, since its hardening time is limited. It is strictly prohibited to re-add water to the drying composition! The remaining adhesive from under the tiles should be carefully squeezed out and removed with a damp cloth. If trimming is necessary, it is best to use a tile cutter.
Preparing the plasterboard base
The technology of preliminary work consists of the following stages:
- Sealing seams between gypsum board sheets. After applying the primer, a reinforcing tape is attached to the joint, covered with a layer of putty on top. As the surface dries, rub it with fine sandpaper.
- Waterproofing is applied to prevent moisture from penetrating into the plasterboard base. Professionals recommend using the Knauf Flachendicht composition. This step can be omitted: high-quality priming and sealing of tile joints will prevent liquid from getting onto the sheet itself. Regular gray drywall must be waterproofed if, for some reason, moisture-resistant was not used.
- To prevent the appearance of mold and mildew, it is worth additionally treating the walls with an antiseptic.
- The primer is necessary to strengthen the base, reduce absorption and ensure good adhesion. You need to prime in two layers, applying the second only after the first has completely dried.
Important point!
Rule ten: when laying tiles on drywall, all work is carried out intermittently. You cannot cover the entire wall at once. We made five rows - rest. Let the drywall “get used” to the load and adapt to new conditions! In addition, carry out all work only using a level. Each tile must lie flat. And don't rush! Remember that correcting defects is quite problematic, since glued tiles can only be removed with a piece of plasterboard base. The work is completed by laying the last row.
Cladding repair
If a tile laid on drywall cracks during use, it can be easily replaced. To do this, cut out the area with the damaged tile so that you get a small hole. After this, take a new profile, fix it on the wall with hangers, cut out a suitable piece of drywall, close the hole and stick a new tile in this place.
How to repair a plasterboard wall