In the modern world, when you need to quickly finish walls, MDF panels (medium density fiberboard) are especially popular. The advantages of this material are its average cost and high environmental friendliness. To install MDF panels yourself, you do not need many years of experience; all you need is:
- know the peculiarities of handling the material;
- understand the principle of this type of finishing;
- be able to prepare the surface, accurately calculate and make markings.
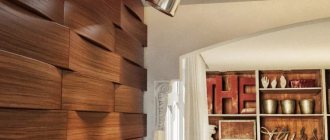
MDF panels horizontal orientation
For information. MDF is a synthetic mixture of wood chips mixed with glue and pressed into sheets of standard sizes. The material has the strength of plywood, rigidity and high quality. Products made from this material are intended for creating home interiors in the form of: panels, pre-finishing, decorative partitions.
Fastening the MDF panel to the wall can be done using a frame structure or using glue. For the second method, use the Liquid Nails adhesive mixture. When using it, it should be taken into account that the finished MDF sheet panels have their own color. Therefore, the sales consultant must show samples of the cured adhesive mixture for selection.
There are various tools used to install MDF panels. They are used depending on the type of fastening of the structure. In addition to the standard tool set, a level, an electric jigsaw and a drill with attachments are often required.
Important! In the process of interior decoration, the question often arises: “Is it possible to glue wallpaper on MDF products?” This is quite possible, however, before work, the wood-fiber sheets must be carefully primed so that they cannot absorb glue during installation.
Features of production and advantages of MDF
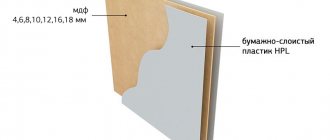
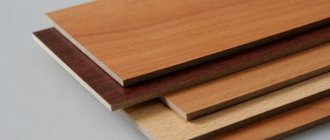
MDF panels are a material consisting of a finely dispersed fraction of wood shavings.
To obtain panels, wood waste is crushed, the resulting fraction undergoes heat treatment, and as a result, an adhesive composition is released - paraffin or lignin. It glues the mass together, and by pressing it gives the necessary strength. Then a melamine film or veneer is glued onto the surface, which gives a beautiful decorative look. Film lamination gives the material an almost indistinguishable resemblance to natural material, while the price remains affordable. The film has different colors and textures, which justifies the widespread use of MDF panels for interior finishing work.
The manufacturing process for MDF is similar to that of particle board. But chipboard contains formaldehyde resins, which are harmful to human health.
In terms of ease of use in the construction industry, chipboard is inferior in reliability of fastening with screws. After some time of use, the holes may become loose and fasteners may fall out. Repairing chips is difficult and sometimes impossible.
MDF boards have a denser structure, which allows them to securely hold fasteners. It is also worth noting the environmental friendliness of MDF. A high-quality board contains only natural substances that are safe to use: wood and carbide resins.
Additional advantages of MDF:
- durability and ability to resist mold and rotting processes;
- water resistance, so the material can be used in rooms with high humidity;
- flexibility when heated, allowing the panel to be slightly curved if necessary.
- maintainability: damaged elements can be easily replaced with new ones without dismantling the entire cladding;
- ease of installation: even beginners in finishing can cope with attaching MDF to a suitable base;
- panels allow you to hide electrical and other communications behind you;
- the material is hygienic and easy to care for: the panels are easy to clean, and if necessary, they can be treated with non-aggressive household products.
The disadvantage of MDF is:
- low resistance to mechanical stress. Although the damage can be easily eliminated by masking it with paint of a suitable color.
Methods for installing MDF panels: 2 fastening methods
Interior decoration of walls with MDF panels is carried out in two main methods: on the lathing and directly on the wall surface. Preference for one or another finishing option is based on the condition of the walls in the room and its operating conditions.
Frame method
The essence of the method is to attach finishing MDF boards to a pre-constructed sheathing. It is used in several cases:
- the wall surface is uneven and there is no way to eliminate the defect;
- the room needs heat or sound insulation;
- there is a need to hide engineering communications - wiring, for example, located on the walls.
Finishing materials
Using the frame method, it is possible to install MDF panels on a wall of any form factor - slats, wall panels and decorative sheets. The appearance of the slab, the thickness of the panel, and the quality are determined not by the installation method, but by the functionality of the room.
- Form factor.
The most commonly used material is rack material, since, thanks to the tongue-and-groove joint, its installation is simple and does not take much time.
Sheathing with tile and sheet panels is more difficult, as it involves the need to adhere to a certain pattern.
- Thickness.
The slabs are produced with a thickness of 6 mm for slats, and from 3 mm for sheet products. For finishing the walls of rooms with severe operating conditions, it is recommended to choose MDF panels of maximum thickness.
- Moisture resistance.
Moisture-resistant MDF panels are used for finishing bathrooms, toilets and kitchens.
Tools and Supplies
- MDF boards - slatted, panel, sheet.
- Universal corner made of fiberboard - used when decorating corners.
- Insulation for walls - if thermal insulation work is being carried out.
- Hammer, jigsaw, knife.
- Square and usually nylon thread.
- “Liquid nails” or other wood glue.
- Wood screws - from 40 to 80 mm, plastic dowels or plugs - for attaching the sheathing.
- Nails, clamps with a tongue of the required height, glue - depending on the chosen method of installing the panel.
Preparatory stage
- Since the process of installing MDF panels on a metal frame or wooden sheathing does not involve leveling the walls, preparing it comes down to cleaning it from dust and dirt. However, if there are large cracks on the wall, they should be repaired.
- The wiring is retracted into corrugated pipes.
- If there is a general high level of humidity in the apartment, it is recommended to treat the surface with an antiseptic primer.
Read more ⇒ Why it is necessary to use an antiseptic against fungus on the walls.
The coefficient of thermal expansion of MDF products is low, but moisture resistance is low, so the material should be kept indoors for 2-3 days in order to equalize the humidity of the board and the air.
With a small sheet thickness - 3-6 mm, this stage can be neglected; with a large sheet - 16-20 mm, exposure is necessary.
Manufacturing and installation of sheathing
The frame is made from wooden blocks with a cross-section of 20×40 mm, or a galvanized profile. Both solutions have their advantages
Wooden sheathing is much easier to install, does not require a large amount of hardware, and is characterized by the ability to absorb and release moisture at a level close to MDF boards.
In this case, the material requires additional treatment with antiseptic agents and does not exclude the possibility of destruction under the influence of moisture.
The metal frame is highly durable and resistant to moisture.
Installation of MDF panels on a metal profile provides rigid fastening, which prevents the panels from elongating. In rooms with noticeable changes in temperature and humidity, for example on a loggia, this leads to warping of the finish.
Since MDF panels for walls, with the exception of special moisture-resistant ones, are also not resistant to moisture, you should not build a frame more durable than the sheathing itself.
Installation of lathing for MDF panels: detailed instructions
Slat slats can be positioned horizontally, vertically or diagonally. Square panels can be formed into a pattern. In any case, the installation directions of the sheathing strip and the MDF panel must be perpendicular to each other.
The diagonal method of laying panels is more material-intensive.
Vertical installation of finishing is most often used, as it ensures a minimum of waste.
- The most convex place on the wall surface is determined - its height is the control point.
The frame rail must pass through the top of the convexity.
- The recommended pitch is 40–60 cm. If the sheet size is large, the pitch can be increased.
The possibility of increasing is checked as follows: if the panel bends slightly when pressed by hand between the slats, then the change is permissible.
- The wall is marked with a pencil.
In this case, it is advisable to place the bottom strip as close to the floor as possible: the baseboard is attached to it.
- The first to install the rail is the most convex place.
The block is placed on the marked line, and a hole is drilled in the wall through the plank using a hammer drill. The depth of the hole is calculated so that the self-tapping screw is at least 30–40 mm deep into the main wall. The fastening pitch is at least 60 cm.
- First of all, the rail is fixed at the top of the convexity - close to the wall, and then at the opposite end, previously leveled.
- To check the plane of the block, a thread is pulled from one end to the other end of the wall and fixed on self-tapping screws at a level; a match is placed between the head and the thread.
Correction of the rack fastening is carried out using wedges, the thickness of which is determined by the deviation of the fastening depth compared to the control point.
- Blanks for wedges are cut from a lath and trimmed with a knife as work progresses.
It is allowed to use pieces of plywood.
- The second rail, usually lower, is installed in the same way: the ends are fixed level, and the rest of the fastening is adjusted along the thread.
- The following frame elements are mounted as follows: the rule is applied to the fixed slats, and the next bar is aligned in the plane with the first two.
It is recommended to sketch or photograph the finished sheathing, indicating the coordinates of the intersections of the bars or profiles.
It is prohibited to attach any objects to the MDF panel. However, it is quite possible to hang a mirror in the hallway if the installation of MDF wall panels is carried out on a frame.
Wall cladding with MDF panels
Sheathing begins after constructing the frame.
Mounting methods:
- Glue it.
The adhesive composition is applied to the panel in the areas of fixation to the sheathing. Suitable for thin slabs;
- Mechanical fastening with staples, nails or screws.
Provides reliable fixation, but does not compensate for thermal expansion. The method is recommended for rooms with stable temperature and humidity;
- Fastening with clamps.
The clip is placed on the edge of the panel and secured to the sheathing with nails. This is the most recommended option.
Installation sequence
- Slat slats and universal corners are cut to length using a jigsaw or hacksaw. The edges are sanded.
- Installation can be started from any corner of the room.
It is usually recommended to move towards the window: errors in this case are detected faster.
- The first lamella is fixed in such a way that the edge with the ridge is directed towards the corner, and the gap between the wall and the sheathing board is 2-3 mm.
On the ridge side, the lamella is fixed with self-tapping screws to the slats, and on the groove side, a clamp is put on the edge and secured. When joining, the fastener is hidden by the ridge of the next element.
The next panels are inserted with a comb into the groove of the previous one and secured with clamps.
- The last panel usually needs adjustment.
The slab is tried on, the required width is determined, and the excess fragment is cut off. Then the element is inserted and also secured in the corner with self-tapping screws.
- The corners and top edge are finished with a universal corner.
Design of sockets and switches
When decorating walls with MDF panels in such areas, you must:
- try on the panel and mark the location of the outlet;
- cut a hole of the appropriate diameter;
- fasten two parallel blocks to the wall so that the future socket can be installed on them;
- fix the MDF board to the sheathing.
Frameless method: do-it-yourself cladding
The method is implemented when the walls of the room have a flat surface, or if one of the tasks of the repair is their careful alignment. Any MDF products can be used, but more often this method
Preparation
Before proceeding with the installation of MDF panels with glue, the surface is cleaned and primed. The most commonly used primer is with an antiseptic effect.
The slatted lamellas are cut to the required height, the corner is also cut off, and the edges are processed with sandpaper. Square panels are adjusted after fitting.
Adhesives used
The adhesive composition must satisfy two requirements:
- After drying, maintain some plasticity to absorb the thermal expansion of the material.
- Have a dense structure, which would allow the glue to be applied in both a thin and thick layer. This property makes it possible to properly attach the panel even in cases where the wall surface is curved.
Most often, “Liquid nails” and “Moment installation” are used, but there may be other options - “MitreFix”, “Moment Crystal”.
Installation of cladding: sequence of actions
- It is recommended to start covering from the corner towards the window opening.
- Horizontal and vertical markings are made on the wall according to the size of the panels.
- Glue is applied to the back of the slab in zigzag strips.
- The panel easily presses against the wall and is immediately removed.
After 2–5 minutes it is fixed tightly. This way a stronger connection is achieved. The first lamella must be checked with a vertical level.
- The slabs are laid end-to-end or overlapping.
- In areas where it is planned to install sockets and switches, holes are pre-made in the panel.
- The corners and upper edge are sealed with a universal corner, the lower edge with a plinth.
Kinds
MDF panels differ in technical characteristics, types of finishes and sizes.
Manufacturers offer 3 types of panels:
Whole pressed
Slabs that are homogeneous in structure and do not have a decorative coating. They have good sound insulation performance and are affordable. In finishing works they are used for painting. After applying the paint, moisture resistance increases.
Laminated
Such panels are lined with a moisture-resistant film on which a decorative pattern is applied. The technical parameters of this material are much higher, due to the insulating layer from moisture and temperature changes.
Moisture resistant
Panels characterized by the highest fraction density, which prevents moisture or steam from penetrating inside. The material belongs to a high price category.
Based on the type of decorative cladding, panels are divided into the following types:
Veneered
The most expensive type, a thin cut of natural wood – veneer – is used for cladding. The finish is glued to the outside using a vacuum, glue or by pressing under high temperatures.
Another option is to apply veneer using fine-line technology. Thin sections of wood are laid on top of each other at a special angle with the addition of binders, and then pressed. The surface is smooth, silky with a beautiful pattern of interlacing wood fibers.
Embossed (3D panels)
This is a new trend in the production of MDF panels, with the help of which the surface is given a certain relief, the material is visually aged, golden or silver highlights are introduced into the texture of the picture, a three-dimensional picture and even a photo are placed.
Glossy
They look stylish, respectable and seem to be illuminated from within. A similar effect is achieved by laminating with a high-gloss transparent film.
Painted
The effect of deep color is achieved by applying a special paint to the panel, which smoothes out all the unevenness, spreading across the canvas. Painted panels can be matte, glossy or have a “mother-of-pearl effect”.
The design of MDF panels exceeds the wildest assumptions.
Modern technologies make it possible to imitate any natural material:
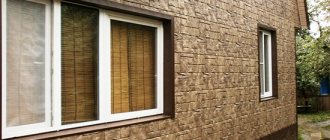
natural stone and brick, which allows you to imitate real masonry without creating a load on the base;
photo printing capable of reproducing any image, including imitation of frescoes and mosaics;
types of wood of any shade;
relief pattern with 3D effect;
metal is an indispensable material in high-tech or loft style rooms.
According to the size and shape of the release, they are distinguished:
sheet panels
tiles
clapboard or rail
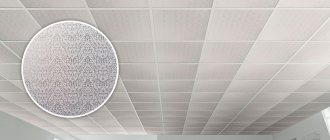
A special position is occupied by the original look - perforated panels. These are slabs with slotted patterns applied to them. The material is mainly used for finishing ceilings and installing partitions to separate zones within one room.
Selection of glue by composition
On sale you can find two-component cyanoacrylate adhesive for MDF, which is based on a viscous gel and an aerosol activator. Among the main advantages of this mixture are:
- high strength;
- Possibility of use for gluing complex surfaces;
- Ideal for application to vertical surfaces.
The substrates to be glued may have an uneven or porous structure, but the glue increases the strength of the connection and prevents the mixture from being absorbed by the porous surface.
When thinking about the question of what is the best adhesive for MDF panels to buy, you should pay attention to the described composition, which does not splash or flow from the walls. It can be used for any wood materials. If the glue remains after work, you can use it to glue:
- rubber;
- plywood;
- skin;
- most plastics.
It is even used in repairing and making furniture. It is especially suitable for quick gluing.
How to choose quality panels
When selecting MDF panels, the first thing to evaluate is their appearance, that is, the texture of the front surface and its compliance with the intended design.
Then the following characteristics are taken into account:
- Thickness _ Panels up to 12 mm perform a purely decorative function. If the purpose of the finishing is additional sound and heat insulation, you should choose a thicker material.
- No defects . You need to check the outside and edges of the products. You cannot purchase items with cracks, unevenness or chips, even if the seller gives the maximum discount on them.
- Color uniformity . An uneven shade on the outside is a defect.
Expert opinion
Mezentsev Sergey Petrovich
Residential renovation and finishing specialist
Important! When purchasing, make sure you have a quality certificate. The document must reflect information about the composition of the material. The presence of formaldehyde and toxic resin in the panels, which can cause harm to health, is unacceptable.
Some useful tips
- To ensure reliable fastening of the plinth, the lowest horizontal profile should be attached to the floor.
- Since MDF products do not bend, they should be trimmed closer to the corner, and the cut edges should be hidden with a special outer or inner corner.
- It is advisable to install every fifth panel in accordance with the vertical level.
- The first board should be fastened with self-tapping screws in those places where it will overlap with a decorative trim, ceiling or baseboard.
The process of installing wall panels with your own hands is completed.
Video with instructions for installing MDF panels
Common Mistakes
Installation without taking into account the characteristics of the material often leads to negative results.
Most often, inexperienced craftsmen make the following mistakes when joining panels:
- Incorrect installation method chosen. This leads to difficulties in fastening and loss of decorative finish:
- Fastening panels without gaps. Leads to deformation of the material due to changes in temperature and humidity.
- Wrong choice of material for height. The result is inaccurate joining and spoils the appearance of the finish.
Drywall
Due to its excellent quality characteristics and low cost, the finishing material is often used for interior decoration.
Finishing the attic with plasterboard allows you to implement original design solutions. All communications that spoil the interior are conveniently located under the structure. The finishing material easily absorbs moisture, but if you use a special moisture-resistant type, then finishing the attic with plasterboard will last for decades.
Just like OSB, it is used to divide a room into several separate rooms.
Rules of care
MDF panels are not particularly dirty, so it is enough to periodically wipe them with a slightly damp cloth. If stubborn stains appear, detergents can be used.
To avoid damaging the top layer, it is important to adhere to the following rules:
- Do not use aggressive chemicals or abrasives. This is especially important when caring for veneer panels.
- Lacquered veneer is wiped with a damp cloth without adding soap.
- Waxed or oiled veneer is periodically treated with special products to care for natural wood. The oil or wax coating is renewed every few years.
If the top coating of the film peels off during operation, it can be removed using fine-grained sandpaper. Any of the damaged slabs can be easily replaced with a new one.
Installation of a decorative corner
How to attach PVC panels to the wall
Decorative corners are used purely for aesthetic purposes. They are attached upon completion of fixing all components of the finish. To install a corner, it is better:
- first secure with mounting tape;
- then glue it securely.
The best solution for gluing corners is the “Liquid Nails” adhesive mixture, which will not damage the coating and will securely fix all decorative corners.
MDF panels are beginning to gain more and more popularity. Among the advantages of this finishing method, it is significant that such installation can easily be carried out by one person without anyone’s help. Moreover, this does not require any special experience. You just need to first familiarize yourself with how to properly attach MDF panels to the wall.
FAQ
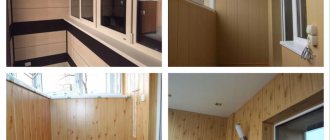
Is it possible to cover MDF walls on a balcony with cold glazing?
It is possible if the humidity level does not exceed 80%. It is better to choose moisture-resistant material.
I want to cover a country house with MDF panels that is not used in winter. Will there be any problems with the material?
If the area is not very damp, high-quality air exchange is organized in the rooms and MDF is mounted on clamps, there will be no problems.
I decorated the walls in the apartment with MDF panels, but after 3 months they came in waves. What is the reason and how to fix it?
Incorrect installation. The panels cannot be mounted close to each other (tenon/groove connection). Each successive panel should not be inserted into the groove of the previous one all the way. The gap should be about 1 cm. Then it is closed with a folding strip. Only in this case the panels will not move even in the presence of significant humidity. Try reducing the distance between the base joists by first removing the panels and stacking them to straighten them.
We bought MDF, but after removing the packaging a strong smell was discovered. Is it possible to use such material, how long will it take for the smell to dissipate?
This can happen for years. But the smell isn't the worst thing. It may indicate the presence of formaldehyde and phenol in the panels. MDF if the varnish or resin with which it was glued may contain harmful substances such as phenols or formaldehyde. These substances belong to the second hazard class according to GOST 12.2.007-84. Therefore, it is easier to go to the store and return the low-quality goods. If the seller refuses to accept, contact your city's consumer protection service.
Soft sheathing
Double-sided foam tape
Installing plastic panels over a soft sheathing seems flimsy, but in fact it is precisely these sheathings, which came out of the hands of the greenest but neatest beginners, that last for 10-15 years without signs of damage. Why? The soft sheathing is made of double-sided foam tape, see fig. In terms of thermal deformation properties, it exactly matches PVC, and its adhesive layer is very viscous and elastic: it stretches behind the board and then returns it to its place.
For soft sheathing to be truly reliable, three conditions must be met:
- Clear the wall of wallpaper, paint and level it with a rough, durable putty (Hercules, Prospector, etc.) to within half the thickness of the tape, 2-4 mm. Sharp small protrusions and depressions are acceptable, so puttying, which is already not difficult, is even easier.
- Stock up on a high-quality finishing profile; without it, sheathing over soft sheathing cannot be done. However, see the penultimate section.
- Reduce the contact time of the adhesive layer of adhesive tape with air as much as possible, up to an instant. This is something we need to talk about in more detail.
Installation of sheathing
The lathing scheme is the same as for the others. It is better to take the width of the adhesive tape from 25 mm, and best of all – from 60 mm. Technology:
- From the initial end of the tape in the roll, 300-350 mm of the upper (outer) protective tape is removed, and the tape with the bottom tape is cut off, as shown in the figure;
- The master (it’s him!) presses the initial end against the wall, and the assistant pulls the final strip;
- The master peels off the lower (adjacent to the wall) end of the protective tape and carefully pulls it out from under the tape, immediately pressing the tape against the wall;
- At the final end, a tail of the upper protective tape of 100-120 mm is left;
- The remaining strips of tape are applied in the same way.
Installing profiles
The principle is the same - the shortest possible contact of the “bare” tape with the air:
- The long tails of the protective tape are pulled back and the strips are stuck to the “back” with ordinary, narrow and cheap stationery tape;
- Apply the upper installation profile (horizontal), carefully pull out the protective tape from under it by the tail, immediately attach the profile with pressure, and an assistant supports it;
- The lower installation profile is also glued;
- The starting profile (vertical) is applied, the assistant holds it, and the master one by one pulls out the protective tape from under the profile, immediately pressing the profile to the tape, the operation proceeds from the bottom up so that the profile does not hang on the tape even for a short time;
- The finishing profile is also installed.
Panel installation
The panels are mounted similarly to profiles, but with some subtleties:
- You need to cut to size very cleanly and precisely to avoid jamming.
- The next panel is brought into place by hand using two ends in agreement; You cannot use a mallet and rule.
- After installing each board, the tails of the protective film are re-glued, and those that are too long so as not to interfere with work are cut off.
Preparing tools
In order to work comfortably, it is necessary to prepare tools that will speed up the installation of the material and make the work as simple as possible. Tools you should prepare:
- electric jigsaw;
- roulette;
- construction stapler;
- pliers;
- plumb line;
- metal screwdriver;
- simple pencil.
The pencil can be replaced with a marker. Don't forget to have a construction corner on hand.
Preparation of materials for installation on the frame
If you plan to install panels on a frame, you should prepare:
- wooden beam;
- insulation material;
- metal hangers;
- clamps;
- wood screws;
- small nails;
- dowels;
- fittings profiles.
The timber is treated with an antiseptic. Foamed polyethylene can act as insulation. Clippers will be needed to fix the panels to the frame.