When planning to do a major renovation in an apartment, most people start it from the balcony. Normal arrangement of a balcony room includes glazing, insulation, installation of electrical wiring and installation of good heating. The renovation is completed by finishing the balcony with MDF panels or using other cladding elements. What is MDF material and how to work with it, what are its advantages and disadvantages - let's take a closer look.
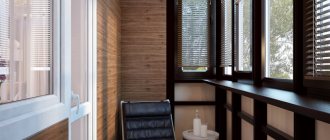
Balcony finishing with MDF panels
Calculation of the amount of materials for finishing the balcony
Before starting work, it is necessary to take measurements of the balcony room and calculate the required amount of materials:
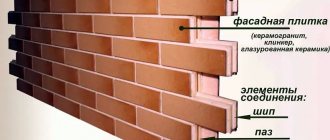
- MDF panels. They are rigid strips of a certain width and length. For finishing balconies and loggias, it is recommended to choose moisture-resistant panels with a thickness of at least 6 mm with a tongue-and-groove fixation system. The amount of material is calculated in accordance with the square footage of the sheathed surfaces plus 10-15% for waste and adjustment.
- Finishing corners are thin strips that can be folded lengthwise to form the angle of the desired degree. They are calculated by footage based on the number of external and internal corners.
- Insulation – purchased by square meters based on the area of the walls to be decorated.
- Wooden bars with a cross section of 20*40 mm or a metal profile for sheathing - calculated in linear meters, taking into account the sheathing pitch of 40-50 cm.
Assembling the floor sheathing
The installation of the sheathing should begin with the floor (if you plan to insulate it), after which they proceed to the ceiling and only then to the fence and walls.
The timber, pre-treated with an antiseptic, is cut to size. The length of the blanks depends on the direction of the finishing material and the configuration of the balcony.
Logs with a minimum cross-section of 40x40 are attached along the bottom slab of the balcony (parallel to the fence). An 80 mm long anchor with a diameter of 8-10 mm is used as fasteners.
Fastening frequency – not less than 50 cm; drilling depth – 50 mm.
Preparing tools and supplies
To work with MDF panels, complex and expensive equipment is not required. You need the bare minimum set of construction tools , which, as a rule, every home craftsman has:
- screwdriver;
- Screwdriver Set;
- perforator;
- cutting tool (jigsaw or electric saw);
- a grinder or other device for cutting metal (in the case of using metal profiles for the construction of sheathing);
- building level or plumb line;
- furniture stapler;
- staples, screws, clamps, glue;
- polyurethane foam;
- silicone sealant;
- pencil, ruler, tape measure;
- protective equipment (glasses, gloves).
Installing sheathing on walls
Installation work depends on the material and design of the balcony parapet (fencing). If it is brickwork, which is quite rare, it is enough to screw bars of the appropriate section to it with dowels (the height depends on the intended insulation). For leveling, just like on the ceiling, you should use spacers or secure them with galvanized hangers.
In case of large differences, we attach them to drywall hangers
A more common situation is when a welded metal structure is installed as a fence, insulated with glass wool and sheathed on the outside with flat slate (built during the USSR). In such cases it is necessary:
It is not always necessary to disassemble the outer casing; in such cases, installation work will be limited to points 2 and 4.
If there are door or window openings to be lined, the sheathing should be installed along their entire perimeter (except for the floor), as well as on slopes.
Installation of galvanized profile sheathing
On the side of the walls, at the corners of the balcony and on the door/window openings, U-shaped guides are mounted vertically. A rack profile is inserted into these guides (thus it is fixed at the edges). The profile is fastened along its entire length on mounting hangers using special self-tapping screws at intervals of 40-50 cm.
For more tips on installing beam sheathing, watch our video:
Source
Preparation of sheathing and insulation
Before constructing the sheathing, you need to pay attention to the walls. There is no need to level them on the balcony, but some preliminary work is necessary. Balconies and loggias are specific rooms with high humidity and temperature changes, so you need to be sure that under the decorative finish there are no places where moisture accumulates and mold spreads.
Preparatory work with walls:
- clean off old finishes;
- seal cracks and loose areas;
- treat with an antifungal compound;
- coat with primer.
The panels can be attached to perfectly flat walls using glue without constructing a sheathing. But when finishing a balcony, it is recommended to install the sheathing at least on the outer wall - insulation can be placed in its cells, thus creating more comfortable conditions for using the loggia as a living space. In addition, finishing materials on an insulated balcony will retain their original aesthetic qualities longer.
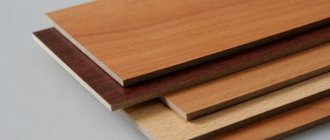
Characteristics of MDF boards
Construction MDF panels are a fairly universal element of modern cladding, attractive both in terms of their external qualities and ease of use.
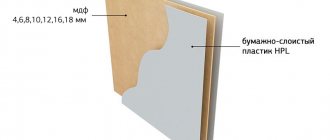
MDF itself is considered a modification of the well-known fiberboard (fibreboard), but is manufactured using a different method and has an additional quality - increased resistance to moisture. This is facilitated by a special laminating film, which, in fact, is the main difference between the two building materials.
MDF is produced according to certain standards, intended for construction work in the form of finishing premises (walls, ceilings), manufacturing frame furniture. If the material is needed for wall cladding, then it is advisable to use standard panels - this simplifies the finishing itself and increases the speed of installation.
MDF boards have a number of serious advantages:
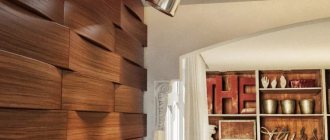
- The material looks like natural wood, but has flexibility and elasticity unusual for it.
- Suitable for covering complex and not perfectly straight frames.
- Using MDF, you can cover various defects in walls or ceilings; the panels do not require mandatory leveling of the surface before installation.
- The material is relatively easy to install and inexpensive.
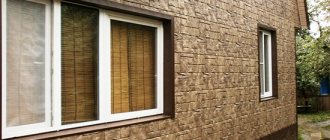
- The laminated surface of the MDF panel allows you to apply decoration. It can be a pattern, texture or imitation of any complexity, for example: natural stone, wood. You can see the imitation options in our photo.
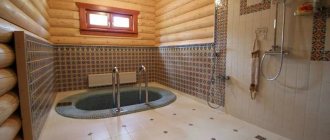
The interior decoration of a balcony with MDF panels requires maximum insulation from steam and moisture; it is desirable that the balcony be high-quality glazed and insulated. If there is a risk of increased moisture, for example, on the top floor of a multi-story building, then ventilate the balcony space more often.
Panel installation
After constructing the frame and installing the insulation, you can begin decorative finishing. The panels can be fastened in several ways:
- adhesive - suitable for installing thin panels in small areas, as it does not provide the necessary strength over large areas;
- mechanical with staples or screws - provides reliable fixation, but rigid fastening prevents the natural expansion of the material; this method is suitable for rooms without changes in temperature and humidity;
- on clamps (special clips that are rigidly attached to the sheathing and placed on the edge of the panel) - the recommended method for loggias and balconies.
Step-by-step installation technology
Some stages of work may vary depending on the characteristics of the room and the selected type of finish for other surfaces, but the general sequence is as follows:
- Cut the panels to the required length, taking into account the fact that on each side you need to leave a gap of 3-5 mm, which will be covered with corners during finishing. Openings are immediately provided for sockets and switches.
A jigsaw will save you a lot of time! - Install the first panel. It is better to start installing vertical siding from the window, horizontal siding - from the bottom up.
- Each subsequent panel is inserted into the groove of the previous one and fixed with clamps attached to the sheathing on the other side.
- Corner panels in a vertical position (or the last top panels in a horizontal position) are trimmed. You should try to keep narrow cuts to the far corners, since around a window or doorway they will be immediately noticeable - these areas need to be done as carefully as possible. If there are protruding window sills or other obstacles, samples are made in the corresponding panel.
Slope finishing
First, the panels are installed on horizontal slopes, then on vertical slopes in the following sequence:
- Measure the upper slopes above the window and doorway.
- Cut parts of the required size from the panel.
- Mount them on mounting foam.
- Support it with vertical struts (remnants of beams or scraps of panels) and leave to dry.
- After the polyurethane foam stops expanding and hardens, trim off its excess.
- Do the same with vertical slopes.
- Secure the panels on the slopes with self-tapping screws to the sheathing so that they fall under the finishing corners.
Finishing corners
The final finishing allows you to hide all the joints, trims and give the room a finished look. Sequence of work:
- If the panels were installed from the floor, then the floor plinth is installed first.
- Now strips of corners, which come complete with MDF panels, are cut into vertical joints of adjacent walls, as well as horizontal ones between the wall and ceiling, if necessary. In order for the vertical and horizontal corners to fit neatly at the points of contact, their ends must be cut at an angle of 45 degrees.
Glue the corners with liquid nails - The prepared parts are coated with glue, bent lengthwise and pressed tightly onto the inner and outer corners of the paneled walls.
- Small gaps between the panels and the window frame are treated with silicone sealant. After drying, the excess is carefully removed.
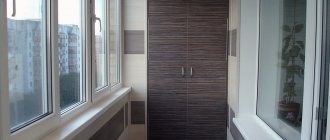
MFD panels are an economical and easy-to-use analogue of wooden lining. Using this type of finishing material, you can achieve an original and presentable appearance of the premises, and the variety of colors allows you to choose the right decor for any design.
Subscribe
Types of sheathing
The material and method of assembling the sheathing directly depends on the finishing and the structural features of the insulated balcony. The frame is assembled either from wooden blocks and slats, or from galvanized profile , which is often used for plasterboard structures.
Metal profile lathing
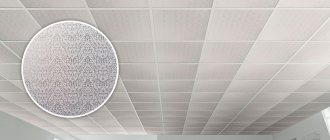
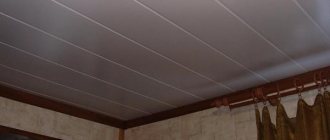
In addition, there is also a plastic profile, but due to its high price and low strength indicators, it is used quite rarely (most often, it is ceiling lathing).
Wood is a natural and warm material; condensation does not form on it, unlike metal, and it is easier to work with. For a balcony, this is a more preferable option, but with some reservations. It should be remembered that under certain conditions wood is subject to deformation; therefore, when choosing bars for sheathing, it is necessary to pay close attention to their quality.
Excessively high humidity of the wood can lead to the fact that when it dries, it will lead, and with it, possibly, the entire structure. The ideal option is dry planed timber of coniferous species (pine, spruce, larch).
Planed dry lath 20x40mm 3 m long will cost 50 rubles.
This will cost 2-3 times more than conventional scaffolding, which is also applicable (if you have the opportunity to choose and confidence in your own competence to make the right choice). In any case, it would be a good idea to treat it with an antiseptic solution before starting to assemble the frame.
To prevent the bars from moving, we foam the cracks!
A structure made from galvanized profiles will cost more than from scaffolding, but cheaper than from dry joinery. The main disadvantage is the high thermal conductivity of the metal, up to freezing in winter when located close to the street.
Assembly method
There are two options - either a horizontal arrangement of load-bearing elements or a vertical one.
Vertical arrangement of the sheathing
As a rule, various types of lining, including MDF and PVC, are mounted vertically, which implies a horizontal arrangement of the wall sheathing.
In the case of sheet finishing materials (plasterboard, OSB), there is no fundamental difference. The main thing is that the rail is located along the entire perimeter of the sheet being screwed, and the internal space is filled with sufficient frequency.
Creating a wireframe
If you use metal profiles to create the base, fastening must be done using dowel screws. First you need to take measurements, and then make markings. Guides are attached to the designated places. Door and window openings will help as a guide during work. The optimal distance is determined from these places.
It is necessary to create a special mark that runs along the ceiling. In the place where it intersects with the corner part of the balcony you need to secure the dowel screws. Plumb lines are fixed here. In this case, a vertical mark is obtained that reaches the floor.
Using the created markings, the guide elements are secured with screws. It is necessary to make holes of a suitable diameter on which the fasteners are fixed.
After this, you need to install profiles that are located in the vertical direction. MDF panels will be fixed to these elements. To ensure the strength of the structure, special hangers or corners are used. You can create such elements with your own hands from the same profile.
Preparatory work
A significant disadvantage of MDF panels is that this material is absolutely unstable to dampness, so it is necessary to ensure a dry microclimate on the balcony where the cladding is supposed to be done. Here is a sample list of events:
- The balcony needs to be glazed.
- Large cracks are filled with foam, small cracks are sealed with putty. A layer of sealant should be applied to the dried polyurethane foam, which will protect it from ultraviolet radiation.
- To avoid the development of mold under the cladding, the walls and balcony fencing should be treated with an antiseptic (applied with a spray).
- If the budget allows, the external enclosing structures of the balcony are insulated. In this case, the thermal insulation material is placed between a layer of waterproofing (on the side of the walls and fence) and a vapor barrier (on the inside).
Main process
The balcony covering should be started from the corner part of the room. The material is secured to the frame using self-tapping screws. The correct location of the panels must be measured with a building level.
The rest of the material must be fixed on horizontal strips using special brackets. During installation, all panels must be aligned and excess parts must be trimmed. It is best to use a jigsaw for this process. It is recommended to carry out the adjustment immediately, fixing the MDF.
At the final stage, the slopes are installed. Along the length of the openings, you need to fix the starting PVC profile.
Many novice craftsmen wonder: is it possible to attach decorative corners using liquid nails? The answer is unequivocal - yes. This option fixes all elements as firmly as possible.
Source
Useful tips for beginners
If this is your first time making repairs on a loggia or balcony with your own hands, we recommend that you pay attention to a number of nuances: 1. First of all, the walls need to be thoroughly cleaned of remnants of the previous coating, and the surfaces should be leveled using sheets of moisture-resistant plasterboard. 2. When choosing a finishing material, give preference to calm, monochromatic shades or coatings with imitation wood texture; this color scheme is universal and harmonizes perfectly with various interiors. It’s worth taking a closer look at the textured surface - if it matches the interior of the room, it automatically turns a simple DIY renovation into a unique design work. 3. Pay attention to the width of the panels, as hardware stores offer several options - standard and narrow. For cladding a balcony, wider panels are optimal; they cover a larger area, so with their help you can significantly simplify the cladding process. It is also recommended to buy materials with a small reserve, because with such work there is always the possibility of a small defect.
You can pay 30-50% less for light, depending on what electrical appliances you use.
4. Since it is very convenient to have a full-fledged lighting system on the balcony, take care of a sufficient number of switches and electrical sockets. All wires must be laid up to the wall sheathing, a hole must be cut in the selected panel, a mounting box must be inserted and the wires must be brought out and then connected. However, if you have no experience in this area, it is better not to install electrical wiring yourself, but to invite a specialist. 5. The panels are adjusted in height and cut according to the openings directly during the installation process, but if you are determined to make the markings in advance, then take into account the natural shrinkage of the panels along the width. 6. To cut MDF, it is best to use an electric jigsaw. At the moment, there are many opportunities for improving the interior of the balcony space. The optimal material to use for this purpose is MDF panels. Simple installation procedures that you can do yourself will allow you to turn your balcony into a beautiful, cozy room.
Necessary accessories
The process of installing a panel without a corner
It has several names (molding, molding, accessories, planks, components), which share the same purpose: with the help of these parts, the panels are attached to the sheathing and have a decorative and applied character, helping to create from the panels a general picture of the completeness of the repair and a beautiful appearance . The fittings include: various angles, a special profile for the ceiling, connection elements.
A few words about the starting corner. If a corner of exactly this color (which you really want to buy) is not available in the store (they are supplied in addition to the panels), then the panel can be placed in the corner without it. Look at the picture how this is done.
The easiest way to have a beautiful front lawn
You've certainly seen the perfect lawn in a movie, on an alley, or perhaps on your neighbor's lawn. Those who have ever tried to grow a green area on their site will no doubt say that it is a huge amount of work. The lawn requires careful planting, care, fertilization, and watering. However, only inexperienced gardeners think this way; professionals have long known about the innovative product - liquid lawn AquaGrazz .
There are many modern construction solutions that allow you to improve the area outside the window on a fairly budget-friendly basis: drywall, lining, MDF and PVC panels, siding, etc. However, finishing a balcony with MDF panels is the most common option.