How to paint chipboard and fibreboard?
The choice of paint is a very important process; the final type of coating depends on this.
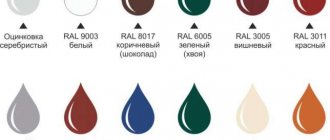
Paint for chipboard
The solution is selected taking into account several factors that depend on the type of surface and external parameters. It is recommended to use the following types of compositions:
- Acrylic. This option is well suited for painting particle boards, but has certain limitations. The main thing is that the mixture cannot be applied to an unprepared surface; priming must be performed. The fact is that the composition of such paints is water-based, which is quickly absorbed and can cause destruction of the slab.
- Latex. They are also a type of water-dispersible materials. Their use allows for excellent protection of products from moisture. The application technology is similar to acrylic mixtures, but such products have several disadvantages: relatively high cost and labor-intensive removal of the decorative layer.
- Alkyd. Enamels are a traditional option for such an event. They can be laid without prior priming, but the consumption of the mixture will increase significantly.
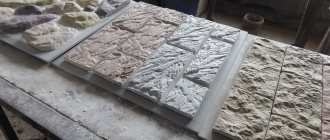
- Stain. It is used as an impregnation to create a certain texture. Using stain for chipboard does not give such an impressive result as when working with natural wood, but it allows you to get a good decorative effect. This option is an excellent solution for chipboard.
- Varnish. This composition has many tint varieties; colorless is used to protect the surface.
A good option is spray paint. But aerosols do not allow painting a large area, so they are used for decoration.
Compositions for fiberboard
Not all types that can be used for chipboard are suitable for fiber boards and panels. For example, water-soluble paints do not have good adhesion to such a surface, since fiberboard contains paraffin, which repels water. That is why, when choosing acrylic mixtures, a deep penetration primer is additionally selected.
In addition to water-based emulsion, materials can be coated with the following types of coloring solutions:
The use of budget formulations is justified in most cases
- Oily. This variety is used less and less due to toxicity, pungent odor and long drying time.
- Alkyd. A good option that is suitable for all types of products made from wood materials.
- Drying oil. It is used as a decorative and moisture-proof impregnation, which is additionally coated with varnish. An alternative could be stain.
For decorative varieties, a quick-drying colorless varnish is suitable.
Specifications
During times of shortage, ordinary glue was used as a primer. Now that the range of compositions offered is wide and varied, it is not so easy for the consumer to answer the question - which primer to prefer? Let's try to understand the intricacies of choice.
In order to correctly decide and choose a suitable primer, first of all you need to know what type of surface the composition will be applied to, as well as study the characteristics of the room (humidity, temperature conditions) and the type of finishing material.
The choice of primer is based on several aspects:
By type of wall covering
Construction stores offer a wide selection of dry and liquid primers for hardboard, OSB boards, brick, metal and wood.
It is very important to take into account the condition of these surfaces. When they crumble, it is worth purchasing a suspension with deep penetration; if the walls are affected by fungus or dangerous mold, it is better to treat them with a quick-drying mixture with fungicides
Different surfaces require different primers. For example, drywall will not “accept” every primer: it absorbs moisture, and if the composition for processing is chosen incorrectly, then the wallpaper layer will be removed in the future only along with the cardboard. That is why special requirements are imposed on primers for this type of material: no solvent is allowed in its composition and it must have moisture-resistant properties. The best choice would be an acrylic primer; it will protect the material and ensure maximum adhesion of surfaces.
Not every soil is suitable for plywood due to its porous structure and high water absorption rate. The best choice would be an alkyd suspension based on drying oil or water-acrylic compositions.
For fresh, untreated wood, as well as fiberboard and chipboard, it is better to purchase improved alkyd primers; they strengthen the pores and prevent the panels from swelling. However, they contain an organic solvent, so the soil cannot be used in residential areas. In houses and apartments, you should give preference to acrylic primers - they have the same properties, but are completely safe for human life and health.
Concrete surfaces, as well as brick, are treated with mineral compounds based on cement or gypsum.
If the walls are covered with old putty, then in addition to the primer, it is advisable to cover the walls with diluted glue. Otherwise, the wallpaper will stick at first, but after a while it will fall off along with the top layer of putty.
By wallpaper type
When choosing a primer, you should take into account what material it is applied under - wallpaper or painting. In theory, you can use universal mixtures, but it would be more correct to focus on specific types of wallpaper (vinyl, non-woven or paper), as well as the type of paint and prime the walls specifically for them
Many people apply diluted wallpaper glue, but it can leave stains and cause the wallpaper to yellow, so this option cannot be considered the most successful.
An acrylic primer will be effective for all types of wallpaper. However, non-woven materials will “require” an alkyd suspension. Thanks to the high number of pigmented particles, as well as the ability to form a thin semi-matte film, it perfectly masks dark spots on the walls and forms an ideal basis for shimmering wallpaper, highlighting the color.
For water-based paint, which is mainly used in interior finishing work, it is advisable to use polymer compounds.
Coloring stage
It is best to paint chipboard surfaces in a horizontal position; in this case, the paint will apply evenly without forming unnecessary drips. If your base is located vertically, then you need to apply the paint smoothly from top to bottom. For small details you can use a brush, for large surfaces - a roller.
For best results, the paint should be applied in 2-3 layers, with each previous layer allowed to dry. Therefore, you should not rush and do everything in a hurry. Apply one layer, wait 15-20 minutes, then apply a second, etc.
Particular attention should be paid to the processing of joints, corners and other elements. Only after all layers of paint have dried can you proceed to varnishing
It is necessary to prevent damage, as well as to give the surface the desired shine and attractiveness.
Only after all layers of paint have dried can you proceed to varnishing. It is necessary to prevent damage, as well as to give the surface the desired shine and attractiveness.
The varnish is applied in 1-2 layers using a sponge or thin brush. Both matte and glossy varnish are suitable for these works, it all depends on your tastes.
You already know how to make chipboard yourself, but finally, here are some useful tips when working with this material.
If you want to paint the base a dark color, you must first apply 2-3 layers. To increase the service life of a chipboard product, the working surface should be treated with a special deep penetration mixture.
Sanding is done before painting begins, after stripping and applying primer.
When working with chipboard, it is better to use paints and other materials from one manufacturer. To obtain an even and smooth painted surface, you can use a short-pile roller; to obtain texture, use a long-pile roller.
During the painting process, always use protective equipment and thoroughly ventilate the room.
Video on how to paint quickly and efficiently:
And do not forget that any process involves obtaining the desired result, the main thing is to choose the right means and methods for its implementation.
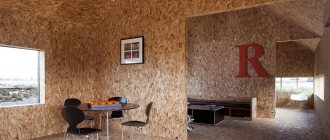
Sometimes when remodeling furniture the question arises of how to paint chipboard. This material is one of the most common materials for making furniture; it is also used in construction and renovation work. Chipboard (chipboard) has been used in various fields for decades, furniture made from this material is especially common.
Chipboard consists of wood chips glued together with formaldehyde resin. Since wood chips can become unstuck under external influences, they are protected with an outer coating - this can be a layer of varnish, paint, polypropylene film, etc. In addition to protection, painting chipboard also creates a decorative effect, since this method can create surfaces not only of different colors, but also with different textures.
To restore the attractive appearance of chipboard, it is enough to update the paint layer, thanks to which products made from this material acquire their own unique style. Also, painting chipboard increases its moisture protection and makes the material resistant to ultraviolet rays. When painting work is carried out correctly, old furniture and other chipboard products not only get a new look, but also extend their service life. Also, coating chipboard with paint reduces its impact on humans (over time, resins tend to evaporate, and paint prevents this process).
An important point is what the chipboard is coated with on top - varnish. There is no veneer, paint, film or coating. Of all the options listed, laminate is the most difficult to paint over. It must be covered with several layers of primer, and no one guarantees the result.
Features of laminated chipboard
The question often arises of how to repaint furniture with a laminated surface. The process of painting laminated chipboard is almost no different from those carried out when working with painted material. It consists of three stages:
- treatment;
- primer;
- painting.
The only difference is the process of initial sanding of the chipboard. The lamination is not completely removed. The main thing is to bring it to a rough state. The primer should be used as a surface primer; a composition with penetrating properties is not suitable for laminated chipboard.
So, by choosing the right paint tone and studying the repainting technology, you can restore the color of furniture, update a table, or paint a chipboard floor. A thing repainted in this way can last for a long time.
Coloring stages
All work is carried out in several stages. It is not recommended to cover furniture with new paint without removing the varnish - this will greatly deteriorate the quality of the finished surface. It is better to carry out the restoration in accordance with the advice of professionals, which will make the result beautiful and durable.
Surface preparation
Removing the old coating is the main stage of preparing furniture for repair. You can remove varnish in different ways - mechanical, thermal and chemical. Experts prefer to use a hair dryer for thermal removal of varnish. The procedure is as follows:
put on a protective suit and gloves, not forgetting about glasses; run a hairdryer over a small area of the surface, warming it up well (instead of a hairdryer, some use a blowtorch, but this method requires extreme caution so as not to damage the wood); take a spatula or knife and scrape off the varnish coating.
The mechanical method is more labor-intensive. You should proceed like this:
- remove drawers from furniture, remove all fittings;
- Wash fasteners, handles and other accessories well with soapy water, use soda if necessary;
- wipe the furniture with soap and powder to degrease it and remove dirt;
- rub off the varnish using a scraper, coarse sandpaper, or a metal brush;
- sand the surface with fine-grain sandpaper or a sander.
You can also get rid of the coating using a chemical method; for this purpose you will need a solvent that does not harm the wood. The remover is applied to the surface of the object with a brush and left under the film for 3 hours. Afterwards, using a spatula, carefully remove the old varnish.
Putty damage
To accurately assess the condition of the furniture, it is recommended to disassemble it into as many elements as possible. This way it will be possible to treat even the most inaccessible places and replace all the old, broken, ugly fittings. After sanding is completed, get rid of dust (wipe the furniture with a dry cloth or vacuum it). Next, an antiseptic is applied so that the product is not damaged by fungus in the future.
All large and medium-sized defects must be thoroughly puttied. It is better to buy transparent putties - they are suitable for any type of wood and do not change its structure. The putty should be applied in a thin layer and leveled well so that the surface remains smooth. After allowing the layer to dry completely, apply it again if necessary. At the end of the work, the treated area is sanded again.
Degreasing
Carrying out this procedure increases the service life of repaired furniture. Also, degreasing significantly improves the adhesion of paint to the surface and makes the coating layer uniform. To do this, use any detergents. They are diluted in water, wiped over the surface of the product, and washed off.
Wipe dry and dry until moisture completely disappears. If puttying has been done beforehand, it is better to use alcohol or vodka rather than an aqueous solution for degreasing. Stubborn stains of grease and dirt can be removed with table vinegar.
Painting process
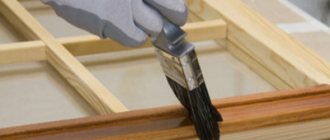
Immediately before painting, priming should be carried out, for which only transparent primers are used. The product must be applied not only to the putty areas, but to the entire surface - the primer reduces paint absorption and improves adhesion.
Painting is done as follows:
- All elements that will not be painted must be removed or sealed with paper tape. This way you won’t have to wash them after the restoration is complete.
- Apply paint to each element separately. It is better to use a roller, so the paintwork will lie flat. Particular care must be taken to paint drawers and shelves, dry them separately, and only then fasten them in place. You need to make sure there are no paint drips.
- After drying, apply another layer of material to the furniture. This way the result will be fixed.
- Assemble furniture. You can install it in place.
Proper drying
Acrylic, latex and other water-based paints take a long time to dry. To prevent furniture from getting in the way, it is better to prepare a place for working and drying in advance. Each layer takes 12-24 hours to dry, and many enamels are harmful due to their fumes. You cannot live in the room where the furniture is, and children and animals cannot be there, even temporarily. The best temperature for drying is 20-23 degrees, so the coating will dry within the time specified in the instructions. If the temperature is lower, drying will take longer.
Putty for chipboard: which one to choose for wallpaper, is it possible to use a gypsum mixture?
- Filler: Marble
- Binder: Ethylene vinyl acetate copolymer
- Fraction: average 20-25 microns
- Max layer thickness: up to 3 mm
- Whiteness: At least 90% according to the CieLAB scale
- Mixture consumption: 1 l/m2/mm
- Density: 1.23 +/- 0.05 kg/l
Oil and oil-adhesive
Puttying chipboard with materials of this type perfectly eliminates defects in the surface of the boards. In addition, the presence of polymer glue in the composition allows you to wallpaper plastered walls. The solution can be used to seal joints between slabs; the drying period is 1-2 days.
Which is better: heated floors or radiators?
Warm floorBatteries
- Consumption
: 0.5-2 kg/m². - Drying time 1 layer
: 12 hours. - Complete drying time
: 24 hours. - Layer thickness
: Up to 3 mm. - Storage conditions
: In original packaging at temperatures from +5°C to +30°C. - Shelf life
: 1 year.
Preparation and painting of chipboard
Any work on painting chipboard at home consists of several stages. You should not neglect them if you ultimately want to get a high-quality result. Furniture made from particle board must first be prepared for painting.
Before painting chipboard furniture, you need to decide on several questions:
- full and partial repainting is planned;
- coloring design, that is, completely in one color or combined.
Let's look at all the stages using a specific example of how to repaint a chest of drawers
In principle, it doesn’t matter what they repaint, the main thing is to understand the process, and it can be applied to any furniture
In the video: painting chipboard products.
Surface treatment
Before painting chipboard furniture, it is important to properly treat its surface and prepare it for painting. Initially, the chest of drawers should be disassembled into individual elements. Remove all drawers, disassemble them if possible and remove fittings
It will be easier to process them and paint high-quality chipboard furniture with your own hands.
It is necessary to sand until the old paint completely disappears. We also make sure that no greasy stains or other contaminants remain on the surface. Otherwise, quality painting cannot be guaranteed. When sanding, movements are performed in a sweeping manner and along the fibers.
After completing the rough processing, we clean the parts of the chest of drawers from shavings and dust. You can use a flat paint brush. It is impossible to work efficiently with this rag. On the contrary, the rag will clog shavings into the smallest dents of the chipboard slab, which will negatively affect the quality of the paint.
The main thing in this process is to treat difficult areas. When finishing the process, we completely clear the chips again. At the final stage, we wipe the parts of the chest of drawers with a damp cloth, then wipe them with a dry cloth and let them dry thoroughly.
Padding
Painting work should not begin without first priming the furniture parts. Treating them with a primer will significantly improve the quality of painting. It is better to use an acrylic-based primer composition.
Painting furniture made of chipboard is done either with a brush or with a roller. The main thing is that the layer is as thin as possible. After applying the composition to the surface, leave the parts for some time to dry completely.
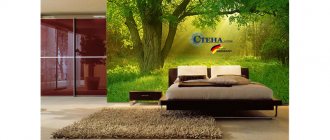
Choosing a paint shade
While the primer dries, we select the tone of the paint. If you plan to paint it in a single color, for example, white, then there won’t be any special nuances. If you decide to be creative and paint old chipboard furniture in combined colors, then you should choose tones that are comparable to each other. We choose the main color, and then select related tones for it, as if shading the main palette.
Before you paint the chipboard with dyes, you need to apply the paint to the unwanted wooden surface to determine the natural shade. This is justified by the fact that acrylic paints change tone when drying.
Application of paint and varnish
Next, we’ll take a closer look at how to paint chipboard with your own hands. At the first stage, we decide on the coloring solution, or rather on its quality. It should be of optimal consistency, neither liquid nor thick. It should also not contain dry grains.
Next, we determine the number of layers to be applied. Here the consumer himself must decide, taking into account the condition of the old chipboard furniture, personal preferences and other factors. But, experienced craftsmen advise applying at least two layers. It is imperative that each subsequent layer is applied after the previous one has completely dried. To apply the layer evenly, paint should be done using a roller or brush, moving in the same direction.
The next step is to fix the paint with varnish.
To do this, wait until the paint has completely dried and apply varnish to the surface using foam rubber. To do this, dip the foam rubber into a container of varnish and apply it evenly and gently onto the layer of paint. For better effect, repeat the procedure several times, naturally after the previous layer has dried. After waiting for the last layer to dry completely, you can assemble the chest of drawers.
Additional touches can be added to add originality or achieve a vintage design. Draw golden lines or artificially age them. The main thing is not to leave smudges or other marks when performing additional strokes. You can ruin all the work done. For insurance, it is better to use masking tape.
Working with putty
For better and uniform application of putty on the wall, as well as for good adhesion, impregnation with a primer mixture is first necessary.
The primer layer must be applied twice. The second one is applied only after the first one has completely dried.
After preparing the chipboard for puttying, proceed as follows:
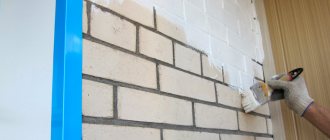
- The main thing to do is to carefully and efficiently seal the seams between the slabs. The selected putty compositions should try to seal the joints and seams as deeply as possible. Sealing should be done with a spatula without leaving traces of the compound on the seams along the edges. In professional language, this action is called “scraping putty.”
- To ensure high-quality sealing, the seams are additionally taped with fiberglass tape or Serpyanka construction bandage.
- After waiting for complete drying, you should begin to apply the first layer of putty. You can use a steel spatula. You need to choose a size based on your skill in using the tool. The smallest spatula has a working blade length of thirty-five centimeters and a width of ten centimeters. You can apply the solution to the spatula using another spatula measuring ten by ten centimeters. To begin with, the mixture eliminates all defects on the slab, and only then the puttying process begins.
For painting
If you need to paint the walls with paint, the layers of putty applied must be increased to three.
Each layer should be no more than three millimeters and applied only after the previous one has completely dried.
All the necessary information is in the section on choosing chipboard paint.
Under the wallpaper
When preparing a wall for wallpapering, it is enough to apply two layers of putty mixture.
You need to putty, being careful not to overlap the layers. You need to be careful when putting putty on internal and external corners.
After drying, begin sanding the surface with sandpaper. At this stage, there should be no cracks, pits, bulges or crumbs left on the chipboard from the plaster.
The cleaned board can be primed or covered with wallpaper glue.
How to fix minor defects
To restore and repaint old furniture, it must first be disassembled. The more individual elements you have, the easier it is to work on particularly hard-to-reach areas.
If you are going to paint furniture yourself for the first time, then paint with a roller rather than a brush, so you can cover the desired area more evenly.
All damage and dents are puttied and cleaned. You can apply an additional layer of antiseptic to prevent the formation of mold and mildew. If you do not plan to paint the product, but only varnish it, buy transparent putty. It will not stand out against the background of the entire wooden surface. To correct defects, work in thin layers, which must dry well.
It is better to apply putty several times than to create a dense layer that will take a long time to dry and possibly become deformed during the painting process.
High-quality painting of interior doors: tips from a painter
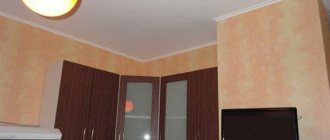
Every theater begins with a hanger, and the interior of any room begins with a door, which sets the mood and makes a significant contribution to the atmosphere of the interior and is an important element of the zoning of the room.
Many people who have started renovations underestimate the need to update interior doors, focusing on the choice of wallpaper, flooring and furniture. As a result, an unpleasant contrast is created between a brand new room and an old door that has lost its appearance
But this can be avoided if you paint the interior doors yourself. Provided that the paint is selected correctly and the painting technology is followed, the result will be excellent, which will allow you to create a complete, harmonious interior and at the same time significantly save money.
Choosing paint for repainting furniture
The material of the furniture affects the choice of paint.
Acrylic paint is popular for painting wooden furniture. Among its advantages:
- increased stability due to good absorption;
- quick-drying;
- economical, as it is diluted with water;
- the smell is not aggressive;
- can be used without priming;
- antiseptic properties,
- non-flammability.
Minus: only white color, which can be tinted with color.
The spray in a can speeds up the painting process, applies evenly, and dries quickly.
For a glossy surface on wood, choose enamel varnish paint.
To prevent the surface from shining, use an oil matte finish.
To preserve the natural structure of the wood, a colorless product is purchased, which is available in shades.
The surface painted with latex composition can be washed. The paint is not afraid of water and sunlight, but is expensive.
Expensive paints also include silicone paints with the addition of acrylic. The paint penetrates the wooden surface and is not afraid of moisture.
Is it possible to paint PVC film for furniture?
Windows and other PVC products are painted using a spray gun. Before pouring polyurethane-acrylic paint into it, you need to add a suitable color to it and mix thoroughly. After opening the can, you can sometimes find a film on the surface of the coloring composition that must be removed.
Interesting materials:
What forms of accounts are used in accounting? What accruals are reflected in account 70? What errors in the invoice prevent VAT from being deducted? What errors in the invoice do not prevent the deduction of VAT? What expenses can be written off against net profit? What accounts are called correspondent accounts? What address should be indicated on the invoice? What currency code to put on the invoice If payments are made in rubles? Which account should I indicate, current or correspondent? Which account is closed at the end of the reporting year?
Paint selection
Now directly about what you can paint with. There are a lot of paint options on the market
Here the main attention is paid to the material from which the furniture is made. In addition to paints, varnish is actively used
It creates an attractive appearance and has excellent protective properties.
Varnish is the basis of the composition. An appropriate coloring pigment is added to it. That is, start by choosing a varnish base, which can be:
- alcoholic;
- epoxy;
- oil;
- polyurethane;
- alkyd;
- nitrocellulose.
If you want to use paint, then listen to a few tips.
- Acrylic compounds are considered the traditional choice for furniture. They are durable, quick-drying, safe and do not have a strong unpleasant odor. At the same time, they are diluted with water;
- Working with a spray can is much easier in terms of doing the job. They also use acrylic compounds. Lay flat on the surface, no need to use rollers or brushes. But the price is higher and the consumption is more impressive;
- Enamel ones are mainly used for treating wooden surfaces. Their advantage is that they create a glossy and shiny structure;
- If you need a matte effect, use oil-based formulations;
- The laminated surface is painted using polyurethane and alkyd compounds;
- Epoxy enamel is generally not bad, but it takes a very long time to dry, plus an unpleasant characteristic odor remains in the room for a long time;
- In theory, laminated chipboard and MDF can be coated with acrylic latex paint, but then you will have to use a special primer and apply it in 2 layers.
Conventional white base paints, which contain a large number of pigments, are very popular. This allows you to create your own shades and experiment without spending a lot of effort, time and money.
Removing old paint
We often come across furniture based on chipboard. Even if it is quite worn out, it can be restored and fit into the interior favorably.
Any repainting procedure begins with preliminary preparation. And sometimes you have to first get rid of the old paint before applying primer, putty and new paint.
There are 2 ways to clean surfaces.
- Chemical method. Here you will need to purchase special chemicals that are designed to remove old coatings. Here, start from the material that previously covered the furniture. The means are distinguished by adaptation to a specific material. Be sure to use gloves when working;
- Thermal method. The essence is the effect of heat. A hair dryer would be an ideal option. First, hot air is supplied to the surface. This allows you to soften the paint or varnish, which is then simply removed with a scraper.
Now you can safely putty, sand and prime before applying the finishing coat of your chosen paint or varnish.
Technology of applying paint and varnish to furniture
So, you can start painting the furniture. First, you should check the expiration date of the paintwork material. If the enamel (varnish) has thickened or dried out, you need to dilute it with water or a solvent according to the instructions and stir thoroughly.
Apply the first (background) layer of enamel with a roller or brush and leave to dry for 24 hours. Then either paint the surface again, or carefully and tightly stick masking tape in accordance with the design idea or a stencil with a pattern and cover with a second layer. The drying time depends on the manufacturer, but, as a rule, is at least a day.
Scotch tape allows you to bring some design ideas to life
If the coverage of the selected brand is weak, and the original color shows through the paint, then you can and should apply the coating one more time. Mirror gloss is achieved with an additional layer of acrylic or alkyd universal varnish.
Varnishing and tinting impregnation is carried out according to the same scheme. The difference is that this process requires perfect cleanliness of both the surface and the room; any speck of dust can nullify all efforts.
What to stock up on before painting?
Painting furniture is not like drawing on paper. The surface must be pre-prepared, no matter what technique you use. Minimum set for decoration:
- Sandpaper of two degrees of hardness or a sanding block
- Degreaser (alcohol or white spirit)
- Primer
- Soft cloth
- Respirator (at least a medical mask)
- Paint brushes of different sizes or a roller (depending on the scale of the task) or a sprayer
- Small detail brush
- Large sponge (can be used for washing dishes)
- Paint in the desired colors or white + colors
- Finish varnish (shellac, acrylic or deck)
Surface preparation
For the production of furniture, they used and still use different coatings on chipboard, which have to be removed at home using largely different methods.
In any case, it is better to disassemble cabinets, tables, bedside tables and take them outside or other open, well-ventilated space. If necessary, you can work without disassembling, then you should free up space around it, lay newspaper or thick oilcloth underneath so as not to stain the floors in the room.
Painted furniture
If varnish or paint has been applied to the slabs, they can be treated with a hairdryer. After heating and softening, the top layer can be easily cleaned off with a spatula. Thick coatings of old paint can form swollen bubbles when exposed to hot air, which are much easier to clean off than thin layers.
If you need to clean an ancient countertop, a regular heated iron will do. By ironing the surface through the foil, the coating can quickly be removed with a spatula or knife. For vertical or shaped surfaces, for example on a rustic chest of drawers, in the absence of a hairdryer, a torch or blowtorch with any heating source will help remove the old paint
Work must be carried out very carefully, keeping in mind safety precautions
There is an alternative method for removing varnishes and paints, the essence of which is to treat the layer with solvents. The organic liquid is generously distributed over the surface with a brush, wait a while, then the softened layer is removed with a spatula
The solvent method is convenient, but requires caution due to the high volatility and flammability of the liquid
Furniture coated with polymers, veneer or laminated paper
If there is a laminated, veneered or laminated layer on the surface, you will have to work hard. It is very difficult to remove them just like paint, because there is a high probability of damage to the particle base of the chipboard material. Therefore, the furniture is treated with sanding cloths until the roughness of the coating is formed, which allows the new layer of paint to be securely fixed.
Nowadays, chipboard home furniture very often has a laminated outer layer. It should be prepared with great care, especially if you plan to subsequently paint the chipboard in an elegant white color.
Sanding is first carried out using sanding plates with large grains, then the dust is carefully swept away with a brush.
Please note that you should not wipe dusty areas with a cloth, because dirt particles will penetrate into the pores and interfere with the subsequent fixation of the color pigment
At the next stage, sanding is carried out with fine-grained sanding sheets, especially focusing on edges, corners, and other areas where pre-treatment was previously difficult to do. After this, sweep out all the dust particles again.
Note! Before you start painting, it is recommended to vacuum the room to prevent dust particles in the air from sticking to the freshly painted furniture.
Otherwise, instead of the long-awaited glossy cabinet or table, you may end up with a non-uniform matte finish.
After sanding, you need to slowly run your hand over the surface of the furniture, feeling each area for any unevenness or damage. If there are any, the furniture must be puttied with special compounds or a mixture of fine wood shavings and PVA.
After waiting several hours, up to a day, you can begin priming, which is absolutely necessary to improve the fixation of coloring pigments in the future. The primer mixture will also need a day to dry completely, provided that the work is carried out in a warm room.
If the temperature is close to the minimum allowed 5℃, drying may take longer.
Preparing for coloring
Before you start painting, remove the door from its hinges. In the event that you only need to slightly update the paint layer, this is not necessary. Painting doors in an apartment with your own hands begins with preparing the workplace. The door removed from its hinges is laid horizontally on suitable supports at a height of at least 50 cm from the floor. Ordinary stools are successfully used as supports, on which boards the width of the door leaf are placed. The supports must be covered with a non-slip, lint-free, dense fabric. The door is processed first on one side, then turned over to the other. The first stage of work is removing the layer of old paint. For convenience, all fittings (handles, hinges, etc.) are first removed, and a small amount of cotton wool or rags is placed in the holes. To remove a layer of old paint, use a solvent, a stiff wire brush or sandpaper.
Why do you need to putty chipboard?
The primer will improve the adhesion of the putty to the finishing materials. The wood board has a rough surface, so before starting the final coating, the chipboard is treated with a primer and then putty.
Otherwise, wallpapering the slabs will result in wasted costs.
Since all the flaws in the plane will be visible on the walls. The same thing will happen with painted cladding.
To avoid such harmful consequences, chipboard putty is necessary.