Facade cladding is advisable not only for decorative purposes, but also as protection from the negative effects of the environment - wind, rain, frost, ultraviolet radiation. The most environmentally friendly option is wood. Sheathing a house with boards is not a cheap method, but it creates a threshold for air flows and moisture that drains without penetrating under the sheathing or onto the walls. But it also has a lot of advantages.
Advantages and disadvantages of finishing boards
Boards for interior wall decoration made from natural material (or based on it) have a number of positive qualities, for example:
- Such interior decorative material for the home as wood can be used in different climatic conditions.
- This opens up the opportunity to create any structural element with your own hands.
- Wooden beams are a natural and environmentally friendly material.
- This type of wall covering does not cause any difficulties during operation.
- This finishing material has a long service life.
- In case of failure of a separate fragment, a partial replacement can be performed.
- Laying technology allows you to additionally insulate or insulate the walls of the building.
- The ability to create a different style, age the canvas or choose the desired texture and shade.
- Affordable price.
Larch finishing board
Despite many advantages, facing surfaces with unedged or edged boards also has some disadvantages, namely:
- Due to an increase in the level of humidity in the room or from exposure to moisture, lumber loses its physical qualities.
- Boards without additional treatment with protective agents support combustion.
- This building material has various defects inherent in wood (resin pockets, knots, cracks, etc.).
- At some intervals, the boards require painting or other maintenance.
- Without treatment with antiseptic solutions, fungi and mold can develop on wood.
Features of self-assembly
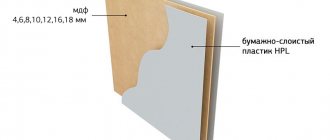
Fiberboard panels coated with a special film are in great demand. This is due to the fact that if the wall surface is flat, you will not have to construct a sheathing. This lightweight material is mounted directly on the wall using adhesive tape. This method will make the work much easier, especially if you do it yourself.
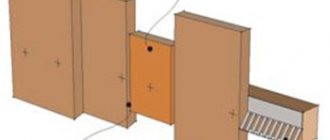
Figured assembly of wooden elements is considered the most difficult option. For example, if the owner decided to make wall cladding with a herringbone pattern , then to achieve the goal the following tool and material will be required:
- protractor;
- cladding boards;
- fine-tooth hacksaw (for wood);
- duct tape;
- pencil.
When working on your own, you will have to face some nuances that are of particular importance. So, an accurate calculation is necessary. When marking walls you should be extremely careful. Cutting boards, fastening wooden planks - a beginner in such work will have to show a lot of patience, especially if they plan to make paneling with a pattern. But you can do it on your own if you follow the following installation rules:
- First, all wall dimensions are transferred to a sheet of paper. It is important to maintain maximum accuracy, otherwise the work will take much longer. Installation of such material begins from the center of the wall; accordingly, a line is drawn in the middle.
- Next you should trim the wooden elements. This is done so that one side is oblique. One half is trimmed to create a corner on the right side, and the other half is trimmed to create a corner on the left.
- Then adhesive tape is fixed on all planks in three longitudinal strips. In this case, the adhesion to the wall will be maximum.
- It is advisable to involve an assistant for work. Installation of wooden panels begins from the center of the wall, then move to the sides. Cut decorative boards are installed at the corners to the drawn line. Gaps between planks are not allowed.
- So, the first planks are already fixed, and you need to build on them and continue installing the remaining elements. At the last stage, the protective film is removed.
Finishing boards are universal in application, so they can be used for different rooms. To improve the interior, it is advisable to combine different tinting strips. If you have even minimal skills in working with tools, the installation process will be significantly simplified and accelerated.
Types of materials
Today, the most popular materials made from wood or based on it are:
- Lining.
- Boards imitated as timber.
- Block house.
- Siding.
- Not an edged board.
Let's look at each of the materials in more detail.
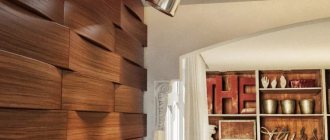
Wooden lining
- Lining. As a rule, solid wood is used for production, so the material has a high level of strength and does not cause difficulties during installation. A distinctive feature is that such finishing can be replaced in case of damage, as well as painted, varnished, etc. Since the lining can be presented in different variations, including physical characteristics, it is equally well suited for interior decoration premises, as well as external work (finishing a bathhouse or sauna, terrace, kitchen, and even a living room or bedroom), this can be seen just by looking at the photo.
Imitation of timber
- Imitation of timber. This is a material that, when assembled, is similar to solid timber. It is this distinctive feature that allows you to give the room solidity. Such a massive and durable material has a high level of strength, is not afraid of mechanical stress, and is also able to withstand environmental factors, but only after specialized processing.
Advice! As you can see, this finishing option is especially good for the living room, and is especially often used in country houses. Installation of the blade is very simple, thanks to the presence of “locks”: the tenon fits into the groove, which significantly speeds up and facilitates the work. This allows you to use the material not only as floor or wall decor, but also to fix it on the ceiling without much difficulty. Ceiling beams will help harmoniously complement the picture and give the room a special atmosphere.
Block house internal
- Block house. This material allows you to imitate a log house made from a cylindrical log. It is used inside and outside buildings due to the presence of canvases of different thicknesses and widths. As a rule, coniferous wood is used to make such boards, which gives not only realism, but also a natural appearance. Larch, cedar or aspen can also be used.
Larch planken
- Planken. This is a small decorative board that is used to decorate small areas inside and outside the house. The material has different textures and comes in a wide range of colors, and easily tolerates moisture. The material is laid end-to-end, but with a small gap, because the material can expand from exposure to moisture.
Types of siding
- Siding. Siding is a decorative material, for the manufacture of which both synthetic and natural materials can be used. Finishing with such material allows you not only to imitate a wooden surface, but also to choose the optimal color and texture. Siding panels are very durable, are not afraid of the sun and moisture, which is why they are often used for exterior decoration. The panels are installed on the sheathing using brackets. Also, when purchasing material, the kit includes instructions and elements that allow you to hide seams and cuts.
- Not an edged board. The material is a board that has a raw edge. This finishing material allows you to create an original room design, especially if you correctly complement it with decorative elements.
How to age wood (video)
Increasingly, walls are decorated with unedged boards without first clearing the wood of bark, which allows you to create the effect of antiquity (a detailed video lesson on how to age boards can be seen below):
Finishing a wall in a bedroom with unedged boards, as in any other residential or non-residential premises, requires pre-treatment of the wood with protective agents that will protect it from moisture and sunlight. I would also like to note that decorating walls with parquet boards, as well as decorating walls with planed boards in a herringbone pattern, are no less popular.
Wood type
Before starting work, decide on the wood.
Typically, sheathing a house with lapped boards is made from softwood and hardwood. The cheapest boards are made from spruce and pine. But the degree of their protection for the home from atmospheric phenomena is small. You will have to carefully treat the surfaces with fire retardants, antiseptics, varnishes and other means. This turns out to be expensive and difficult.
Larch-based boards are denser and also protect the structure well from moisture and precipitation.
So for exterior decoration it is better to take larch.
For a cubic meter of good quality lumber you will have to pay 200-250 dollars.
An excellent choice would be American lining made of natural wood. But the price will be a little higher.
To finish the facade of the house, take boards 30 cm wide and 20-30 mm thick.
To minimize shrinkage and shrinkage, leave the boards in the sun for 1-2 weeks before covering.
Approximate cost of material
The table below shows the approximate cost of wood from which planed finishing material can be produced.
| Hardwood: | Cost per m2: | Coniferous wood: | Cost per m2: |
| Linden: | From 700 rub. | Larch | From 750 rub. |
| Alder: | From 900 rub. | Cedar | From 550 rub. |
| Oak: | From 3000 rub. | Pine or spruce | From 350 rub. |
| Ash: | From 1500 rub. | ||
| Aspen: | From 1200 rub. |
Interesting examples of interior design with wood
Wood adds warmth and softens the color contrast in the home. Interiors made from this material are also crucial for creating unique accents. Over the years, wood has become one of the popular natural materials used by humans.
Current interior design trends with wood paneling bring the home closer to nature, such as using decorative accessories made from branches and logs. If you combine wooden decor with images of trees in the painting, as well as wood panels on the walls, you will create a natural feeling of cleanliness and eco-friendliness.
Board installation tips
Since decorating the walls in the kitchen with boards has some differences from installing boards in the bathroom or bedroom, below we will try to highlight the most relevant tips and tricks that we hope will make your work easier.
- The boards can be fixed to a frame partition or glued directly to the walls, like wallpaper, with liquid nails (the wall must be perfectly flat).
- Try not to use an old design solution by choosing one color of wood, even if the species is expensive. Today it is very fashionable and popular to combine different colors and textures, brush boards and even give the walls additional volume by fixing the canvas with an overlap or a herringbone pattern. Thus, finishing the walls with boards in the Provence style looks great.
How to decorate walls with boards
- The combination of horizontal, vertical and diagonal fixation of boards looks no less original. You can also insert parquet or brushed material or laminate into this combination, creating a herringbone pattern.
- To finish paintwork materials, try not to use synthetic materials, or better yet, do not use them at all.
- If you still decide to use a plain material, decorative elements, additional lighting, and fresh flowers will help to dilute it.
- Since old pallets (pallets) have recently been very often used for finishing in order to save money, it is not recommended to use them in children's rooms. To arrange children's rooms, instead of Euro pallets, it is best to take parquet or other hollow, smooth material that your baby cannot get hurt on.
Staged cladding
The sheathing of the house itself with overlapping boards is carried out in several stages.
First you need to start preparing the walls.
The point is to remove unnecessary elements, as well as seal cracks and eliminate other obvious defects.
Then the main stages begin.
Lathing
The boards will be installed horizontally. Then the sheathing beam should be installed vertically. Reminds me of attaching lap siding.
The lapped boards are attached to pre-installed wood sheathing. Although you can replace it with a metal profile.
The lathing allows you to additionally lay layers of insulation and a windproof membrane for a ventilated façade. This improves the protective properties of the building and also has a positive effect on the indoor microclimate.
The tips will be as follows:
- use wooden blocks with a section of 50x50 for the sheathing frame;
- before laying the boards in 2-3 layers, treat the frame with antiseptics;
- Take a break between each layer to allow complete drying;
- when installing beams, an interval of 1.5 meters is observed, but no more;
- if insulation is used, the pitch will be equal to the width of the insulator.
There are several options for fixing the sheathing beams.
The following options are available to choose from:
- Long nails
. They are used provided that it is a wooden house, and insulating materials will not be installed in the frame; - Dowel screws
. Suitable for block houses; - Hangers for drywall
. They are used when installing insulation pie.
Make your choice based on the situation.
Insulation and insulation
It is important that the vapor permeability of the layers increases from the walls of the building outward. Otherwise, condensation will accumulate in the cake. Over time, this will cause the walls to collapse.
First, waterproof the walls. If it is a brick or block house, take bitumen mastic. But rolled material works well. It is laid overlapping on the sheathing, and joints of 10 cm are made on adjacent materials. Leave a ventilation gap between the wall and the insulator.
The insulation is based on polystyrene foam or mineral wool. They are mounted with dowels and glue.
A membrane is fixed on top of the insulation. There should be a gap between it and the boards for the outer cladding.
Installation of boards
Having assembled the insulation cake, as well as dried and prepared the boards, you can begin sheathing.
- Start working from the bottom near the plinth;
- Place several thin wooden slats under the lumber. This will allow you to obtain a starting slope for installation;
- Choose the angle of inclination yourself. This is already the privilege of the homeowner;
- The board is laid horizontally. At the same time, monitor compliance with the level;
- Fastening is carried out with nails or self-tapping screws to the sheathing;
- Each subsequent panel should close the fastening of the previous one and create the desired angle of inclination.
Moving board by board, the end result is a beautiful herringbone pattern.
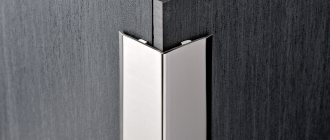
Special decorative corners are used for the corners of the building. Carefully fill all resulting joints with polyurethane sealant.
Photo gallery of walls decorated with wooden boards
Interesting techniques
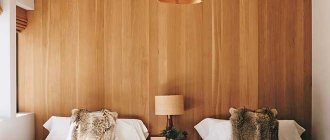
If you want to give your decor a special expression, pay attention to a wooden wall.
This is a stylish and practical design technique that can transform a monotonous interior in a typical living space. This technique will breathe new life into the decor, making the atmosphere fresher and more comfortable. A wall covered with solid wood will help take your mind off concrete buildings. Certain varieties have a charming aroma and special properties that have a positive effect on human health.
One of the walls, decorated with wood, will attract attention. This element will become the key element of the interior
This technique has a number of advantages:
The design will become more attractive and multifaceted.
Additional sound insulation.
An accent that attracts attention will distract from the shortcomings of the layout and design. A wooden canvas will help mask wall defects, such as cracks, unevenness, potholes, etc.
A wooden sheet will help mask wall defects, such as cracks, unevenness, potholes, etc.
If you want to highlight a separate location in the room, a wooden wall is an ideal option.
Light varieties will visually increase the space of the room.
In combination with other elements and objects made of wood, an additional wall will create a unique ensemble. This combination will elevate the room and take the style to a new level.
When choosing a material for wall decoration, keep in mind that it should be combined with the floor finish and furniture
Pay attention to the color of the variety. It can blend in with the color scheme of the flooring or contrast
The second thing to consider is the texture of the material. The wall can be smooth, with a slight glossy sheen, or have picturesque cracks and scuffs. Consider the individual characteristics of the breed: resistance to temperature, moisture, fading and other influences. The descriptions of the breeds given above will help you make the right choice.
In the next video you can see an overview of interesting ideas for interior design with wood.
Basic processing methods
The prestige and richness of the decoration of a wooden interior is largely ensured by the high-quality surface treatment of natural materials. To give a sophisticated look to any decorative element, the following technologies are used:
- The simplest and most practical option is to coat it with a protective varnish. This processing method allows you to leave the texture of the wood material unchanged, as well as its natural shade;
- The so-called “Luxury” finish involves consistent sanding and varnishing of the wooden surface. Thanks to many repetitions, it becomes perfectly smooth. To achieve such a magical tactile effect, you need to choose hardwood;
- Artificial aging of the material. To age wood, it must be brushed (removing soft fibers from the surface) and then treated with a protective varnish;
- Gilding. To give the decor a truly aristocratic look, the material is sometimes coated with an expensive gold component. It can be either artificial gold leaf or natural gold leaf. Noble silver is also sometimes used, which adds regal gray hair to a wooden interior;
- Tinting. In addition to protective varnishes, this procedure involves the use of tinting compounds for processing the array;
- Wooden interior decoration can take on different textures if you use special effect varnishes (enamels);
- Often, decorative wall decoration with wood involves coating the surface with special oils. To guarantee an eco-friendly interior, it is necessary to trace the natural origin of the same wax.
How to draw a tree on the wall with your own hands step by step
When it is necessary to draw a tree, the following step-by-step actions are used:
- The dimensions are marked out using templates or by eye. Determine the parameters, both height and width.
- Then the drawing is detailed. This is a marking that takes into account smaller elements - large and small branches, the shape of the crown.
- The paint and varnish composition that will be used to apply the design is diluted. Do this in accordance with the recommendations on the packaging.
- Begin drawing using a tool in accordance with the chosen application technique. These can be small or thick brushes, foam rubber sponges for printmaking, templates.
- Before you start painting, you need to prepare the surface. It must be clean and grease-free.
- Errors when applying paint should be erased immediately with a damp sponge soaked in water or solvent, not allowing it to dry out. Otherwise, you will have to adjust the drawing to get rid of the shortcomings.
- If necessary, after the paint and varnish material has completely dried, the design is secured on top with transparent varnish. This will not only preserve it for a long period of time, but also give it a brighter color.
Using step-by-step instructions, you will be able to create an image of wood on the wall that will be in harmony with the interior and have high-quality detailing. Don’t forget that if you want to hide imperfections in the perpendicularity of the walls and ceiling, you can smoothly transfer the pattern from the wall to the ceiling, thereby achieving a unique three-dimensional effect. This way you can create a real garden in the interior of the room.
If necessary, after the paint and varnish material has completely dried, the design is secured on top with transparent varnish.
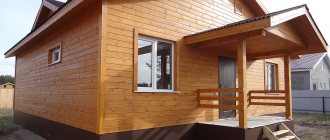
Facade finishing in our design
The walls of the house were quite warm. Finishing with overlapping boards created additional thermal insulation. Therefore, Vadik and I, after treating the outside walls with all the protective compounds, waited until they were completely dry. Then we did the following work.
- Marking of vertical lines along the entire perimeter;
- Wooden planks were screwed onto them with self-tapping screws.
- They nailed the ebb along the top of the base.
- Above it they placed a beam with sides equal to the thickness of the sheathing board. This will ensure a uniform slope of the sheathing strips.
- Nails were driven into the boards at the bottom and top of the vertical posts. 2 cm were removed from the side end.
We cover the boards with an overlap with our own hands.
We started from the bottom row and from the corner began to move to the right and up. Having completed the sheathing, we installed additional protective elements in the corners of the house. The casing was installed on the window and door openings during the construction of the walls. All we have to do is adjust the size of the board so that its end fits snugly against the frame.
Having completed the finishing, we walked around the entire perimeter of the house and sealed all the cracks and joints with sealant. I chose the color of wood in the store.
We took up our brushes again. We coated the overlapping boards on the wall with antiseptic. Then, for decorative purposes, use a glaze compound. It gave the wood a golden-chocolate hue and highlighted the natural grain of the wood.
Overlapping boards can be painted, varnished, or waxed. This gives the finish a unique look. It all depends on your taste and the board used for covering.
Ceramic tile
- reliable and inexpensive;
- suitable option for bathrooms and toilets;
- complex installation.
Another good answer to the question of how you can inexpensively and beautifully cover the walls of your home, if it is made of wood. Good - in terms of material costs and the final decorative effect. However, in order to lay the tiles evenly and correctly, you cannot do without special skills. Still, good specialists are worth it.
The tiles are glued to the base surface using tile adhesive, and after direct cladding, the seams are sealed with fugue - a special grout that prevents the appearance of pathogenic flora on the walls of a wooden house and, at the same time, by adding various dyes, also helps to emphasize certain shades in the interior.
Three-dimensional slats
The modern Italian company produces fastening elements that are placed perpendicularly and vertically at an angle, using T-type slats created by extrusion from a high-strength steel alloy. They are produced in several modifications designed for different levels of loads.
The fastening system must be selected according to the size range of sections of the combined beams and the dynamic as well as static loads acting on them.
During the installation process, the slatted base is attached to the beam using self-tapping screws. Then a groove of the same size as the slatted shelf is created on the end part, attached to the base of the joist beam. If there is no perforation, the shelf is equipped with a log and the connection is secured using self-tapping screws.
What additional decor can be
After the finishing of the walls is completed, you can begin additional decoration. This will make it possible to beautifully present the interior of the room in any stylistic direction.
Textile wallpaper in frames on the walls of the living roomSource metrarus.ru
Wallpaper in frame
Great idea for country, classic, modern style. A contrasting frame is hung on an empty wall, into which a piece of bright vinyl or non-woven wallpaper is inserted. Several strips of material may be required.
Stencil painting in the living room on a bright backgroundSource pinterest.de
Stencil painting
If you have a ready-made stencil design, then it is easy to use it to create a unique image on a bare wall. For example, a good option is a tree branch, under which there are interesting small shelves.
Decorating a wall in the living room using tapeSource pinterest.com.au
Drawing with tape
Chaotic placement of strips without kinks or defects will help achieve an interesting decorative effect. Usually they create a figured geometric ornament. Inside the resulting figures, paintings are placed in small frames.
Large-scale slate wall in the living roomSource howmeb.com
slate wall
This option is acceptable if there is a false wall or column in the living room. It is easier to create a black surface on these objects. This living room wall decoration can be used for drawing with crayons. Every day you can depict something unusual and appropriate to your mood.
Paper applique for the walls of the living room Source multiurok.ru
Volumetric paper applications
Paper plastic is quite popular. It helps to hide all the flaws on the walls of spacious living rooms. Can also be used as decoration for staircase partitions in a hall or hall. Beautiful figures: flowers, spirals, monograms are made of thick paper. Pencils are used to transform them into voluminous, realistic accessories.
Interesting homemade giclee panel with your own hands made of woodSource yandex.ru
Panel giclee
Model with the author's brushwork. When using this method of decoration, designers recommend purchasing at least 6-9 narrow paintings. All of them are made of wood. For decoration in hand-made style, bright colors are used.
Using plywood panels to decorate a wall in the living roomSource furniture-kitchen.kiev.ua
Plywood panels
Narrow panels of wood are adjusted to the required pattern: clouds, animals, natural compositions are cut out. Next they are painted and varnished. Perforated plywood decor models remain trendy.
Selection of full-length photo
For a living room with low ceilings, this decoration option will be just right. All you need to do is choose a canvas model with a suitable color. In this way, you can decorate not only a wall, but also create a special screen.