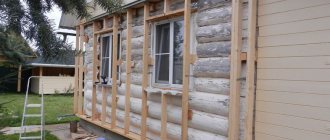
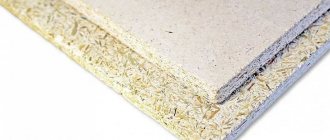
Such a popular finishing material as gypsum plasterboard is in most cases attached to a special frame. Usually it is mounted from metal profiles. An alternative option is a lathing made of wooden beams, which is very easy to assemble with your own hands. But do not be deceived by the ease of manufacture: wood is a capricious material, its use is not always possible. Let's look at all the features of this design and find out when and how you can make a wooden sheathing for drywall yourself.
Self-tapping drywall wood
The juxtaposition of plasterboard sheets and wood in a structure is possible in two options.
Firstly, when the frame for a plasterboard structure is made entirely of wooden beams, or wooden house structures are used as lathing for plasterboard.
Secondly, when in a wooden house the frame for the structure is made of standard metal profiles and only the hangers or profile come into contact with the wood.
A striking example of working with plasterboard on wood is the technological map for cladding attics with KNAUF-supersheet. The technology provides 4 types of designs:
- M 681-1/2 – Attic cladding on a wooden frame with one/two layers of cladding;
- M 682-1/2 – Cladding of attics on a metal frame with cladding in one or two layers.
Only in the first case, self-tapping screws are used to attach plasterboard sheets to a wooden frame, which in everyday life are called plasterboard wood self-tapping screws.
In the technological maps of the KNAUF company, this type of self-tapping screw is called the MN screw. The MN self-tapping screw is a self-tapping piercing screw with a countersunk milling head. Dimensions: 3.9×25/30/35/40 mm.
Here's what the technology sheet says:
The sheets are fastened to the wooden frame with self-tapping screws with a countersunk countersink head type MN. The screws must enter the KNAUF supersheet at right angles and penetrate the wooden frame to a depth of at least 20 mm. The screw heads should be recessed into the sheet to a depth of about 1 mm.
Let's look at a photo of a plasterboard wood self-tapping screw, otherwise a self-tapping screw MN with a countersunk head.
Let's talk about the hidden head of the self-tapping screw. Unlike “bug” self-tapping screws, the self-tapping screws used for fastening sheets have a conical head. This design allows the screws to be recessed into the sheet for further high-quality puttying.
The length of the plasterboard wood screws is 25/30/35/40 mm, thickness is 3.5 or 3.9 mm. The coating is black phosphated or galvanized.
Visually, the MN self-tapping screw (screw) is easy to distinguish by its large thread pitch.
Dimensions and types of fasteners for gypsum boards
For the installation of plasterboard sheets, various types of products are used; it is recommended to rely on existing documentation, namely SP 163.1325800.2014. This standard contains a table that allows you to select the optimal type of fastener.
For gypsum plasterboards it is customary to use the following products:
- TN self-tapping screws. They have a hidden cap measuring 3.5 mm. The length of the rod is selected depending on the situation; the most popular options are 25, 35, 45 and 55 mm.
- Screw TV. It has characteristics similar to the previous version; if necessary, it is preferable to screw on thicker elements of the suspension system.
There are dozens of types of fasteners, but both amateurs and professionals use only a few common models: 1 - LN screw, 2 - LB screw, 3 - TN screw, 4 - TV screw - Screw LN. It has a convex head and a sharp penetrating end, the length of the rod is 9, 11 and 16 mm. An alternative is the LB screw, which acts as a drill.
- Self-tapping screws with press washer. The standard cap size is 4.2 mm. When working with plasterboard surfaces, elements with a length of 13 to 25 mm are used.
- Butterfly dowel. The diameter of the head is from 3.5–4 mm, the diameter of the rod is 5.5 mm.
Self-tapping screws with a press washer, as well as a butterfly dowel, are more focused on screwing any objects to a plasterboard structure, for example, a shelf or a picture
To choose correctly and quickly, you need to pay attention to the special designations in the name.
Other names for self-tapping screw plasterboard wood
The name used in the text for the drywall-wood screw “MN screw” is used in the KNAUF product range. In fact, you can find such a self-tapping screw under different names:
- Self-tapping screw ГД/СГД/ШСГД,
- Black self-tapping screw with large thread,
- wood screw,
- Self-tapping screw for wood,
- Black wood screw.
In addition, plasterboard-wood self-tapping screws are often used to refer to any self-tapping screws with a wide thread pitch (see photo).
Features and disadvantages of wood lathing
The construction of a wooden frame under gypsum boards is attractive due to its low cost and ease of operation. Especially if during the repair there are a small number of boards left that can be used as slats for the supporting structure. In this case, you will not have to spend money on purchasing metal profiles, as well as the necessary fastening elements, such as direct hangers.
But you should also remember about the properties of wood that limit its use in construction:
- Wooden structures are subject to changes in geometric dimensions due to excess or insufficient moisture. The drywall attached to such a sheathing will move with it, resulting in cracks appearing at the joints of the sheets. This is a constant process, as wood releases moisture when the room is dry or absorbs when there is excess humidity.
- Leveling walls using gypsum plasterboard is often combined with insulation. Ventilation of the wooden parts of the sheathing under these conditions is minimal, which leads to their rapid rotting.
- The bars are not suitable for leveling walls. It is unacceptable to use wedges for lining: over time, the wood may bend under the influence of moisture and temperature, and weak areas will form in the areas of such linings.
- It is not recommended to use a wooden frame when finishing plasterboard ceilings. This design does not have a sufficient safety margin; it is better to use a metal profile for this purpose.
- It is unacceptable to use a wooden frame in rooms with high levels of humidity or temperature. Strictly speaking, lathing made of this material is only suitable for rooms with constant microclimate parameters.
- If it is planned to place electrical wires under the surface of the plasterboard, then metal guides must be used: wooden elements do not have a sufficient level of fire safety.
USEFUL INFORMATION: Do-it-yourself lining of toilet pipes with plasterboard
A simple way to count the number of screws
There are several factors to consider here:
- the volume of the room that is covered with a plasterboard structure;
- gypsum board type;
- distances between installed profiles;
- step when attaching gypsum board to the profile (it is usually 20-30 cm);
- fact of using hangers (4 screws are needed for fastening to each)
- product quality.
When purchasing products, it is worth considering their appearance, although it is preferable to choose the manufacturer's name in advance. Poor quality screws may break when screwed in. The slots on them may wear out, etc. Therefore, if you are not sure of the quality of the purchased material, you should first purchase a trial batch. But, even knowing how many self-tapping screws will be spent on a sheet of drywall, you always need to have a small supply of them. Their price will be incomparably less than a trip to the nearest store in case of a shortage of 10-20 pieces.
It is always better to give preference to individually packaged products. This will allow you to control the quantity purchased and avoid leftovers or shortages of fastening materials during operation.
In the world of self-tapping screws
There are a variety of self-tapping screws for drywall.
While engaged in construction, I repeatedly went to purchases. Passing by the rows of hardware, I “rarely reached the middle of the Dnieper,” because their number and variety amazed the imagination. In the end, I had to figure it out, and now I consider it my duty to share this knowledge with you, dear readers.
Self-tapping screws for attaching drywall to a store shelf.
Peculiarities
- A self-tapping screw is an improved screw that does not require pre-drilling. I would say it's a hybrid of a drill and a screw. He drills himself, cuts the threads himself, and attracts the parts to be connected himself. The savings in effort and time are obvious.
If you want to know how to fix laminate flooring without drilling, use self-tapping screws.
- Screw - most often used to connect wood. They can be used to fasten a variety of materials: metal, wood, wood and metal, concrete, brick, plastic, plaster, plywood, etc. This is a universal and convenient fastening element, without which it is difficult to imagine modern construction.
Self-tapping screw for drywall and metal - please.
- Finally, to work with self-tapping screws, in 99% of cases, electric screwdrivers are used, which not only makes the work easier, but also significantly speeds up the work. As a result, labor productivity increases.
Self-tapping screw in drywall in a few seconds: forget about the screwdriver.
If you learn to distinguish a self-tapping screw from a screw not only externally, but understand their functional differences, you will begin to think like a modern builder. You will be able to generate relevant ideas and plan installation work.
Varieties
Let's figure out how hardware for drywall differs.
I mentioned the variety of hardware. It's time to clarify and understand this issue. If we apply the classification, we will not encounter any difficulties.
Self-tapping screws differ in the material of manufacture:
- High carbon steel.
- Steel resistant to aggressive chemicals and water – stainless steel, alloy steel.
Differences by thread type:
- Frequently applied carving.
- Rarely applied carving.
The thread frequency will tell you how to choose a product.
Differences in the type of coating applied:
- Coated with phosphates.
- Covered with oxides.
- No coatings.
- Galvanized.
Drywall bugs (the bottom one has a drill tip).
- For installation of structures made of gypsum plasterboard and gypsum fiber board.
Use in work with gypsum boards.
- For roofing work and fastening corrugated sheets.
During roof installation.
- For working with wood.
Installation of plywood on the floor.
- Window hardware.
- Products for metal work.
Connection of metal parts.
- For concrete and brick.
Fastening the board to the brick.
Each of the listed types can have different lengths and thicknesses. That is why there is such an abundance of hardware in stores. Before you go shopping, you need to find out what kind of work they are needed for, what parameters they should have, their length, diameter, type of thread, and so on. Then the purchase will not cause you any problems.
When can you make a frame for gypsum boards from wood?
It is recommended to use a wooden structure under plasterboard sheets:
- In houses made of logs or timber. In this case, the lathing is ideally combined with the wall material due to the same physical properties. It turns out that any change in humidity is compensated. In such conditions, the drywall remains motionless and is not damaged.
- In ordinary apartments with perfectly smooth walls. In this case, the frame made of timber will be a reliable basis for fastening the gypsum board.
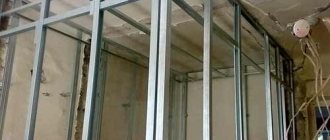
Assembling a partition from plasterboard
Once again we repeat that you can only use a profile with a metal thickness of 0.55-0.6 mm, for example, Knauf. They are good not only because of their rigidity, but also because their design allows them to be inserted into each other, thereby lengthening and strengthening them on the sides of the doorway. Profiles from other manufacturers may not have this option. The walls of the PN already have ready-made holes with a diameter of 8 mm for dowels. Do not unscrew the pieces of plasterboard from the profiles until we have secured the PN at all the necessary points.
There are often situations when the holes available in the PN are not enough. In these cases, they should be drilled independently, and this can be done in one step - through the profile into the base. The main thing is to carefully ensure that the boundaries of the gypsum board pieces clearly coincide with the marking lines.
After fixing the guides on the sides of the doorway, I advise you to check them correctly and make sure that they lie strictly on the same line. Dimensions of rack profiles: 50x50, 75, 100 mm. For single-layer partitions, the 50th racks are rather weak, so we advise all of you to take the 75th or 100th. In the walls of the Knauf rack profiles there are 3 pairs of closely spaced holes with a diameter of 33 mm for laying wires.
All that remains for us is to make a lintel for the doorway. It is made from a guide profile by cutting its shelves obliquely and bending part of its length by 5-7 cm. The slide clearly shows how it will look. That is, you will need to cut a piece of PN 10-14 cm longer than the width of the opening.
Cut and bend it symmetrically. On each side, the jumper is attached to the side posts using 2-3 LN self-tapping screws. PSs are placed in one direction - with the wall facing the corner from which the plasterboard covering will begin. The maximum weight of the door leaf that a pair of PS-100 can withstand is 40 kg.
Rack profiles are installed strictly vertically. Their length should be 1 cm less than the height of the ceilings. And the holes in all profiles must be at the same height.
The profiles can be secured to the guides using a cutter or self-tapping screws with a press washer (temporarily). Before installing the gypsum board stripe, all self-tapping screws must be unscrewed.