Frame material made of metal profiles
What is good about the produced drywall material? Standard versatility. Whatever you plan to build, a partition, a ceiling, a niche, standard profiles are used everywhere (read about profiles here and here), standard sheets of drywall, even standard self-tapping screws. The only difference is in size.
Therefore, for any plasterboard structure, a material from the following list is used (in brackets I showed the profile marking according to Euro standards).
Rack profile, marking PS (CW), example in the photo.
Guide profile, marking PN (UW), example in the photo.
Ceiling profile PP (CD), example in the photo.
Ceiling guide profile PNP (UD), example in the photo.
Sheets with new markings (old designations in brackets).
- GSP-A (GKL): simple sheet, size 1200×2500÷4000 mm, thickness 9.5; 12,5,15 mm;
- GSP-N2 (GKVL): moisture-resistant sheet, same size;
- GSP-DFH3IR (GKLU): reinforced sheet.
- GSP-DF (GKVO): fire-resistant sheet, the size is the same, but there are no 9.5 mm sheets.
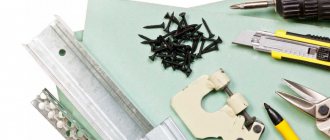
Self-tapping screws for fastening profiles: types LN, LB (bugs), FN (the latter for the ceiling P131, P231)
Self-tapping screws for fastening HA sheets to the profile: types TN, TB, MN.
I note that other manufacturers (not KNAUF), for example GIPROC, have the same profile dimensions as KNAUF, only the thickness of the steel and the perforation on the walls and flange of the profiles differ.
By the way, the profiles have one wall and two shelves.
Three types of frame
To understand the principle of assembling drywall frames, let’s look at the three most used frames. This
- Ceiling frame;
- For wall covering;
- For partitions.
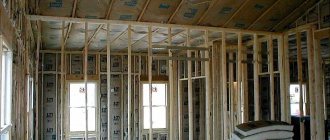
Frame made of metal profiles for the ceiling
There is no universal ceiling frame. The choice of design depends on the distance by which the ceiling needs to be lowered and on the size of the room where the ceiling is being made.
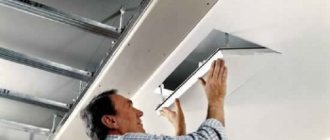
Option 1. On direct hangers
The flow frame on direct hangers is used if it is necessary to lower the suspended ceiling to a minimum distance. The length of the straight hangers allows you to lower this ceiling by 125 mm (see photo). To be fair, I note that there are direct hangers of 50 and 200 mm, which are rarely used, more often in wooden houses.
This frame uses:
- Guide profiles (PN);
- Ceiling profiles (PP);
- Direct hangers.
The frame itself is made according to the diagram shown in the photo.
Option 2. On traction
If it is necessary to lower the suspended ceiling below 125 mm, then instead of direct hangers, the frame is fastened to rods and hangers. The suspension rod length is 125-500 mm.
On rods, the most popular design is a single-level frame, in which the profiles are fastened at the crosshairs with a special “crab”. Ceiling P113.
The frame itself is made according to the diagram shown in the photo.
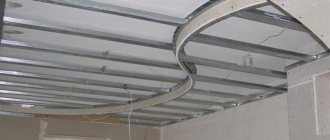
Option 3. Two-level frame on rods
A two-level frame on rods requires more profiles, but is more reliable. In this frame, the profiles are not cut, but are mounted entirely one on top of the other, creating two levels of the frame. The two-level profiles are fastened with a special fastener (two-level profile connector).
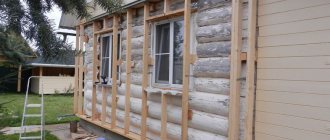
Choosing corrugated sheeting for cladding
Covering the walls of a house with corrugated sheets
According to GOST 24045-2010, corrugated sheeting is divided according to purpose into several types - load-bearing, roofing, wall and mixed type.
GOST 24045-2010
Bent steel sheet profiles with trapezoidal corrugations for construction. File for download
GOST 24045-2010
Each type is marked accordingly. For cladding facades, wall corrugated sheeting (C) is intended, characterized by a trapezoidal corrugated shape. The profile height varies between 8-44 mm, the decorative coating can be either plain or with a pattern.
Seeing the letter “C” standing in front of the numerical marking combination, there is no doubt that this is wall corrugated sheeting.
Wall corrugated sheeting
If you need to sheathe the frame of a garage or some other non-residential building, it is recommended to choose load-bearing (N) corrugated sheeting, or a mixed type, which is designated by the letters NS.
Load-bearing corrugated sheet
When marking sheets, numbers are placed next to the letter designation that indicate the height of the corrugation - C-8, C-10, C-20 and so on. When cladding private houses, the most popular is C-8 corrugated sheeting: it is the most inexpensive, lightweight, but at the same time has good strength.
Profiled sheet S-8
If the façade is subject to high wind loads, it would be more appropriate to use profiles C-15, C-20 or C-21, which are more rigid and not prone to bending.
Profiled sheet S-15
Profiled sheet S-20
No less important when choosing are the decorative qualities of the material. An ordinary galvanized sheet is not suitable for a residential building; such cladding is more appropriate for industrial buildings or domestic buildings. Therefore, preference should be given to colored corrugated sheets with a high-quality polymer coating.
Corrugated sheeting with a stone pattern
The decorative layer can be matte or glossy, plain, with a texture like stone, wood, brick and other materials. Sheets with a pattern are much more expensive than plain ones, but they look just great. From a distance, the wavy relief of the cladding is not noticeable, and it seems that the house is really made of stone or brick.
Brick imitation
Imitation of torn stone
Stonework, drawing
Volumetric drawing
Advice. When choosing a material, pay attention to the back side of the sheet. There are options with double-sided decorative coating designed for fences and partitions. Of course, they can also be used for cladding a house, but why overpay for something that won’t be visible anyway?
It is more economical to use corrugated sheets painted on one side
Prices for corrugated sheets
Corrugated sheet
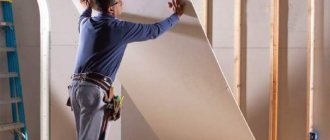
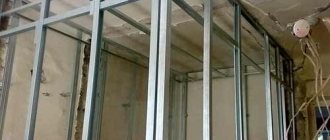
Frame made of metal profiles for partitions
A plasterboard partition is made on a frame made of metal profiles or wooden beams. In this article we look at the frame on profiles.
For the frame of a blind partition, PS rack profiles are used as vertical posts and PN guide profiles are used as a framing structure around the perimeter of the partition. Vertical posts are connected along their length with additional jumpers made of PS profiles.
It is important to note. That all profiles in contact with walls and ceilings are covered with a Dichtungsband type sealing tape.
Preparatory stage
In the case where the installation of profiles for plasterboard is required for the ceiling and walls, work begins with the ceiling, after which they work on the walls. Then adjusting the gypsum board at the top will not be so difficult. The preparation includes the following steps:
- Cleaning the walls and preparing for further installation of the profile for drywall. Removing old finish and cleaning the surface.
- Carrying out electrical installation work. The cable is routed to the places where the lighting fixtures will be. It is recommended to make a cable length reserve of 10–15 cm. The connections are checked for functionality. When spotlights are used in lighting, the passage of the metal sheathing is carefully planned.
- Next, you need markings on the walls so that the sheathing for the drywall is perfectly level. You should start from a low angle or convexity of the ceiling.
This completes the preparatory stage. You can cut the strips of the required size in advance so as not to have to do this on the go. Further work will look like this: installation of horizontal guides, direct hangers, PP and fastening of drywall to the wall on a profile. Now let’s take a closer look at the step-by-step instructions on how to make a sheathing for plasterboard on a wall.
Marking (diagram) of the partition frame
In the frame diagram of a blind partition, the most important parameter is the pitch between the vertical posts. It depends on the height of the room and the size of the PS profiles used. For example, for single-layer (C111) and two-layer (C112) partitions, the following rules apply:
1. Partition thickness up to 75 mm. PS 50 profiles are used for vertical posts. Guide profiles are correspondingly PN 50.
- With a ceiling height of up to 3 meters, the pitch between the racks is 600 mm (along the axis of the rack);
- At a height of 4 meters, PS pitch is 50 - 400 mm;
- At a height of 5 meters, the PS pitch is 50 - 300 mm.
2. The thickness of the partition is 100 mm. PS 75 profiles are used for vertical posts. Guide profiles are corresponding to PN 75.
- With a ceiling height of up to 3 meters, the pitch between the racks is 600 mm (along the axis of the rack);
- At a height of 4 meters, PS pitch 75 – 400 mm;
- At a height of 5 meters, the PS pitch is 75 - 300 mm.
3. Partition thickness 125 mm. PS 100 profiles are used for vertical posts. Guide profiles are corresponding to PN 100.
- With a ceiling height of up to 3 meters, the pitch between the racks is 600 mm (along the axis of the rack);
- At a height of 4 meters, PS pitch is 100 - 400 mm;
- At a height of 5 meters, the PS pitch is 100 - 300 mm.
Important! According to technology, the height of metal rack profiles should be 10 mm less than the height of the room.
Fasteners for metal profiles
When decorating and arranging buildings, there are no minor details. The slightest mistake can later lead to serious negative consequences. If you are irresponsible when choosing fasteners for a metal profile, the service life of the structure can be reduced significantly.
We are not talking about the quality of hardware. This goes without saying. It is important to correctly select exactly those fasteners that are needed in each specific case for attaching the metal profile to the load-bearing surface. If the fasteners are not reliable enough, the structure will collapse, unable to withstand the load. If the connection is excessively rigid, the structure will move due to the lack of backlash and the ability to adequately respond to external influences.
Dowel-nails
Dowel-nails are used for fastening sheet plates, soft insulating coatings and frame metal profiles to brick and concrete walls. They can withstand moderate loads, but will not be able to withstand strong twisting or eversion forces. It is not recommended to use them for fastening roofing profiles.
The main advantage of dowel nails is that they are made of non-flammable, flexible polyamide and have a design that allows them to bend slightly under light loads. Thanks to this property, the integrity of the structure and metal surface is maintained.
Anchors
Anchors are the most powerful type of hardware that are used in places where metal products and bases are rigidly attached. When driven or screwed in, anchors behave like regular nails or screws. They show their character when external influence on bending or tearing begins. The wedging mechanism, which is located at the bottom of the product, is activated and forms a spacer inside the bearing surface.
The reliability of the anchor connection is so high that it is used when installing any heavy structures. Using anchors, you can attach a metal profile to a wall, or you can mount the load-bearing frame of a building.
Anchors, depending on the direction of application, can have different types of heads (for a bit, for a wrench or for a screwdriver). Thanks to the variety, you can choose fasteners for any type of structure.
Option 2. Partition with door
Door frames are installed together with the partition frame assembly. The place under the door is mounted like this:
- Where the door is installed, vertical posts (PS profile) are placed to the right and left of it. A beam is laid from them to secure the door frame. The beam is rigidly attached to the profile.
- A lintel is made from the PN profile above the door frame and additional racks are placed 20 cm from the opening;
- The door is part of the frame structure, so it must be installed before the sheathing;
- Additional vertical posts must be installed above the door.
Option 3. Partition with a heavy door (25-100 kg)
In this option, mount UA profiles on both sides of the door frame. The rest remains unchanged. Details: Installing a heavy door into a drywall partition.
Purpose
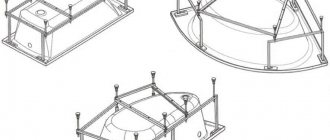
Not everyone likes to cover the bathtub with various trims. A simple way to solve the problem is to purchase a bathtub with beautiful legs and treated, presentable sides. But it also happens that it is not possible to hide sewer and water supply structures.
Acrylic bathtubs usually come with ready-made screens that cover the space underneath to a minimum. The design features of such bathtubs differ from their cast iron/steel counterparts in that they do not form large voids underneath.
The space under the bathtub can be used more rationally by building a screen with shelves or sliding doors underneath it. So, you can store detergents under the bathroom, for example.
Mosaic bath screen
Among other things, such coverings help improve sanitary conditions in the bathroom. Thanks to them, moisture does not accumulate on the floor areas under the bathroom, which provokes the growth of bacteria and fungi.
Modern design developments provide the opportunity to decorate the bathtub in an original and beautiful way. With their help, you can create imitations of, for example, the underwater world or an aquarium.
conclusions
As you can see, each frame made of metal profiles for plasterboard has its own technological, strictly regulated parameters. Changing the pitch between profiles or replacing one profile with another can lead to deformation of the partition. Moreover, this deformation will not occur immediately, but during operation.
Installation details are especially important, namely:
- The vertical posts of the partitions should not rest against the ceiling of the room;
- Soundproofing tape of the Dichtungsband type must be glued to the walls of profiles that are in contact with the walls, floor and ceiling;
- To increase the sound insulation of partitions and ceilings, soundproofing material must be laid in the frame structure, and two-layer plasterboard sheathing must be used for partitions.
©Gipsokart.ru
More articles
- Architectural terms
- Types of wall cladding on a metal frame
- Soundproofing tape
- How to cover a curved wall with plasterboard
- How to connect drywall profiles
- Frame made of metal profiles for plasterboard
- Plasterboard structures in wet areas
Advantages of metal profiles
The advantages of products made from metal profiles, in comparison with wood, plastic, ceramic and other analogues, have allowed them to become the main building material in their segment. The following positive properties of the material are distinguished:
- Reliability, durability and strength. These qualities of the metal were inherited by products made from it. In addition, frame materials are distinguished by the presence of stiffeners, and sheet panels have a metal thickness sufficient to withstand significant loads.
- Resistant to corrosion, sunlight and other external influences. Almost all products that are intended for outdoor use have a protective coating made of zinc or polymers. If it is not damaged during transportation or installation, the metal profile will last for decades without losing its original appearance.
- Convenience and ease of installation of metal profiles. Fastening metal products does not require special knowledge. Any craftsman who knows how to use universal tools can handle this work: a screwdriver, a grinder, a hacksaw.
- Price/quality is the best indicator among analogues. Low cost with all the variety of choice distinguishes metal profile products from alternative options.
Where not to look for water
The vegetation growing on the site, as well as its relief features, make it possible to determine not only the proximity of water, but also its absence. Water should not be looked for in the following places:
- on hilly areas;
- near bodies of water, including rivers, lakes and ponds;
- in close proximity to river cliffs;
- in an area where beech or acacia grows;
- in close proximity to quarries or water intakes.
No living creature can survive without water. This means that the aquifer vein is similar to gold, and searching for it is no less exciting. Your own well allows you to solve the problem of the lack of central water supply on the site. But even in the absence of this problem, autonomous water supply will significantly save time and money. The main thing is that when starting to search for water, use not one method, but several.
Currently, the most popular method is to use aluminum wire. However, even after finding the location of the water, you need to use other methods that will confirm this fact and allow you to avoid mistakes.