Some interior solutions cannot be applied because restrictions are imposed on the designer’s work, for example financial or technical. But the desire to implement any decorative style in the design of your home, to make an apartment or house original and spectacular, leads to the use of modern technologies and materials that embody the flight of scientific and technical thought. Such a solution today is suspended ceilings with a textured fabric that imitates an expensive coating - Venetian plaster. See photo below.
Interior with imitation Venetian plaster
Textured stretch ceilings make it possible to create the interior of a simple room in the style of an antique Italian hall. Even a living room with a low ceiling can now be decorated with noble marble or golden silk. Today, the use of suspended ceilings imitating various expensive materials is one of the fashionable trends in home interiors. Below we will consider in more detail the effect of Venetian plaster created by the canvas, but first we will discuss suspended ceilings in principle.
Design
In short, the design of such ceilings consists of a thin fabric stretched over a frame, which is attached under the surface of the rough ceiling. The material is polyvinyl chloride film, or in rare cases, polyester fabric impregnated with a protective compound. The technology of constructing suspended ceilings from stretched fabrics has been known for a long time, but only in our time has it become popular due to the elasticity and water resistance of PVC films.
Completed work on installing ceiling panels
Minuses
Despite the abundance of positive qualities, such finishing also has certain disadvantages. Basically, they relate to the specifics of the canvas used:
- There are very few shades - about ten, which significantly reduces the designer's options.
- PVC film creates a continuous coating that does not allow not only moisture, but also air to pass through.
- During installation, a heat gun is used, which heats the air in the room to a high temperature, which can negatively affect the rest of the room’s decoration.
- The height of the walls will decrease due to the need to install special profiles on the walls, which will serve as the basis for tensioning the film.
- The cost of such coverage will be higher than that of standard options.
Main advantages
Compared to traditional plaster, stretch ceilings are preferable in many respects. There is no dust or dirt during installation, the materials used in the work are not heavy and easy to transport, they are quickly installed, allow you to install lamps and provide additional sound insulation. Defects in the ceiling itself are hidden - cracks, unevenness, etc.
The advantages of suspended ceilings are a flat surface, a variety of colors, strength, absence of cracks, the ability to tear down electrical wiring and pipes, and protection from leaks. The ability to create several levels gives scope for design imagination.
Advantages and disadvantages of decorative plaster for ceilings
Upon examination, the number of advantages prevails over the disadvantages, which can be easily eliminated during the finishing process. Among the advantages of use are noted:
- the ability to cover various substrates (brick, concrete, plasterboard, wood);
- the ability to hide minor defects (chips, differences) with minimal preliminary preparation;
- ability to withstand loads without losing its attractive appearance (no crumbs, cracks);
- extended service life while maintaining properties;
- variety and durability of colors (ornaments);
- support for a favorable microclimate (porosity, sound insulation);
- hand-made finishing without inviting craftsmen;
- selection of mixtures for dry, damp and unheated rooms;
- environmental safety due to the use of natural ingredients.
Flaws
To be fair, we also note the negative aspects of suspended ceiling structures:
- With this technology, the room decreases in height by 3-5 centimeters;
- Sometimes, when using inexpensive materials, a “greenhouse effect” is formed;
- There is a possibility of damage to the material by sharp objects;
- It is impossible to carry out installation yourself;
- The room gets very hot.
However, the advantages still outweigh the disadvantages, which do not prevent stretch ceilings from becoming increasingly popular and widespread.
Adviсe
Decorative plaster should always be purchased with a reserve of at least 10%. It will be needed if the material dries out or falls on the floor during application.
The issue of saving is always very relevant. This is especially true for estimates for repair work. Experienced craftsmen have some rules and secrets that can reduce material consumption per square meter.
For rough work, they suggest using the most inexpensive cement-based mixtures. At the beginning of work, you need to try to level the walls as much as possible. The differences should not exceed five millimeters. If the walls are too crooked, you should use plasterboard. This budget option will help you quickly and economically give your walls a smooth surface.
You cannot skimp on primer material. It is best to use those products recommended by the decorative plaster manufacturer. The most important thing is to plan everything correctly before starting the renovation. Correctly calculated quantities and selection of successful consumables will help you save money and protect you from additional purchases.
When using Venetian plaster, it is worth watching video tutorials or enrolling in special courses. We must not forget about rough samples. They are best done a few days before the start of the main work. Drywall is perfect for this. Decorative plaster is a very expensive material, so you should carefully prepare for its application.
A novice master should apply decorative plaster to small areas of the walls. These can be arches or small structures based on plasterboard. Small defects will not be so noticeable on them. But a large wall canvas will not make it possible to hide the first experience of a novice master.
An interesting design option for the corridor and part of the living room would be brick or brickwork. It will look more elegant if you imitate brickwork using decorative plaster. Imitation significantly saves space. Construction work will take much less time than using real bricks.
There are two ways to create imitation brickwork. In the first case, the wall is drawn manually, and in the second, special metal stencils are used. Decorative plaster is poured into them.
When working independently, a novice craftsman should use a narrow metal spatula. This tool will help smooth out the edges of the “bricks” and add a little texture.
Whatever method and type of decorative plaster is chosen, it is important to treat the matter with the utmost care and study in advance all the features of applying and preparing decorative plaster. Then a wonderful result will not take long to arrive.
Watch the following video for a master class on applying decorative plaster “Velvet Relief”.
Types of ceilings
All of the above applies to a greater extent to canvases made of polyvinyl chloride film, but there are also options for so-called seamless ceilings. They are made from fabric that contains polyurethane fibers, which make the fabric water-repellent, durable and elastic. Such ceilings have a pleasant matte surface, there are no seams, and no increased heating is required during installation. The use of impregnated fabrics is as reliable as PVC films. Fabric-based ceilings require more maintenance than those made from film, but they give a rich look to the interior.
Bedroom interior
How to level a ceiling with plaster
If the surface is too far from ideal, leveling is done by plastering the ceiling along the beacons. To install beacons, a laser level gauge is used, usually with a level. If the surface is almost flat, leveling is done without beacons.
Relatively flat ceilings
Relatively smooth ceilings are plastered in several layers (two, sometimes three). In this case, one of the layers can be partial (selected areas are plastered), the second must be complete. If the layer thickness is more than 1 cm, reinforcement is used. The mesh is fixed to the surface under tension before plastering begins. It should be inside the plaster layer.
Ceilings with large unevenness
If the ceiling surface has large irregularities (more than 2 cm), plaster the ceiling along the beacons. The composition is applied with a spatula (a medium-width tool is used) so that the mixture protrudes above the beacons. Moving the rule in a zigzag manner, level the applied mixture. The excess is removed from the rule and thrown onto areas that need to be replenished. The rule is moved towards itself.
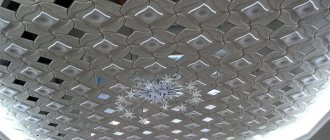
Venetian plaster effect
The original and spectacular texture of the canvas has become an innovation in interior design. In principle, it is the same tension surface made of PVC film, onto which a relief pattern is applied. There is a feeling that there is marble or brocade, granite or Venetian plaster above your head. There are no visual differences to be detected, but the feeling of an exquisite interior remains for a long time. The photo shows a marbled canvas.
Marble surface effect
It's no surprise that Venetian has become a fashion trend in ceiling design. This textured material fits into many style solutions. Its appearance is expressive, but not pretentious, effective, but not tacky. There are a lot of color options and designs, and the work on the device is quite simple.
Another version of the Venetian in the interior
Pattern and Texture Ideas
- reflect light in different areas to varying degrees, which will create the impression of a pattern;
- roughness replaced by smooth areas - it also creates the impression of a change in texture and color;
- the presence of relief grooves, protrusions, waves, stripes and other patterns.
The texture pattern cannot be found in stores or among ready-made factory solutions
- wrinkled bags or newspapers;
- fleecy rollers;
- foam rubber sponges with grain, etc.
Tip Beautiful patterns are obtained by winding a cord of different diameters or even a cable around a roller. Such wide and deep furrows perfectly imitate plant stems.
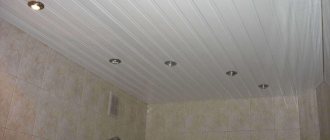
Lighting for Venetian ceilings
The impression of Venetian ceilings can be enhanced by properly organizing the lighting in the room. It is recommended to use point light sources that highlight individual areas and interior elements. It is better to choose central lamps (chandeliers) with shades that illuminate the surface of the ceiling, but do not direct the light down. The same applies to floor lamps and wall lamps. Lighting from different points will create an additional feeling of changing terrain. The structural, embossed canvas plays with the shimmer of light in the right lighting, as in the photo below.
Stylish interior design work with multi-dimensional lighting
Venetian ceilings with imitation of Venetian plaster are installed in residential premises and in all kinds of institutions that want to create their own original and memorable style (theaters, restaurants). Beautiful iridescent surfaces of the ceilings, brightly illuminated, visually expand the space; the light seems to penetrate from within, creating a festive atmosphere.
Venetian woman with a pattern on canvas
Examples
You can truly appreciate the beauty of such coatings only by seeing them with your own eyes. Therefore, below are several photo examples of how Venetian plaster looks on the ceiling in already decorated rooms.
Natural Venetian
Wall decor has been practiced since ancient times; even ancient aristocrats painted intricate patterns on the walls of houses. Today, Renaissance-style interiors are in fashion. The effect of a palace decoration, chic and rich, is given by the so-called Venetian plaster, which is applied to the surface of the walls. The photo below shows an example.
Venetian plaster - a material that adds chic
It is interesting to apply Venetian, it makes the room unusually beautiful, creates a refined and solemn atmosphere in the room. The master's work imitates finishing with noble stone - marble or granite. This effect is formed due to the relief and multi-colored pattern on the wall. The combination of sophistication, originality and practicality has made this finishing method fashionable and very popular.
Combination of Venetian with Art Nouveau style
The technology, which originated in ancient Rome, received a second life during the Renaissance - in the 16th century. Once again, craftsmen began to apply marble chips and lime to save money when finishing various public and private buildings. The result was an imitation of marble, and the work was inexpensive. Therefore, even noble families tried to apply such plaster.
Today, Venetian plaster has become fashionable again. In combination with modern technologies, designers began to achieve unique effects, the example in the photo is the author’s work.
Spectacular Venetian color scheme
Its components
The “historical” Venetian has two main components - lime and marble chips, waste obtained from hewing out slabs and blocks. This combination allows you to achieve the texture of unpolished marble and a characteristic pattern, which is an integral aesthetic property of this stone.
Modern Venetian is a modified composition that is more durable and has a number of other useful properties. As a connecting component it may have:
- acrylic or other polymeric substance
- silicone resin
- epoxy resin
- potassium-based liquid glass
- various dyes
There are many different types of decorative plasters on the market, intended for various premises. The color palette is unusually wide and allows you to choose the right solution for a room of any style.
Features and Benefits
To make a Venetian, a composition is used that includes slaked lime and marble chips (flour) - waste from marble production. European technologies even involve aging lime in special containers for a certain period of time. This saturates the composition with microelements and gives the lime the required properties, which makes it easier and faster to apply the composition to the walls. Working with such material is much more convenient. Lime crushed to a powder is mixed with marble chips, also thoroughly crushed, forming a homogeneous viscous composition. The quality of Venetian depends on how fine the fractions are during production.
Initial composition for creating a Venetian
Modern technologies add acrylic and other polymer additives to the initial mixture to give greater strength and wear resistance to the material and make work easier. Mixing dyes gives a rich color palette.
Various colors and patterns of Venetian plaster
Plaster made using the old, classical technology of preparing the composition required painstaking work, and it was not easy to apply it to the surface. At the end, the walls were covered with wax to add shine and additionally protect the surface.
Modern recipes for making Venetian plaster using polymer materials impart plasticity to the composition, and working with it has become easier and faster, and it has become more convenient to apply plaster. And additives provide surface strength and shine.
The photo shows an example of decorative Venetian plaster
Advice! Using modern technological types of plaster, cover them with a water-repellent coating after applying the composition. This will allow cleaning work to be carried out with wet wiping of the walls. Venetian wax coating does not allow wet cleaning of the surface.
The Venetian interior decoration work gives the room an aristocratic style. Yes, this is an expensive option for finishing the ceiling and walls of the room, but the result is worth it. The sophistication and chic of the interior leaves an unforgettable impression. The plaster itself has the following advantages:
- long service life;
- resistance of the composition to fungus;
- additional thermal insulation layer;
- environmentally friendly, no allergic reactions;
- reduction of humidity due to the hygroscopicity of the surface composition;
- resistance to temperature changes.
The long service life allows the Venetian to retain its properties for a long time and does not require reapplying.
Do-it-yourself Venetian painting on the ceiling
Before starting finishing, it is advisable to familiarize yourself with the nuances of the process. Then you can avoid many mistakes. There are important points associated with coating application. Only an experienced craftsman can take into account the peculiarities of working with Venetian.
It is easier for beginners to use useful tips:
- if you have no experience in applying plaster, it is recommended to use the services of a professional;
- when doing the work yourself, you need to choose a simple Venetian that does not require special skill - “Veneto”, an imitation of matte marble;
- the surface to be processed must be flat - thorough preparation of the floor should not be underestimated;
- It is necessary to use shades of the same color and change them when moving from layer to layer.
The applied coatings should be as thin as possible. The more layers you make, the stronger the visual effect will be. However, if there are too many passages, finishing the ceiling with Venetian plaster will become more difficult.
Preparing for work
First you need to prepare the necessary tools. The coating is applied manually. To do the job correctly, you need to choose the right tools. Otherwise, the application of the finish may be of poor quality. It is recommended to purchase a Venetian trowel. The tool helps to make good strokes and correct color transitions.
The trowel has a rectangular shape and is slightly elongated. The edges are rounded to prevent accidental damage to the surface. It is better to choose a metal product with plastic handles. Using the tool simplifies the process of finishing the ceiling.
Other necessary tools:
- spatulas for mixing the composition and collecting the solution;
- sandpaper to remove irregularities;
- rags or pieces of suede for rubbing.
To get rid of uneven surfaces manually, you can use a sander with different attachments. To stir the composition you will need dishes and a construction mixer. If you don't have one, you should take a drill with an attachment.
You need to start preparing by leveling the ceiling. It is recommended to level the surface with putty and a level. It is necessary to proceed to further steps after the ceiling has dried. Facing putty promotes better adhesion of the mixture to the surface. The primer should be mixed with water in a ratio of 1:7. Its drying time is 6 hours.
Mixing plaster
Do not allow lumps to appear when preparing the composition. It is worth mixing the plaster long and thoroughly. The problem is that the consistency of the mixture should be thick. Otherwise the finish will not stick. Do not mix the composition manually. It is preferable to use a hammer drill or drill with a mixer attachment.
Applying plaster
Before work, you can watch training videos or consult with a specialist. Such events are organized in building materials stores.
It is necessary to press the composition with a large spatula with rounded edges. The instrument must not be damaged in any way. Before finishing the ceiling, it is worth thoroughly leveling the surface, because... Several layers of coating will not adhere well. Over time they may fall off. If after drying there are any uneven spots left, you need to remove them with a trowel.
After 6-8 hours it is necessary to apply a second layer of plaster. Then do the last layer - the finishing layer. The pattern is created by brushing the surface with a small spatula in different directions. The color of the layer should be slightly different from the first. After the second pass, it is necessary to polish the coating with a trowel or large spatula.
All kinds of application techniques involve obtaining a composition with different properties. The layer will be shiny or matte. It is necessary to apply the mixture quickly, because... it begins to harden within minutes.
At the end of processing you need to use a wax coating. It protects the surface from damage and makes it glossy. After hardening, you need to polish the wax with chamois leather. After 20 days, the strength of the plaster will improve, because... the carbonization process will end. However, you can wash the coating with water earlier. If all stages of the work are carried out correctly, the Venetian plaster on the ceiling will resemble marble.
Varieties of Venetian plaster
Different shades are achieved by tinting the original composition. But the work of the master and the method of applying plaster give interesting textures and unique relief designs. An experienced plasterer will create a spectacular coating that, even up close, is indistinguishable from marble. There are several types of Venetian plaster:
- Classic, imitating the texture of marble;
- Layer-by-layer, with the application of 2-3 layers of composition;
- Textured – imitation of various materials and surface types;
- Mother-of-pearl, iridescent in various shades;
- Plaster with larger grains of marble chips gives new visual effects.
Different types are obtained by using marble chips of varying degrees of grinding. And the work of a professional craftsman who knows how to apply plaster allows you to make one or another design on the wall.
Mother-of-pearl decorative Venetian plaster
The variety of plastered walls and ceilings is achieved by methods of applying the original composition to the surface. The most common one involves applying prepared plaster using various movements. The number of layers of the composition also affects the final result. Application work is divided into three main methods:
- The classic method is to apply a base layer of the composition, and then additional ones (1 or 2) with a change in direction.
- Imitation of various materials due to the formation of a relief pattern.
- The artistic method is the creation of original textures by laying several layers of material of different colors.
The combination of Venetian plaster with an image adds additional charm to the interior, originality and style.
Venetian plaster with a pattern
Features and composition of the material
In order to facilitate the process of applying Venetian joker, you should study and understand its features and properties. By understanding what potential each component has, you can come up with the most appropriate use for it.
| Component, property | Characteristic |
| Polymers | In addition to the fact that they impart integrity to all components, due to such components the level of strength of the material, its resistance and durability are increased. Some types of these substances give the material the ability to resist the appearance and development of mold and fungal structures. |
| Powder made from marble, lime or mineral rocks | Gives the composition beauty, shine and pearl, depending on the type of stone used. Allows the surface, which is finished with plaster, to freely pass air flows and not retain moisture. Additionally affects the duration of operation. |
| Transparency | It is created due to the fact that the particles included in the composition are dusty or very small. Allows colors to be combined very harmoniously, creating transitions and amber effects when applied. Gives you the opportunity to implement any design ideas. The only thing worth considering based on this property is that all wall flaws, cracks and irregularities can be noticeable with some application technologies. |
| Can be applied to various types of surfaces | Surfaces of various textures are suitable for finishing with Venetian plaster. Wooden, brick or concrete walls lend themselves equally well to finishing. It will also be a plus that the color of the finishing material does not change its saturation and tone, depending on what type of wall it is applied to. It is possible to create an imitation of various types of marble or stone coverings even on a wooden wall. |
| Duration of service | Thanks to the above characteristics, the service life can reach 16 years. |
| Availability of film | The carbon oxide absorbed by Venetian plaster forms, thanks to the carbonization processes that occur, a layer consisting of carbon. This makes it possible to further ensure the protective properties of the material. |
There is a synthetic version of this material made from natural ingredients. At first glance, it may seem that the first type is more reliable and durable, but this is not entirely true. Regardless of the components of Venetian plaster, the qualities necessary for operation will be ensured. Any of these types is especially good for interior design and the implementation of desired ideas.
The choice of Venetian plaster should be made after you have a ready-made design project for a specific room. From the rich variety of species, you can choose the right one, based on the individual parameters of the room, the arrangement of furniture, color preferences and texture that you need to achieve.
Preparing the walls
It is possible to use finishing material on surfaces made of:
- wood;
- concrete;
- bricks
In any case, a very important stage in the finishing work will be the quality of the prepared coating, so that it is possible to easily apply the composition and there is no need for rework. Venetian plaster requires the main surface to be dry, smooth, solid, without various kinds of flaws.
To correctly carry out the process of preparing walls for decorating with Venetian plaster, you need to perform the following manipulations:
- get rid of the previous finishing material on the walls;
- using putty to give the walls an ideal look, eliminate various bumps, holes, cracks;
- start leveling the walls;
- Using sandpaper, sand down any remaining imperfections. This process can be carried out twice, using different abrasiveness of the sandpaper, moving from more to less;
- After this, prime the cleaned wall and leave it until completely dry. For this stage, it is better to use an acrylic type primer, which requires a two-layer application.
When the walls are completely dry and ready for finishing, you need to start preparing a mixture of finishing material, after which you can begin the process of applying Venetian plaster.
AT WHAT STAGE OF REPAIR ARE STRETCH CEILINGS INSTALLED?
What comes first, wallpaper or suspended ceilings?
“When to do suspended ceilings? Should I glue wallpaper or install suspended ceilings first? Should I paint the walls first or do the ceiling?” - These are perhaps the most popular questions. Many organizations involved in stretch ceilings respond - upon completion of all apartment renovations, i.e. after completion of all types of finishing work. I wouldn't agree with this. So, I'll tell you why. They answer this way only because, apart from suspended ceilings, nothing connects these organizations with construction and finishing work. Organizations that deal with the full range of finishing work can identify several scenarios when installing a stretch ceiling. There are several nuances: the connection of the ceiling to the wall (tight, with a gap, with lighting), the qualifications of installers and painters, the timing of repair work.
WALLPAPER or suspended ceiling? What's first?
- Theoretical option: first the suspended ceiling, and then the wallpaper. It is very difficult to glue (cut) wallpaper under a suspended ceiling - it is much riskier than installing profiles on the wallpaper. And there are exceptions.
- A realistic option: glue the wallpaper, wait 4 days until it dries, and then use hammer drills and a vacuum cleaner when installing the ceilings.
- The ideal option is to split the installation of suspended ceilings into two stages: first, wrapping the profiles (dusty work), then gluing wallpaper, then installing canvases for the stretch ceiling (clean work). This option is possible if you have not one ceiling, but several, and if you do not have a very tight time frame for repairs.
first wallpaper, then installation of stretch ceiling
wallpaper on the wall and hidden lighting from behind the ceiling
Naturally, if you really want to, you can always influence the order of work and do the ceiling first, and then the wallpaper. But then difficulties will arise - where to find craftsmen who will agree to glue wallpaper (or rather, trim it) under a suspended ceiling. There are several reasons why we do not recommend the first option. People often call us and complain that the suspended ceiling was cut when wallpapering - what can be done? We can only eliminate this on our own mount; when mounting with a perimeter plug, we cannot. To repair the cut, we partially unfasten the canvas, cut it a little, re-glue the harpoon and pull it a little tighter (ceiling repairs cost extra).
first the wallpaper, and then the illuminated ceiling.
If you already have a suspended ceiling and still need to put wallpaper under it, then there are instructions on how to do this safely and optimally.
PAINT the walls or do the ceiling?
- Standard option: your painters paint the walls, wait a week for them to dry, and then we install the suspended ceilings. When drilling walls, we use hammer drills with a vacuum cleaner.
- A good option: we divide the installation of ceilings into 2 stages. The first stage is wrapping the profiles onto the putty walls. Then the painter, having covered the profile with masking tape, paints the walls underneath it, the walls dry for 4-7 days. The second stage we install the canvases on already painted walls, without dust.
- Lighting from the ceiling is a more complicated option. In the case of floating suspended ceilings, it is impossible to paint the wall with a screwed profile - they will ruin the appearance of the profile (they will paint it, but it will then be visible after installation). Painting is divided into 2 stages. The painter paints a 10 cm strip of the wall at the top in the desired color. We install complete ceilings. Then the painter simply paints the remaining part of the wall, almost to the ceiling - the paint joint is not visible, and at the same time, in the niche along the backlight, the wall is already painted.
Options for using paintings on walls
Thousands of years ago, people knew how to appreciate beauty and tried to decorate their homes with images. At first they painted with charcoal, created frescoes on plaster, then photography and graphics appeared. By and large, it makes no difference exactly how beauty is created - if the work is talented, it always improves your mood and invigorates you no worse than morning exercises.
You can contemplate the beauty while admiring the plot on the tension wall
The plot corresponds to the eco style in which the room is decorated
In contrast to minimalism in the interior - a panorama of the metropolis
Advantages over photo wallpapers
Now, in order to decorate your home, it is not at all necessary to paint on the walls, which, by the way, is still quite a labor-intensive and expensive pleasure today. What for? After all, you can create the desired ambiance in the interior quite quickly and for a very reasonable price. For example, by mounting a stretched canvas with a corresponding image on the wall.
- To do this, you can, of course, use photo wallpaper, but there is a lot of hassle with them: you need to perfectly align the wall under them, stick the canvases, trying to match the pattern as accurately as possible. At the same time, the choice of images is not very diverse, and the print quality is not always satisfactory.
- Another thing is PVC film or ceiling fabric with photo printing, which has clear and rich colors and a huge range of subjects. In addition, you can put a backlight under the film or along its perimeter, which will not only enliven the picture, but create the effect of presence.
- In order to achieve overall harmony, all that remains is to choose the right plot. Some of them (landscapes, animals and even large flowers) often looked out of place on the ceilings. But the walls are the best place to place them. It is only necessary that the theme of the image corresponds to the general concept of the interior, and the color background echoes its content.
For example, we offer a gallery of photographs with a similar design:
Women's feet walking on water - an unusual plot
Ceiling and wall plasterboard structure, decorated with fabric
Brooklyn Bridge on the billiard room wall
Manhattan skyscrapers in an ordinary living room
Floral accent in the seating area
Stretch fabric “night sky” both on the ceiling and on the wall
The space theme on the canvas is supported by the shape of the lighting fixtures
Canvas with an image similar to a fresco
City in an apartment
Pastoral landscape for a small living room
Design ideas
An interesting plot, chosen with meaning, will never spoil the overall atmosphere of the interior. And there is always a choice, because photo printing allows you to put any image, design, texture on the base, to imitate any technique - be it ancient or modern. Moreover, a picture on the wall can serve not only as decor as such, but also serve as a zoning element or adjusting the parameters of the room.
With this design, you can beautifully dilute an interior with a predominance of black and white or pastel colors, or, conversely, balance the riot of colors in decoration or textiles. In a small room, for example, a plot with endless expanses (sky, sea, forest) - or any landscape or small ornament - will look great. For a studio, some compact composition the size of half a wall would be better suited.
Example of small room design
The image visually expands the walls of a narrow corridor
There will always be morning in this bedroom
Zoning a large room
Tension wall in a classic interior
Wall and floor covering in one color scheme
An image can calm, encourage action, or be abstract - it all depends on what kind of room it will decorate. So, having decided to highlight one wall surface with the help of a stretched fabric, and approaching the choice of the theme of its design with all responsibility, you can “kill” not only two, but three birds with one stone at once.
Required Tools
The list of tools used to apply decorative coating depends on the chosen technology. The main ones include:
- spatulas of various widths;
- trowels, the working platform of which is made of different materials;
- rollers;
- brushes;
- graters for leveling and smoothing;
- special devices for leveling or giving the desired relief;
- construction mixer, which allows you to obtain a homogeneous solution;
- roulette;
- masking tape;
- sandpaper.
Attention! Considering that the ceiling is to be decorated, it is worth taking care of the presence of a scaffold or stepladder to gain free access to the surface
What room is this design suitable for?
Of course, you can install a suspended ceiling with imitation Venetian plaster in any room. However, this design option will not look appropriate everywhere. This finish is best suited for the following rooms:
- Living room. The best option for such a design. In the living room, not only household members, but also guests will be able to appreciate the attractive design.
- Bedroom. The design is suitable for this room, the only thing is that you should choose a discreet, calm shade. Then an atmosphere of calm and tranquility will reign in the bedroom.
- Hallway. This is a suitable option if the hallway is large, since in a small room it will be difficult to examine the design and appreciate its beauty.
- Kitchen. Not the best room to implement this idea. Fat and soot will accumulate in the grooves of the relief pattern and then get into the food. However, if you wish, you can do such a finish, but in this case you will need to wipe the ceiling surface every day.