The basic stage of any building renovation - external or internal - is leveling the walls. At the same time, variations are allowed indoors, for example, the use of drywall. However, plastering on beacons is considered a more rational and cheaper method. The work itself of creating a layer of cement-sand mixture does not present any particular difficulties and does not require professional skills. It is more difficult to position the beacons correctly, because the final result depends on them - the verticality and flat plane of the wall.
Why is it necessary to display beacons?
The use of beacons for plaster is justified if:
- the surface to be finished is “filled up”, that is, it has a slope up/down or to the right/left. In this case, the limitation on deviation from the vertical or horizontal should be no more than 5...12 mm, otherwise the plaster layer will be too thick. It is permissible to plaster walls with large deviations based on reinforcing mesh;
- there are depressions or protrusions on the surface. It is easier to fill local depressions with a cement-sand mixture without plastering the entire wall; it is advisable to remove the protrusions using a grinder or other tool. If depressions and protrusions are located over the entire surface, it is worth applying mass finishing;
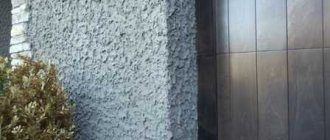
- unevenness of the wall due to the characteristics of the base material. An example is poorly executed brickwork or a cut stone wall.
The use of beacons for plastering walls makes it possible to smooth out unevenness, ensure the verticality of the wall, and straighten “strewn” corners.
Preparation
Before placing beacons for plaster using a laser level, you must carefully prepare the surface of the walls. It doesn’t matter what material they are made of: brick, foam or gas block, drywall, concrete and so on. Preparation is an important procedure consisting of several stages that should not be neglected.
First of all, the old coating is removed from the surface: wallpaper, plaster or something else. The procedure is specific to each case. For example, wallpaper or water-based paint must be removed. If oil paint was used to cover the walls (removing it is problematic), you can leave it, but notches are made on it, which are necessary to improve adhesion between the plaster and the oil composition. As for old plaster, it is allowed not to touch it only in one case - if it holds firmly without falling off. If it “spits”, then it’s better to remove it. At this stage, you should not waste time, as the cleaning must be thorough.
The next step is to wash away dust, dirt and particles of the old finish. The coating should be clean and slightly rough.
Now you can start priming. It is recommended to use a deep penetration composition. This procedure will have to be performed 2-3 times, each time waiting for the previous layer to dry.
Before installing plaster beacons for walls using a laser level, the surface should be treated, where everything depends on the material from which it is made. The brick ones are left as is. For concrete surfaces, liquid cement mortar is used. Those assembled from wood or metal are strengthened, for which special plaster meshes fixed between the beacons are suitable.
These are the main points of preparation before placing beacons. Before starting any repair work, you should protect all nearby objects and surfaces by applying masking tape.
Preparatory work is one of the most important stages
Factors influencing the correct installation of beacons
To correctly position beacons, it is necessary to take into account factors that affect the accuracy of their placement and the final result:
- the correct geometry of the slats or profile used for beacons. Unevenness, bends and other defects will not make it possible to ensure the verticality of the line;
- insufficiently fast or too fast hardening of the solution fixing the marks. When curing slowly, the lath (profile) may slide, changing position. If it is too fast, it is difficult to position the beacon correctly;
- incorrectly assessed geometry of the surface to be finished;
- inaccuracy of the level (plumb) or its incorrect use.
What to make beacons for plaster from
When choosing a material, two factors should be taken into account: its resistance to aggressive environments and subsequent surface finishing.
When placed in a damp solution, wooden slats (beams) quickly gain moisture and swell. As the solution dries, gaps may appear on both sides of the slats. In addition, the wood itself, under the influence of moisture and the active components of the sand-cement mixture, is prone to cracking, warping and deformation. Therefore, wooden beacons are placed on the wall only with the condition of removal after partial curing of the solution and subsequent sealing of the places where they were located.
Metal T-shaped profiles, depending on the external finish (galvanized), can remain in the solution after finishing the plastering work. However, in rooms with high humidity levels (bathroom, kitchen, sauna), the metal may corrode. As a result, rust spots sometimes appear on the finish (wallpaper, decorative plaster, paint). Therefore, it is advisable to remove or completely cover the beacons with a layer of cement-sand mixture if you do not plan to finish the wall with ceramic tiles or other slab (panel) facing materials.
Materials and tools
The necessary materials and equipment are purchased after figuring out how to properly install the beacons and choosing the method of attaching them, as well as the type of rail or profile. You will need:
- slats or profile for beacons, the length corresponds to the height of the wall. When the surface height is more than two meters, for convenience, sections 2 m long and additional sections up to full size are used. For example, for a room 2.5 m high, beacons 2 and 0.5 m long are used;
- cement-sand (cement-polymer) mortar for basic plastering work and the same mixture or quick-drying mortars (alabaster, cement-gypsum mixture);
- a primer to increase adhesion between the base wall and the plaster mortar and to slow the absorption of liquid into the wall. Especially relevant for red brick and foam or aerated concrete blocks, porous stone;
- water and a container for diluting the solution;
- level with a length of 2 m;
- rule length 1.3...1.5 m;
- trowels and graters;
- cord for aligning intermediate beacons (fishing line, thin flexible wire);
- electric drill and screws;
- protective equipment - glasses, gloves, respirator if necessary;
- chalk, markers, construction pencil or other means for marking the wall;
- brush (broom, vacuum cleaner) for initial cleaning of the wall.
Important: the control profile for plaster is available in lengths of 250...300 cm, widths of 10...20 mm and thicknesses of 6 and 10 mm. Moreover, the thicker and more rigid the profile used in the work, the more massive the layer of mortar can be applied to the wall. Thin profiles bend under the weight of the solution and the load from the rule when leveling.
Rules for plastering lighthouses
Before figuring out how to place beacons under plaster, it is important to clarify the order of work in general.
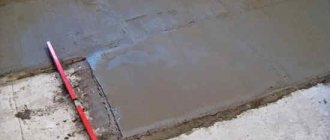
Preparing the wall
The illustration shows a typical example of a wall that requires leveling.
If there are old finishing materials or remnants of plaster on the surface, they must be removed before taking measurements and the wall must be thoroughly cleaned of dust, dirt and debris.
Before installing beacons, it is necessary to check the verticality of the wall, the correctness of the angles (the angle between adjacent walls should be 90 degrees over the entire height of the room), and the presence of noticeable protrusions. The first point is checked by a level or plumb line. For more effective measurements, it is advisable to use a laser level, but with some handling skill, a bubble level with a length of 2...2.5 m or a plumb line of the same length is acceptable. The correctness of the angles is assessed using a square or laser level.
The presence of significant irregularities (depressions, protrusions) is determined visually. If this is difficult, you can check it after installing the basic (corner) beacons.
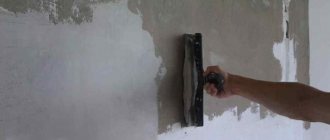
Surface primer
Treating the wall with a primer with antibacterial, fungicidal and adhesive properties is necessary. It is advisable to do this before installing the beacons. The more porous the wall surface, the more carefully you should consider the choice of soil.
Base marks
Installation of beacons for plastering walls begins from the corners of the room. The base slats are fixed at a distance of 15...30 cm from the corners on both sides of the wall.
To simplify the creation of a strictly vertical line of a profile or rail, experts advise creating a “line” of self-tapping screws. For this purpose, holes are drilled in the wall along the entire length of the future lighthouse, and self-tapping screws (screws) are attached to dowels (wooden chips) so that the cap does not adhere to the wall. A plumb line is hung on the top self-tapping screw, and the heads of the intermediate and bottom screws are aligned with it. The same procedure can be performed using a level. For metal profiles, the same self-tapping screws can be used to install beacon fasteners. The distance between fasteners is assumed to be 25…40 cm.
Next, the rail (profile) is mounted.
Another option for installing beacons for plaster is on the solution. Using a plumb line (level), a vertical line is drawn on the wall. Along this line, at intervals of 15...30 cm, a mortar is thrown with a trowel, to which the beacon is applied. By pressing down the beacon with a level and maintaining its strict verticality, a stable position of the slats (profile) is achieved.
Important: if the wall is “filled up” both to the floor and to the ceiling, the minimum distance between the lighthouse and the wall may be at the middle of the height or in any other place. Therefore, before starting work on installing beacons with your own hands, it is important to find the deepest and most protruding place on both lines of the base (angular) marks.
Intermediate beacons
They are set in any of the described ways. It is important to maintain the overall plane of the wall, so control of the position of intermediate parts using a cord (fishing line) is used. To do this, self-tapping screws (nails) are attached to the wall near the corner beacons so that the fishing line stretched between them rests on the base slats.
It is advisable to stretch the thread at the top and bottom of the wall; to control unaccounted protrusions, the thread is drawn along the entire plane of the wall so that the line constantly rests on the base beacons (it is convenient to do this together). Detected protrusions are cut down or the thickness of the plaster layer is increased.
The marking of the wall for the installation of beacons is carried out so that the distance between them does not exceed 2 m. A more convenient option is with a meter distance: this will allow you to use a shorter and stricter rule and avoid the risk of premature hardening of the solution on the site.
The vertical alignment of the intermediate slats is done in the same way as for the base ones, but two self-tapping screws aligned along the tensioned thread are sufficient.
After checking the verticality of all beacons, plastering work is carried out.
Important: if the planks are attached to the solution, before starting the main procedures you should wait until the mixture is completely cured.
You can check the compliance of the position of all slats using a long rule: resting it on three slats at once, identifying possible installation flaws.
To guarantee, you can check the correct position of all elements diagonally on the wall.
For plastering the floor, a slightly different principle is used. Here, the horizontality of future lighthouses is determined using screws (screws) and tightly stretched cords.
Otherwise, you can place beacons on the floor under the plaster with a laser level in the same way as on the wall.
Pull the “laces”
Using a hammer drill, we drill 6 holes with a drill (an impact drill for a hammer drill is called a drill) with a diameter of 6 mm along the edges of the profiles (to the right of the right and to the left of the left). The holes should be at the same distance from each other vertically as much as possible, that is, the lace lines should run as horizontally as possible.
To do this, measure along the edges of the beacons (between the corner and the beacon) an equal distance of 15-20 cm from the floor and ceiling along both edges and also find the vertical center of the wall and put marks. We drill holes for the dowels with self-tapping screws, insert the dowels, but do not screw in the screws.
We drill holes for screws on the right and left of the installed beacons
Having drilled the holes, we tie the end of the “lace” to the self-tapping screw near the cap. We tie it well so that it doesn’t come undone. We screw the self-tapping screw with the cord into the hole into which the dowel was previously inserted. The self-tapping screw with the cord must be recessed deeper than the lighthouse! If it is more convenient (if the depth from the beacon is shallow), then first screw in the self-tapping screw, then tie it with a string, then tighten the self-tapping screw.
I recommend: How to treat floors before laying laminate or linoleum to avoid dust?
We unwind the second end of the “lace” to the other edge. We screw the self-tapping screw into the second hole, not all the way. We tie the lace onto the self-tapping screw and screw the self-tapping screw deeper than the beacon. Thus, the lace lies tightly on the beacons, screwed with self-tapping screws. The tension should be strong enough so that it is like a string and does not sag. We expose two other “laces”.
The laces lie tight on the beacons
Sealing corners
It is important to remember: correct plastering of corners is quite complex, but it is precisely this that determines the convenience of further finishing of the room. The accuracy of joining of skirting boards and ceiling cornices, ease of installation and integration of furniture and appliances, laying of communications, cladding or finishing of walls depend on how smooth the corners of the room are.
It is not enough to install the beacons correctly and quickly on the wall; it is necessary to maintain the verticality of the joint between the walls, walls and/or ceiling, floor. To strengthen the plaster composition, a reinforcing mesh or perforated corner is used.
The correct geometry is ensured by using a special trowel.
In this case, the sealing of parts of the wall adjacent to the corner can be carried out using a rule using a square and mandatory support on two or more beacons.
Video description
This video shows the process of installing mortar beacons without applying mortar to the walls:
Application of laser level
Installing beacons on walls for plastering using modern equipment takes little time. There is no need to perform a number of preliminary steps here. The process looks like this:
- the level is placed 40 cm from the corner as close as possible to the working site;
- the laser line is adjusted along the protruding part of the walls;
- markings are applied for future landmarks, taking into account the length of the rule;
- The solution is applied along the lines (it’s more convenient to do this pointwise first);
- The selected rigid beacon is pressed against the plaster while excess plaster is simultaneously removed.
Using a laser level for installing plaster beacons Source stroi-instrum.ru