Any finishing work involves surface preparation. This is especially important when it comes to repairs. It is then that a situation arises in which you have to remove the old coating from the walls. Most often this is wallpaper or various paints and varnishes. If everything is clear with the first option, then the second one causes a lot of difficulties. It is not always possible to completely remove a layer of paint, then a reasonable question arises: is it possible to putty over paint?
This question is not idle. The fact is that it is not always possible to remove the entire painted layer. There are always mistakes left. They can be removed, but then you will have to remove part of the coating. And this, in turn, leads to additional costs. And in general, will the putty layer stick then?
Preliminary surface study
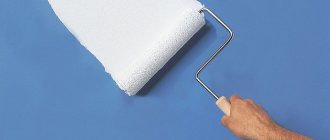
Surfaces found in houses and apartments are usually coated with oil-based, water-based paints and enamels. Complete removal of such coating is not always necessary. The old layer can stick very well and not delaminate. Thus, before taking drastic measures, you need to check whether anything should be done. This can be understood if you resort to a simple test: run a well-wetted rag over the painted wall. What you can see:
- The coating will begin to “wash off”. The marks will remain on the rag and the layers will begin to peel off. All these signs indicate one thing - water-based paint was used. It can be easily removed when exposed to water. If you put putty on it, the same thing will happen. Namely, the solution will simply fall off. The work will go down the drain. To put it simply, everything will have to be removed and redone. The worst thing is when this happens while wallpapering.
- There may be another option. The surface will not react to exposure to water. This means that this is a paint based on drying oil or solvents. Such materials are not afraid of increased moisture. It's not scary to apply putty on them. Although here, not everything is so simple. The painted layer should adhere very well.
Removing paint
As already noted, water-based paint can be easily removed using water. After it is completely washed off, the surface needs to be thoroughly dried. The situation is different with oil solutions and enamels. There are several options that are used to remove such compounds. This:
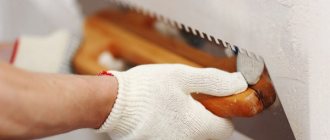
- Mechanical method To remove the coating, use special tools and electrical devices. This method requires a lot of physical strength. It leaves behind a lot of dust and dirt. For work, it is advisable to wear a respirator and safety glasses.
- Chemical method Special chemical reagents are used. They are applied to the painted surface. Under their influence, the layer is destroyed. Work is performed in protective clothing, gloves and goggles.
- Thermal method: A hair dryer is used. Under the jets of hot air, the paint begins to rise. It is easy to clean.
What do you need to get in the end? It's okay if some painted areas remain. The most important thing is to ensure that there is no peeling. The places where the old layer remains must be well cleaned and free of swelling and swelling. Then you can not be afraid and putty on the paint.
Is it possible to putty over paint: recommendations from professionals
Apartment renovations always involve leveling walls and ceilings. Especially if the property was purchased on the secondary real estate market. Often the surfaces in the apartment, on staircases and in corridors were already painted. In this case, the owners have a natural question: is it possible to putty over paint? Experts advise first removing any paint materials from surfaces, but do not exclude the possibility of working with painted rooms.
Evaluation of a painted surface
Before you start puttingtying, you need to carefully inspect the walls and ceiling and determine what paint was used to treat them.
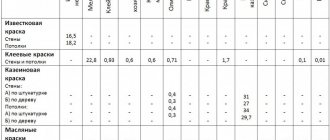
To do this, moisten a small sponge or brush with water and wet the surface. Leave for 15 minutes. Below is a table describing the materials that can be used on the walls and ceiling.
To ensure the strength of the painted layer on the surface, you need to take a metal spatula and scratch it. If after such manipulations the coating begins to crack, crumble or peel off, then it must be completely removed.
In addition to repair work around the house, many car enthusiasts also paint their vehicles themselves. Is it possible to putty over the old paint of a car? Body work professionals say that it is possible, but the body must be sanded first. The old coating will serve as an additional protective layer for the metal.
Putty process
Is it possible to putty over old paint and how to remove it if necessary? The entire process of work for leveling walls and ceilings in a room is conventionally divided into two stages:
- cleaning and preparation,
- applying putty and leveling.
If the master decides to first get rid of the old coating, then the surface must be thoroughly cleaned and prepared for puttying.
Preparing walls for puttying
Only the owner of the apartment decides whether to remove the coating or not. Below are ways to remove oil paint from a surface.
Removing paint before puttying
There are three ways to clean walls from oil compounds and enamel:
- Mechanical method. It is rightfully considered the most labor-intensive. To clean the walls, use a metal spatula or sanding machine. The disadvantage of this treatment is partial removal of the coating. The remaining islands of paint must be sanded and primed. Concrete contact is suitable for this.
- Chemical method. Special compounds are used to remove oil coating. Their application softens the enamel and is easy to remove with a spatula. However, this method also has its drawbacks. Chemical compounds are quite toxic, so it is recommended to use them only in ventilated areas. It is also necessary to protect the skin of your hands and respiratory tract from the possibility of contact with products.
- Thermal method. To use this type of enamel removal, you will need a hair dryer. When heated, the paint softens and is easily removed with a spatula. This method is considered the easiest, fastest and most convenient.
How to apply putty to a painted surface?
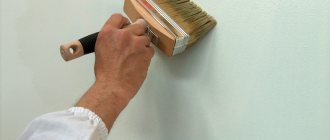
After assessing the walls and ceiling, when it is already known whether it is possible to putty over the paint, you need to prepare the surface for work. A special primer is used to process the paint. It contains small granules that improve the adhesive properties of a smooth surface. The composition of such solutions includes quartz sand, and the liquid itself has the property of deep penetration. After processing, the smooth surface of the paint acquires a noticeable roughness, which ensures reliable adhesion to the putty solution.
Is it possible to putty the ceiling over paint? Following all the above points, this work will not be difficult. Putty is applied to the surface in layers.
Tip: When working with putty, you need to monitor the thickness of the application. It is better to take a wide spatula for convenience.
Each layer should not exceed a thickness of several mm. After high-quality putty work, the surfaces of the ceiling and walls should be even and smooth, without depressions, roughness or flaws. Each ball of putty is applied only after the previous one has completely dried. To remove uneven surfaces, you can use fine-grained sanding paper.
Surface preparation
Before you putty the walls and ceiling, they need to be prepared. Any surface requires thorough cleaning of paint, paint and dirt. If there are oil stains, they are removed using a soap solution. It is possible that when removing painted areas, the integrity of the coating was compromised. That is, potholes, cracks, and chips appeared. They need to be sealed.
It is important not to forget that there is always such an important stage as priming. Due to the fact that all surfaces that are coated with paint are very smooth, this process must not be forgotten. Only then can it be achieved that the adhesion of the putty mixture to the painted section of the wall will be as strong as possible. This will also give greater strength to the old coating. Any neglect will result in the solution peeling off. That is, the putty will not adhere to the paint.
Putty Vetonit LR Plus (Vetonit LR Plus)
The modern building materials market offers a wide range of products for construction, renovation, and interior decoration. Even professionals cannot always correctly assess the advantages of a particular material and make a clear choice in favor of a particular brand. However, there are also brands whose quality even very picky customers cannot doubt. One of these manufacturers is, which offers, in particular, products under the Vetonit brand. Today there are few people involved in construction who have not heard about this famous brand of building mixtures. Various solutions, putty, materials that are intended for tiling the surface - all this will become a proven and reliable assistant for any builder during finishing or repair work.
Putty Vetonit LR Plus
"Vetonit" has a large number of names among finishing and building materials. For example, Vetonit LR Plus is a high-quality material that is widely used by builders for interior finishing work. This putty is used to treat walls and ceilings of rooms for a variety of purposes, but is not intended for rooms with excessive humidity. At the same time, we should not forget that this material is not intended either for leveling floors, or for laying tiles, or for grouting joints between plasterboard boards, and, accordingly, cannot be used for other purposes.
Putty application and final finishing
Further work is no different from simply applying the solution to the walls and ceilings. The putty is easily applied to the paint. The resulting surface will hide traces of previous painting. If everything was done correctly, then there will be no problems.
The following nuances are taken into account:
- Any major defects will be corrected after the base paint has been removed. Then the areas that were generated in this case are simultaneously closed.
- The putty must be applied in thin layers. You cannot make them larger than those specified by the manufacturer. Especially when working on a painted surface.
- If you notice that the mixture begins to lag behind areas of the wall on which paint remains, then most likely you need to reduce the thickness of the applied layer.
- After the putty is applied to the paint, everything should dry thoroughly. Then it is coated with primer again.
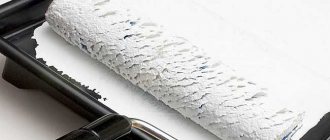
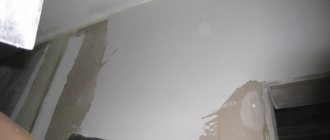
In the photo - work with putty on a painted wall
How to putty a ceiling correctly: applying the material
You can putty the ceiling yourself, or you can invite specially trained craftsmen. Ceiling putty is the main and most common finishing. However, any ceiling surface requires special preparation before applying putty.
What are the advantages of puttying over other methods of wall finishing:
- Gypsum putty is ideal for residential apartments because it does not contain harmful substances and helps create a favorable microclimate;
- It has a very good property - when there is an excess of moisture, it absorbs it, and when there is a lack, it gives it back, thereby regulating humidity and creating a favorable environment;
- The putty can be applied to any surface - brick, concrete, made of plasterboard;
- The structure of the putty mixture allows it to easily adhere to any materials;
- Allows you to save money, since its consumption is much less than that of similar cement mixtures;
- It is easy to apply and sand, making the process of working with it easy and fast.
Of course, there are some disadvantages to using putty. Creates a lot of dust - during finishing and sanding, a lot of white dust is poured out, which causes some discomfort to the residents of the apartment and requires constant wet cleaning of the room. It is necessary to constantly dilute the mixture - this requires some effort. You cannot prepare a lot of the mixture at once, because after a certain time it becomes unsuitable for use.
However, despite these disadvantages, using putty to finish the ceiling is one of the most popular methods in the world of construction.
Before you start puttingtying the ceiling, careful preparation of the surface is necessary. If there was wallpaper on the ceiling, you need to carefully remove it with a wet roller and spatula. For better adhesion to the surface, a primer is used. If the ceiling was simply puttied, then it is necessary to remove the old plaster also with a wet roller.
Sources:
https://englishpromo.ru/2019/12/mozhno-li-shpaklevat-po-vodojemulsionnoj-kraske/
How to putty
When working with a clean room, questions about old painting do not arise, but what to do when it comes to repairs, and we are faced with old painted walls? 10 out of 10 experts will answer that first you need to understand what kind of material is on the wall.
Putty on old paint is allowed in rare cases and if the surface is not painted with water-based emulsion. In addition, it is necessary to check how tightly the coating adheres to the base. To do this, it is enough to cause several mechanical damage to the painted wall and make sure how tightly the paint layer adheres to the base of the surface.
An old painted surface that falls apart due to mechanical damage
Regarding water emulsion
Naturally, the question immediately arises: is it possible to putty over water-based paint? We’ll answer right away – no! The fact is that the water emulsion will draw water out of the putty, and as soon as this process begins, everything will peel off from the wall, along with the layers of putty.
Important! It is necessary to immediately exclude the moment of filling with water emulsion. Regardless of the dry mixture, it will still flake off!
Paint with putty peels off very easily
One question always leads to another, because you need to understand what kind of paint is applied to the wall.
This is very easy to calculate:
- Warm water is filled into the container.
- A simple sponge is used to treat part of the painted wall.
- You can rub a small space with a sponge, and if it foams, then it is a water emulsion.
- After 15 minutes, using a spatula, the swollen part of the painted surface is calmly removed.
And in this case, the paint putty will simply be completely useless, since it will not be able to fulfill its functional duties and very soon it will simply fall off the walls.
Are all paints equally contraindicated for applying putty?
The next question, whether it is possible to put putty on paint, essentially stems from the fact that in addition to water-based emulsion, there are other types of paint and varnish materials.
And here there are some interesting points:
- If the paint really shows excellent adhesion to the walls, then you can put putty on it.
- The painted surface must be washed with soap or other detergent to prevent oil stains on the wall.
- Notches are applied to the surface, they can be scratched directly with a spatula, or beaten with a hammer and chisel, this will be a kind of mesh.
Notches on the wall help with grip
- After all, the wall is primed, this will give adhesion to the entire surface.
Important! This procedure is perfect for oil paint. But at the same time, the painted layer must be in good adhesion to the wall.
Work ban
Naturally, there are surfaces where paint putty is canceled in any case. There are several such conditions:
- A loose base that falls off when pressed lightly.
- Wet walls on which the paint has already swollen and started to “bubble”.
- An easily removable layer of painted surface.
How to sand a ceiling after puttying
First, starting putty is applied to the walls, which covers all the necessary cracks, holes, and eliminates defects. Then the surface is covered with a special construction mesh, which is buried in the first finishing layer. Such methods of wall treatment are provided for by GOST standards.
READ Seal the seams on the ceiling between the slabs
Further surface treatment should occur only after the previous layer has thoroughly dried. How long the putty dries depends on its type, method of application and environmental conditions. So, the standard drying time is from 2 to 24 hours.
Drying speed is influenced by factors such as:
- Temperature conditions;
- Humidity;
- How many layers of plaster do you plan to apply to the ceiling;
- Type of putty.
After applying the finishing putty, the ceiling surface requires sanding. This is done using a special sandpaper or a grinding machine. The first option will be more labor-intensive, but less expensive.
In order to start grinding the surface, you need to prepare all the necessary materials:
- Sandpaper;
- Sanding beam;
- Sanding sponge for hard-to-reach areas;
- Putty knife;
- Wear a respirator or mask to prevent construction dust from entering your lungs.
The process of sanding the ceiling after puttying takes place in 2 stages. First, you need to sand the surface using coarse-grained sandpaper, and then the final processing is done with fine-grained material.
Sanding should be carried out only after the previous layer has thoroughly dried. It is very important to provide good lighting - the flow of light should come at a slight angle to the surface being treated. Be sure to wear a mask and protect your head from getting sanding dust on your head or in your mouth. Large protrusions are removed with a regular construction spatula. Then a coarse-grained sandpaper is attached to the sanding beam from left to right, and the main process of sanding irregularities begins.
There is no need to sand the entire surface at once - it is mentally divided into small square areas, which are processed one after another.
If you are starting this type of work for the first time, you need to practice on a small area. During the grouting process, do not press the block intensely; light pressure is sufficient. There is also no need to sand the ceiling for a long time. If, while polishing the ceiling, you notice small holes, you need to skip them and subsequently fill them up again with putty.
Conclusion
In conclusion, you can derive a simple formula for successful puttying and painting - everything needs to be done according to the rules, and the video in this article will clearly show how to accurately follow the basic principles of finishing and painting work (see also the article “Types of putties and features of their use”).
Almost any renovation begins with leveling the walls before their subsequent finishing. However, what to do if the surface has been painted? Is it possible to apply putty over paint or should I still clean the wall?
Secrets of builders: why add putty to paint
Decorative plaster is gradually replacing wallpaper. This coating is often preferred by families with children or pet owners - areas with scratches and chips can be easily updated on your own. It is not necessary to purchase special expensive compounds in construction stores. They can be made at home, using paint and ordinary cheap putty.
- Combination of putty and paint
- Fashionable wall painting
- Decorating walls using a stencil
- Venetian plaster
Study of surface properties
In order to find out whether putty can be applied to old paint, you should determine its type. There are several main varieties:
- If, when the painted surface comes into contact with water, the paint begins to bubble and wash off, this means that the walls were covered with water-based paint. Can putty be applied to water-based paint? When exposed to moisture, the paint layer is destroyed and washed off, so the applied putty, which also contains water, simply will not stick.
- If the surface is smooth and shiny, and does not react to contact with water, then this means that the walls are painted with drying oil or solvent-based paint. Can putty be applied to oil paint? There is no clear answer to this question. The fact is that putty can be applied to old paint that still holds, but if chips, cracks and blisters are visible on the coating, then the surface of the wall will have to be cleaned.
Features of performing putty work on a painted surface
When renovating an apartment, many people ask whether it is possible to putty over paint? This is a rather practical question, considering the time and effort required to dismantle the old finishing material. The developer is first of all interested in whether it is possible to putty on paint, and if so, then how long the putty will last on such a base.
Classification of putty material
Based on the main binding ingredient, putty is divided into three groups:
- Cement-based putty. Such mixtures are quite durable and have excellent moisture resistance. They can be used for work outside buildings. Disadvantage: they shrink. Cement putties are more affordable.
- Gypsum mixtures. They are characterized by less shrinkage and contribute to better leveling of surfaces. With their help, you can, for example, make a fairly even and smooth ceiling. Disadvantage: poor resistance to moisture. Therefore, it is recommended to use such mixtures only when performing work inside dry rooms.
- Polymer-based mixtures. They are the highest quality material with high strength and long service life. Disadvantage: the material is quite expensive and also requires some experience to apply the plaster yourself. Polymer mixtures are often sold ready for plastering work.
Important point!
If there are difficulties in identifying a certain type of material, its composition and instructions for use can be read on the packaging.
How to putty
When carrying out work in a clean room, putty on paint is unnecessary, but what to do when it comes to painted surfaces? Every experienced craftsman will answer that first you need to figure out what material the wall was finished with.
Puttying on a painted surface is allowed extremely rarely, even if it is not painted with water-based paint. Plus, it is recommended to check the tightness of the coating. To do this, you just need to inflict a couple of mechanical damages on the wall and make sure how tightly the layer of material adheres to the base of the wall.
Puttying on a painted surface.
Regarding water-based emulsion
The question immediately arises: is it possible to carry out puttying work using water-based paint? The answer is no! The water emulsion will draw water from the putty, causing the finish to peel off from the surface along with the putty layer.
Important! Puttying with water-based emulsion must be immediately avoided even if a dry mixture is used!
How to understand what kind of paint a wall surface was painted with
In order to determine what paint is on the surface, you should perform the following steps:
- fill any container with warm water;
- treat a small area of the wall with a moistened sponge;
- if foam appears on the surface, it means it is water-based paint;
- such a surface must be completely treated, and after fifteen minutes, when the old finish swells, remove it with a spatula.
To understand what paint the surface is painted with, you need to moisten it with a sponge.
In such situations, putting putty on is absolutely useless, since it will soon begin to peel off.
What kind of paint can putty be applied to?
In addition to water-based paint, there are other types of materials. Therefore, the next question arises: which of them can be used for puttying?
Answer:
- If the paint has really good adhesion to the surface, then putting putty is not prohibited.
- The painted surface must be washed with soapy water (any detergent can be used) to prevent the appearance of oil stains.
- On such a surface you need to make notches (scratches) with a spatula for better adhesion of the material to the base. The result should be a kind of grid.
- After this, a primer is applied, which will increase the adhesion of the wall plane.
Important!
The process of creating a mesh, priming the plane before puttying, is perfect for oil paint. But even in this case, the paint layer must have reliable adhesion to the wall.
Putty work is prohibited
There are surfaces for which putty paint work is strictly prohibited, for example:
- the base is quite loose; with a slight touch, individual pieces begin to fall off;
- the walls are saturated with moisture, the paint on them has swelled and began to “bubble”;
- the painted layer can be easily removed from the plane.
Putty cannot be applied to a loose painted surface.
In such cases, the walls must undergo complete dismantling of the old paintwork.
The putty will, of course, apply easily to the paint, but it will also begin to fall off fairly quickly, regardless of the type of putty material used.
The best decision
The most correct solution is to completely dismantle the old paint layer. This is what all experienced professionals recommend doing.
Methods for dismantling old coating:
- you can simply wash off the old paint in the same way as with water-based emulsion;
- you can use a hair dryer to heat the wall, after which the old coating will be easily removed with a spatula;
- the process of dismantling the paint layer down to the rough base.
Since in this situation it will not be possible to perform putty work on a painted surface, to install the old finish you must have the following tools on hand:
- sponge;
- container with warm water;
- construction hair dryer;
- spatula, chisel and hammer;
- A hammer drill may come in handy if you need to remove old paint and plaster.
How to remove old paint from a surface.
How to paint over new putty
Painting work after puttying is easy to do. Any developer can do them, the main thing is to comply with a few simple requirements:
- The plane of the wall must be ideal; paint cannot hide surface imperfections; on the contrary, it clearly highlights them.
- After puttying, the surface must be allowed to dry completely.
- Coloring is carried out clearly from top to bottom. This will eliminate unnecessary drips and the formation of paint drops.
- Painting work should be carried out with a roller and brush. You can use a spray gun, which makes it possible to distribute the paint evenly in a thin layer. With its help, finishing work is completed much faster.
Each of the separately used painting tools has its own advantages:
- Using a brush you can easily paint the most difficult to reach places, for example, the corners of a room.
- The roller makes it possible to immediately cover a significant surface area, apply a dense layer of paint, creating the impression of texture in the resulting coating. The main advantage of using this tool: processing a large surface area in the shortest possible time.
- Regarding the use of a spray gun, with the right approach to the matter, not only time is saved, but also the material itself. The main disadvantage: possible paint getting onto areas not intended for painting. But this problem can easily be avoided by covering surfaces that do not need to be painted with polyethylene or other materials.
Conclusion
Puttying and painting surfaces must be performed, like any other types of finishing work, strictly according to certain rules, and do not avoid the advice of competent and experienced craftsmen. Then the quality and reliability of any work is guaranteed!
And a little about the author’s secrets
Have you ever experienced unbearable joint pain? And you know firsthand what it is:
- inability to move easily and comfortably;
- discomfort when going up and down stairs;
- unpleasant crunching, clicking not of your own accord;
- pain during or after exercise;
- inflammation in the joints and swelling;
- causeless and sometimes unbearable aching pain in the joints.
Now answer the question: are you satisfied with this? Can such pain be tolerated? How much money have you already wasted on ineffective treatment? That's right - it's time to end this! Do you agree? That is why we decided to publish an exclusive interview with ARMEN DZHIGARKHANYAN, in which he revealed the secrets of getting rid of joint pain, arthritis and arthrosis.
Putty for acrylic paint
Acrylic is not as popular as the types of paints described above. However, it is also used for wall decoration. Can putty be applied to acrylic paint? Acrylic-based pigment is as durable as its oil-based counterparts.
To ensure good adhesion to the smooth surface of the painted wall, apply a layer of primer with fine abrasive particles. They will penetrate into the pores and irregularities in the paint, thereby creating an optimal rough surface for good adhesion to subsequent putty.
Oil putty
This putty is made using oil, chalk and water. It is very durable and will last a long time, but this type takes a very long time to dry. The thick consistency of the material makes it easy to apply it to the required areas.
It is worth noting that you can prepare the putty yourself. To do this you need the following components:
- drying oil (500 g);
- animal glue (100 g);
- turpentine or kerosene (125 g);
- liquid drier (25 g);
- chalk, liquid soap.
Homemade wood putty is prepared as follows: heat up the glue and add soap. All this is kept on fire and mixed well. Drying oil, drying agent and kerosene are added. In order for the wood putty to be white, chalk is added to the mixture last. The consistency of this putty resembles sour cream. When using it, you need to know that the mixture should not be cold. For convenience, you can put it in a container with hot water and keep it warm the entire time you are working with the mixture.
How to remove old paint
In most cases, the old coating must be removed. You can do this in several ways:
- Water-based paint is thoroughly washed off with water, after which the wall surface must be thoroughly dried before applying putty or other finishing materials.
- Oil paint is removed mechanically. It involves scraping the surface using special tools. This method takes a lot of time and leaves a lot of dust and dirt. It is recommended to use personal protective equipment - goggles and a respirator.
- The chemical method is the use of special reagents that destroy the paint layer. Substances that can harm humans are often used, so it is recommended that all manipulations be carried out with gloves, goggles and a respirator.
- The thermal method involves heating the paint surface with a hair dryer. As a result, the coating will begin to separate from the walls, and it will be quite easy to clean it off with a spatula and other tools.
Methods for final rough finishing of the ceiling
At the final stage, finishing the ceiling involves several methods.
- You can just rub it in and leave it at that.
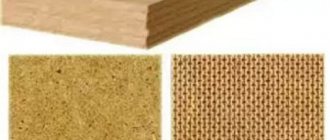
- Another method involves finishing the ceiling with foam boards. This can be done quite quickly and at quite reasonable prices.
- At the final stage of applying putty, you can decorate the ceiling with some kind of pattern.
The decorative slab looks great on any ceiling surface. Wallpapering the ceiling is also a fairly common decoration. However, this option is not applicable everywhere due to the use of non-moisture resistant coating.
It is still recommended to finish a concrete or brick ceiling with gypsum putty.
Depending on the type of putty used, its consumption will also differ. Thus, starting putty requires a high consumption if an uneven surface with large differences is being processed. The finishing putty will have less consumption.
Materials and tools
Can putty be applied to paint? It’s possible, but it’s important to choose the right building materials and tools:
- Finishing paint work is carried out with finishing putty, which has a fine fraction and is applied in a thin layer. This is necessary in order to obtain a perfectly flat and smooth wall surface.
- It is recommended to use gypsum or acrylic putty. It meets all the necessary requirements.
- To mix the composition, you may need a plastic bucket and a drill with a mixer attachment.
- Coarse sandpaper is used to sand the wall surface.
- A small spatula is needed to scrape off paint that is unstable on the wall surface.
- A large spatula will be needed to apply layers of putty.
How to apply putty mixture to the wall and ceiling
It is recommended to putty the surface from the corner sections of the wall towards the center. Irregularities in large areas are covered with longitudinal strokes. To correct cracks, a special metal or fiberglass mesh for puttying is used. Grouting of irregularities is carried out as a rule. Corner areas are puttied with a special spatula.
If there is a deviation from the level or there is major damage, it is recommended to level the walls with a starting solution with a coarse-grained structure. For smooth application of the subsequent finishing material and durability of the repair, multi-layer puttying is necessary. The thickness of each layer is up to 2 mm. Decorative finishing is carried out after the putty layer has dried.
When performing finishing work for wallpapering and painting, a different number of layers of putty is required: in the first case - 2-3, in the second - up to 5-6. The coating should be thin, each layer is dried and rubbed with sheets of sandpaper.
Work on puttying under wallpaper is carried out using a spatula about 60-80 cm wide. Grouting work is carried out with sheets of P80 or 120 sandpaper. When preparing panels for painting, careful sanding is required. An electric lamp is brought to the wall to highlight defects and irregularities. Use fine-grained sandpaper on hardened putty (P120-150).
rent a one-room apartment in nizhniy tagil
After the layer-by-layer applied mixture has dried, the hardened paint putty is sanded with sandpaper or mesh. There should be no abrasions or unevenness.
Surface preparation
The surface, cleared of old paint, must be prepared for applying putty. To do this, you should inspect the wall for dirty stains that need to be washed off. Then the surface must be primed to ensure good adhesion of the putty to the wall.
If you cannot get rid of the paint, you should use the following methods:
- A smooth painted surface does not adhere well to putty, so you should make notches on the wall using a knife or other sharp tool.
- In some cases, builders recommend cleaning the surface with a wire brush or sandpaper to create roughness.
Any of the chosen methods guarantees a good result.
Principles of leveling walls for painting - how to take into account all the nuances?
Correctly puttingtying any walls is not so difficult if you know the specifics of such an operation in advance. First of all, we stock up on the necessary tools:
A set of spatulas of different sizes. The set must contain both large (up to 50 cm) and small tools. The latter are needed for processing hard-to-reach areas of walls. Electric drill with mixer attachment. This tool allows you to mix dry starting or finishing putty in water. We will not be able to mix a high-quality composition manually. There will probably be lumps in it. If we work with ready-made putties, a drill will not be needed. Brush and roller. They are necessary for applying primer to the walls. Please note! Priming is not a mandatory step in preparing walls for painting. But it’s better to do it. Then the wall will have high adhesion to paint
In addition, priming increases the strength of the surface being decorated, which is important. Level – laser (ideally) or regular alcohol level. Without this tool, we will not be able to properly level the wall surface. Rule
The main working tool in situations where walls have serious differences in height. The rule ensures fast and high-quality application of large volumes of leveling (starting) mass. It is optimal to carry out such work with a long metal rule. Hand sander, sandpaper. Grouting of the leveled surface is carried out with coarse (starting putty) and fine (finishing) sandpaper. The process of using them becomes much easier if you have a manual skinner - a simple device with clamps for installing and fixing the skin.
The puttying operation begins with preparing the walls. We remove stains of soot, old paint, and grease from them. We tap the plaster. If the old layer does not hold up very well, we completely clean the wall. In cases where only individual plastered areas are coming off, we knock down only them. Then we vacuum the wall and apply primer to it. It is most convenient to do this with a roller. One layer of soil is enough. The main thing is that it completely covers the wall. We begin work on filling the surface for painting at normal room temperatures. Do not putty on frozen walls.
After preparing the surface, you can begin the main operation. Puttying in most cases is carried out in two stages. First we level the wall with the starting mixture, then with the finishing mixture. When using universal compositions, puttying is also performed in two stages.
Application of primer
Using a primer to obtain a high-quality result is simply necessary. It must be applied to the wall surface before starting puttying. It can also secure a layer of putty.
Experienced builders recommend using a quartz primer, which has large fractions of mineral inclusions in order to create an ideal surface for attaching putty to the wall. The finishing primer, which is applied to the putty before subsequent finishing, is used with smaller fractions so as not to stand out too much against the background of a smooth wall.
How to do the job correctly?
After puttying and sanding, the wall needs to be primed, and only then painted. This must be done to strengthen the top putty layer, otherwise dust will settle on the roller and interfere with the repair.
- After the walls have dried, the main work begins.
- They mix the paint and apply color to the entire volume of the room at once, so that there is no difference in color.
- The roller for work is selected according to the thickness of the paint and its composition. Foam rubber is suitable for water-based emulsion, but the thicker the solution, the longer the pile is needed. The mixture should not flow from the roller.
- The paint is rolled out with smooth movements, starting to move from the left side of the wall to the right.
- The composition is applied in two layers, the first one must be allowed to dry completely, and only then the next one must be applied. Otherwise, there is a risk of getting a surface with drips and sagging.
- Don't forget to paint the corners.
- To preserve the geometric pattern on the base, use masking tape during repairs.
Help Velor rollers are universal: they are suitable for all types of paintwork materials. It is easier for a non-professional to work with them.
The video clearly demonstrates how to paint a wall:
Puttying on paint
Can finishing putty be applied to paint? This type of finishing work is acceptable, but you should adhere to these recommendations:
- When preparing the surface for puttying, it is necessary to clean the wall from dirt and dust, as well as sand the surface that could not be cleared of paint.
- The thickness of the layers of putty applied should be minimal. This is also indicated by the manufacturer on the label.
- It is recommended to apply a layer of primer before applying putty.
- If in some place it begins to lag behind the paint, this means either a poorly prepared surface or a too thick layer of the applied material.
- It is important to pay sufficient attention to drying the mixture before continuing finishing work.
- After finishing the puttying, you need to coat the surface again with a primer.
Padding
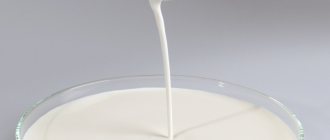
Puttying of painted walls is carried out after priming. The work uses special solutions that increase surface adhesion. The liquid components of the primer mixture penetrate deeply into the painted layer, providing a durable, even coating under the starting or finishing putty.
Experts recommend choosing mixtures according to the type of base material. The most popular primers are mineral, acrylic, alkyd, etc.
Primers with a mineral base are intended for preparation for puttying of brick, concrete, and plastered substrates. Alkyd primer is optimal for treating surfaces made of wood, fiberboard, fiberglass, etc. The material is characterized by quick drying, strength, durability, and resistance to mechanical damage.
The primer will need to be stirred to a uniform consistency. It is recommended to dilute an excessively thick solution with water and leave for 2-3 hours. Before use, the primer composition is stirred again.
The primer is applied with a roller. Movements on the surface are performed from bottom to top. During the process, the flow of the composition is controlled. Hard-to-reach areas are treated with a compact brush. The primer is applied in 2 layers, each coating is thoroughly dried.
Auto putty
Putty is also used in car repairs. Of course, this is far from the same material that is used to putty on walls, but the same question still arises: is it possible to apply putty to the paint of a car? This is absolutely not worth doing; such a structure will not hold up and will fall off immediately after drying. It is important to remove the paint layer from the car and strip the area down to bare metal. Only after this is the car ready to apply putty.
Ceiling primer for putty
For better adhesion of the putty to the surface, it is necessary to use a primer.
- A primer mixture must be applied to the leveled and prepared ceiling surface. And only after it has completely dried, we putty on the ceiling.
- There is no need to sand the surface after applying the primer. To properly prime the walls, it is recommended to watch a video tutorial on following the correct application technology or study priming and putty lessons in specialized articles.
- The technology for processing a painted ceiling is slightly different - first you need to remove the paint, then start puttingty and apply a primer to the ceiling .
READ How to cover bathroom walls
How and with what can you paint surfaces after puttying?
The putty for painting must be of high quality, and the walls must become smooth and flat. While wallpaper can cover some defects, paint cannot do this. Unlike plaster, putty has a finer structure.
Preparation for painting is carried out in two stages:
When preparing, it is important to estimate the amount of work. Material consumption depends on the quality of the wall
A rule is applied vertically to each of the corners to understand how much the wall deviates from the vertical: the difference must be corrected. To save money, the procedure is best performed with two compositions - starting and finishing. Both are applied with a spatula. Putty the base for painting from top to bottom. The spatula is held at an angle of 30 degrees, and the mixture is collected in small quantities. The difference between the starting layer and the finishing layer is thickness. These are 50 mm and 2 mm, respectively. The finished base will need to be rubbed down. After grouting, there should be no defects or flaws left on the surface.
Advice If the differences are more than five centimeters, then before puttying it is worth leveling the wall with plaster to reduce this figure.
Polymer compositions
Polymers are better suited than other materials for applying the finishing layer. This solution easily makes the surface smooth and makes painting easier. The only drawback is the high price. The material is unprofitable when working on large areas. The thin structure of the composition makes it possible to perfectly eliminate even minor defects during puttying. The mixture binds firmly to the wall surface; the risk of detachment simply disappears.
Plaster
When working with gypsum-based mixtures, skill is required: the solution sets easily. The material is used for interior work: sealing cracks, joints, eliminating minor defects.
- acceptable price;
- economical consumption;
- environmentally friendly material;
- ease of grinding.
Gypsum has poor contact with concrete, and it is not suitable for treating rooms with high humidity and for facade work.
Cement
Cement for painting is a durable, reliable material. Resistant to high temperatures, not afraid of moisture. In addition to cement, the composition includes lime, which provides high plasticity, or gypsum, which accelerates drying. Builders love this mixture for its low price and ease of application: even a beginner can handle the job. The composition has a coarse-grained structure.
How to treat walls when fungus appears
Black spots on or under the wallpaper indicate the presence of a problem such as fungus. It cannot be removed using detergents. Even if you wash the stains, the fungus will appear again. If the walls are infected, it is necessary to get rid of the finishing and treat the entire surface with a special antibacterial composition. To do this, you can use a regular brush or roller. There are products on sale that come with a spray bottle for ease of application. During processing, protect your respiratory tract with a respirator. After cleaning, the walls need to be thoroughly dried, and only then can the repairs begin.
Here are some sample instructions:
- Before starting work, it is imperative to prime the surface. Photo of a wall to be painted in the interior photo of a hallway? For these purposes, deep penetration primers should be used, specially designed for walls and other surfaces.
Today there are many brands of such primer, produced by almost all global brands. Primers for walls come in both regular and anti-fungal primers.
We prime the surface before filling.
- When asking: how to putty walls for painting, it is worth taking into account the specific case, since the surfaces are different, and to putty a wall with deep unevenness, a starting putty mixture is used, and for minor flaws and final putty, a finishing mixture is used.
Stir the starting putty composition.
- When putting plasterboard walls, first of all it is necessary to close the seams between the sheets, as well as the recesses from the screws (photo). The primer solution can be applied using a roller or a wide brush.
- After the soil has completely dried, which is about 3-5 hours, you can begin applying putty.
Plastering of the plasterboard surface is completed.
We lay the serpyanka reinforcing mesh.
Please note: When sealing seams, it is important to prevent the formation of voids and gaps; a special “serpyanka” reinforcing mesh is inserted into the joints joining the plasterboard sheets, which is covered at the top with the next layer of putty. When sealing joints between sheets of drywall, a medium-sized spatula should be used to apply the putty mixture, and a special corner spatula should be used for corners.
Stage two. Let's get started
So, how to putty walls for painting. The first layer of putty mixture can be applied after 24 hours, when the joints are completely dry.
The process of applying the solution to the surface is as follows:
- First, prepare the putty mixture by mixing the dry mixture with water.
- Then, using a small spatula, it is applied to a large one, and applied evenly to the surface to be treated. When performing this work, the spatula used to apply the mixture to the wall must be held at an angle of 30 degrees. When applying, you need to take into account the force of pressing it, since the quality and evenness of the initial surface depends on this.
- Depending on the type of surface, in order to properly putty walls for painting, there may be a need for additional reinforcement. This reinforcement is carried out by inserting reinforcing mesh between layers of putty; it should also be taken into account that strips of reinforcing mesh must be laid overlapping.
- After applying and drying the first layer of putty, the surface is sanded. It is made using sandpaper or sanding mesh.
Advice! We check the evenness of the resulting surface using a bright lamp; under its light, all irregularities and defects will be visible. If necessary, apply a second layer of putty, similar to the first, while a primer must be applied to the first layer of putty.
We putty ourselves. What do we need
Sand with sandpaper.
It is quite possible to putty the walls yourself. Despite the apparent complexity of the process, even a beginner in construction and finishing can do it.
To do this you will need the following tools, devices and materials:
- putty mixture directly;
- mixing container;
- mixer and drill for mixing;
- sandpaper or mesh for sanding;
- a set of spatulas, including wide, narrow and angled spatulas.
Tools needed for puttying.
It is necessary to ensure the cleanliness of the instrument, namely:
- Do not leave any remaining mixture in the mixing container or on the spatulas;
- Carry out timely rinsing to remove any remaining putty mixture;
- The hardened putty residues form lumps, which leave streaks during the work process; they subsequently add unnecessary hassle when sanding the surface. When performing puttying, you need to take into account that the putty mixture tends to harden, as a result of which you need to have time to work out the putty before it sets, so it is not recommended to mix too large a volume;
- Also, when choosing a mixture for puttying, it is necessary to consider the conditions under which it will perform its functions.