Fiberboard (fibreboard) is a material that is very diverse in its appearance, strength and density. By the way, MDF used in furniture production is essentially just one of the varieties of fiberboard. It is made by the so-called “dry” method, using synthetic resins, and not necessarily epoxy. And the name comes from the English abbreviation Medium Density Fiberboard, which simply means that this is medium-density fiberboard, or semi-solid.
In addition to the “dry” method of producing this wood-composite material, there is also a “wet” method, where there are no resins. Instead, before pressing wood waste, paraffins, antiseptics, substances that prevent the combustion of the material and plasticizers are introduced into the composition. But since the pressing of a mixture of wood dust, sawdust and these substances is carried out at high pressure and temperature, the density and hardness of such fiberboard can be higher than with the participation of epoxy or alkyd ester resins in the pressing. Such a slab looks smooth on one side and embossed, with a mesh structure reminiscent of rough canvas, on the other.
It’s no wonder that artists love cardboard so much, using it to paint instead of canvas. Especially when they know that the painting is unlikely to be transported anywhere. And the primer they use to prevent excess oil from being absorbed from the paint is made by hand according to ancient recipes.
How to cover the fiberboard joints on the floor?
Work on sealing fiberboard
are carried out with special putties or plasters for joints using reinforcement tape. Under no circumstances should you seal the seams with regular finishing putty as it is not intended for such work.
Interesting materials:
How to wear a black down jacket? How to wear a long white shirt for a woman? How to wear a long denim skirt? How to wear a long shirt with jeans? How to wear a long plaid shirt? How to wear a long cardigan without buttons? How to wear a long scarf with a down jacket? How to wear a long jacket? How to wear denim for men? How to wear a denim skirt 2022?
Which mixture to choose
Three types of plaster are used for finishing - gypsum, acrylic, mineral.
Gypsum plaster
Gypsum-based plasters contain fillers and polymers that increase adhesion to fiberboard.
Benefits of coverage:
- is used sparingly;
- has good vapor permeability;
- has sufficient plasticity;
- does not support combustion;
- hardens quickly (but this has a drawback - you need to work with a small area);
- dries in 2–3 days.
Disadvantages of gypsum plaster:
- not suitable for rooms with high humidity (but there are also moisture-resistant solutions);
- the price is higher than that of cement mortar.
Gypsum plaster is used for fiberboard treated with resin. Under these compositions, the entire wall or ceiling is covered with a mounting mesh.
Acrylic
Acrylic plasters are made on the basis of acrylic resins and functional additives - wetting, dispersing, neutralizing, thickening agents, coalescents, defoamers, biocides.
Polymer plasters are valued for the following properties:
- elasticity - cracks from temperature changes and mechanical vibrations rarely appear;
- resistance to mechanical abrasion, pet claws;
- waterproof, allowing wet cleaning of walls;
- color palette;
- ease of work;
- fast setting.
But the material is not without its shortcomings. The finish attracts dust and does not allow air to pass through well.
Mineral
The plaster contains chalk, clay, stone chips, cement, and after drying it forms a breathable and non-flammable coating. The material has a number of useful properties:
- adheres firmly to the working surface;
- keeps warm;
- withstands mechanical impact of medium strength;
- vapor permeable;
- resistant to high temperatures;
- tolerates wet care and sometimes washing;
- produced in different textures and textures.
I consider the disadvantages of mineral plaster:
- sensitivity to violation of proportions when preparing the mixture;
- labor-intensive - work must be done only manually;
- limited selection of colors;
- relatively short service life - 10 days.
Video description
How to seal cracks in a wooden floor
The composition is left for a while and the cracks are prepared in the standard way (small debris and dust are removed). Afterwards, apply the mixture with glue onto a rubber spatula and evenly fill the spaces between the boards. It must be well leveled so that there are no tubercles. The filled cracks are left for two to three days. This time will be enough for quality hardening.
On a note! While the adhesive mass is setting in the cracks, it is better not to use the floor, since when walking on it, the boards will inevitably move, which will cause premature ejection of the filling material.
Paint combined with sawdust
In this case, they try to use exactly the paint that will subsequently be used to paint the entire surface of the floor. To prepare the mixture when sealing cracks, use one part paint and one part wood varnish. Four parts of fine sawdust are added to them.
All components are thoroughly mixed together, and then the cracks are sealed with this mixture. One pass will be enough to fill small crevices, but larger defects will have to be filled several times in a row.
Cement with broken glass
This mixture is an excellent protector against rodents that will not be able to penetrate from the underground into the home. To prepare a mixture for eliminating cracks, you will need to do the following:
If it is not possible to use glass chips, then you can replace it with finely chopped wire. An alternative to regular wire will be small fragments of a kitchen scraper.
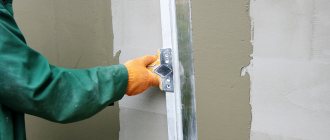
How to putty GVL for painting and wallpaper
As a decorative finish for walls covered with gypsum fiber, wallpapering or painting is used. In order to achieve the smoothest possible surface, it is necessary to seal all the joints between the wall slabs and any metal fasteners that are visible.
- prime;
- putty the joints of the sheets;
- finally putty the entire surface.
A specialized store will tell you which putty is best and what to choose for the existing surface.
Stages of puttying the ceiling
To carry out successful work, you should learn how to putty a ceiling, if the stage is carried out independently, without turning to professionals for services, the stages of work include:
- Surface preparation.
- Applying the starting layer.
- Applying the finishing layer.
- Grinding.
Ceiling preparation
Before plastering the walls and ceiling, a preparatory stage must be carried out. The ceiling surface, due to the lighting fixtures, is best illuminated, therefore any defects will be evident. Therefore, they start by leveling the base. Dirt, dust and old finishes must be removed from any type of surface.
If you are working with concrete, then the joint parts of the material are sealed, then a plaster mixture of gypsum is applied; after drying, it is advisable to cover the surface with a painting mesh, it will prevent cracks from appearing on the layer. A primer is also applied.
They work with chipboard, fiberboard, and plasterboard sheets, starting with the seam zones, they are closed. Single-layer priming is carried out. If there is an old plaster layer, it is removed with a metal spatula, followed by the application of a primer mixture.
Starting putty
The first step after preparing the surface is to prepare a putty solution. Dilution of the mixture with water should be done in the ratio specified by the manufacturer in the instructions. It is necessary to strictly follow the manufacturer's recommendations in order to obtain the declared properties from applying the composition.
When the solution is ready, they begin to apply the starting putty to the surface; the ceiling covering is more difficult to process due to the horizontal base and height. You should find a convenient place to make applying the composition easier. The processing process includes the following steps:
- It is better to start distributing the solution from the corner, put a little product on the spatula, and apply it in an even layer over the ceiling;
- It is necessary to apply a little pressure on the spatula and smooth out the strips of the mixture;
- In areas with flaws, more composition is applied to level them with the rest of the surface;
- Rub the base with sandpaper; if any irregularities are detected, re-treat the surface with the starting composition.
If the corners are rounded, then a rubber spatula with a flexible beginning is selected with the tool.
Finishing putty
Applying the finishing putty to the ceiling is the stage that completes the work with the mixture, but special care and speed are required from the master, because the layer will be made thin, and the solution will dry quickly, there will not be much time for correction. Follow the application steps below:
- Scoop the solution onto a spatula, spreading it first to the edges;
- The starting point is chosen to be the same as when working at the previous stage;
- When the distribution of the composition is completed on one zone, they pass over it again with a spatula, this will help remove excess and obtain the required layer thickness;
- This solution is distributed in a standard single layer, but if painting is also planned afterwards, then it is advisable to apply two layers of finishing.
What is hardboard and is it possible to glue wallpaper on it?
Hardboard is nothing more than fiberboard (chipboard), which is made from waste from wood processing and paper production. The only thing is that it is correct to call only hard fiberboard grades hardboard. However, among the people these two words have long become simply synonymous.
Hardboard is a hard fiberboard grade
Is it possible to glue wallpaper onto hardboard? Of course you can, i.e. The wallpaper will hold up well, but you will encounter a number of problems:
- Hardboard usually has a slightly wavy surface. Wallpaper cannot hide unevenness; rather, on the contrary, it emphasizes it;
- The surface of the slabs is black, as a result of which dark spots will definitely show through under the thin wallpaper;
- Wallpaper glue will penetrate deep into the structure of the material; accordingly, when removed, the wallpaper will come off along with the top layer of fiberboard
Therefore, wallpaper should not be glued to hardboard, but putty, which is previously applied to the surface of the slabs. This way you can solve all the above problems at once. The only thing is that you need to choose the right primers and putty to make the finish strong and durable.
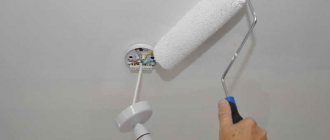
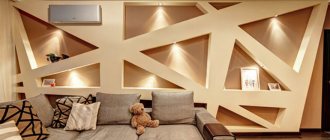
How to paint a fiberboard ceiling - recommendations, photos
A fiberboard ceiling is a simple solution that saves a lot of hassle. The main ones are that the fiberboard surface does not need to be plastered and leveled. All that remains is the finishing touches.
If you are just thinking about installing a fiberboard ceiling, it makes sense to pay attention to laminated panels. They are already finished - one side is laminated. Moreover, the palette is quite wide - although fiberboard panels are often used to decorate walls, it is also easy to choose for ceilings.
Palette of fiberboard panels for the ceiling
painted fiberboard panel sheets
If ordinary panels are attached to the ceiling, then, of course, the question arises about painting them. How to paint a fiberboard ceiling to get a full, durable and beautiful coating?
PGP IN THE BATHROOM. What to plaster with?
SPECIAL CASE:
Hello, I encountered the same problem. My bathroom is made of monolithic concrete and tongue-and-groove. Since this is a bathroom, gypsum plaster is not allowed. But cement plaster is not allowed according to the GGP. In addition, for good contact of the plaster, a rough surface is necessary, which concrete contact can provide, but it cannot be used under cement plasters, what should I do?
Indeed, the situation is not the most ordinary. Many mutually exclusive conditions.
Let's start with the fact that the surface of the PGP is smooth and, if installed correctly, does not require plastering. In addition, if there are any minor flaws in the form of protrusions, they can be easily removed with the help of an abrasive.
Some craftsmen do not want to sand moisture-resistant PGP, because... they are afraid that they will “remove the top moisture-resistant layer.” The fears are in vain. The moisture resistance of the slabs is achieved by introducing hydrophobic additives at the stage of preparing the solution, which ensures the moisture resistance of the slab throughout the entire thickness and the removal of the surface layer will not reduce it.
If plastering cannot be avoided, then it is necessary to choose the safest course of action in terms of consequences.
If the question on the use of cement plasters according to the GWP has a clear answer, it is impossible. Experts disagree about the use of gypsum mixtures in bathrooms. The manufacturer does not recommend the use of gypsum SSS in wet rooms due to the risks of getting wet and subsequent destruction of the plaster layer under the influence of moisture. But there is a way to minimize these risks - using waterproofing.
Thus, we come to the choice of plastering with gypsum SSS followed by treatment with latex-based coating waterproofing.
Procedure:
1. Prepare surfaces for plastering. To do this, the concrete surface must be treated with VOLMA-Contact primer to create roughness. It is necessary to remove the gloss from the surface of the PGP by treating it with an abrasive material with a large grain, then remove dust and prime it with a deep penetration compound (VOLMA-Universal primer)
2. Next, you can begin applying gypsum plaster according to the instructions.
3. After the plaster has completely dried, treat the surface with latex-based coating waterproofing.
Professional ways to eliminate cracks
You can eliminate cracks in boards using special means that are highly reliable. Let's list the alternative options.
Regular wood putty
This material option is considered the most alternative only in cases where minor cracks have appeared. Here it is important to decide on the type, since they can be finishing, sealing, universal, or filling. It is better to give preference to the last option. The dilution principle for each individual type of material is written on the packaging.
Trademarks offer various options depending on the presence of special components in the product:
The rules for diluting and using professional putties are written on each package.
Ready-made putties for interior work - fibreboard, chipboard Working surface material: fibreboard, chipboard.
Add to comparison
| Tikkurila Tikkurila |
Add to comparison
Add to comparison
Add to comparison
- Working surface material: concrete, gypsum board, fiberboard, chipboard, plaster
- Thinner: water
- Working tools: spatula, roller, brush
- Time until next coat is applied (hours): 3 hours
- Number of layers: 1-2
Add to comparison
- White color
- Working surface material: concrete, gypsum board, fiberboard, chipboard, plaster
- Thinner: water
- Working tool: spatula
- Number of layers: 1-3
- Touch dry time (hours): 2 hours
Add to comparison
- White color
- Working surface material: concrete, gypsum board, fiberboard, chipboard, plaster
- Thinner: water
- Working tool: spatula
- Number of layers: 1-3
- Touch dry time (hours): 2 hours
Add to comparison
- White color
- Working surface material: concrete, gypsum board, fiberboard, chipboard, plaster
- Thinner: water
- Time until next coat is applied (hours): 2 hours
- Number of layers: 2-3
- Time to dry completely (hours): 24 hours
Add to comparison
- Working surface material: fiberboard, chipboard, concrete, gypsum board, foam concrete, aerated concrete, brick, plaster
- Thinner: water
- Binder type: acrylic
- Density (kg/l): 1.2
- Dry residue (%): 65%
Add to comparison
| Tikkurila Tikkurila |
- Working surface material: fiberboard, chipboard, concrete, gypsum board, foam concrete, aerated concrete, brick, plaster
- Thinner: water
- Binder type: acrylic
- Density (kg/l): 1.2
- Dry residue (%): 65%
Add to comparison
| Tikkurila Tikkurila |
- Working surface material: fiberboard, chipboard, concrete, gypsum board, foam concrete, aerated concrete, brick, plaster
- Thinner: water
- Binder type: acrylic
- Density (kg/l): 1.2
- Dry residue (%): 65%
Causes of the unpleasant phenomenon
If the owners eliminate the cracks, but do not identify the culprits of their formation, then soon the defects that appear will “delight” them again. Therefore, the first necessary step is to discover the causes of the cracks. Several factors can be suspected of “complicity.”
The scope of work depends only on the size and number of cracks, so repairs can be either simple or incredibly complex. The most serious damage already requires radical measures - a complete replacement of the floor.
Properties of plywood as a construction and finishing material
The use of plywood as a leveling material for walls is typical for private low-rise construction. The choice of material for leveling is usually determined by two factors: either concern for the environmental friendliness of the living space (plywood is a fairly environmentally friendly material), perfectly permeable to air and creating comfortable living conditions in the room.
This choice is especially relevant for houses made of timber or logs. Or an economic factor - plywood (fibreboard, MDF panels) is an inexpensive finishing material. But it has one significant drawback - high moisture absorption, as a result of which its delamination, swelling, and warping are possible.
General principles
Let's start by reviewing the basics.
So, what surfaces can be puttied?
- Stable . What does it mean? The only thing is that if the coating peels off, nothing good will come of this venture.
- Porous . On a glossy plastic panel or glass, most coatings will stick simply disgustingly. The composition that is applied to the surface must penetrate its unevenness.
However: there are exceptions. For example, heat-resistant mastics based on stone flour and a polymer binder adhere perfectly to stainless steel and glass, and cleaning the surfaces after they dry is almost impossible. However, cement, gypsum and acrylic putties cannot boast of such reliable adhesion.
- Quite tough . However, there is a loophole here: putty reinforced with fiberglass mesh can make the surface of foam plastic or glued mineral wool hard enough to use such a coating as a finishing coating on the facade of a house above the base.
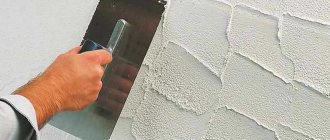
Technique for applying the finishing layer
Before applying the material, the wall needs to be prepared a little. It needs to be leveled, cleaned and primed. The walls are primed with a roller or brush. By working with a roller with a bath, you can achieve uniform application of the composition over the surface.
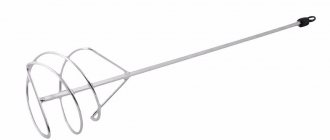
For further work you must have:
- container for mixing plaster;
- drill with mixer attachment;
- a set of spatulas (narrow 10–15 cm and wide 40–60 cm);
- corner spatula or trowel;
- grater for polishing the surface.
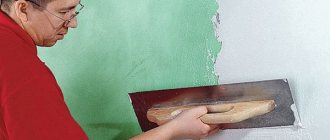
First, mix the plaster. How to do this is stated on the packaging from the manufacturer. Make the solution according to the instructions. But, you don't need to knead a lot. Now you can putty.
So the process is as follows. Using a narrow spatula, apply the plaster from the container onto a large spatula. They apply the plaster to the wall and spread it over the surface. Carrying out the work at a certain angle, the mixture is evenly applied to the wall. Using a corner spatula or trowel, you need to apply plaster into the corners and process them. With such simple movements the entire surface is gradually processed.
It is worth noting that when you decide to glue non-woven or vinyl wallpaper to the walls, it is enough to apply the finishing putty in one layer. And if you just want to paint the wall, we recommend applying 2 or 3 layers of finishing material.
You can perform putty in two different ways. The first is simpler and consists of applying and leveling the solution over the surface with broad strokes. Hold the spatula at an angle of 20˚. As you apply the mixture, run the spatula over one area several times, covering the surrounding area as you go. During work, you cannot avoid the formation of irregularities, but do not be afraid, you will eliminate them all during grinding. This method is quick and easy, but after drying everything needs to be sanded.
The second method is more difficult to implement. In this case, the leveling mixture is applied in clear, small strokes. This kind of work is tedious and painstaking. However, with this technique you can achieve a perfectly flat and smooth surface that does not require further sanding.
All you have to do is wait until the wall is completely dry. Now everything is ready to decorate the wall with wallpaper. As you can see, the technology for processing walls has changed since past times, but this metamorphosis has gone for the better. Now the premises look more attractive, neat and artful.
- Liquid glass and its application
- How many boards in a cube
- Fiberboard or hardboard
- DIY bark beetle plaster
Discuss the article on the forum
Problem surfaces
We seem to have figured out the theory. Now let's move on to specifics. Let's look at some problematic surfaces and find out whether leveling coatings can be applied to them.
Whitewash
Is it possible to putty over whitewash?
The answer depends on what the surface was whitened with.
- It is better to remove lime deposits by first soaking them with water. The tool is a hard steel spatula. As a last resort, the whitewash is tapped, the flaking layers are removed from it, while the rest of the surface is primed with a penetrating acrylic-based primer and puttied with gypsum putty.
Soaked lime can be easily removed with a spatula.
- Chalk whitewash is washed off with plenty of water. Primers that transform chalk into a stable surface exist in principle, but their price and inaccessibility call into question the feasibility of the undertaking.
- You can safely paint over water-based paint with the same type of paint, after priming the surface. But it is undesirable to use different compositions: acrylic water-dispersion paint will not adhere reliably to silicate paint.
Video description
Securely level old floorboards
Construction foam
This material is most often used to seal joints between the wall and wooden boards on the floor. This option is also suitable for sealing large cracks and damage in the floor. Before using such a product, the surfaces of the gaps are moistened with water so that the liquid foam adheres better to the wood.
It is recommended to apply polyurethane foam in small quantities, as it tends to expand and subsequently the boards may begin to deform, which will negatively affect the plane of the floor.
Acrylic sealant
Sold in special tubes equipped with a syringe. Ideal for filling gaps between laminate and parquet joints, and eliminating spaces between dry boards.
After applying the composition, the boards will stop moving, the creaking will disappear, and it will be comfortable to move on the floor. The acrylic sealant on top can be painted with enamel or special paint for wooden floors.
Walls
For many decades, serpyankas have been indispensable in construction and repair work. They help to avoid the appearance of cracks in new houses, which may shrink in the first years or when repairing cracks that have already formed.
Content:
Functional purpose of serpyanka
- Even 70–80 years ago, strips of gauze were used for this. Which was first glued with wallpaper glue, and putty on top. This method was widely used when repairing walls in “Stalinist” houses. To this day, you can often hear advice to use gauze as a cheaper option. But it is difficult to tinker with it, since it is too soft and when puttying can move away from the wall, leaving unevenness.
- Then manufacturers produced construction bandages; they were already narrow in shape, like a modern serpyanka, made from stamps and impregnated with a putty compound. Before application, they were dipped in water for some time, during which they soaked and stuck to the surface. A modern analogue is serpyanka, which is highly durable.
- Reinforcing mesh for walls helps to do the job efficiently, and is simply necessary if temperature changes or high humidity are possible in the room being repaired, since these factors provoke the formation of cracks on the walls.
- Corner serpyankas can significantly speed up the work of puttying knocks, both internal and external. These are the most complex elements; making them even is quite difficult. And a flat plastic corner with self-adhesive sickle tape on the sides will make the job doable even for non-professionals.
- Reinforcement of drywall seams will prevent the appearance of cracks, even if finishing materials are carried out in violation of the technological process.
Why do you need putty?
This composition must be used if you want to install roll products on the walls in a high-quality manner. It performs the following functions:
- Creating the right clutch. In the production of wood-based panels, various resins are used, which ensure the unity of the canvas, but prevent the wallpaper from setting.
- Base protection. Due to the porosity of the material (especially untreated chipboard), the glue is quickly absorbed without creating a binding film, so application must be repeated many times. The use of a water-based composition may lead to surface deformation.
- Leveling the coating. For filing vertical structures, panels of not the highest class are used, and puttying allows you to eliminate existing shortcomings (depressions, chips, scratches).
Also a significant problem are stains that may appear on the decorative layer due to the presence of resins in the composition of the sheet. They appear even after a significant amount of time and spoil the appearance of the walls.