When they carry out repairs on their own, beginners often do not know what steps must be completed so that the walls are well prepared for finishing work. After all, you can’t just glue wallpaper or paint the surface; you need to properly prepare the surface in order to get a reliable and high-quality result without defects. Many people know that a layer of plaster is applied, but what next? Is it necessary to putty the walls after plastering, what materials to choose, working rules, answers will be given below.
Puttying followed by painting
The technological process is different from puttying followed by wallpapering in one operation: after final leveling and rubbing with an abrasive material, the wall is covered with finishing plaster. Particular attention is paid to the wall, if it will be painted with enamel, in particular acrylic, then the finishing mixture must be white, durable and specially designed for this purpose.
Grouting is done with an abrasive with a fine grain of at least 150.
For mirror painting, the wall is also polished with a polishing trowel with suede material (felt and felt pieces are not suitable). A used suede cover will not cope with the task - it will have to be replaced with a new one. Also, for painting, the wall must be primed in accordance with the instructions indicated on the packaging of the material.
Preparation of putty mixture
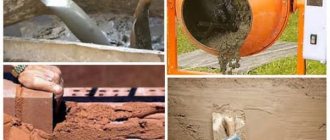
Dry mixtures must be properly mixed with water. The proportions are shown on the packaging. First, water is poured into the bucket, then the mixture is poured in, wait until the water absorbs the mixture, soaking the entire mixture, this happens quickly in literally half a minute.
After using a construction mixer, mix the composition for 2 minutes until a homogeneous mass is obtained. The solution is infused for a minute, and the composition is stirred again.
Adding more water or mixture is not acceptable.
Consumption per 1 m2 for plaster
The consumption of putties is influenced by the thickness of the layer, as well as the constituent components included in the product; their density may vary. Each putty may have its own consumption, indicated on the packaging. But we can distinguish the following standard indicators per square meter:
- Cement products for facades – 1.2-1.5 kg/sq.m. m.;
- Gypsum – 0.8-1 kg/sq. m;
- Polymer – 0.6 kg/sq. m.
The putties are not distributed in a thick layer. For the starting putty mixture the norm is up to 3 mm, for the finishing mixture up to 1 mm.
The consumption of putties is influenced by the thickness of the layer, as well as the constituent components included in the product; their density may vary.
The article talked about whether it is possible to putty on plaster, the answer is yes. This is the recommended step to get a level base ready for finishing. It is important to choose the right product and act step by step. The process itself is simple and can be done with your own hands.
Sequence of application of layers
In traditional wall finishing technology, the described layers are applied in the following order:
- Plaster (2-3 layers applied to a prepared and cleaned base with leveling).
- Putty (2-3 leveling layers applied to primed plaster).
This sequence allows you to eliminate all significant flaws in the wall and, having leveled its surface, prepare it for painting, applying decorative finishes, and wallpapering.
However, if a situation arises in which it is necessary to smooth out defects in the putty layer using plaster, this is possible under the following conditions:
- The leveling layer of putty is applied with a mixture that does not contain gypsum and other lime components.
- There are no large voids under the putty layer. In order to identify them, the entire wall is tapped with a wooden hammer handle. In those places where air cavities formed when the finishing layer hardened, the sound will be booming (empty).
- The thickness of the putty is no more than the layer of plaster required to smooth out flaws.
- For plastering, quick-drying and lightweight gypsum or lime mixtures are used.
If all these conditions are met, leveling the putty by plastering will allow you to quickly and effectively eliminate all the flaws (various irregularities) of the wall and prepare it for subsequent finishing. Otherwise, you will have to completely remove all the putty and repeat the finishing process again.
Important! Plastering of putty flaws with gypsum mixtures is carried out exclusively inside buildings. When carrying out such work on the outside, the leveling layer will quickly become damp and peel off.
Choosing putty for walls
The choice of the best way to putty the walls after plastering is also important. After all, it is necessary to obtain a high-quality result and easy distribution of the putty over the surface. Directly after priming the plaster, a starting type of putty solution is used. They can be applied in a thicker layer compared to finishing ones.
The finishing type application is necessary to prepare the wall for painting or gluing thin wallpaper; the coating will be even and smooth. The layer turns out thin. There are universal types of putties that can be used both instead of starting and instead of finishing.
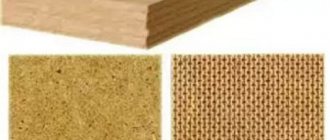
Based on their constituent components, the following types are distinguished:
- Cement-based, waterproof, but shrinks after drying;
- Gypsum is easily distributed over the surface, but does not withstand high humidity;
- Polymer ones are more expensive than those described above, but the quality is higher, they do not shrink, are moisture resistant, and are easy to apply.
There are ready-made and dry mixtures, the latter are diluted with water before use. The first option is more convenient, but the cost is higher.
Sometimes the question arises: can cement putty be applied to gypsum plaster? It is not recommended to do this, gypsum reacts poorly to water, for this reason the solution can soften the layer. This action is permissible only when creating a protective moisture-resistant layer before the gypsum putty. The choice here is not limited with how to putty cement plaster; you can choose any type of putty mixture.
The finishing type application is necessary to prepare the wall for painting or gluing thin wallpaper; the coating will be even and smooth.
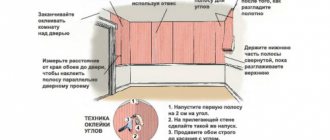
The nuances of puttying corners and slopes
Inexperienced craftsmen are often recommended to apply more than the required amount of material to the corners, followed by rubbing with an abrasive product. But when it is planned to apply silicone to any area with a gun before puttying, physical costs can be reduced, while at the same time increasing the efficiency of the result.
Work plan:
- When the silicone is used up, you need to unscrew the tube, remove the residue and wipe it with a rag soaked in vinegar solution.
- During puttying, the corner is bypassed, leaving unfilled.
- When the wall is dry, you need to fill the tube with putty and slowly squeeze it into the corner crack. It is recommended, if possible, to do the procedure from bottom to top in one approach.
- Next, they work with an angled spatula, resting on the surface, similar to plastering on beacons.
- After drying, the protrusions will need to be removed with an abrasive mesh.
Instead of a silicone tube, you can use a syringe used when baking cakes. With rubber or foam pads and fixation with electrical tape, the pastry syringe is fixed in the gun like a glove.
At the corners of the slopes, the master works with an angular trowel of his choice using any of the methods known to him, knocks down the protrusions with an abrasive mesh, and checks the smoothness using the construction rules. There is no significant difference in the process of laying the putty layer on the walls and in the corners, but the corners are difficult to bring to the ideal - a professional will need to step up to two times.
Tips from experts on puttying (2 videos)
Preparing plastered walls for putty
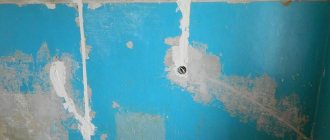
The preparatory stage is necessary to make further actions easier. Plastering the walls is not enough to proceed to the stage of applying putty; you must wait until it dries. Remove any dust that appears on the surface to obtain better adhesion.
If beacons were used, they are removed as standard and the voids are filled with a suitable solution. But after that you still need to prime the surface.
If beacons were used, they are removed as standard and the voids are filled with a suitable solution.
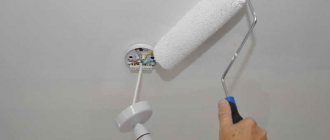
Do I need to prime the walls?
Professionals recommend applying a primer solution for a number of reasons. The first layer makes it easier to evenly distribute the putty layer over the wall. The following advantages are also highlighted:
- The setting of the primer layer creates a film coating that prevents the formation of contaminants on the surface;
- The primer includes additives that protect the base from biological formations, moisture and others;
- There is a reduction in putty consumption and an increase in the degree of adhesion.
The setting of the primer creates a film coating that prevents the formation of contaminants on the surface.
Results
As you can see, applying plaster to the walls is not everything. You also need to do leveling, remove beacons, prime the surface and much more, in order to ultimately get a perfectly flat surface with a beautiful pattern that is pleasing to the eye.
Plastering walls and ceilings is done to level the surface and protect it. To apply any finishing material, such as paint, wallpaper, parquet or laminate, a flat wall or ceiling is required. Otherwise, they will not look good, and some will not even install on a curved surface .
Therefore, plastering the walls and ceiling is an important stage in the renovation.
It is worth immediately understanding that cement-sand plaster is applied according to the scheme from bottom to top! Before plastering a brick wall, you need to moisten it generously with water or a liquid solution of cement and sand, after which you can begin the actual finishing work, which is carried out in three stages.
Here the work will be somewhat more difficult. In order for the plaster to adhere well to a wooden wall, a plaster metal mesh must be installed. Before installing it, we treat the surface of the wall with a wood primer. We stretch the plaster mesh onto the screws; to do this, they should be driven into the wall in a checkerboard pattern, not reaching the end by half a centimeter.
After tensioning the mesh, we nail it tightly to the wall with self-tapping screws.
You can also plaster walls with cement in facade work - the material is not afraid of frost, and it is also not afraid of moisture. Characterized by exceptionally high wear resistance and strength. It cannot be said that the surface quality will be the highest, but taking into account the fact that the technology is usually used for rough leveling, the result is definitely acceptable - this should not be denied.
You can always find a wide selection of plaster mixtures on the construction market. What putty is best for plastering plastered walls? But despite this fact, classic cement-sand plaster is often used for rough finishing.
It is considered the most reliable, durable and durable. However, when purchasing and using it, you need to take into account some nuances so that the repair work is completed quickly and efficiently.
Source
Work technology
Let's look at the work in stages.
Surface preparation
For both methods of leveling walls with plaster, preparation of the base is very important, consisting of the following manipulations:
- Cleaning the wall - using a broom or brush with soft bristles, remove all debris (cobwebs, dust) from the wall; with a slightly moistened clean rag, wipe off all water-soluble contaminants from the leveled layer of putty.
- Removing loose areas of putty that easily separate from the wall - remove from the wall with a thin metal spatula or knife all areas that have weak adhesion to the rough plaster.
- Tapping for the presence of small voids - in order to determine the presence of voids.
- Sealing identified small voids - identified air cavities are thoroughly cleaned and sealed with quick-drying gypsum plaster.
- Applying notches - using a hammer and a small chisel, a large number of notches are made on the surface of the putty layer (from 200-300 to 1000 per 1 m2), with a depth of no more than 1.5 mm. They are necessary for a tighter adhesion of the applied layer of plaster to the putty.
- Priming - to improve the adhesion of the plaster applied to uneven surfaces, the entire surface of the wall is covered with 2-3 layers of a special primer with an interval of 4-5 hours between applications. For priming, rollers and round paint brushes are used (narrow areas in corners, near the ceiling, near the floor).
- Fastening a special synthetic plaster mesh - for this, a small layer of plaster is applied to the primed wall, after which the mesh strips are immediately tightly applied to it and leveled with a spatula or rule.
To improve the adhesion of the plaster to the leveled layer of putty, you should use a fiberglass mesh - unlike metal, it has light weight, better flexibility, and a long service life.
Installation of beacons
This stage is typical for leveling a layer of putty that has flaws (irregularities) of more than 3 mm.
Beacons are installed as follows:
- Using a long rule and a level, it is determined what maximum layer of plaster will need to be applied.
- The first beacon with a profile height of 6 mm is placed exactly in the middle of the wall - for this, the distance of half the length of the wall is measured from the upper and lower corners, and marks are made with a pencil or marker.
- The upper and lower marks are connected using a rule with a clearly visible line.
- A small amount of quick-drying gypsum putty or plaster is diluted in a container.
- The prepared mixture is distributed in small even portions along the outlined line.
- A beacon is applied to portions of the solution distributed in the line.
- While the solution has not hardened, the beacon is aligned using a level and a long rule in the vertical plane and relative to the corners of the wall (the distance from any point in the profile to the corner should be the same).
- After the central beacon, two corner beacons are installed in the same way, aligning them into one plane using a long and even rule.
- Intermediate profiles are installed between the central and corner beacons.
- After completing the installation of the beacons, to prevent them from sagging, when plastering, the profiles up to the upper edge are covered with the remainder of the quick-drying mortar.
This method of installing beacons is simpler and cheaper than using a laser level, self-tapping screws with dowels, or special fasteners.
In addition to installing guide profiles, it is very important to correctly install socket boxes and electrical boxes. They must be installed in the same plane as the beacons, otherwise serious problems will arise during further finishing and installation of electrical equipment - sockets, switches. A strongly recessed socket box will not allow you to properly install and secure an external socket; An electrical box that protrudes strongly above the plane of the beacons, even after finishing, will unattractively protrude above the wall.
Applying plaster
The technique for plastering a prepared wall differs for different methods:
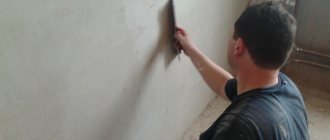
- According to beacons - plastering an unevenly puttied wall along beacons involves applying 2-3 layers. In this case, the solution prepared strictly according to the instructions is applied using a trowel in small portions onto the wall between the beacons, after which, using a long rule, the applied solution is leveled, moving it from bottom to top. After leveling the wall, the beacons are left in a layer of plaster.
- Without beacons - the plaster is prepared in a large container, a trowel is evenly applied in small portions onto the layer of putty to be leveled, after which, using a vertical rule, the plane of the wall is gradually leveled, moving it from one corner to another. All excess mortar removed by this rule is cleaned from it using a trowel back into the container.
Using this technology, in addition to conventional cement-sand mixtures, you can also apply decorative plaster to putty. To do this, they do not use long aluminum rules, but wide metal spatulas and special graters.
How to grind a surface
When grinding, different types of sandpaper are used depending on the type of mixture - starting or finishing. For the first, you can choose a larger one, for the second, smaller. The starting one can be rubbed down with a grinder, moving in a circle. To check for unevenness, you need to shine through the surface at an angle. If there are shadows, then there is an uneven part in this place that needs to be sanded.
The starting one can be rubbed down with a grinder, moving in a circle.