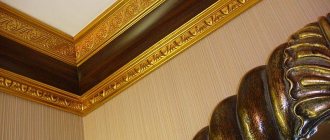
How to hang wallpaper on plaster without putty, gluing features
not
to putty, but to immediately glue wallpaper onto the plaster. In addition, manufacturers of gypsum plaster compositions constantly repeat this, that their super plaster does not require puttying! Is this so, and is it possible to glue wallpaper directly onto plaster without puttingty, let's figure it out.
Indeed, many manufacturers (Knauf, Volma) write on their gypsum plaster mixtures that they do not require puttying. Partly this is a marketing ploy, but partly it’s not, because it’s quite possible to put wallpaper on plaster, but is it worth the trouble?
Contents:
1.
Need more primer!
2.
Depending on the wallpaper.
3.
Is it easier to putty?
4.
How to prepare plaster for wallpapering.
5.
Smooth the plaster.
6.
Disadvantages of wallpapering plaster.
Need more primer!
The first problem is that plaster is more porous than putty and requires more primer to seal those pores.
If the plaster is not primed well, the wallpaper glue will be absorbed into the plaster and the wallpaper will not stick or will stick poorly. Personally, from experience, I primed it 2 times with primer (it flowed from the plaster, there was so much of it) and still the first layer of glue is absorbed and I have to apply a second one. Therefore, the first time we prime the base with deep impregnation soil to strengthen the base, the second time we use wallpaper glue to reduce the porosity (absorbability). You can read more about primer in → a separate article on the website.
You can also walk 3-4 times with deep impregnation primer, but there is no point in this as such - it is an extra waste of primer.
Depending on the wallpaper
The second problem is that the base for the wallpaper must be almost perfectly smooth. Depending on the type of wallpaper, namely its thickness and texture, flaws that were left on the base will be visible. So, if you glue thin wallpaper directly onto the plaster, small flaws will be visible through the wallpaper.
Making the surface of the plaster perfectly smooth is a somewhat labor-intensive task, almost the same as puttingty in one layer.
Depending on the wallpaper, you can glue it directly onto the plaster, almost without worrying about the quality of the plaster surface, if your wallpaper is thick and textured, and not particularly light. If it is of medium thickness and light, then you need to think about whether it’s worth doing this.
Not all wallpaper can be glued directly to plaster
Is it easier to putty?
Almost the same thing if you putty in one layer. Anyone who knows how to putty, putty. If you don’t know how to putty, glue it onto the plaster (but you also need to know how to plaster), but remember that it needs to be smoothed out in almost the same way as you would with putty. It may be a little easier, but you don’t need to buy putty.
If you take expensive putties, like Rotband Paste, then even a teenager will putty with such putty after watching 2-3 videos on the Internet, working “to peel off”, without giving a layer. That is, using a spatula, simply spreading the putty over the base with force. There is a separate detailed article about puttying walls, I won’t dwell on it here, → read (with pleasure!).
Characteristic signs
Pasta Rotband
The distinctive properties of the products say:
- About high resistance to humidity, but not increased. Steamy, frosty. Therefore, after pre-treatment, you can stick wallpaper and drywall. Use for bathrooms, corridors, etc.
- Water retention. Surfaces become porous. And the ceilings and walls will absorb moisture.
- Adhesiveness. Good adhesion to concrete, brick and wooden substrates. Using drywall.
- Elasticity.
You can buy Rotband plaster in 30, 50 and 10 kg bags. But be sure to take into account all the advantages, disadvantages, features of such material before you start working with it.
How to prepare plaster for wallpapering
First comes the plaster itself and it can be done in several ways:
but that's not the point. The point is the smoothness of the surface after the work is carried out.
On lighthouses, plastering is done quite well and practically does not require smoothing after work (if the work is done conscientiously). You can read about beacon plaster → by following the link.
Plastering under a trowel (trowel) is practically the same as puttingty, only with a plaster compound.
Plastering as a rule is something between beacon plaster and trowel plaster. You can read about it → in a separate article.
Plaster work can be of different quality
If trowel and beacon plaster provide a fairly smooth surface that practically does not require additional smoothing, then with plaster the situation is usually somewhat more complicated. With this type of work, the surface is made smooth, but it turns out to be somewhat rough (not smooth) and requires the application of a second smoothing layer of plaster.
Preparing a plastered wall or ceiling for wallpapering is carried out in several stages. After the plastering itself you need:
- smooth the surface with a liquid plaster solution,
- sand the surface
- prime with deep impregnation soil,
- then prime it again with wallpaper glue.
Priming the plaster with wallpaper glue is a good thing; the subsequent layer of glue will be less absorbed into the plaster
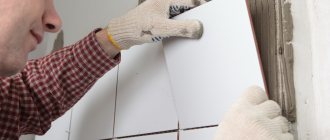
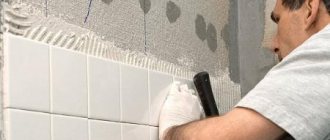
Laying tiles
Laying tiles on the wall
Many people wonder whether it is possible to glue tiles on Rotband.
For such work, you need to prepare the gypsum base well. The master must increase strength, adhesion, reduce water throughput and level out surface defects.
When laying tiles, a not very thick layer of glue is applied, so all defects are first covered with a layer of plaster. If you get protrusions, grind them off with a grout mesh. If you can’t hide it, then apply plaster to even out significant differences.
Be sure to let the surface dry thoroughly after plastering. This will take a week if the room is well ventilated. Afterwards, it needs to be treated with an anti-fungal agent and a primer. Every centimeter of the base should be thoroughly coated.
And then glue the tiles. Is primer really that important? Certainly. Because it penetrates the structure and creates a protective film. There’s no way without her. When installing tiles, first apply adhesive to the wall with a low-notched trowel. Or mortar on tiles. This will prevent you from overloading the plaster finish and reduce the layer. But in general, the masonry process is identical to work on other bases.
Smoothing the plaster
Ideally, the surface of the plaster should be like the surface of an egg shell. Small holes or depressions (only small ones, 2-3 mm) are not terrible, but due attention should be paid, on the contrary, to nodules and bumps; it is better to sand them first, before smoothing them, if any, with sandpaper No. 100-180.
We dilute plaster (gypsum) with the consistency of thick cream or liquid sour cream in a small container. The plaster consumption is not high, so you don’t need to mix a lot.
We will need a spatula or a metal trowel (also called a trowel) and a small auxiliary spatula.
Larger and smaller spatula
Using a small spatula, apply the plaster on a large spatula or directly with a small spatula on the wall in those places where there are unevennesses and level them, working “scraping”. We accurately go through all the irregularities that are on the wall. After drying, after 2-3 hours, we remove sagging and unevenness with sandpaper or an abrasive mesh.
As a result, you should get a fairly smooth surface without bumps or sagging of the solution.
Disadvantages of wallpapering plaster
- Absorbency of the base - it takes a lot of primer to properly hang wallpaper.
- It is necessary to smooth the plaster with a liquid solution to obtain a high-quality surface suitable for wallpapering, or to carry out work on plastering the walls initially with high quality, so as not to smooth it later.
- Not suitable for thin and light wallpaper.
- It's a little difficult to stick, since you can stain the wallpaper with non-white plaster.
- No need to buy putty.
- There is no need to putty work, but in place of this you need a high-quality base for wallpaper.
In the end, I would like to say that the work done is 10-20% less than puttying in 2 layers. In general, if you don’t care much about the quality of the coating and the wallpaper is textured, not light and of medium thickness or more, then you can. Read how to hang wallpaper → here.
Required Tools
In order to properly hang wallpaper, you need to take care in advance about the tools and materials for puttying, priming or leveling the surface.
- spatulas of various sizes;
- paint roller;
- brush with metal bristles;
- several containers for diluting cement and putty mortars;
- rack building level;
- scissors and a sharp knife;
- maklovitsa - a large brush-brush for applying primer.
- steel smoother.
The materials you need to purchase are: gypsum, plaster, finishing putty, cement and sand for preparing mortars for leveling the walls. You can buy primer or wallpaper paste from a hardware store that can be used to cover the walls instead of primer.
And in conclusion, you can watch a video with step-by-step instructions for preparing walls for wallpapering:
Is it possible to glue wallpaper directly onto Rotband?
Posted by provit, November 18, 2007 in Plastering, gluing, painting
Recommended Posts
To publish messages, create an account or log in
You must be a registered user to post a comment.
Create an account
Register in our community. It's very simple!
Already have an account? Sign in.
Or login using one of these services
Installation of plasterboard ceiling
andral published a topic in Plasterboard ceilings, January 17, 2005, topic
Portal for an electric fireplace with your own hands (Almost a Real Fireplace))
m8881 published a blog entry in m8881 Blog, March 24, 2014, blog entry
Testing of saws SCW 22-A and SCM 22-A
Sano published an article in Tools and Equipment, December 24, 2012, article
Test of a circular saw on wood, the blade itself is, however, a little used, but the battery is new, just out of the packaging and fully charged, 22volt battery with a capacity of 3.3 Ah.
To begin with, I cut noodles from 12mm plywood, the batteries were enough for 14 strips, each one and a half meters long, the total length is 21 linear meters. A good result, the capacity of one battery is easily enough to work on laying plywood in an average room, or laying laminate, parquet boards or other sheet material.
How best to make a partition from plasterboard
Sander posted a topic in Working with drywall, March 3, 2005, topic
Gas mounting gun HILTI GX 120
Sano published an article in Tools and Equipment, March 11, 2012, article
But a tool is a tool, and knowledge of safety precautions and rules on how to work with it has not stopped anyone.
By the way, it would be useful to note that bringing a tool to the workplace like this, showing it in action, even in the hands of a representative, or even trying out the signature move of the Hilti company yourself, it’s very convenient to try everything yourself before purchasing and then decide whether the tool is suitable or what you need. something else.
Cordless hammer drill TE 30-A36
Sano published an article in Tools and Equipment, April 29, 2013, article
Cordless hammer drill TE 30-A36 The hammer drill can be conditionally considered a wireless analogue of the network hammer TE 30, of course it is not an exact copy, but still.
The tool will be supplied in various configurations; I was given a suitcase version for testing.
How to install hinges in interior doors.
Sano published an article in School of Repair, June 15, 2007, article
1 After the frame for the interior doors has been assembled and the necessary gaps have been set.
2. You can figure out how to position the hinges and how they will look on the doors.
Homemade casing for an angle grinder for a diamond cup or brush
FugenFührer published a blog entry in FugenFührer Blog, February 13, 2022, blog entry
Is it possible to glue wallpaper directly onto Rotband?
I covered the internal walls made of gypsum blocks with Rotband. It turned out not perfect, but more or less smooth. I want to prime and glue vinyl wallpaper on a paper base using METYLAN VYNIL. The hired workers advise me to apply finishing putty, otherwise everything will be unreliable. I understand that this is better , but there is no time...
How to properly glue various materials onto Rotband
Rotband is one of the types of dry gypsum plaster. The manufacturer of this material is Knauf.
Contains high quality gypsum.
Basic colors depend on the deposits where gypsum is mined. But the color does not affect the technical characteristics. It can be gray and with various other combinations of shades.
What functions does gypsum plaster perform?
She solves problems:
- Technical. To prevent excess moisture. dampness, fungus. And obtaining a smooth surface. So that you can then continue to carry out finishing work.
- Protective. Insulation of external walls and protection from environmental influences.
- Decorative. Rotband makes it possible to obtain beautiful, smooth surfaces.
Wallpapering after plastering. Deadlines?
The plaster layer is 3 cm. After how many days can I putty and glue the wallpaper?
1st day putty, 2nd pasting. This is about 40-50 sq.m.
in about a week
After the plaster has dried, usually one and a half to two days. The putty dries in 1 day (if there is not a large layer). Wallpapering after the putty has completely dried on a flat surface. Good luck to you Alya.
If the plaster is fresh, it will take 5-6 days before wallpapering
Wait a week to make sure everything is dry, in some places the depth is greater.
What plaster, what base surface? If you don’t know, you can tell by the fading of the plaster layer: wet plaster is darker, dry plaster becomes lighter. For most gypsum plasters, the average drying time is approximately 4-7 days, depending on the density of the plaster solution, ambient temperature, atmospheric pressure, and room convection parameters.
Depends on room humidity
The plaster drying process takes 7-10 days at 20 degrees. then putty 1 layer, 1-1.5 mm thick. honey mushrooms 1-1.5 days drying process. and then you can glue wallpaper or paint it.
after 5-6 days, otherwise there is a risk of cracks, after puttingty 24 hours, sand it, be sure to prime it and glue it to health
as soon as the wet spots disappear and the color of the plaster becomes uniform
After complete drying. It could be 2 days or maybe 2 weeks.
Thanks everyone for the answers!
The plaster dries for at least 48 hours
The plaster dries for at least a week, if there is good ventilation. One cm dries in about two days, and if you have as much as 3 cm, you can count it. Shapaklevka also dries up to 2 days and only then (if everything is dry) there will be no wet spots, you can glue the wallpaper.
Three days on a little damp is possible
After the walls have completely dried, you need to prime them, dry them again, and then glue the wallpaper. And plaster dries depending on the material used and temperature, for example Rotband 1-3 days, while cement plaster can take a week to dry.
Pip. masters I'm shocked. Only one person asked WHAT PLASTER, etc. and so on.? THIS SHOULD BE THE FIRST QUESTION! And there are so many empty opinions, this is how your repairs are done. And many also have ABM status. SHAME COMRADES.
Thanks for your comment. Rotband plaster. 1.5 weeks have passed. Not only did it not dry out, but it started to grow mold. Now I’ve forced the would-be masters to film it completely. Losses: 40 bags for 366 rubles. Total 12000! When they removed it, I saw that they didn’t even remove the previous layer of paint and putty. Now hire other workers and stand behind and LEAD.
Good afternoon. Yes, old layers must be removed. The mold appeared most likely from poor ventilation (high humidity in the room). When drying, Rotband releases a lot of moisture; if there is no inflow and outflow of air from the room, mold will certainly develop. As a rule, everyone installs plastic windows and metal doors with seals, thereby preserving the premises. There is no air flow, and on top of everything else, the ventilation ducts are clogged (old stock). The moisture has nowhere to go, resulting in mold. Don't stand behind your back, contact a good repair company that has a reputation. Cheap and high quality are not compatible. All the best, please contact us.
What to put after Rotband?
After Rotband, do I need to prime the walls and apply a finish?
If necessary, should I wait until the rotband dries or hardens? It is very important to know what we are preparing the walls for.
If you decide to paint or paste over, for example, textile wallpaper, then you need a perfectly flat surface for these materials.
It turns out that we add finishing putty with sanding to Rotband.
There is wallpaper (for example, glass wallpaper)
As for all other issues, Rotband must dry completely, it is necessary to prime between layers, this must become a habit, that is, layer-primer, start-finish-primer.
Finish - wallpaper, primer and so on.
If necessary, should I wait until the rotband dries or hardens?
It’s better when the Rotband completely hardens and gains strength (about a week), but a lot depends on the timing of the work and on the layer of Rotband, if the layer is large, then we wait about a week, if up to cm, then you can putty a little earlier, but again you need to know clearly temperature and humidity in the room.
Temperature and humidity affect the drying time of Rotband.
In my opinion, one of the best universal plaster mixtures is, of course, Rotband. And I can say this even from my own experience). The question is very relevant.
I had to use this material for plastering walls, and my review of it is only the best. But there are a number of points that it is advisable to know.
Therefore, to your question about whether, after using Rotband, it is necessary to prime the walls and apply a finish, the answer will be positive - Yes. It is simply necessary to prime the walls. And after the primer has dried well, you will need to apply the finish.
When asked whether you need to wait until Rotband dries or hardens, I say again - yes, you need to wait for it. The plaster should dry well, changing its original color to light. The drying time of the Rotband mixture may vary. If the conditions are met - normal room temperature, the layer is not thick (up to two centimeters), the ventilation in the room is excellent, then the drying time of the layer is from three to five days. In rare cases - a week with a maximum thickness of three centimeters.
Next we do the finish. If the walls have a lot of unevenness, then I recommend using Fugenfüller Knauf.
I want to make one important addition. If you use gypsum in a room where the humidity is off the charts, for example, a bathroom, then the finish is not necessary.
We used tiles, which look great in the bathroom, and we also applied a water-repellent primer to the Rotband (you can choose the same Ceresit CT 10 or Litoplast). Next we used waterproof paint. The result was excellent. I've been happy for almost four years now.
And if you are preparing walls for the same vinyl wallpaper, then the finishing is also not needed here.
Therefore, whether to do the finish or not depends on these points.
Source
Is it possible to glue wallpaper onto a rotband?
Have questions? Call!
Ufa, st. Rossiyskaya, 106/1
What surface should I glue the wallpaper on?
This is a very pressing question before starting repairs, since the full cycle of preparatory work, which includes removing the old finish and puttying the wall, is quite labor-intensive and expensive. But, often, the following question arises: is it possible to wallpaper immediately after plastering the walls, without finishing putty?
This question is very relevant and important, since a lot depends on this process: will the walls be smooth, will the wallpaper come off, will there be “waves,” etc. There is no clear and precise answer! But still, we will try to understand this issue by looking at what people write on construction forums and what they write on official websites.
So, on the official website of the Knauf group company, if you select Knauf-Rotband universal gypsum plaster in the catalog, then in the advantages category the following is written: Knauf-Rotband gypsum plaster provides a smooth surface that does not require additional puttying, that is, these words mean, that after plastering you can immediately glue the wallpaper without any additional leveling.
Now let's see what people who know a lot about interior finishing work write on various construction forums.
On many forums, you can notice that of the two options: whether it is necessary to putty the walls after plastering before gluing wallpaper or not, most people are inclined to the first option, the rationale is that after applying a layer of plaster, unevenness remains (the composition includes large grains) various small pores that will prevent you from gluing the wallpaper evenly and beautifully. All this can be eliminated by applying a layer of finishing putty (the composition contains fine grains), which will level your wall and close the pores. But there is a second way: you can glue the wallpaper onto the rotband after properly grouting the surface, but you need the hand of a master so as not to overdo it.
So, to summarize, if you want to save on materials, then you can plaster the wall, then get rid of the unevenness in a competent way (for example, by sanding), be sure to prime it and only then glue the wallpaper, but there is a guarantee that everything will look beautiful and perfect, and then Nobody can tell you that they will last for a long time. If you want the wallpaper to last a very long time, not peel off and everything to be smooth, perfect, beautiful, then you will have to spend money on additional materials (putty) and do everything in this order: you need to go over the plaster with emery cloth - knock down rough irregularities, then putty, then sandpaper again, and finally, of course, primer.
Is it possible to glue wallpaper onto a rotband?
Is it possible to glue wallpaper onto rotband? Do you have any questions? Call! Ufa, st. Rossiyskaya, 106/1 What surface should I glue the wallpaper on? This is a very pressing question before starting repairs, since complete
Putty technology
The puttying process can be divided into four stages:
Stages of preparing walls for wallpapering
Next, we will take a step-by-step look at this procedure from start to finish.
Preparation of materials
First of all, let's look at what you need to putty the walls. So, you will need:
- White starting putty, it is best to use gypsum mixture as it is inexpensive and easy to work with;
- Acrylic universal primer (if the base is loose, deep penetration primer should be used, but if the surface, on the contrary, has poor adhesion, an adhesive primer should be used);
To prepare the base you will need an acrylic primer
- Abrasive mesh P80-P120;
- Set of spatulas;
- Paint roller with cuvette;
- Clean plastic bucket;
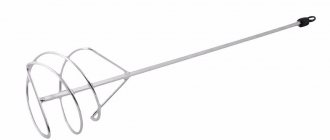
- Electric drill and special mixer attachment.
It is also advisable to have a long rule to control differences in the surface of the walls.
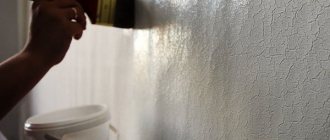
Preparing the base
Before you putty the walls, you need to prepare them as follows:
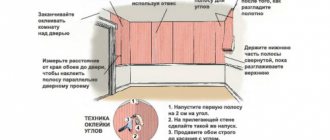
| Illustrations | Actions |
| Cleaning from dirt. The surface must be cleaned of dust and dirt, if any. To do this, the walls can be vacuumed or wiped with a damp cloth. | |
Padding:
| |
Joint reinforcement:
|
Now you can start puttingty.
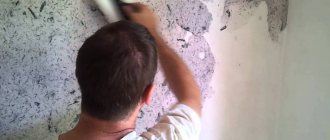
Puttying
The putty technology is as follows:
| Illustrations | Actions |
Preparation of putty:
| |
Puttying seams:
| |
Puttying walls:
|
This completes the puttying. Many beginners are interested in how many layers of putty should be applied to properly prepare the surface? It all depends on the condition of the base and the putty itself. If, for example, the differences are a centimeter, and the composition can be applied in a layer no thicker than 7 mm, then, accordingly, two layers will be needed.
If the differences exceed 10 mm, then plaster should be used to level the walls.
Therefore, you need to inspect the walls in advance and apply a rule to know how many times you will have to putty them.
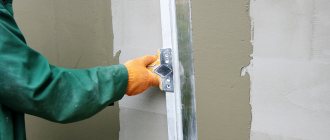
Sanding and preparation for gluing
Now the final stage remains - sanding and preparing for wallpapering. This work is done as follows:
| Illustrations | Actions |
Grinding.
| |
| Padding. Before gluing wallpaper after puttying, be sure to prime the surface of the walls. |
Beginners often doubt whether they need to prime the putty before wallpapering. The primer will improve adhesion, ensure uniform absorption of the glue and slightly reduce its consumption.
Therefore, it is highly advisable to apply a primer to putty walls. After they dry, you can start gluing wallpaper.
Why plaster or putty a wall?
Plastering is done to make each wall smooth:
- in the plane: smooth out significant irregularities, pits, differences, cracks, transitions of dissimilar materials;
- vertically: remove debris and differences in wall levels;
- horizontally: level out undulations and unevenness.
If necessary, the geometry of the walls is leveled with plaster (for example, the angle or parallelism of the walls between each other).
The plaster is applied in layers of 5 to 50 mm. If it is necessary to apply a thicker layer, then this coating is applied in several approaches.
The dried coating can be of different colors - from dark gray to white, depending on the type of raw material - cement or gypsum.
Putty is performed to finish leveling the walls in layers of 1 to 5 mm. It has a light cream or white color. It is most often made from gypsum with various additives. After application, it is processed with sandpaper of various grain sizes.
What you need to know about puttying walls
Do I need to putty the base?
Many beginners are interested in whether it is necessary to putty the walls at all? To answer this question, you should understand that putty can solve the following problems:
- Provides a uniform light surface . If you stick thin, for example, paper wallpaper onto cement plaster or concrete, then gray spots will appear underneath;
- Levels the surface . Wallpaper cannot hide significant differences and unevenness of the base, therefore, if there are flaws, they must be eliminated with putty;
- Improves adhesion . If you are going to glue wallpaper on wood, OSB or concrete, then putty will improve the adhesion of the glue to the base;
The putty gives the walls a uniform white color
- Allows you to remove old canvases without damaging the base . This property is relevant for plasterboard walls. If you do not putty them, then later you can tear off the old wallpaper only with a layer of cardboard.
From this we can conclude that you can do without putty only if the walls are plastered with light plaster - gypsum or lime, and have a smooth surface. In other cases, it is highly advisable to apply an additional leveling layer.
To prepare the walls, use gypsum starting putty.
What putty to use
As you know, putty is divided into two types:
- Starting . Designed to eliminate large differences (up to 1 cm);
- Finish . Allows you to give the surface smoothness, applied in a layer of up to 1 mm.
I’ll say right away that finishing putty is completely unnecessary in our case. Firstly, under them you cannot see which surface is smooth or rough. And secondly, finishing putty will only worsen adhesion.
Therefore, wallpaper should be glued to a starting putty or universal putty, and the finishing putty is needed to prepare the surface for painting, since paint does not hide defects, but more often, on the contrary, reveals them.
Do's and don'ts
Gypsum plasters compositions are well leveled because they have high plasticity. With experience and preparation, you get a fairly smooth surface, even when applied manually, on which you can glue wallpaper. One of the most popular gypsum plasters for manual application, Knauf Rotband, is very elastic and can be leveled well. If the work is done correctly, you can glue wallpaper on Rotband without putty.
Of course, wallpapers are different. Wallpaper that is too thin, paper or light-colored wallpaper should not be glued directly onto the plaster; it must be puttied.
Cement-based mixtures require mandatory puttying because:
- the cement base absorbs moisture well, this affects the composition of the glue, its viscosity decreases;
- due to the dark color of the base, the shade of the lighter coating will change;
- changes in humidity can lead to stains;
- Irregularities that are not noticeable during rough finishing can appear on the wallpaper.
You cannot glue wallpaper onto wet plaster; the base layer must dry before finishing work begins.
For better adhesion, the base surface must be primed.
What you need to know about puttying walls
Do I need to putty the base?
Many beginners are interested in whether it is necessary to putty the walls at all? To answer this question, you should understand that putty can solve the following problems:
- Provides a uniform light surface . If you stick thin, for example, paper wallpaper onto cement plaster or concrete, then gray spots will appear underneath;
- Levels the surface . Wallpaper cannot hide significant differences and unevenness of the base, therefore, if there are flaws, they must be eliminated with putty;
- Improves adhesion . If you are going to glue wallpaper on wood, OSB or concrete, then putty will improve the adhesion of the glue to the base;
The putty gives the walls a uniform white color
- Allows you to remove old canvases without damaging the base . This property is relevant for plasterboard walls. If you do not putty them, then later you can tear off the old wallpaper only with a layer of cardboard.
From this we can conclude that you can do without putty only if the walls are plastered with light plaster - gypsum or lime, and have a smooth surface. In other cases, it is highly advisable to apply an additional leveling layer.
To prepare the walls, use gypsum starting putty.
What putty to use
As you know, putty is divided into two types:
- Starting . Designed to eliminate large differences (up to 1 cm);
- Finish . Allows you to give the surface smoothness, applied in a layer of up to 1 mm.
I’ll say right away that finishing putty is completely unnecessary in our case. Firstly, under them you cannot see which surface is smooth or rough. And secondly, finishing putty will only worsen adhesion.
Therefore, wallpaper should be glued to a starting putty or universal putty, and the finishing putty is needed to prepare the surface for painting, since paint does not hide defects, but more often, on the contrary, reveals them.
Wallpaper can be glued to gypsum plaster
Recently, mechanized plastering of walls with gypsum compounds has been gaining popularity. The technology of this process involves glossing the finishing layer, which makes it almost perfectly smooth. On such a base you can glue thick non-woven wallpaper or paintable wallpaper.
At the same time, overall costs are reduced due to the elimination of work and materials for putty, and the time for performing this operation is also saved. This approach is most often used in projects with tight deadlines and tight budgets - for example, when renovating commercial real estate, apartments for rent and renovations from the developer.
On plastering.rus you will find interesting offers on mechanized plastering for wallpaper, painting and other decorative coatings. Many years of experience and strict adherence to technology guarantee decent quality of work.
Putty technology
The puttying process can be divided into four stages:
Stages of preparing walls for wallpapering
Next, we will take a step-by-step look at this procedure from start to finish.
Preparation of materials
First of all, let's look at what you need to putty the walls. So, you will need:
- White starting putty, it is best to use gypsum mixture as it is inexpensive and easy to work with;
- Acrylic universal primer (if the base is loose, deep penetration primer should be used, but if the surface, on the contrary, has poor adhesion, an adhesive primer should be used);
To prepare the base you will need an acrylic primer
- Abrasive mesh P80-P120;
- Set of spatulas;
- Paint roller with cuvette;
- Clean plastic bucket;
- Electric drill and special mixer attachment.
It is also advisable to have a long rule to control differences in the surface of the walls.
Preparing the base
Before you putty the walls, you need to prepare them as follows:
| Illustrations | Actions |
| Cleaning from dirt. The surface must be cleaned of dust and dirt, if any. To do this, the walls can be vacuumed or wiped with a damp cloth. | |
Padding:
| |
Joint reinforcement:
|
Now you can start puttingty.
Puttying
The putty technology is as follows:
| Illustrations | Actions |
Preparation of putty:
| |
Puttying seams:
| |
Puttying walls:
|
This completes the puttying. Many beginners are interested in how many layers of putty should be applied to properly prepare the surface? It all depends on the condition of the base and the putty itself. If, for example, the differences are a centimeter, and the composition can be applied in a layer no thicker than 7 mm, then, accordingly, two layers will be needed.
If the differences exceed 10 mm, then plaster should be used to level the walls.
Therefore, you need to inspect the walls in advance and apply a rule to know how many times you will have to putty them.
Sanding and preparation for gluing
Now the final stage remains - sanding and preparing for wallpapering. This work is done as follows:
| Illustrations | Actions |
Grinding.
| |
| Padding. Before gluing wallpaper after puttying, be sure to prime the surface of the walls. |
Beginners often doubt whether they need to prime the putty before wallpapering. The primer will improve adhesion, ensure uniform absorption of the glue and slightly reduce its consumption.
Therefore, it is highly advisable to apply a primer to putty walls. After they dry, you can start gluing wallpaper.